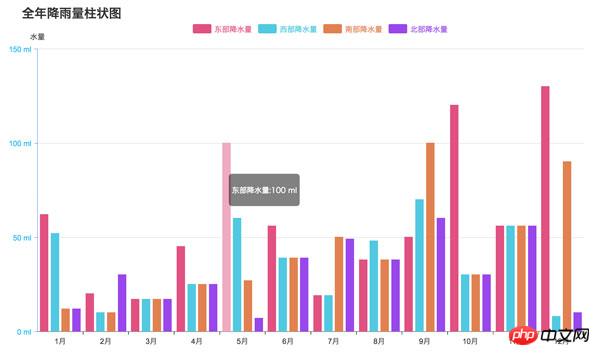
이번에는 히스토그램 구현을 위한 H5 캔버스 차트를 가져오겠습니다. 캔버스 차트에 히스토그램을 구현할 때 주의사항은 무엇인가요?
몇일전에 차트 라이브러리를 사용해봤는데 그중에서도 Baidu의 ECharts가 가장 좋은 것 같습니다. 기본적으로 캔버스를 사용하는 것인데 svg보다 빅데이터 처리가 더 좋습니다. 그런 다음 캔버스를 사용하여 차트 라이브러리를 구현하겠습니다. 먼저 간단한 막대 차트를 구현해 보겠습니다.
효과는 다음과 같습니다:

주요 기능 포인트는 다음과 같습니다:
텍스트 그리기
XY 축 그리기;
데이터 그룹 그리기우선 사용 방법을 살펴보겠습니다. 일부 ECharts 사용 방법을 참조하면 먼저 html 태그
를 전달하여 차트를 표시한 다음 init를 호출하고 초기화 중에 데이터를 전달합니다.var con=document.getElementById('container');
var chart=new Bar(con);
chart.init({
title:'全年降雨量柱状图',
xAxis:{// x轴
data:['1月','2月','3月','4月','5月','6月','7月','8月','9月','10月','11月','12月']
},
yAxis:{//y轴
name:'水量',
formatter:'{value} ml'
},
series:[//分组数据
{
name:'东部降水量',
data:[62,20,17,45,100,56,19,38,50,120,56,130]
},
{
name:'西部降水量',
data:[52,10,17,25,60,39,19,48,70,30,56,8]
},
{
name:'南部降水量',
data:[12,10,17,25,27,39,50,38,100,30,56,90]
},
{
color:'hsla(270,80%,60%,1)',
name:'北部降水量',
data:[12,30,17,25,7,39,49,38,60,30,56,10]
}
]
});class Chart{
constructor(container){
this.container=container;
this.canvas=document.createElement('canvas');
this.ctx=this.canvas.getContext('2d');
this.W=1000*2;
this.H=600*2;
this.padding=120;
this.paddingTop=50;
this.title='';
this.legend=[];
this.series=[];
//通过缩小一倍,解决字体模糊问题
this.canvas.width=this.W;
this.canvas.height=this.H;
this.canvas.style.width = this.W/2 + 'px';
this.canvas.style.height = this.H/2 + 'px';
}
}class Bar extends Chart{
constructor(container){
super(container);
this.xAxis={};
this.yAxis=[];
this.animateArr=[];
}
init(opt){
Object.assign(this,opt);
if(!this.container)return;
this.container.style.position='relative';
this.tip=document.createElement('p');
this.tip.style.cssText='display: none; position: absolute; opacity: 0.5; background: #000; color: #fff; border-radius: 5px; padding: 5px; font-size: 8px; z-index: 99;';
this.container.appendChild(this.canvas);
this.container.appendChild(this.tip);
this.draw();
this.bindEvent();
}
draw(){//绘制
}
showInfo(){//显示信息
}
animate(){//执行动画
}
showData(){//显示数据
}draw(){
var that=this,
ctx=this.ctx,
canvas=this.canvas,
W=this.W,
H=this.H,
padding=this.padding,
paddingTop=this.paddingTop,
xl=0,xs=0,xdis=W-padding*2,//x轴单位数,每个单位长度,x轴总长度
yl=0,ys=0,ydis=H-padding*2-paddingTop;//y轴单位数,每个单位长度,y轴总长度
ctx.fillStyle='hsla(0,0%,20%,1)';
ctx.strokeStyle='hsla(0,0%,10%,1)';
ctx.lineWidth=1;
ctx.textAlign='center';
ctx.textBaseLine='middle';
ctx.font='24px arial';
ctx.clearRect(0,0,W,H);
if(this.title){
ctx.save();
ctx.textAlign='left';
ctx.font='bold 40px arial';
ctx.fillText(this.title,padding-50,70);
ctx.restore();
}
if(this.yAxis&&this.yAxis.name){
ctx.fillText(this.yAxis.name,padding,padding+paddingTop-30);
}
// x轴
ctx.save();
ctx.beginPath();
ctx.translate(padding,H-padding);
ctx.moveTo(0,0);
ctx.lineTo(W-2*padding,0);
ctx.stroke();
// x轴刻度
if(this.xAxis&&(xl=this.xAxis.data.length)){
xs=(W-2*padding)/xl;
this.xAxis.data.forEach((obj,i)=>{
var x=xs*(i+1);
ctx.moveTo(x,0);
ctx.lineTo(x,10);
ctx.stroke();
ctx.fillText(obj,x-xs/2,40);
});
}
ctx.restore();
// y轴
ctx.save();
ctx.beginPath();
ctx.strokeStyle='hsl(220,100%,50%)';
ctx.translate(padding,H-padding);
ctx.moveTo(0,0);
ctx.lineTo(0,2*padding+paddingTop-H);
ctx.stroke();
ctx.restore();
if(this.series.length){
var curr,txt,dim,info,item,tw=0;
for(var i=0;i<this.series.length;i++){
item=this.series[i];
if(!item.data||!item.data.length){
this.series.splice(i--,1);continue;
}
// 赋予没有颜色的项
if(!item.color){
var hsl=i%2?180+20*i/2:20*(i-1);
item.color='hsla('+hsl+',70%,60%,1)';
}
item.name=item.name||'unnamed';
// 画分组标签
ctx.save();
ctx.translate(padding+W/4,paddingTop+40);
that.legend.push({
hide:item.hide||false,
name:item.name,
color:item.color,
x:padding+that.W/4+i*90+tw,
y:paddingTop+40,
w:60,
h:30,
r:5
});
ctx.textAlign='left';
ctx.fillStyle=item.color;
ctx.strokeStyle=item.color;
roundRect(ctx,i*90+tw,0,60,30,5);
ctx.globalAlpha=item.hide?0.3:1;
ctx.fill();
ctx.fillText(item.name,i*90+tw+70,26);
tw+=ctx.measureText(item.name).width;//计算字符长度
ctx.restore();
if(item.hide)continue;
//计算数据在Y轴刻度
if(!info){
info=calculateY(item.data.slice(0,xl));
}
curr=calculateY(item.data.slice(0,xl));
if(curr.max>info.max){
info=curr;
}
}
if(!info) return;
yl=info.num;
ys=ydis/yl;
//画Y轴刻度
ctx.save();
ctx.fillStyle='hsl(200,100%,60%)';
ctx.translate(padding,H-padding);
for(var i=0;i<=yl;i++){
ctx.beginPath();
ctx.strokeStyle='hsl(220,100%,50%)';
ctx.moveTo(-10,-Math.floor(ys*i));
ctx.lineTo(0,-Math.floor(ys*i));
ctx.stroke();
ctx.beginPath();
ctx.strokeStyle='hsla(0,0%,80%,1)';
ctx.moveTo(0,-Math.floor(ys*i));
ctx.lineTo(xdis,-Math.floor(ys*i));
ctx.stroke();
ctx.textAlign='right';
dim=Math.min(Math.floor(info.step*i),info.max);
txt=this.yAxis.formatter?this.yAxis.formatter.replace('{value}',dim):dim;
ctx.fillText(txt,-20,-ys*i+10);
}
ctx.restore();
//画数据
this.showData(xl,xs,info.max);
}
}데이터 항목은 이후에 애니메이션을 적용해야 하고 마우스를 슬라이드할 때 콘텐츠가 표시되므로 애니메이션 대기열 animateArr에 넣습니다. 여기서는 그룹화된 데이터를 확장하고 이전 두 개의 중첩 배열을 하나의 레이어로 변환하고 이름, x 좌표, y 좌표, 너비, 속도 및 색상과 같은 각 데이터 항목의 속성을 계산해야 합니다. 데이터가 정리된 후 애니메이션이 실행됩니다.
showData(xl,xs,max){
    //画数据
    var that=this,
        ctx=this.ctx,
        ydis=this.H-this.padding*2-this.paddingTop,
        sl=this.series.filter(s=>!s.hide).length,
        sp=Math.max(Math.pow(10-sl,2)/3-4,5),
        w=(xs-sp*(sl+1))/sl,
        h,x,index=0;
    that.animateArr.length=0;
    // 展开数据项,填入动画队列
    for(var i=0,item,len=this.series.length;i<len;i++){
        item=this.series[i];
        if(item.hide)continue;
        item.data.slice(0,xl).forEach((d,j)=>{
            h=d/max*ydis;
            x=xs*j+w*index+sp*(index+1);
            that.animateArr.push({
                index:i,
                name:item.name,
                num:d,
                x:Math.round(x),
                y:1,
                w:Math.round(w),
                h:Math.floor(h+2),
                vy:Math.max(300,Math.floor(h*2))/100,
                color:item.color
            });
        });
        index++;
    }
    this.animate();
}애니메이션 실행
애니메이션 실행에 대해서는 말할 것도 없고, 자체 실행되는 클로저 기능입니다. 애니메이션의 원리는 속도 값 vy를 y축에 순차적으로 누적하는 것입니다. 하지만 대기열이 애니메이션 실행을 마치면 중지해야 하므로 대기열 실행이 완료될 때마다 판단되는 isStop 플래그가 있다는 점을 기억하세요.
animate(){
    var that=this,
        ctx=this.ctx,
        isStop=true;
    (function run(){
        isStop=true;
        for(var i=0,item;i<that.animateArr.length;i++){
            item=that.animateArr[i];
            if(item.y-item.h>=0.1){
                item.y=item.h;
            } else {
                item.y+=item.vy;
            }
            if(item.y<item.h){
                ctx.save();
                // ctx.translate(that.padding+item.x,that.H-that.padding);
                ctx.fillStyle=item.color;
                ctx.fillRect(that.padding+item.x,that.H-that.padding-item.y,item.w,item.y);
                ctx.restore();
                isStop=false;
            }
        }
        if(isStop)return;
        requestAnimationFrame(run);
    }())
}Binding event
Event 1: 마우스 이동 시 마우스 위치가 그룹 라벨인지, 데이터 항목인지 확인하고, true인 경우 경로를 그린 후 isPointInPath(x,y)를 호출합니다. 커서= '포인터'; 데이터 항목인 경우 열을 다시 그려야 하며 이를 구별하기 위해 투명도를 설정해야 합니다. 콘텐츠도 표시되어야 합니다. 여기에는 초기화 중에 상위 컨테이너 컨테이너를 기준으로 절대 위치 지정
이 포함된 p가 있습니다. 표시 부분을 showInfo 메소드로 캡슐화합니다.bindEvent(){
var that=this,
canvas=this.canvas,
ctx=this.ctx;
this.canvas.addEventListener('mousemove',function(e){
var isLegend=false;
// pos=WindowToCanvas(canvas,e.clientX,e.clientY);
var box=canvas.getBoundingClientRect();
var pos = {
x:e.clientX-box.left,
y:e.clientY-box.top
};
// 分组标签
for(var i=0,item,len=that.legend.length;i<len;i++){
item=that.legend[i];
ctx.save();
roundRect(ctx,item.x,item.y,item.w,item.h,item.r);
// 因为缩小了一倍,所以坐标要*2
if(ctx.isPointInPath(pos.x*2,pos.y*2)){
canvas.style.cursor='pointer';
ctx.restore();
isLegend=true;
break;
}
canvas.style.cursor='default';
ctx.restore();
}
if(isLegend) return;
//选择数据项
for(var i=0,item,len=that.animateArr.length;i<len;i++){
item=that.animateArr[i];
ctx.save();
ctx.fillStyle=item.color;
ctx.beginPath();
ctx.rect(that.padding+item.x,that.H-that.padding-item.h,item.w,item.h);
if(ctx.isPointInPath(pos.x*2,pos.y*2)){
//清空后再重新绘制透明度为0.5的图形
ctx.clearRect(that.padding+item.x,that.H-that.padding-item.h,item.w,item.h);
ctx.globalAlpha=0.5;
ctx.fill();
canvas.style.cursor='pointer';
that.showInfo(pos,item);
ctx.restore();
break;
}
canvas.style.cursor='default';
that.tip.style.display='none';
ctx.globalAlpha=1;
ctx.fill();
ctx.restore();
}
},false);
this.canvas.addEventListener('mousedown',function(e){
e.preventDefault();
var box=canvas.getBoundingClientRect();
var pos = {
x:e.clientX-box.left,
y:e.clientY-box.top
};
for(var i=0,item,len=that.legend.length;i<len;i++){
item=that.legend[i];
roundRect(ctx,item.x,item.y,item.w,item.h,item.r);
// 因为缩小了一倍,所以坐标要*2
if(ctx.isPointInPath(pos.x*2,pos.y*2)){
that.series[i].hide=!that.series[i].hide;
that.animateArr.length=0;
that.draw();
break;
}
}
},false);
}
//显示数据
showInfo(pos,obj){
var txt=this.yAxis.formatter?this.yAxis.formatter.replace('{value}',obj.num):obj.num;
var box=this.canvas.getBoundingClientRect();
var con=this.container.getBoundingClientRect();
this.tip.innerHTML = '<p>'+obj.name+':'+txt+'</p>';
this.tip.style.left=(pos.x+(box.left-con.left)+10)+'px';
this.tip.style.top=(pos.y+(box.top-con.top)+10)+'px';
this.tip.style.display='block';
}相信看了本文案例你已经掌握了方法,更多精彩请关注php中文网其它相关文章!
推荐阅读:
위 내용은 H5 캔버스 차트는 막대 차트를 구현합니다.의 상세 내용입니다. 자세한 내용은 PHP 중국어 웹사이트의 기타 관련 기사를 참조하세요!