이동 영역은 보기 영역 이동 보기를 이동하는 데 사용할 수 있는 WeChat 애플릿의 새로운 구성 요소입니다. 이번 글에서는 주로 WeChat 애플릿의 이동 가능한 뷰 동영상과 두 손가락 확대/축소 예제 코드를 소개합니다. 필요한 친구들이 참고할 수 있습니다.
movable-area는 뷰 영역을 이동 가능하게 하는 WeChat 애플릿의 새로운 구성 요소입니다. -보다. 이동 방향은 수직, 평행 중에서 선택할 수 있습니다. 이동 가능한 영역에는 기타 텍스트, 그림, 버튼 및 기타 구성 요소가 포함됩니다. 이동 가능한 영역은 touchend 및 기타 이벤트에 바인딩될 수 있습니다. 이동 가능한 뷰의 매개변수는 애니메이션 효과를 조정할 수 있습니다.
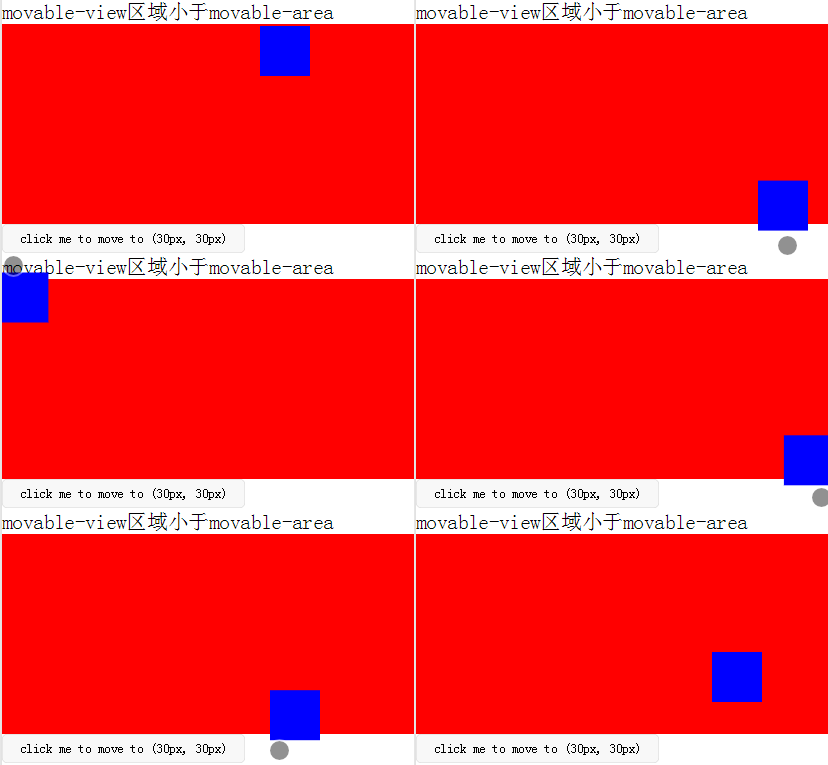
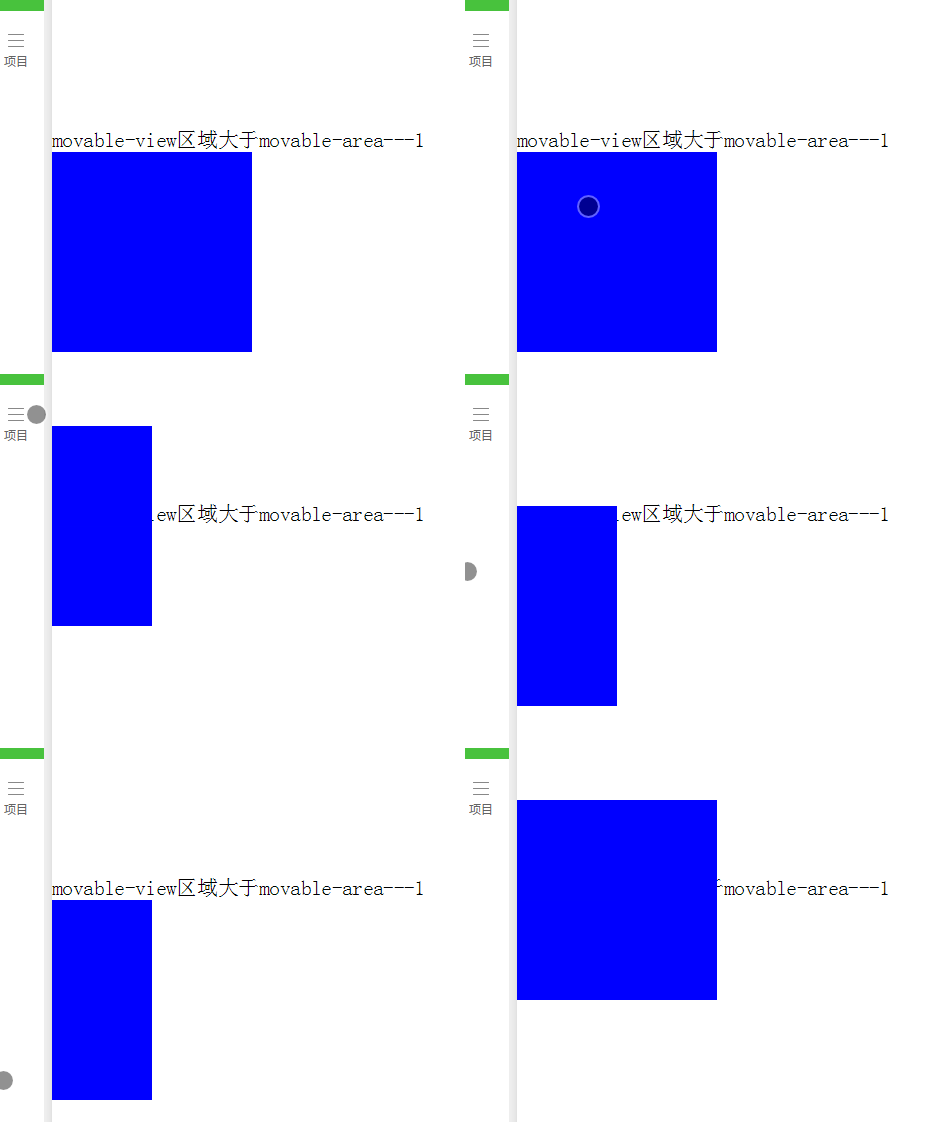
movable-view부터 시작해 보겠습니다. movable-view는 미니 프로그램의 사용자 정의 구성 요소입니다. 설명은 다음과 같습니다. "페이지에서 드래그하고 슬라이드할 수 있습니다." "이동 가능한 뷰가 이동 가능한 영역보다 작은 경우 이동 가능한 뷰의 이동 범위는 이동 가능한 영역 내에 있고, 이동 가능한 뷰가 이동 가능한 영역보다 큰 경우 이동 가능한 뷰의 이동 범위는 다음과 같습니다. include movable-area (x축 방향과 y축 방향은 별도로 고려됨)"입니다. 즉, 상위 컨테이너의 이동 가능 영역은 하위 컨테이너의 이동 가능 영역보다 작을 수 있지만, 하위 컨테이너의 이동 범위에는 상위 컨테이너가 포함되어야 합니다.
먼저 공식 예제를 살펴보세요. 코드:
<view class="section">
 <view class="section__title">movable-view区域小于movable-area</view>
 <movable-area style="height: 200px;width: 200px;background: red;">
 <movable-view style="height: 50px; width: 50px; background: blue;" x="{{x}}" y="{{y}}" direction="all">
 </movable-view>
 </movable-area>
 <view class="btn-area">
 <button size="mini" bindtap="tap">click me to move to (30px, 30px)</button>
 </view>
 <view class="section__title">movable-view区域大于movable-area</view>
 <movable-area style="height: 100px;width: 100px;background: red;" direction="all">
 <movable-view style="height: 200px; width: 200px; background: blue;">
 </movable-view>
 </movable-area>
</view><movable-area style="height: 100px;width: 100px;background: red;" > <movable-view style="height: 200px; width: 200px; background: blue;" direction="all"> </movable-view> </movable-area>
1) 이동 가능 영역이 이동 가능 영역보다 작을 때 하위 컨테이너 이동 가능 뷰 아래 그림의 효과는 out-of-bounds="true" 속성을 설정하면 하위 컨테이너가 경계를 초과하는 애니메이션을 발생시킬 수 있다는 것입니다. 그런 다음 상위 컨테이너의 경계에 도달하면 반동합니다. 실제로 하위 컨테이너가 상위 컨테이너 외부로 이동할 수 없습니다.
2) 이동 가능한 뷰 영역이 이동 가능한 영역보다 큰 경우 하위 컨테이너에는 상위 컨테이너가 포함되어야 합니다.
 보고 싶은 긴 사진과 큰 사진을 만들면 사진이 동적으로 로드되고 보기가 아닌 경우 효과를 얻을 수 있습니다. 고정된 사진의 경우, 사진의 너비와 높이가 화면의 보이는 너비와 높이보다 작고, 사진의 너비와 높이가 보이는 화면의 너비와 높이보다 클 가능성과도 호환되어야 합니다. 위의 두 가지 상황을 고려합니다. 이동 가능한 구성 요소가 로드되는 동안 이동 가능한 뷰의 너비와 높이를 설정해야 합니다. 왜냐하면 이동 가능한 구성 요소가 성공적으로 로드된 후 이동 가능한 뷰의 크기가 변경되기 때문입니다. 영역은 변경되지 않습니다. 페이지에서 볼 이미지의 onload 이벤트를 통해 이미지 너비와 높이를 얻을 수 있습니다(현재는 바인드로드 이벤트가 이미지 너비와 높이를 얻을 수 있다는 것만 알았습니다). imgHeight.imgHeight.사용자가 이미지를 클릭하면 bintap 이벤트에서 이동 가능한 뷰의 너비와 높이를 설정하고 이동 가능한 영역의 팝업 wx;if를 true로 설정합니다.
<!-- 要查看的图片列表 -->
<view class="flex-wrap flex-pic">
<view class="picList">
<image wx:for="{{item.imglist}}" wx:for-item="itemImg" wx:key="*this" id="{{'rfnd_'+index}}" bindload="imageOnload" src="{{ itemImg}}" bindtap="showResizeModal" src="{{itemImg}}"></image>
</view>
</view>/**
* 加载图片
*/
imageOnload:function(e){
var id = e.currentTarget.id
this.data.imgIdList[id] = {
width:e.detail.width,
height:e.detail.height
}
},
模板页面
<!--components/resizePicModal/resizePicModal.wxml-->
<template name="resizePic">
<scroll-view class="backdrop">
<view class="close-icon" bindtap="closeResizeModal">
取消预览
</view>
<movable-area style="width:100%;height:100%;" >
<movable-view direction="all"
out-of-bounds="true" x="{{img.x}}" y="{{img.y}}" >
<image mode="widthFix" class="dtl-img" src="{{img.currentSrc}}"></image>
</movable-view>
</movable-area>
</scroll-view>
</template>
/**
* 打开弹窗
*/
showResizeModal: function (e) {
var src = e.currentTarget.dataset.src;
var x = 0
var y =0
try {
var width = this.imgIdList[e.currentTarget.id].width; //图片原宽
var height = this.imgIdList[e.currentTarget.id].height; //图片原高
//小程序默认固定宽320px,获取top和left值,使图片居中显示
height = height * (320 / width);
width = 320;
x = (app.windowWidth - width) / 2
y = (app.windowHeight - height) / 2
} catch (e) { }
var img = {
x: x,
y: y,26 currentSrc: src,
};
this.setData({ img: img, isCheckDtl: true });
}, CSS 코드의 일부
.backdrop{
 background: rgba(0, 0, 0, 1);
 width:100%;
 height: 100%;
 position: fixed;
 top:0;
 left:0;
}위 내용은 기본적으로 다음과 같습니다. 이미지를 보려면 클릭 요구 사항을 완료하십시오.
사용자 정의 컨트롤 resizePicModal .wxml:
<!-- 缩放 -->
<template name="resizePic">
 <scroll-view class="backdrop" catchtouchmove="bindTouchMove" catchtouchend="bindTouchEnd" bindtouchstart="bindTouchStart" >
 <view class="close-icon" bindtap="closeResizeModal">
  取消预览
 </view>
  <image catchtouchmove="bindTouchMove" bindtouchend="bindTouchEnd" bindtouchstart="bindTouchStart"
  style=" transform: scale({{img.baseScale}}); position:absolute; top:{{img.top}}px; left:{{img.left}}px; "
  mode="widthFix" class="dtl-img" src="{{img.currentSrc}}"></image>
 </scroll-view>
</template> /**
* 使用方法:
* 1) WXHTML要缩放的图片 必须 传入 src 以及绑定 bindtap事件,
* e.g:
* <image bindtap="toggleDtl" src="{{item}}" wx:for="{{productCard.arrImg}}" wx:key="*this" src="{{item}}" style="width:100%" mode="widthFix"></image>
* 2) WXHTML 要引入Modal模板(isCheckDtl无需再定义):
* <view wx:if="{{isCheckDtl}}">
* <import src="/components/resizePicModal/resizePicModal.wxml"/>
* <template is="resizePic" data="{{img}}"></template>
* </view>
* 3) JS页面要引入JS文件,覆盖当前页面的事件:
* var resizePicModalService = require ('../../components/resizePicModal/resizePicModal.js')
* var resizePicModal = {}
* 4) 在onLoad事件中,实例化ResizePicModal
* resizePicModal = new resizePicModalService.ResizePicModal()
*/
var app = getApp()
let modalEvent = {
distanceList: [0, 0],//存储缩放时,双指距离.只有两个数据.第一项为old distance.最后一项为new distance
disPoint: { x: 0, y: 0 },//手指touch图片时,在图片上的位置
imgIdList:{},
/**
* 打开弹窗
*/
showResizeModal: function (e) {
var src = e.currentTarget.dataset.src;
var x = 0
var y =0
try {
var width = this.imgIdList[e.currentTarget.id].width; //图片原宽
var height = this.imgIdList[e.currentTarget.id].height; //图片原高
//小程序固定宽320px
height = height * (320 / width);
width = 320;
x = (app.windowWidth - width) / 2 //> 0 ? (app.windowWidth - width) / 2 : 0;
y = (app.windowHeight - height) / 2// > 0 ? (app.windowHeight - height) / 2 : 0;
} catch (e) { }
var img = {
top: y,
left: x,
x: x, y: y,
width: '100%',
baseScale: 1,
currentSrc: src,
};
this.setData({ img: img, isCheckDtl: true });
},
/**
* 关闭弹窗
*/
closeResizeModal:function(){
this.setData({ isCheckDtl: false })
},
/**
* 加载图片
*/
imageOnload:function(e){
var id = e.currentTarget.id
this.imgIdList[id] = {
width:e.detail.width,
height:e.detail.height
}
},
/**
* bindtouchmove
*/
bindTouchMove: function (e) {
if (e.touches.length == 1) {//一指移动当前图片
this.data.img.left = e.touches[0].clientX - this.disPoint.x
this.data.img.top = e.touches[0].clientY - this.disPoint.y
this.setData({ img: this.data.img })
}
if (e.touches.length == 2) {//二指缩放
var xMove = e.touches[1].clientX - e.touches[0].clientX
var yMove = e.touches[1].clientY - e.touches[0].clientY
var distance = Math.sqrt(xMove * xMove + yMove * yMove);//开根号
this.distanceList.shift()
this.distanceList.push(distance)
if (this.distanceList[0] == 0) { return }
var distanceDiff = this.distanceList[1] - this.distanceList[0]//两次touch之间, distance的变化. >0,放大图片.<0 缩小图片
// 假设缩放scale基数为1: newScale = oldScale + 0.005 * distanceDiff
var baseScale = this.data.img.baseScale + 0.005 * distanceDiff
if(baseScale>0){
this.data.img.baseScale = baseScale
var imgWidth = baseScale * parseInt(this.data.img.imgWidth)
var imgHeight = baseScale * parseInt(this.data.img.imgHeight)
this.setData({ img: this.data.img })
}else{
this.data.img.baseScale = 0
this.setData({ img: this.data.img })
}
}
},
/**
* bindtouchend
*/
bindTouchEnd: function (e) {
if (e.touches.length == 2) {//二指缩放
this.setData({ isCheckDtl: true })
}
},
/**
* bindtouchstart
*/
bindTouchStart: function (e) {
this.distanceList = [0, 0]//回复初始值
this.disPoint = { x: 0, y: 0 }
if (e.touches.length == 1) {
this.disPoint.x = e.touches[0].clientX - this.data.img.left
this.disPoint.y = e.touches[0].clientY - this.data.img.top
}
}
}
function ResizePicModal(){
let pages = getCurrentPages()
let curPage = pages[pages.length - 1]
Object.assign(curPage, modalEvent)//覆盖原生页面事件
this.page = curPage
curPage.resizePicModal = this
return this
}
module.exports = {
ResizePicModal
}비즈니스 페이지 wxml: 사용자 정의 컨트롤 템플릿 소개
<view class="flex-wrap flex-pic">
<view class="picList">
<image wx:for="{{item.imglist}}" wx:for-item="itemImg" wx:key="*this" id="{{'rfnd_'+index}}" bindload="imageOnload" src="{{ itemImg}}" bindtap="showResizeModal" src="{{itemImg}}"></image>
</view>
</view>
<!-- 缩放 -->
<view wx:if="{{isCheckDtl}}">
<import src="/components/resizePicModal/resizePicModal.wxml"/>
<template is="resizePic" data="{{img}}"></template>
</view>业务页面js,引用js文件,实例化resizePicModal
var that
 var resizePicModal = {}
 var app = getApp()
 var resizePicModalService = require('../../components/resizePicModal/resizePicModal.js')
 /**
  * 生命周期函数--监听页面加载
  */
 onLoad: function (options) {
  that = this 8  resizePicModal = new resizePicModalService.ResizePicModal()
}总结
위 내용은 WeChat 미니 프로그램의 이동 가능한 동영상 및 두 손가락 확대의 예에 대한 자세한 설명의 상세 내용입니다. 자세한 내용은 PHP 중국어 웹사이트의 기타 관련 기사를 참조하세요!