

Écrit par Carlos Mucuho✏️
Les comptes à rebours sont une fonctionnalité populaire sur de nombreux sites Web, améliorant les fonctionnalités pour les événements, les ventes et l'engagement des utilisateurs. Bien que JavaScript soit couramment utilisé pour le comportement dynamique sur le Web, il est également possible de créer un compte à rebours fonctionnel et visuellement attrayant en utilisant uniquement CSS.
Dans ce tutoriel, nous explorerons les deux approches, en commençant par un compte à rebours JavaScript de base, puis en passant à un compte à rebours CSS uniquement. À la fin, nous comparerons les performances des deux approches à l'aide de Chrome DevTools et discuterons de chacun de leurs avantages et inconvénients.
Nous allons commencer par créer un simple compte à rebours qui se met à jour toutes les secondes. La minuterie comprendra un bouton de démarrage et de pause pour contrôler son fonctionnement.
Avant de créer le compte à rebours JavaScript, nous devons créer un répertoire pour stocker les applications que nous allons créer tout au long de ce didacticiel.
Ouvrez une fenêtre de terminal, accédez à un répertoire adapté à votre projet et utilisez la commande suivante pour créer un répertoire nommé compte à rebours :
mkdir countdown-timer
Ensuite, accédez à ce répertoire :
cd countdown-timer
Créez deux sous-répertoires nommés javascript-countdown et css-only-countdown, et à l'intérieur de chaque sous-répertoire, créez un sous-répertoire nommé public :
mkdir javascript-countdown && mkdir javascript-countdown/public mkdir css-only-countdown && mkdir css-only-countdown/public
Ensuite, accédez au sous-répertoire javascript-countdown, initialisez un nouveau projet de nœud avec les paramètres par défaut et installez le package express :
cd javascript-countdown npm init -y npm install express
Ouvrez votre éditeur de texte préféré, créez un fichier nommé server.js et ajoutez-y le code suivant :
const express = require('express'); const app = express(); const port = 3001 app.use(express.static('public')); app.listen(port, () => { console.log(`Javascript countdown app server started on port ${port}`); });
Le code ci-dessus crée un serveur express qui sera utilisé pour servir l'application de compte à rebours JavaScript dans le port 3001.
Toujours dans votre éditeur de texte, créez les fichiers suivants dans le sous-répertoire public situé à l'intérieur du répertoire javascript-countdown :
Ajoutez le code suivant à index.html :
Javascript Countdown Timer
Ce fichier HTML met en place une structure de base avec un conteneur contenant des boutons de contrôle et une zone d'affichage du compte à rebours.
Ensuite, nous ajouterons JavaScript pour gérer la logique du compte à rebours. Ajoutez le code suivant à index.js :
window.addEventListener("load", () => { const startBtn = document.getElementById('startBtn'); const pauseBtn = document.getElementById('pauseBtn'); const countdownView = document.getElementsByClassName('countdown')[0]; let totalTime = 10; let timeLeft; let countDownIntervalID; let isPaused = false; pauseBtn.style.display = 'none'; });
Dans ce bloc de code, nous initialisons les éléments startBtn, pauseBtn et countdownView par leurs identifiants et classes respectifs. Nous définissons également quelques variables initiales : totalTime, timeLeft, countDownIntervalID et isPaused. De plus, nous avons configuré le bouton pause pour qu'il soit masqué initialement.
Maintenant, ajoutons des écouteurs d'événements pour les boutons de démarrage et de pause :
startBtn.addEventListener('click', startOrStopTimer); pauseBtn.addEventListener('click', pauseOrResumeTimer);
Ces lignes attachent les écouteurs d'événements de clic aux boutons de démarrage et de pause. Les fonctions startOrStopTimer et pauseOrResumeTimer sont définies ultérieurement pour gérer les clics sur les boutons.
Ajoutez le code suivant pour définir la fonction startOrStopTimer :
function startOrStopTimer() { startBtn.innerHTML = startBtn.innerHTML === 'Start' ? 'Stop' : 'Start'; if (countDownIntervalID === undefined && !isPaused) { timeLeft = totalTime; startTimer(); pauseBtn.style.display = 'inline'; } else { stopTimer(); countdownView.innerHTML = ''; pauseBtn.style.display = 'none'; isPaused = false; pauseBtn.innerHTML = 'Pause'; } }
Dans cette fonction, nous basculons le texte du bouton de démarrage entre Start et Stop. Si le compte à rebours n'est pas en cours et n'est pas en pause, nous initialisons timeLeft à totalTime et démarrons le chronomètre. Sinon, nous arrêtons le chronomètre et réinitialisons la vue.
Maintenant, définissez la fonction startTimer :
function startTimer() { countDownIntervalID = setInterval(() => { countdownView.innerHTML = timeLeft; if (timeLeft === 0) { stopTimer(); startBtn.innerHTML = 'Start'; pauseBtn.style.display = 'none'; countdownView.innerHTML = ''; } else { timeLeft = timeLeft - 1; } }, 1000); }
Cette fonction définit un intervalle pour mettre à jour le compte à rebours chaque seconde. Si timeLeft atteint zéro, nous arrêtons le chronomètre, réinitialisons le texte du bouton de démarrage et masquons le bouton pause.
Ensuite, ajoutez la fonction stopTimer :
function stopTimer() { if (countDownIntervalID !== undefined) { clearInterval(countDownIntervalID); countDownIntervalID = undefined; } }
Cette fonction efface l'intervalle du compte à rebours et réinitialise countDownIntervalID. Enfin, ajoutez la fonction pauseOrResumeTimer :
function pauseOrResumeTimer() { isPaused = !isPaused; pauseBtn.innerHTML = isPaused ? 'Resume' : 'Pause'; if (countDownIntervalID !== undefined) { stopTimer(); } else { startTimer(); } }
Dans cette fonction, nous basculons l'état de pause et le texte du bouton entre Pause et Reprendre. Si le compte à rebours est en cours, on arrête le chronomètre ; sinon, on recommence.
Maintenant, stylisons le compte à rebours en utilisant CSS. Ajoutez le code suivant à styles.css :
body { background-color: black; font-family: Arial, sans-serif; height: 100%; } .container { display: flex; flex-direction: column; justify-content: center; align-items: center; } .controls { width: 20%; margin-top: 10%; display: flex; justify-content: space-between; flex-direction: row; flex-wrap: wrap; } .countdown-container { position: relative; width: 20vw; height: 20vw; margin-top: 2%; border: 0.4em solid #9b51e0; } button { font-size: 1.5em; border: none; padding: 0.3em; background-color: #9b51e0; border-radius: 0.4em; color: white; } .countdown { position: relative; width: 100%; height: 100%; list-style: none; padding: 0; margin: 0; display: flex; justify-content: center; align-items: center; font-size: 5em; color: #9b51e0; }
Ce CSS définit les styles pour l'interface du compte à rebours. L'arrière-plan du corps est défini sur noir et nous utilisons Arial comme police principale. La classe .container est conçue pour centrer son contenu et fournir un espacement entre les éléments. La classe .controls stylise les boutons permettant de démarrer et de mettre en pause le minuteur, en garantissant qu'ils sont uniformément espacés et réactifs. La classe .countdown-container définit la taille et l'apparence de l'affichage du compte à rebours, y compris une bordure et une marge.
Retournez sur votre terminal et exécutez la commande suivante pour commencer à servir l'application de compte à rebours JavaScript :
node server.js
Open a new tab in your browser, navigate to http://localhost:3001, and you should see something similar to the following: Test out the countdown timer and once you are done, terminate the server application and move to the next step.
To enhance the user experience of our countdown timer, let’s add a circular progress indicator to give the user a visual representation of the time remaining.
First, we need to modify our HTML code to include the circular progress element. In index.html, we add a span element with a class of circular-progress inside the countdown-container div. This span element will be used to create the circular progress indicator:
Next, we need to define the CSS for the circular progress indicator. In styles.css, we add the following code:
.countdown-container { ... /* border : 0.4em solid #9b51e0; */ } .circular-progress { width: 20vw; height: 20vw; border-radius: 50%; display: flex; justify-content: center; align-items: center; position: absolute; transition: 0.5s; background-color: #13171f; } .circular-progress::before { width: 18.5vw; height: 18.5vw; content: ""; position: absolute; border-radius: 50%; background-color: black; }
This code first removes the border from the countdown-container div, then sets the dimensions and shape of the circular progress indicator, as well as its position and background color. We also add a ::before pseudo-element to create the inner circle of the progress indicator.
Now we need to add the JavaScript code to animate the circular progress indicator.
Add the following code in the variables initialization block:
const circularProgressEl = document.getElementsByClassName("circular-progress")[0]; let circularProgress; let circularProgressIntervalID;
This code initializes the circularProgressEl variable to target the circular progress element and creates two new variables, circularProgress and circularProgressIntervalID, that will be used to animate the progress indicator.
Add the following code below the pauseOrResumeTimer() function:
function startCircularProgressAnimation() { let start = totalTime - timeLeft; let degreesPerSecond = 360 / totalTime; let degreesPerInterval = degreesPerSecond / 20; circularProgress = degreesPerSecond * start; circularProgressIntervalID = setInterval(() => { if (Math.round(circularProgress) === 360) { clearInterval(circularProgressIntervalID); } else { circularProgress = circularProgress + degreesPerInterval; circularProgressEl.style.background = `conic-gradient(#9b51e0 ${circularProgress}deg, #13171f 0deg)`; } }, 50); }
This code defines the startCircularProgressAnimation function, which calculates the starting point and degree of rotation for the circular progress indicator, and sets up an interval to animate the progress indicator.
Add the following code below the startCircularProgressAnimation:
function resumeCircularProgressAnimation() { startCircularProgressAnimation(); } function pauseCircularProgressAnimation() { clearInterval(circularProgressIntervalID); } function stopCircularProgressAnimation() { clearInterval(circularProgressIntervalID); circularProgressEl.style.background = `conic-gradient(#9b51e0 0deg, #13171f 0deg)`; }
This code defines the resumeCircularProgressAnimation, pauseCircularProgressAnimation, and stopCircularProgressAnimation functions, which are used to start, pause, and stop the circular progress animation.
Finally, we need to modify the startOrStopTimer and pauseOrResumeTimer functions to start and stop the circular progress animation along with the timer:
function startOrStopTimer() { // ... if (countDownIntervalID === undefined && !isPaused) { // ... startCircularProgressAnimation(); } else { // ... stopCircularProgressAnimation(); } } function pauseOrResumeTimer() { // ... if (countDownIntervalID !== undefined) { stopTimer(); pauseCircularProgressAnimation(); } else { startTimer(); resumeCircularProgressAnimation(); } }
With these modifications, our countdown timer now includes a circular progress indicator that animates along with the timer.
Return to your terminal and run the following command to start serving the JavaScript countdown application:
node server.js
Go back to the tab in your browser where you visited the http://localhost:3001 URL, refresh the page, and you should see something similar to the following:
In this section, we'll dive into creating a countdown timer that updates every second and is made using only CSS. Our timer will be simple yet functional, featuring start and pause buttons to control its operation.
Navigate to the css-only-countdown subdirectory, initialize a new node project, and install the express package:
cd ../css-only-countdown npm init -y npm install express
Then, return to your text editor, create a file named server.js, and add the following code to it:
const express = require('express'); const app = express(); const port = 3002 app.use(express.static('public')); app.listen(port, () => { console.log(`Css-only countdown app server started on port ${port}`); });
The code above creates an express server that will be used to serve the JavaScript countdown application in port 3002.
Still in your text editor, create the following files in the public subdirectory:
Add the following code to the index.html file:
CSS Countdown Timer
- 10
- 9
- 8
- 7
- 6
- 5
- 4
- 3
- 2
- 1
This code sets up the basic structure of our countdown timer. It includes a container div that holds the controls for starting and pausing the timer, as well as the countdown display itself. The controls div contains two checkboxes with labels that will serve as our start and pause buttons. These buttons toggle their respective states using CSS, thanks to the checkbox hack.
The countdown-container div holds an unordered list (ul) of list items (li) representing the countdown numbers from 10 to one. These numbers will be displayed one by one as the timer counts down.
Now, let's style the countdown timer using CSS. Add the following code to styles.css:
body { background-color: black; font-family: Arial, sans-serif; height: 100%; } .container { display: flex; flex-direction: column; justify-content: center; align-items: center; } .controls { width: 20%; margin-top: 10%; display: flex; justify-content: space-between; flex-direction: row; flex-wrap: wrap; } .countdown-container { position: relative; width: 20vw; height: 20vw; margin-top: 12%; border : 0.4em solid #9b51e0; } #startLabel span { display: none; } label { cursor: pointer; font-size: 1.5em; padding: 0.3em; background-color: #9b51e0; border-radius: 0.4em; color: white; } #startBtn:checked~#startLabel span:nth-child(1) { display: inline; } #startBtn:not(:checked)~#startLabel span:nth-child(2) { display: inline; } #startBtn:not(:checked)~#pauseLabel, #pauseBtn { display: none; } #pauseLabel span { display: none; } #pauseBtn:checked~#pauseLabel span:nth-child(1) { display: inline; } #pauseBtn:not(:checked)~#pauseLabel span:nth-child(2) { display: inline; } .checkbox-wrapper { display: none; }
In this CSS file, we start by setting some basic styles for the body and container. The body has a black background and uses the Arial font. The container is centered using flexbox and has a margin to push it down from the top of the viewport.
The controls div is styled to be responsive and to ensure that the buttons are spaced out evenly. The countdown-container div is styled with a border, which will later be replaced by the circular progress indicator.
We use the checkbox hack to toggle the visibility of the labels for the start and pause buttons. Depending on whether the checkboxes are checked or not, different spans within the labels are displayed. This allows the labels to show different text (Start or Stop, Pause or Resume) based on the state of the checkboxes.
Now, add the following code to the bottom of the styles.css file:
.countdown { position: relative; width: 100%; height: 100%; list-style: none; padding: 0; margin: 0; display: flex; justify-content: center; align-items: center; font-size: 5em; color: #9b51e0; } .countdown li { position: absolute; opacity: 0; transition: opacity 1s linear; } #startBtn:checked~.countdown-container .countdown li:nth-child(1) { animation-delay: 0s; } #startBtn:checked~.countdown-container .countdown li:nth-child(2) { animation-delay: 1s; } #startBtn:checked~.countdown-container .countdown li:nth-child(3) { animation-delay: 2s; } #startBtn:checked~.countdown-container .countdown li:nth-child(4) { animation-delay: 3s; } #startBtn:checked~.countdown-container .countdown li:nth-child(5) { animation-delay: 4s; } #startBtn:checked~.countdown-container .countdown li:nth-child(6) { animation-delay: 5s; } #startBtn:checked~.countdown-container .countdown li:nth-child(7) { animation-delay: 6s; } #startBtn:checked~.countdown-container .countdown li:nth-child(8) { animation-delay: 7s; } #startBtn:checked~.countdown-container .countdown li:nth-child(9) { animation-delay: 8s; } #startBtn:checked~.countdown-container .countdown li:nth-child(10) { animation-delay: 9s; } @keyframes countdownAnimation { 0%, 10% { opacity: 1; } 11%, 100% { opacity: 0; } } #startBtn:checked~.countdown-container .countdown li { animation: countdownAnimation 10s steps(10) forwards; } #pauseBtn:checked~.countdown-container .countdown li { animation-play-state: paused; }
With this code, we style the countdown list. The countdown class is positioned absolutely within the countdown-container, and its list items are initially hidden with opacity: 0.
We then use keyframes and the animation property to create the countdown effect. The list items are displayed one by one with a delay using the animation-delay property. The countdownAnimation keyframes control the visibility of each list item, making them visible for a short period before hiding them again.
We also pause the animation when the pause button is checked, using the animation-play-state property.
Go back to your terminal and run the following command to start serving the CSS-only countdown application:
node server.js
Open a new tab in your browser, navigate to http://localhost:3002 URL, and you should see something similar to the following: Test out the countdown timer and once you are done, terminate the server application and move to the next step.
To make the countdown timer more visually appealing, we can add a circular progress indicator that shows the remaining time. To do this, we will modify the HTML and CSS code as follows:
First, replace the countdown-container div in the index.html file with the following code:
- 10
- 9
- 8
- 7
- 6
- 5
- 4
- 3
- 2
- 1
In this code, we add a span element with a class of circular-progress inside the countdown-container div.
Next, add the following code to the styles.css file:
.countdown-container { ... /* border : 0.4em solid #9b51e0; */ } .circular-progress { width: 20vw; height: 20vw; border-radius: 50%; display: flex; justify-content: center; align-items: center; position: absolute; transition: 0.5s; background: conic-gradient(#9b51e0 var(--angle), #13171f 0deg); } .circular-progress::before { width: 18.5vw; height: 18.5vw; content: ""; position: absolute; border-radius: 50%; background-color: black; } @keyframes circularProgressAnimation { to { --angle: 360deg; } } @property --angle { syntax: ""; initial-value: 0deg; inherits: false; } #startBtn:checked~.countdown-container .circular-progress { opacity: 1; animation: circularProgressAnimation 10s linear; } #pauseBtn:checked~.countdown-container .circular-progress { animation-play-state: paused; }
In this code, we first remove the border from the countdown-container div, and then add styles for the circular-progress class. The circular progress indicator is a span element that is absolutely positioned within the countdown-container. It uses a conic gradient to create the circular progress effect.
We also define a keyframe animation, circularProgressAnimation, that animates the progress indicator from 0 to 360 degrees over the duration of the countdown. The --angle CSS property is used to control the angle of the gradient.
Finally, we use the checkbox hack to start and pause the circular progress animation along with the countdown numbers. The animation is applied to the circular-progress span when the start button is checked and paused when the pause button is checked.
With these modifications, our countdown timer now includes a circular progress indicator that animates along with the timer.
Go back to your terminal and run the following command to start serving the CSS-only countdown application:
node server.js
Return to the tab in your browser where you visited the http://localhost:3002 URL, refresh the page, and you should see something similar to the following:
Now that we have implemented both the CSS-only and JavaScript countdown timers, let's compare their performance using Chrome DevTools.
To get started, open the Chrome browser and navigate to the webpage containing the countdown timers. Right-click anywhere on the page and selectInspectto open Chrome DevTools.
In the DevTools window, click on theNetworktab and then refresh both the JavaScript and CSS-only countdown pages. This tab allows you to monitor all network requests made by the page, including HTML, CSS, JavaScript, and other resources:
By analyzing the requests, you can determine how many resources are being loaded, their sizes, and the overall impact on page load time:
| CSS-only countdowntimer | JavaScript countdowntimer | |
|---|---|---|
| Number of requests | 2 | 3 |
| Total size | 4.5 KB | 4.7 KB |
| Page load | 24 ms | 27 ms |
D'après ces résultats, nous pouvons voir que le compte à rebours CSS uniquement nécessite moins de requêtes et a une taille totale légèrement inférieure à celle du compte à rebours JavaScript. Cela conduit à un temps de chargement de page légèrement plus rapide pour la version CSS uniquement, ce qui la rend plus efficace en termes de chargement initial.
Maintenant, dans la fenêtre DevTools, accédez à l'ongletPerformanceet lancez une session d'enregistrement en cliquant sur le boutonEnregistrer. Pour évaluer le compte à rebours JavaScript, cliquez sur le boutonDémarrersitué sur sa page respective et laissez le compte à rebours suivre son cours. Une fois le timer arrêté, arrêtez l'enregistrement dans l'ongletPerformance.
Effectuez ce processus pour les pages de compte à rebours JS et CSS uniquement afin de collecter des données de performances pour chaque implémentation. L'ongletPerformancespropose une analyse complète des performances d'exécution de votre page, englobant les temps de script, de rendu et de peinture. En analysant ces métriques, vous pouvez identifier les domaines qui peuvent nécessiter une optimisation pour améliorer les performances de votre application Web :
| CSS-only countdowntimer | JavaScript countdowntimer | |
|---|---|---|
| Scripting | 2 ms | 49 ms |
| Rendering | 510 ms | 103 ms |
| Painting | 275 ms | 55 ms |
En interprétant ces résultats, nous observons que le temps de script pour le compte à rebours CSS uniquement est nettement inférieur à celui du compte à rebours JavaScript, ce qui indique une surcharge d'exécution minimale. Cependant, le compte à rebours CSS uniquement a des temps de rendu et de peinture plus élevés. En effet, les animations CSS peuvent parfois nécessiter plus d'efforts de la part du navigateur pour être rendues, en particulier pour les styles ou les transitions complexes.
En revanche, le compte à rebours JavaScript affiche un temps de script plus élevé en raison de la logique impliquée dans la mise à jour du compte à rebours, mais il bénéficie de temps de rendu et de peinture inférieurs. Cela suggère que même si JavaScript ajoute une certaine surcharge en termes d'exécution de script, il peut être plus efficace en termes de mise à jour du DOM et de rendu des modifications.
Dans l'ensemble, le compte à rebours CSS uniquement est plus efficace pour les scénarios dans lesquels la minimisation du temps d'exécution du script est critique, tandis que le minuteur JavaScript peut mieux fonctionner dans les cas où les temps de rendu et de peinture sont la principale préoccupation.
Après avoir exploré les comptes à rebours CSS uniquement et JavaScript, pesons leurs avantages et leurs inconvénients pour déterminer quelle approche convient le mieux à vos besoins.
Le compte à rebours CSS uniquement exploite du CSS pur pour obtenir l'effet de compte à rebours, offrant ainsi une solution légère et simple.
Ses avantages sont les suivants :
Les inconvénients de cette approche incluent :
Le compte à rebours JavaScript, quant à lui, utilise JavaScript pour gérer la logique du compte à rebours et les mises à jour du DOM. Cette approche offre plus de contrôle et de flexibilité.
Les avantages de cette approche incluent :
Les inconvénients incluent :
Le minuteur CSS uniquement est léger et facile à comprendre, ce qui en fait un bon choix pour des comptes à rebours simples avec un minimum de scripts. Cependant, il peut avoir des difficultés avec des animations plus complexes et des fonctionnalités interactives. D'autre part, le minuteur JavaScript offre un plus grand contrôle et une plus grande flexibilité, permettant des interactions plus dynamiques. Cela se fait au prix d’une surcharge de script plus élevée et d’une complexité accrue.
En fin de compte, le choix entre les deux approches dépend des besoins spécifiques de votre projet et des compromis que vous êtes prêt à accepter.
이 튜토리얼에서는 카운트다운 타이머를 만드는 두 가지 방법, 즉 JavaScript를 사용하는 방법과 CSS만 사용하는 방법을 살펴보았습니다. 우리는 기본 JavaScript 카운트다운 타이머로 시작하여 사용자 친화적이고 시각적으로 매력적으로 보이도록 기능과 스타일을 추가했습니다. 그런 다음 CSS 전용 카운트다운 타이머를 구현하여 간단하면서도 효과적인 애니메이션을 만드는 CSS의 힘을 보여주었습니다.
단순성을 위해 CSS 전용 접근 방식을 선택하든 유연성을 위해 JavaScript 접근 방식을 선택하든 이제 프로젝트 요구 사항에 맞는 카운트다운 타이머를 구현할 수 있는 도구와 지식을 갖게 되었습니다.
웹 프런트엔드가 점점 더 복잡해짐에 따라 리소스를 많이 사용하는 기능으로 인해 브라우저에서 점점 더 많은 것을 요구하게 됩니다. 프로덕션에 있는 모든 사용자의 클라이언트측 CPU 사용량, 메모리 사용량 등을 모니터링하고 추적하는 데 관심이 있다면 LogRocket을 사용해 보세요.
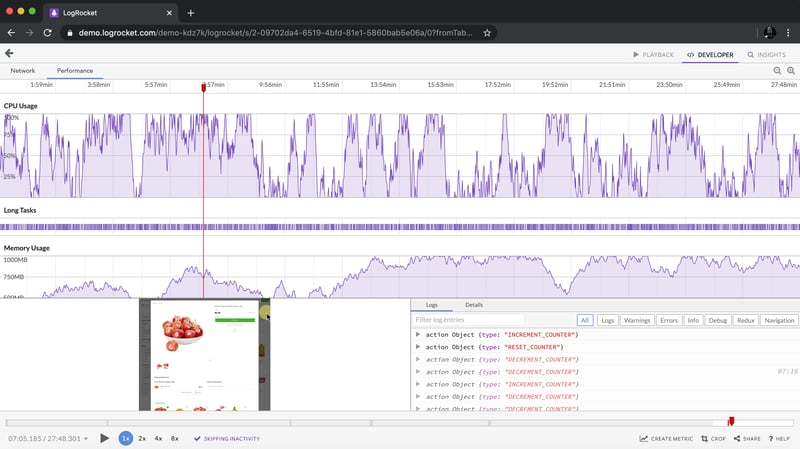
LogRocket은 웹 앱, 모바일 앱 또는 웹사이트에서 일어나는 모든 일을 기록하는 웹 및 모바일 앱용 DVR과 같습니다. 문제가 발생한 이유를 추측하는 대신 주요 프런트엔드 성능 지표를 집계 및 보고하고, 애플리케이션 상태와 함께 사용자 세션을 재생하고, 네트워크 요청을 기록하고, 모든 오류를 자동으로 표시할 수 있습니다.
웹 및 모바일 앱 디버깅 방법을 현대화하고 무료로 모니터링을 시작해 보세요.
위 내용은 CSS를 사용하여 카운트다운 타이머를 만드는 방법의 상세 내용입니다. 자세한 내용은 PHP 중국어 웹사이트의 기타 관련 기사를 참조하세요!


![[웹 프런트엔드] Node.js 빠른 시작](https://img.php.cn/upload/course/000/000/067/662b5d34ba7c0227.png)


