
The content shared with you in this article is about the practical analysis of TypeScript in node projects. It has certain reference value. Friends in need can refer to it.
TypeScript can be understood as a superset of JavaScript, which means it covers all JavaScript functions and has its own unique syntax.
A recent new project has started the pitfall journey of TS, and I would like to share with you some routines that you can learn from.
As a statically strongly typed compiled language produced by Juhard Company, this language has been around for several years. I believe that under the maintenance of the community, it has become a A very stable language.
We know that JavaScript is a dynamically weakly typed interpreted scripting language. Dynamicity brings a lot of convenience. We can modify the variable type at will during the running of the code to achieve the expected purpose.
But at the same time, this is a double-edged sword. When a huge project appears in front of you and faced with extremely complex logic, it is difficult for you to tell what type a certain variable is through the code. What should this variable do? What, it is very likely that you will step into a pit accidentally.
Static strongly typed compilation can bring many benefits, the most important of which is that it can help developers avoid some careless problems: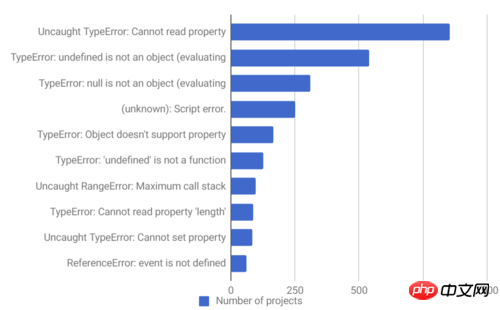
The picture shows the top ten exceptions among the thousands of projects counted by rollbar
It is not difficult to see that there are more exceptions caused by type mismatch and empty variables than you dare to admit.
For example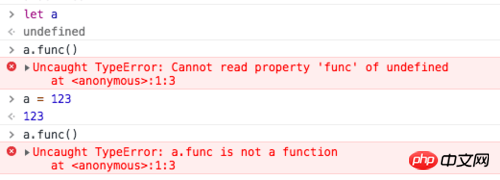 This has been greatly improved in TS. Any reference to a variable needs to specify its own type. What can you use in the code and what methods are supported? They all need to be defined above:
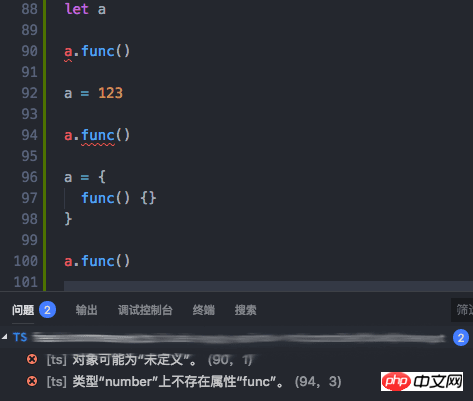 This prompt will be given to developers during development and compilation to avoid having to modify it if problems are discovered after going online.
Another benefit brought by statically compiled types is function signatures.
As mentioned above, because it is a dynamic scripting language, it is difficult for an editor to correctly tell you during development what parameters need to be passed to a function you want to call, and what type of return the function will return. value.

In TS, for a function, you first need to define the types of all parameters and the type of the return value.
In this way, when the function is called, we can clearly see the effect of this function: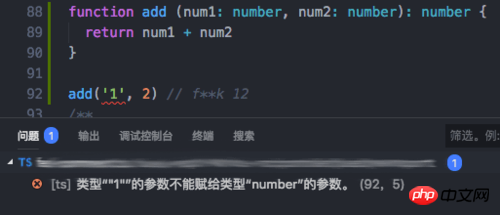
These are the two most basic features that can make the program more stable. , of course, there are more functions in TS: TypeScript | Handbook
There are a large number of examples on the official website of TS, among which you can find The Express version example is slightly modified for this and applied to a koa project.
Before using TS, you need to prepare these things:
VS code, both are huge hard Produced by the company and developed by TS, the editor is currently the one with the highest support for TS
Node.js version 8.11 or above is recommended
npm i -g typescript, install TS globally, and the tsc command used for compilation is here
##npm i -g nodemon, install nodemon globally, and automatically refresh the server program after tsc compilation
reflect-metadata: One that a large number of decorator packages depend on Basic package, used to inject data
routing-controllers: Use the decorator method to develop koa-router
sequelize: Abstract database operations
sequelize-typescript: The decorator version of the above plug-in, used when defining entities
. ├── README.md ├── copy-static-assets.ts ├── nodemon.json ├── package-lock.json ├── package.json ├── dist ├── src │ ├── config │ ├── controllers │ ├── entity │ ├── models │ ├── middleware │ ├── public │ ├── app.ts │ ├── server.ts │ ├── types │ └── utils ├── tsconfig.json └── tslint.json
srcis the main development directory, all TS codes It's all here. After compilation, adistfolder at the same level assrcwill be generated. This folder is the code that thenodeengine actually runs. .Under
src, the main code is divided into the following structure (add or delete according to the actual situation of your own project):
controllers只负责处理逻辑,通过操作model对象,而不是数据库来进行数据的增删改查
鉴于公司绝大部分的Node项目版本都已经升级到了Node 8.11,理所应当的,我们会尝试新的语法。
也就是说我们会抛弃Generator,拥抱async/await。
使用Koa、Express写过接口的童鞋应该都知道,当一个项目变得庞大,实际上会产生很多重复的非逻辑代码:
router.get('/', ctx => {}) router.get('/page1', ctx => {}) router.get('/page2', ctx => {}) router.get('/page3', ctx => {}) router.get('/pageN', ctx => {})
而在每个路由监听中,又做着大量重复的工作:
router.get('/', ctx => { let uid = Number(ctx.cookies.get('uid')) let device = ctx.headers['device'] || 'ios' let { tel, name } = ctx.query })
几乎每一个路由的头部都是在做着获取参数的工作,而参数很可能来自header、body甚至是cookie及query。
所以,我们对原来koa的使用方法进行了一个较大的改动,并使用routing-controllers大量的应用装饰器来帮助我们处理大部分的非逻辑代码。
原有router的定义:
module.exports = function (router) { router.get('/', function* (next) { let uid = Number(this.cookies.get('uid')) let device = this.headers['device'] this.body = { code: 200 } }) }
使用了TypeScript与装饰器的定义:
@Controller export default class { @Get('/') async index ( @CookieParam('uid') uid: number, @HeaderParam('device') device: string ) { return { code: 200 } } }
为了使接口更易于检索、更清晰,所以我们抛弃了原有的bd-router的功能(依据文件路径作为接口路径、TS中的文件路径仅用于文件分层)。
直接在controllers下的文件中声明对应的接口进行监听。
如果是全局的中间件,则直接在class上添加@Middleware装饰器,并设置type: 'after|before'即可。
如果是特定的一些中间件,则创建一个普通的class即可,然后在需要使用的controller对象上指定@UseBefore/@UseAfter(可以写在class上,也可以写在method上)。
所有的中间件都需要继承对应的MiddlewareInterface接口,并需要实现use方法
// middleware/xxx.ts import {ExpressMiddlewareInterface} from "../../src/driver/express/ExpressMiddlewareInterface" export class CompressionMiddleware implements KoaMiddlewareInterface { use(request: any, response: any, next?: Function): any { console.log("hello compression ...") next() } } // controllers/xxx.ts @UseBefore(CompressionMiddleware) export default class { }
文件只负责定义数据模型,不做任何逻辑操作
同样的使用了sequelize+装饰器的方式,entity只是用来建立与数据库之间通讯的数据模型。
import { Model, Table, Column } from 'sequelize-typescript' @Table({ tableName: 'user_info_test' }) export default class UserInfo extends Model { @Column({ comment: '自增ID', autoIncrement: true, primaryKey: true }) uid: number @Column({ comment: '姓名' }) name: string @Column({ comment: '年龄', defaultValue: 0 }) age: number @Column({ comment: '性别' }) gender: number }
因为sequelize建立连接也是需要对应的数据库地址、账户、密码、database等信息、所以推荐将同一个数据库的所有实体放在一个目录下,方便sequelize加载对应的模型
同步的推荐在config下创建对应的配置信息,并添加一列用于存放实体的key。
这样在建立数据库链接,加载数据模型时就可以动态的导入该路径下的所有实体:
// config.ts export const config = { // ... mysql1: { // ... config + entity: 'entity1' // 添加一列用来标识是什么实体的key }, mysql2: { // ... config + entity: 'entity2' // 添加一列用来标识是什么实体的key } // ... } // utils/mysql.ts new Sequelize({ // ... modelPath: [path.reolve(__dirname, `../entity/${config.mysql1.entity}`)] // ... })
model的定位在于根据对应的实体创建抽象化的数据库对象,因为使用了sequelize,所以该目录下的文件会变得非常简洁。
基本就是初始化sequelize对象,并在加载模型后将其抛出。
export default new Sequelize({ host: '127.0.0.1', database: 'database', username: 'user', password: 'password', dialect: 'mysql', // 或者一些其他的数据库 modelPaths: [path.resolve(__dirname, `../entity/${configs.mysql1.entity}`)], // 加载我们的实体 pool: { // 连接池的一些相关配置 max: 5, min: 0, acquire: 30000, idle: 10000 }, operatorsAliases: false, logging: true // true会在控制台打印每次sequelize操作时对应的SQL命令 })
所有的公共函数,都放在这里。
同时推荐编写对应的索引文件(index.ts),大致的格式如下:
// utils/get-uid.ts export default function (): number { return 123 } // utils/number-comma.ts export default function(): string { return '1,234' } // utils/index.ts export {default as getUid} from './get-uid' export {default as numberComma} from './number-comma'
每添加一个新的util,就去index中添加对应的索引,这样带来的好处就是可以通过一行来引入所有想引入的utils:
import {getUid, numberComma} from './utils'
configs下边存储的就是各种配置信息了,包括一些第三方接口URL、数据库配置、日志路径。
各种balabala的静态数据。
如果配置文件多的话,建议拆分为多个文件,然后按照utils的方式编写索引文件。
这里存放的是所有的自定义的类型定义,一些开源社区没有提供的,但是我们用到的第三方插件,需要在这里进行定义,一般来说常用的都会有,但是一些小众的包可能确实没有TS的支持,例如我们有使用的一个node-qconf:
// types/node-qconf.d.ts export function getConf(path: string): string | null export function getBatchKeys(path: string): string[] | null export function getBatchConf(path: string): string | null export function getAllHost(path: string): string[] | null export function getHost(path: string): string | null
类型定义的文件规定后缀为 .d.ts
types下边的所有文件可以直接引用,而不用关心相对路径的问题(其他普通的model则需要写相对路径,这是一个很尴尬的问题)。
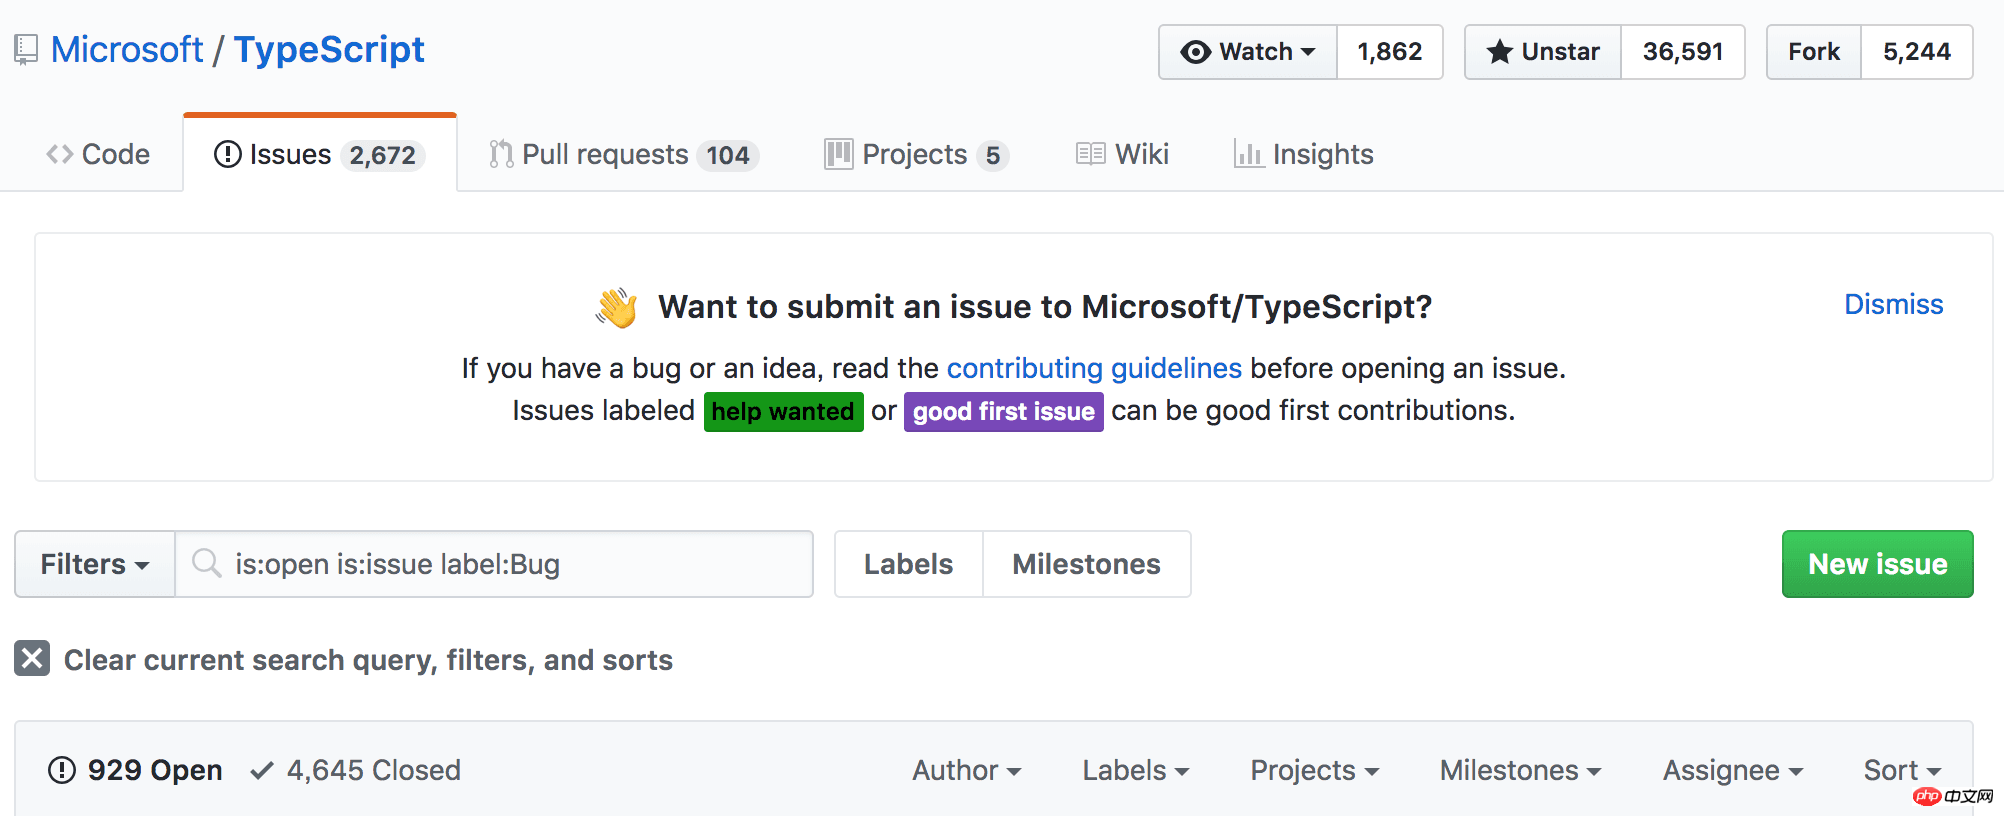 当前GitHub仓库中,有2600+的开启状态的issues,筛选bug标签后,依然有900+的存在。
所以很难保证在使用的过程中不会踩坑,但是一个项目拥有这么多活跃的issues,也能从侧面说明这个项目的受欢迎程度。
目前遇到的唯一一个比较尴尬的问题就是:
引用文件路径一定要写全。。
import module from '../../../../f**k-module'
controllers | is used to process interface requests, original
apps,routesfolders. |
|
middleware | Stores various middleware, global or custom middleware
||
config | The location of various configuration items, including port,
logpath, various parameters constant definition. |
|
entity | All entity definitions are stored here (sequelize is used for database operations).
||
models |
sequelize# using entities fromentity##To complete the initialization operation and throw thesequelizeobject. |
|
| utils | |
|
| types | |
The above is the detailed content of Practical analysis of TypeScript in node projects. For more information, please follow other related articles on the PHP Chinese website!


