
Sudoku is a mathematical game originated from Switzerland in the 18th century. It is a logic game that uses paper and pen to perform calculations. The following article mainly introduces you to the relevant information about using vue to develop a so-called Sudoku. The article introduces it in detail through sample code. Friends in need can refer to it.
1. Preface
I recently encountered a problem at work, because there is no new demand for the background management system page function, so I was thinking What should I put on the homepage? Recently, what I have been thinking about is to put a so-called Sudoku. Why is it a so-called Sudoku? Because the rules are different from the standard Sudoku. It only requires that the numbers in each row and column are different! This example is also based on vue, and the code is shared with everyone. The purpose of giving you the code is not to let you copy the code directly, but to treat it as a practice project or to learn knowledge. If you feel that I have written something poorly or wrongly, please point it out so that everyone can exchange opinions and make progress together.
The code has been uploaded to github: you can star it if you need it! vue-demos
2. Running effect
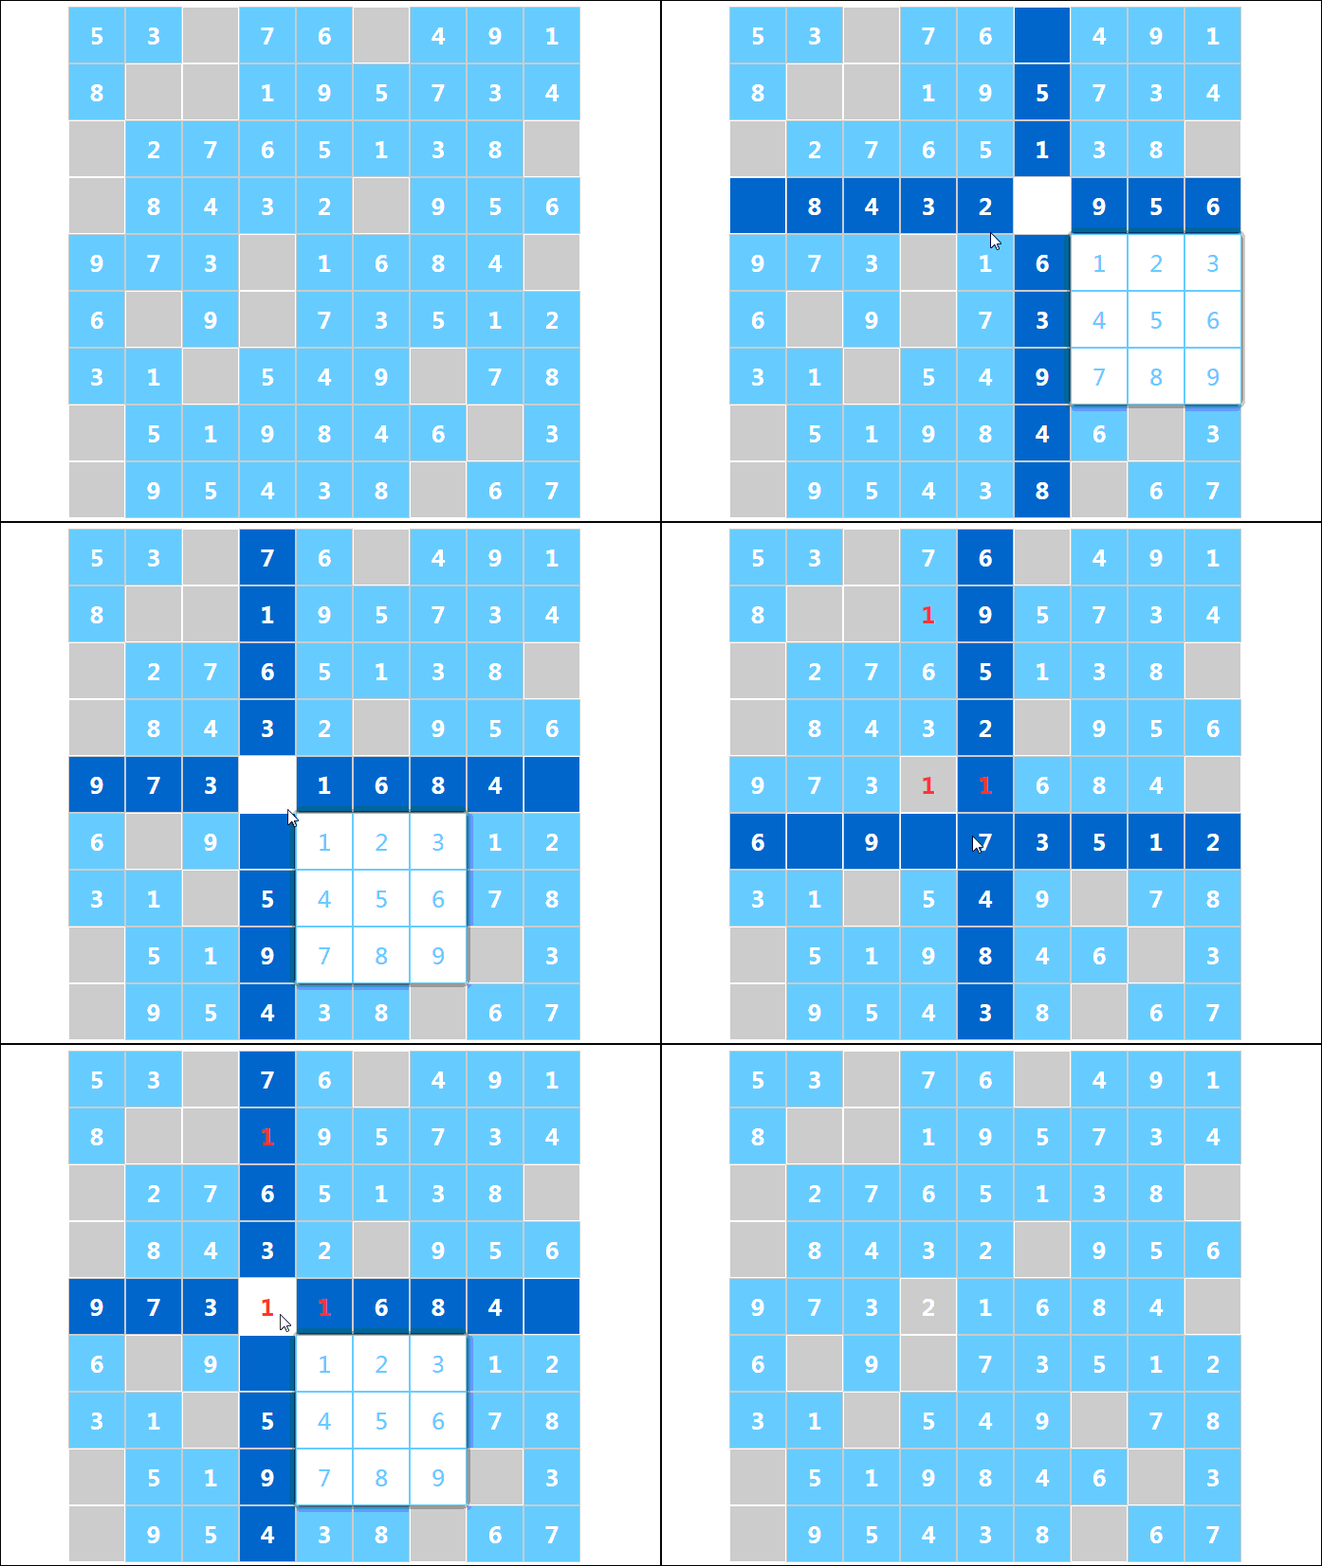
3. Implementation steps
The implementation steps feel a bit convoluted. I suggest you read the article while writing so that you will not be confused. Or go directly to the source code (sudoku) and understand the source code! This project isn’t complicated either!
3-1. Preparing data and typesetting
I won’t go into details about the html css code for typesetting. Typesetting is very simple. I believe this will not be difficult for everyone. What’s a little more complicated is the interaction of data!
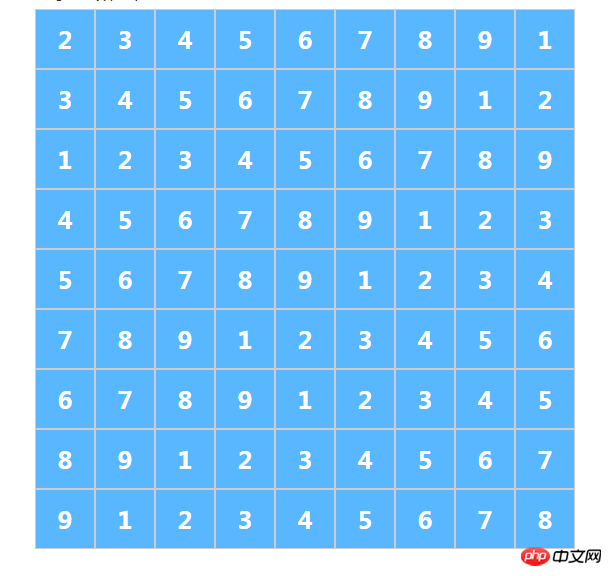
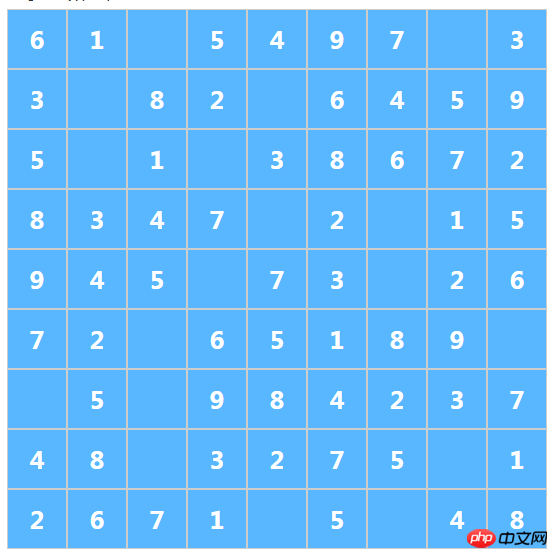
Let’s start with the first step. Prepare the Sudoku data first. Everyone knows what the data is, it is data like the following!

The layout effect is as follows.

The html code is as follows
{{allNumText[index][indexSub]}}
The code is also very simple, as follows
mounted(){ let arr1 = [1, 2, 3, 4, 5, 6, 7, 8, 9]; let row = [], rowCol = 0; for (let i = 0, len = arr1.length; i < len; i++) { row = Object.assign([], arr1); this.allNum.push(row); //删除第一个数字并记录下来 rowCol = arr1.splice(0, 1)[0]; //在最后面插入数字 arr1.push(rowCol) } }
You can also find that in this data, each row and The numbers in each column are different!
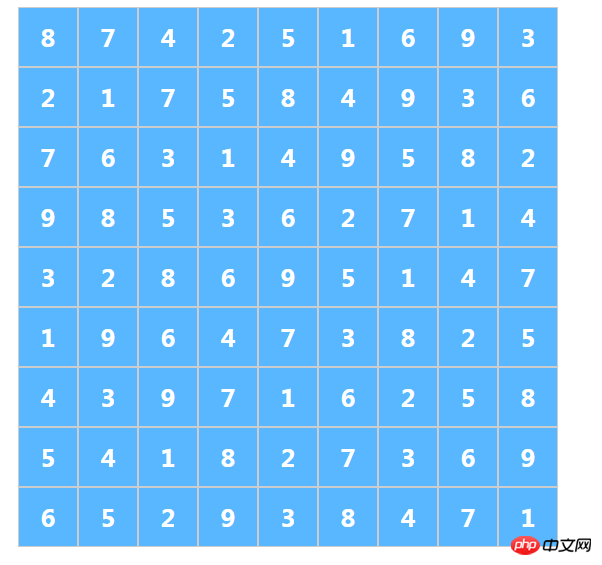
3-2. After shuffling the rows
, the order will be randomly shuffled. The shuffling of the order must ensure a premise, which is to ensure that the numbers in each row and column All different. In this case, I used a simple and crude method-disrupt in units of rows or columns. For example, the first row and the third row interact with each other, and the first and fifth columns exchange positions. Let’s talk about the disordered order of behavioral units!
Row shuffling is very simple, just randomly shuffling the array! One line of code and done!
this.allNum.sort((n1, n2) => Math.random() - 0.5);
3-3. Scramble the columns
The rows are scrambled. Next, shuffle the columns in units of columns. This one is a little more complicated.
Think about it, for example, if the second column is to exchange the value of the fifth column, that is, the value of the second cell in each row is exchanged with the value of the fifth cell, then each row needs to be traversed. ! To exchange, as for the number of columns in the second and fifth columns mentioned earlier, it can be realized with a function!
Look at the code below!
//随机获取两列的索引 function randomText() { let rondomIndex = 0, rondomIndexAfter = 0; //获取第一列的索引 rondomIndex = Math.floor(Math.random() * 9); function randomDo() { rondomIndexAfter = Math.floor(Math.random() * 9); //如果第一列和第二列索引一样,第二列的索引再次重新随机获取 if (rondomIndexAfter === rondomIndex) { randomDo(); } } randomDo(); //返回两列的索引 return [rondomIndex, rondomIndexAfter] } //打乱列 let randomArr = [], nowValue = 0; //同样遍历9次 for (let i = 0; i < 9; i++) { randomArr = Object.assign([], randomText()); //遍历每一行,给每一行的随机两列交换值 for (let j = 0, len = this.allNum.length; j < len; j++) { //随机两列交换值 nowValue = this.allNum[j][randomArr[0]]; this.allNum[j][randomArr[0]] = this.allNum[j][randomArr[1]]; this.allNum[j][randomArr[1]] = nowValue; } }
3-3. Randomly empty cells
To empty cells is to randomly empty some cells, and then Let people play Sudoku. Fill in these cells!
Requirement, what I am realizing now is that each row has two grids empty. My approach here is to record the coordinates of each grid first, and then randomly obtain the coordinates from the recorded coordinates. , use the obtained coordinates to set the null!
First, get the coordinates of all points
//记录所有坐标 let rowText = '', arrText = [] for (let i = 0; i < 9; i++) { rowText = '' for (let j = 0; j < 9; j++) { rowText += i + '-' + j + ','; } arrText.push(rowText.substr(0, rowText.length - 1)) } console.log(arrText);
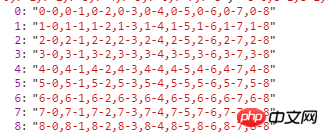
Seeing this coordinate, you can easily know that one element of the array is the first row, '0-0' is the first grid in the first row. The last element of the array is the last row, '8-8' is the last row, the last grid, and so on!
The following is a random hollowing out, the code is also very simple!
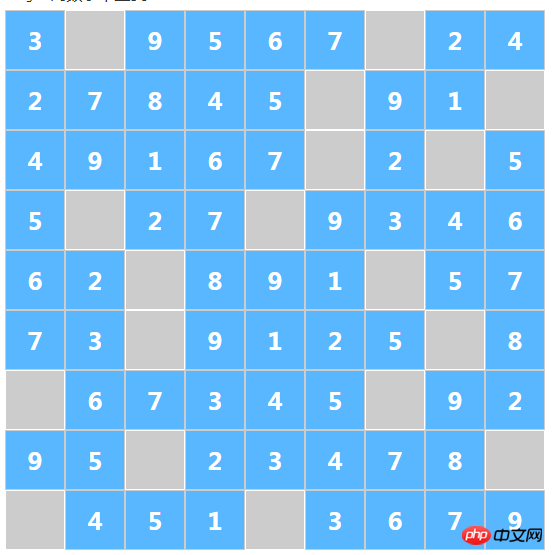
//随机掏空 let nowItme = [], _option, nowOption = []; for (let i = 0; i < 9; i++) { //抽取当前行的所有坐标 nowItme = arrText[i].split(','); nowOption = []; //当前行的随机两个坐标掏空 for (let j = 0; j < 2; j++) { //抽取当前行的随机一个坐标 _option = Math.floor(Math.random() * nowItme.length); //分割坐标的x,y nowOption = nowItme.splice(_option,1)[0].split("-"); this.allNum[nowOption[0]][nowOption[1]] = ''; } }
I believe everyone will find this strange. Now let’s write the style, which is to change the style of the empty grid! I have written the style corresponding to the .no class in css. Please pay attention.
{{allNumText[index][indexSub]}}
3-4.显示数字键盘
首先,我简单的用一个流程图说下逻辑,如下
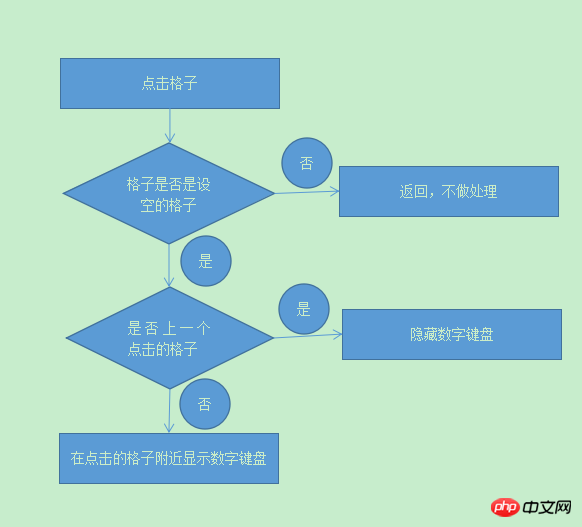
然后关于数字键盘的位置,看下图(数字键盘的样式我不多说了,就是一个是相对定位,一个绝对定位的设置而已)
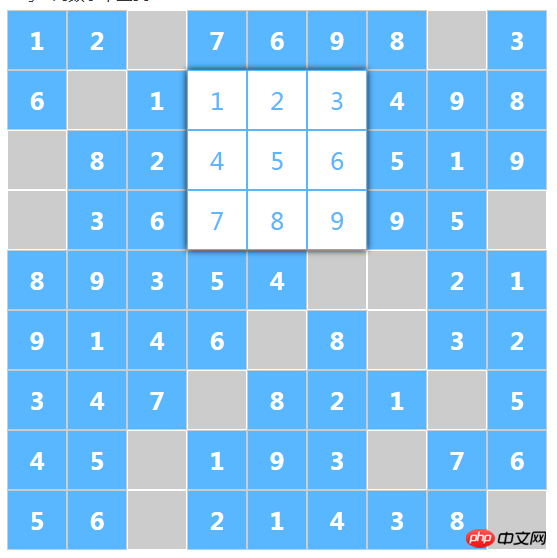
如上图,我点击的是第一行第三个格子,首先,我期待被点击的格子的样式有所改变,方便我区分,这个不难,用一个class改变样式就可以了,这个可以看下面的代码,我用一个.cur的class控制样式。还有一个就是期待数字键盘在第二行,第四个格子那里出现。这样的话,大家就知道,数字键盘的位置是怎么定位的了!数字键盘的top就是,被点击格子所在的行的索引+160(60是格子的宽高),left就是,被点击格子所在的列的索引+160(60是格子的宽高)。比如上图,第一行第三个格子,top=(0+1)*60+'px',left=(2+1)*60+'px'。
代码如下
{{allNumText[index][indexSub]}}
js代码
/** * @description 显示数字键盘 * @param i1 * @param i2 */ showCheck(i1, i2){ //点击的格子是否是被掏空的格子 if (this.allNum[i1][i2] !== '') { return } //点击的格子如果是上一次点击的格子(当前格子) if (i1 === this.curRow && i2 === this.curCol) { //隐藏数字键盘,curRow和curCol设空 this.checkShow = false; this.curRow = ''; this.curCol = ''; } else { //隐藏数字键盘,curRow和curCol分别设置成当前的点 this.checkShow = true; this.curRow = i1; this.curCol = i2; } },
运行效果
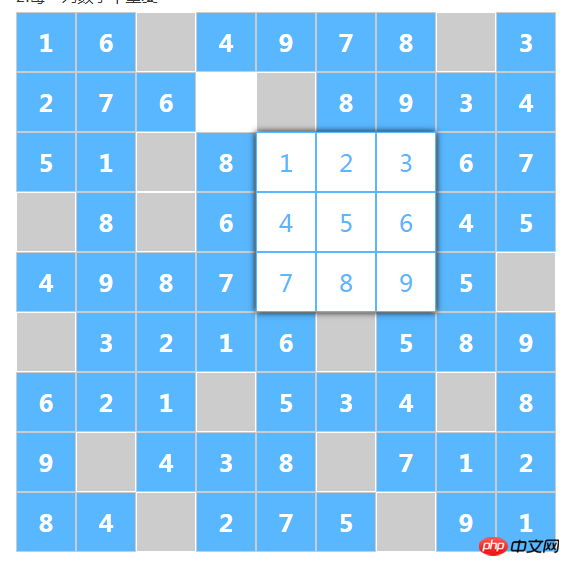
3-5.高亮显示同行同列
这一步很简单,首先,高亮显示行,大家都知道怎么做了,就是行对应的p,设置一个:hover,然后对应设置单元格的样式而已!这个不多说!

然后,高亮显示列,复杂一点,但是也很简单,原理我想大家也知道,就是当鼠标进如格子的时候,在data里面,用一个变量储存进入的格子的列的索引,然后加上判断,如果格子的列的索引等于进入的格子的列的索引。就加上一个class,这里我用.cur-col。
代码如下
{{allNumText[index][indexSub]}}
运行效果
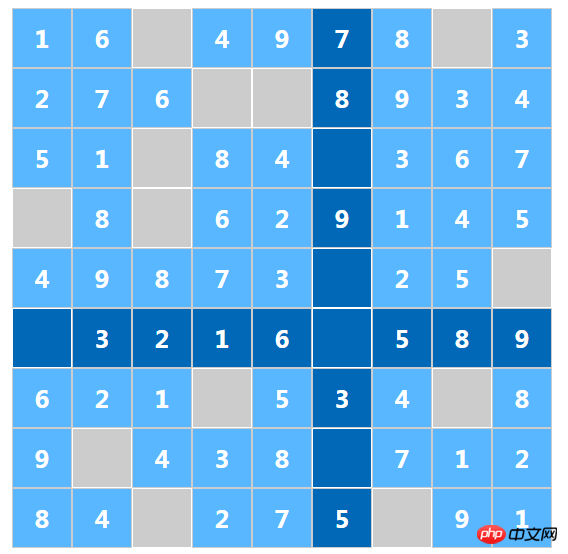
3-6.填写操作和错误提示
这一步的操作函数,我直接发代码吧,看代码比我说的会清晰些,毕竟说的有点绕
{{allNumText[index][indexSub]}}
js代码
inputText(_text){ //*****************************检查前的初始化 let _row = this.curRow, _col = this.curCol; this.curRow = ''; this.curCol = ''; this.isErr = false; this.optionNow = { x: '', y: '', } this.optionNowInRow = { x: '', y: '', } this.optionNowInCol = { x: '', y: '', } //*****************************检查行 //根据当前格子进行赋值 this.allNumText[_row][_col] = _text; let rowCheck = Object.assign(this.allNumText[_row], []); this.checkShow = false; for (let i = 0, len = rowCheck.length; i < len; i++) { //如果值一样,但是坐标不一样,就是填写错误 if (_text === rowCheck[i] && _col !== i) { this.isErr = true; this.isShake = true; //记录当前格子的信息 this.optionNow = { x: _row, y: _col, } //记录和当前格子同一行,以及同一个值的格子的坐标 this.optionNowInRow = { x: _row, y: i, } } } //*****************************检查列 let colCheck = []; //首先把每一行的那一列的数值保存起来 for (let i = 0, len = this.allNumText.length; i < len; i++) { colCheck.push(this.allNumText[i][_col]); } //遍历检查 for (let i = 0, len = colCheck.length; i < len; i++) { //如果值一样,但是坐标不一样,就是填写错误 if (_text === colCheck[i] && _row !== i) { this.isErr = true; this.isShake = true; //记录和当前格子同一列,以及同一个值的格子的坐标 this.optionNowInCol = { x: i, y: _col, } } } //如果发现的同样的 if (this.isErr) { setTimeout(() => { this.isShake = false; }, 1000) return; } //如果数组去重后,长度小于9,就是行没完成 rowCheck = rowCheck.filter(item => item !== ''); if (rowCheck.length !== 9) { //console.log('行没完成') return; } let coloCheck = []; //如果数组去重后,长度小于9,就是列没完成 for (let i = 0, len = this.allNumText.length; i < len; i++) { coloCheck = [...new Set(this.allNumText[i])]; coloCheck = coloCheck.filter(item => item !== ''); if (coloCheck.length !== 9) { //console.log('没完成') return; } } alert('挑战成功,但是没奖品'); this.numShow = false; }
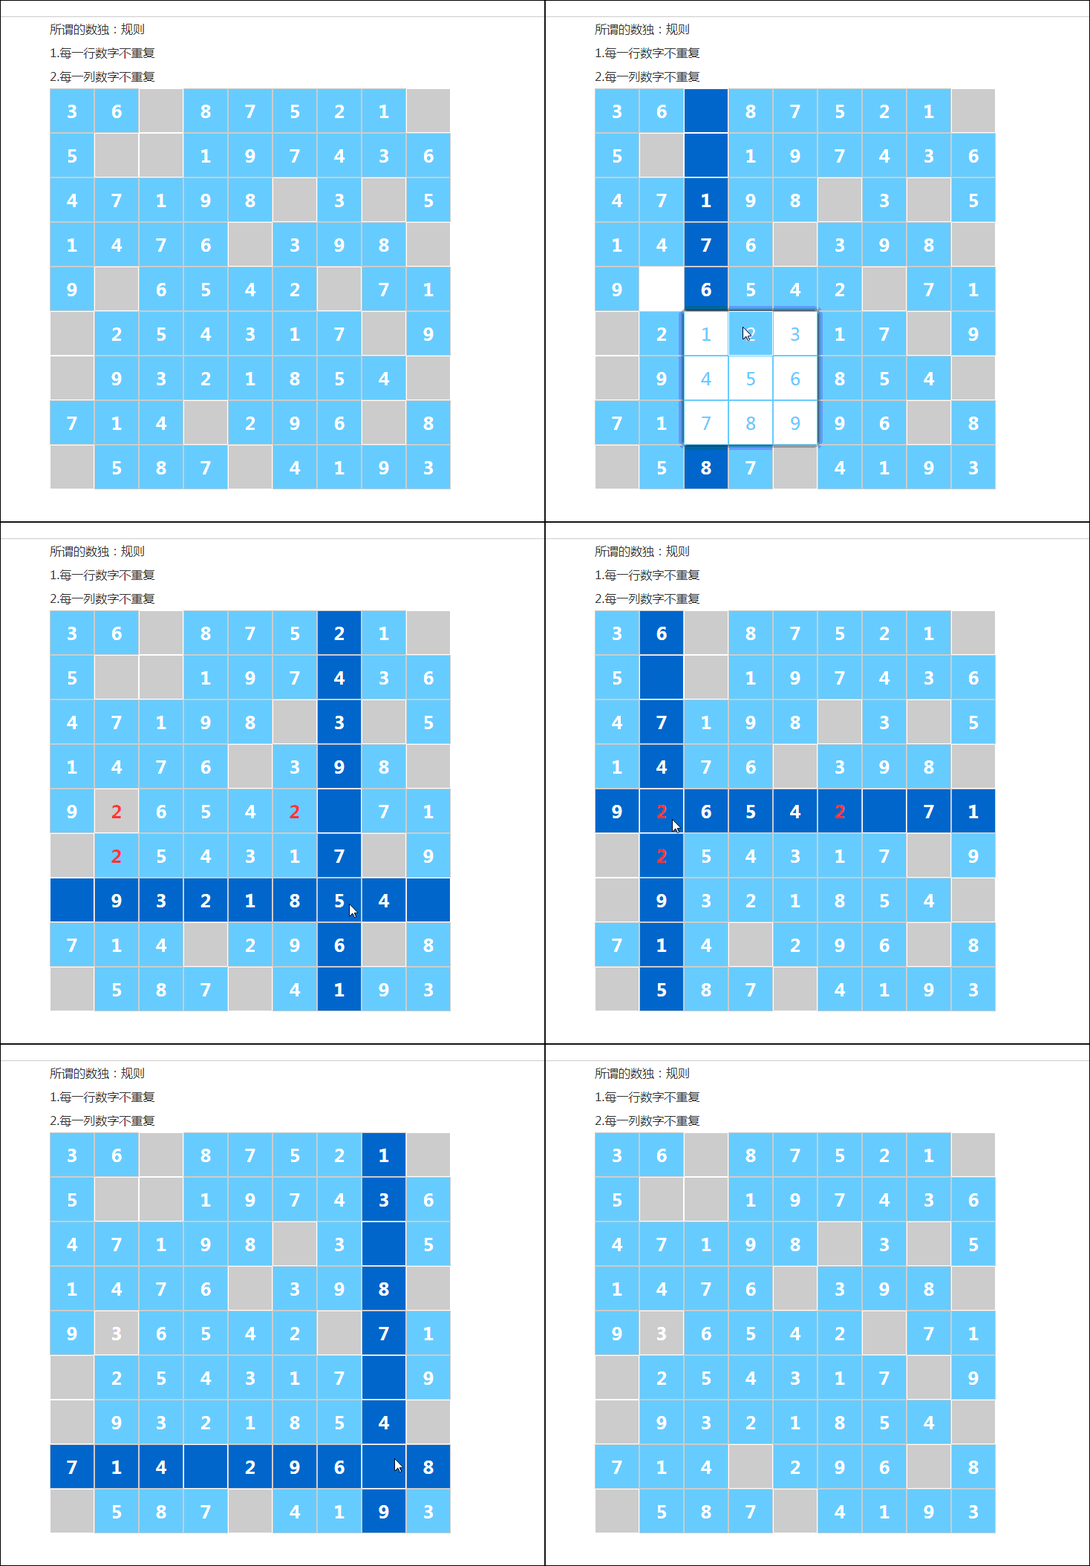
上面的代码逻辑,简单说下
1..err 这个class是设置红色字体所使用的,至于判断,就是在inputText这个函数里面,有optionNow和 optionNowInRow和optionNowInCol。只要格子的坐标等于三者其中之一,就会添加这个class,就会变红。
2..isShake这个class是控制,抖动的动画,添加上了之后,在一秒后,要去掉这个class,不然下次添加没有动画效果。
3.在inputText这个函数里面,我操作的数独列表,并不是之前,提到的allNum,而是利用allNum,深度拷贝生成出的allNumText(this.allNumText = JSON.parse(JSON.stringify(this.allNum));)。主要就是为了避免下图的情况!
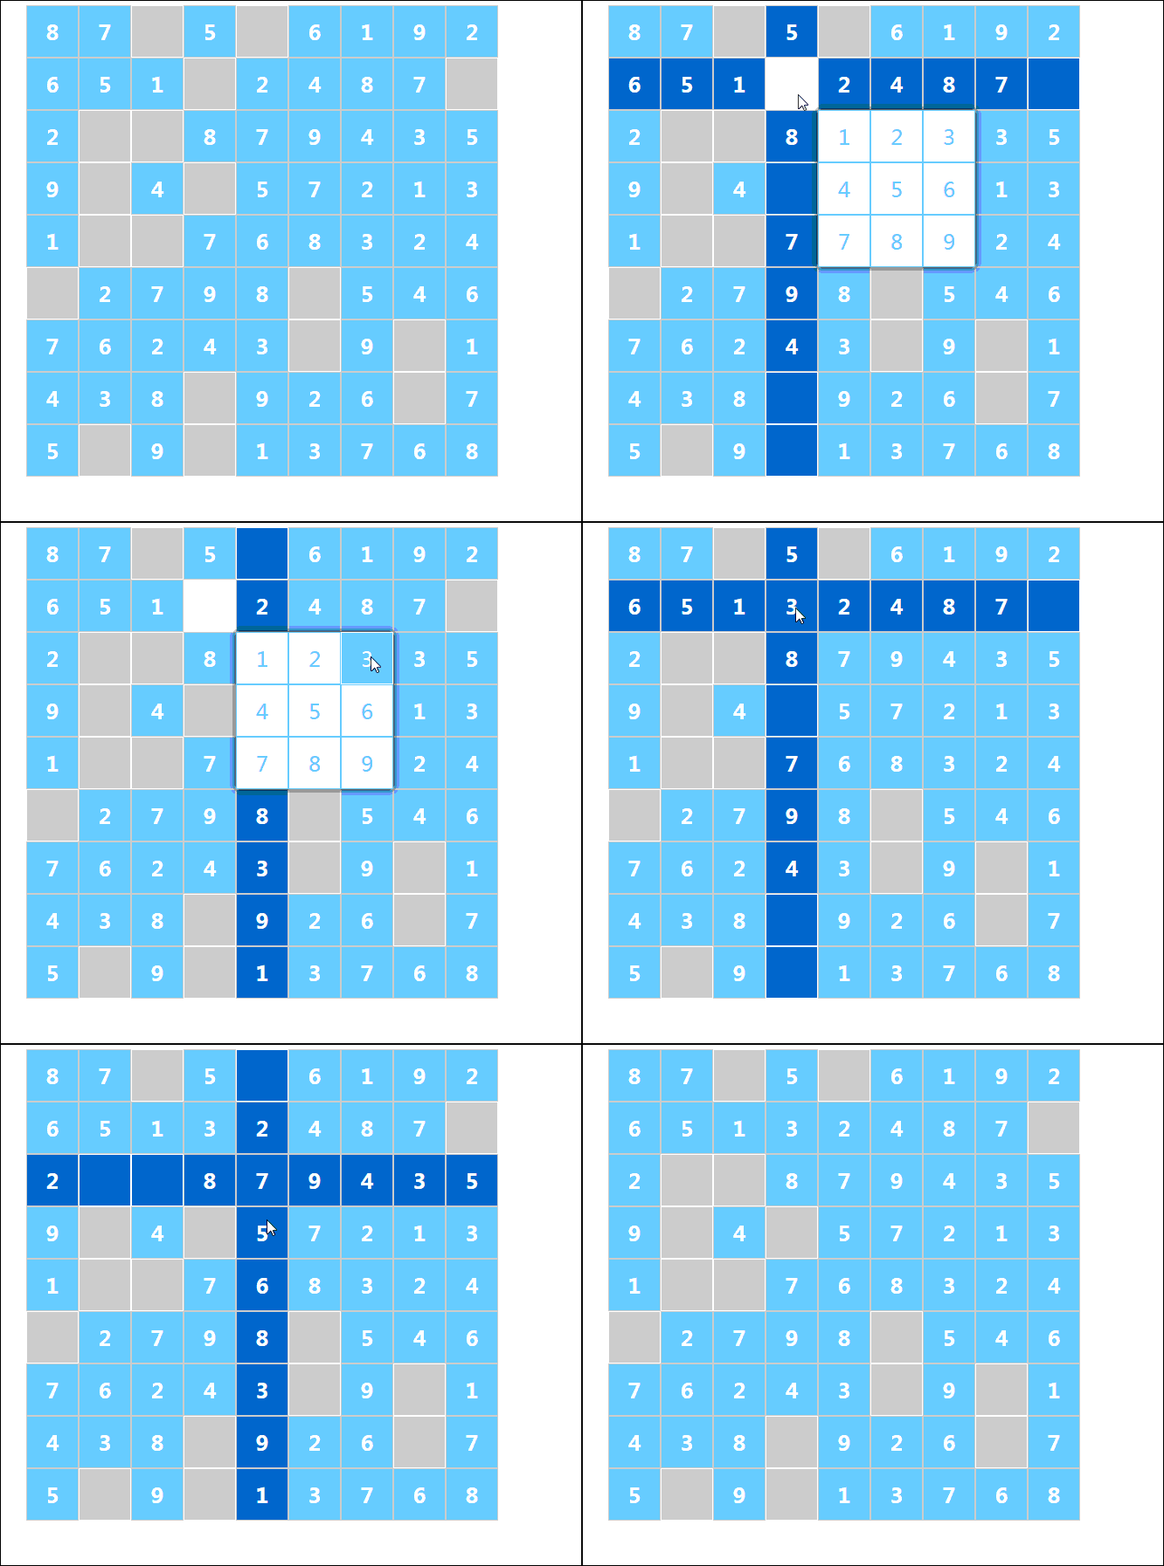
这样是为了往掏空的格子输入数字的时候,然后那个格子就不能再改了,即使是填错了,都不能改。样式控制也不正确!正确的格式应该是下面这样,即使填入了,格子的样式还是灰色的,这样可以方便的知道哪个格子是当时被掏空的,填写错了,也是可以改的。
4.完整代码
vue-所谓的数独
所谓的数独:规则
1.每一行数字不重复
2.每一列数字不重复
{{allNumText[index][indexSub]}}
reset.css和vue.min.js大家自行到github下载!
5.小结
好了,用vue做的所谓的数独,就写到这里了,主要就是逻辑有点绕,其它的问题相信都难不倒大家。这个实例比之前快速入门的三个小实例要麻烦一点,但是也很好理解!大家只要稍微看下估计都不难理解!最后,如果大家觉得文章写得不好,哪里写错了,欢迎给建议或者指点下迷津。期待和大家交流意见,共同进步!
上面是我整理给大家的,希望今后会对大家有帮助。
相关文章:
How to implement two-way binding in js
Details introduction to the more practical functions of webpack
How to implement menu addition using jQuery Remove features
The above is the detailed content of How to develop a Sudoku game using vue. For more information, please follow other related articles on the PHP Chinese website!


