

This time I will show you how to use Webpack to develop projects, and what are the precautions for using Webpack to develop projects. The following is a practical case, let's take a look.
1. Introduction to common packaging tools
Among the packaging tools, the common ones are RequireJS, browserify, and webpack, among which RequireJS is a2. Use of tools
(1) RequireJS as an npm package provides an executable r.js The tool is executed through the command line and is used as follows:npm install -g requirejs r.js -o app.build.js
npm install -g browserify
browserify main.js -o bundle.js
As shown below, use the command to install and use it, as shown below:
npm install webpack -g
webpack main.js -o bundle.js
3. Project construction
For front-end projects, webpack plays the role of a build tool, not a code dependency, and should be installed In dev-dependencies, use the following command to install:npm install webpack --save-dev
module.exports = 'Hello world';
var text = require('./hello');
console.log(text);<!DOCTYPE html> <html lang="en"> <head> <meta charset="UTF-8"> <title>Title</title> </head> <body> <script src="./bundle.js"></script> </body> </html>
webpack ./index.js bundle.js
Hello world
configuration file. Before using the configuration file, we are installing the style loader, such as the following command:
npm install style-loader css-loader --save-dev
var path = require('path');
module.exports = {
 entry: path.join(dirname, 'index'),
 output: {
  path: dirname,
  filename: 'bundle.js'
 },
 module:{
  loaders: [
   {
    test: /\.css$/,
    loaders: ['style-loader', 'css-loader']
   }
  ]
 }
};* entry: represents the
entry file of the project * output: represents the result output after building and packaging, there are still multiple items in the output object Configuration such as the output path and output file name used above
* module.loaders is the configuration used for the loader in the module. The value is an array. Each item of the array specifies a rule. The test field of the rule is
Regular expression, if the ID of the dependent module matches the regular expression, the dependency will be converted using loader. In this way, we can use the webpack command to convert the codeFor more detailed instructions, please see ( http://www.jb51.net/article/136710.htm)
webpack
body {
  background-color: darkgray;
}// import style from './index.css';
var style = require('./index.css');
var text = require('./hello');
console.log(text); 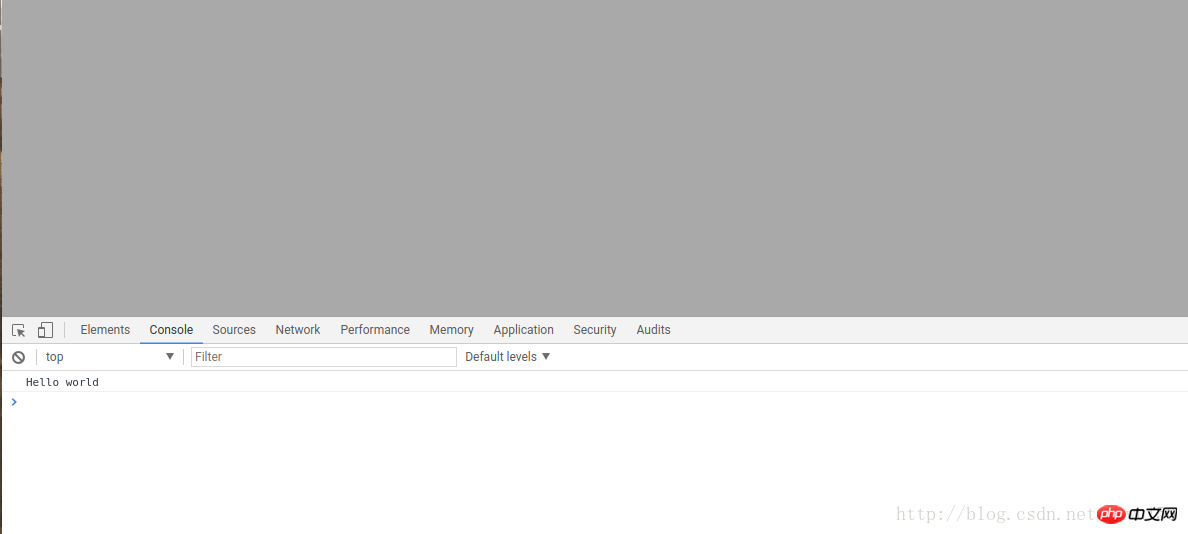
当然,webpack也能够通过webpack-dev-server进行项目的实时构建.
使用如下命令进行webpack-dev-server的安装:
npm install webpack-dev-server --save-dev
在安装之后,我们能够配置使用服务器,首先,我们的package.json文件将会更为下面这样,新增内容为:
 "scripts": {
  "test": "echo \"Error: no test specified\" && exit 1",
  "start":"webpack-dev-server --inline"
},在添加完这行命令之后,我们就可以使用下面命令进行启动webpack-dev-server服务器了,
npm run start
之后完整的package.json为如下:
{
 "name": "react-basics-review",
 "version": "1.0.0",
 "description": "a practise of react study ",
 "main": "index.js",
 "scripts": {
  "test": "echo \"Error: no test specified\" && exit 1",
  "start":"webpack-dev-server --inline"
 },
 "repository": {
  "type": "git",
  "url": "git+https://github.com/suwu150/react-basics-review.git"
 },
 "author": "jkwu",
 "license": "ISC",
 "bugs": {
  "url": "https://github.com/suwu150/react-basics-review/issues"
 },
 "homepage": "https://github.com/suwu150/react-basics-review#readme",
 "devDependencies": {
  "babel-plugin-transform-object-rest-spread": "^6.23.0",
  "babel-preset-es2015": "^6.24.1",
  "css-loader": "^0.28.5",
  "lodash": "^4.17.4",
  "mocha": "^3.5.0",
  "react": "^15.6.1",
  "style-loader": "^0.18.2",
  "webpack": "^3.5.5",
  "webpack-dev-server": "^2.7.1"
 },
 "dependencies": {
  "lodash": "^4.17.4"
 }
}webpack配置文件修改为如下内容:
devServer中常用的配置对象属性如下:
* 1. contentBase:”./” // 本地服务器在哪个目录搭建页面,一般我们在当前目录即可;
* 2. historyApiFallback:true // 当我们搭建spa应用时非常有用,它使用的是HTML5 History Api,任意的跳转或404响应可以指向 index.html 页面;
* 3. inline:true // 用来支持dev-server自动刷新的配置,webpack有两种模式支持自动刷新,一种是iframe模式,一种是inline模式;使用iframe模式是不需要在devServer进行配置的,只需使用特定的URL格式访问即可;不过我们一般还是常用inline模式,在devServer中对inline设置为true后,当我们启动webpack-dev-server时仍要需要配置inline才能生效,这一点我们之后再说;
* 4. hot:true // 启动webpack热模块替换特性,这里也是坑最多的地方,不少博客都将hot设置了true,这里其实如果单单设置为true是不起作用,会报错误的,错误如下图所示:
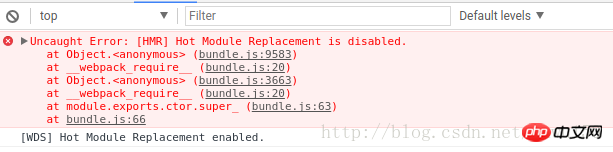
这是因为在使用的过程中没有使用插件的原因,只需要将下面命令添加到配置文件即可:
plugins:[
  new webpack.HotModuleReplacementPlugin(),
 ],
也就是调用webpack的热模块插件处理.
*5 .port:端口号(默认8080) ;
*6.其他配置信息
–quiet 控制台中不输出打包的信息
–compress 开启gzip压缩
–progress 显示打包的进度
–open 自动打开浏览器
var path = require('path');
const webpack = require ("webpack");
module.exports = {
 entry: path.join(dirname, 'index'),
 output: {
  path: dirname,
  filename: 'bundle.js',
  publicPath: "/assets/",
 },
 module:{
  loaders: [
   {
    test: /\.css$/,
    loaders: ['style-loader', 'css-loader']
   }
  ]
 },
 plugins:[
  new webpack.HotModuleReplacementPlugin(),
 ],
 devServer:{
  //我们在这里对webpack-dev-server进行配置
  contentBase: "./",
  historyApiFallback:true,
  inline:true,
  hot:true
 }
};index.html文件的内容修改为下面面格式:
<!DOCTYPE html>
<html lang="en">
<head>
  <meta charset="UTF-8">
  <title>Title</title>
</head>
<body>
<p>身在山中不知山高</p>
<script src="assets/bundle.js"></script>
</body>
</html>
也就是将路径进行修改,因为在webpack.config.json文件中进行了服务器路径的配置,修改了 publicPath: "/assets/",项,在命令行执行npm run start能看到服务器正常启动,然后我们去浏览器进行访问,如下所示结果:
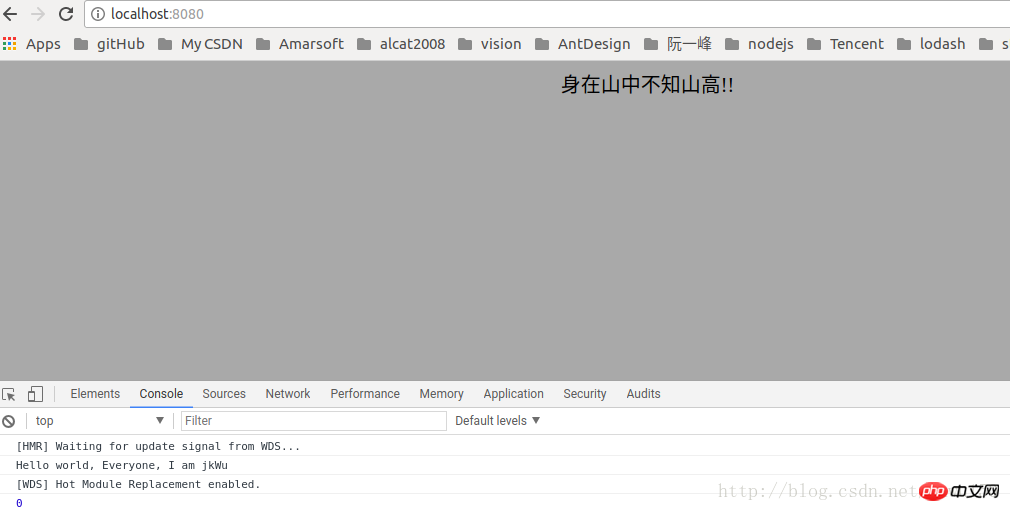
至此,我们完成了webpack实时构建的配置,当我们进行修改某一样式文件或者js文件的时候,项目就会重新打包,并且自动刷新加载到浏览器中.
如下面链接提示:,进行实时构建的搭建webpack-dev-server实时搭建
相信看了本文案例你已经掌握了方法,更多精彩请关注php中文网其它相关文章!
推荐阅读:
The above is the detailed content of How to use Webpack to develop projects. For more information, please follow other related articles on the PHP Chinese website!
 Session failure solution
 How to set ppt widescreen
 Can Douyin sparks be lit again if they have been off for more than three days?
 Why does vue.js report an error?
 What to do if your IP address is attacked
 The difference between WeChat service account and official account
 msdn official website entrance
 The difference between fprintf and printf


![[Web front-end] Node.js quick start](https://img.php.cn/upload/course/000/000/067/662b5d34ba7c0227.png)


