


This article shares with you the steps to build a front-end forum using node koa2 mysql bootstrap through examples. Friends in need can refer to it.
Preface
After learning koa2 and express and writing some demos, I plan to write a project to practice my skills. Since I am a student, there is nothing to do. This project aims to develop a front-end forum. The functional requirements are formulated with reference to some communities. The main ones are:
Login and Registration
Personal Information Maintenance , avatar and other basic information
Publish articles, the rich text editor uses the wangEditor plug-in to edit, delete articles, article classification, etc.
Article comments, article collections, likes Wait
Support article paging and comment paging loading
Follow and unfollow users
Resource (file) upload sharing, downloading, viewing
Recommended learning resources...
Author's personal diary
but. . . . Due to various reasons, only some functions have been implemented so far, and resource sharing has not yet been written
Project operation effect: http://120.77.211.212/home
Project technology stack application: node -koa2-ejs-bootstrap3—jquery, github address: https://github.com/Jay214/myblog-koa2, if you find it helpful or can still read it, please star~~encourage my front-end scumbag .
Development environment
node: v8.3.0
koa: ^2.4.1
mysql: 5.7. 1
npm: 5.3.0 and above
How to run the project
Clone the project to local git clone [email protected] :Jay214/myblog-koa2.git
Install module middleware npm install
Install mysql
mysql It is recommended to use the version below 5.7. There is a bug in 5.7. For the graphical interface, it is recommended to use navicat for MySQL
. You can install supervisor by running the project (npm install supervisor project running tool. After opening, it will be in monitoring mode. Modify Just save the file, no need to start the project again) node index or npm supervisor index
localhost:8080/home The port number can be modified by yourself
If the project is found to exist If you have any bugs or better suggestions, please feel free to comment. QQ: 2752402930.
Preparation work
Since koa2 is based on es6's promise and es7's await/async syntax, if you don't understand es6/es7, please go through it first. After reading the document, building the database in the background is the key, so please install mysql first. Mysql is recommended to be installed below version 5.7, because version 5.7.0 has a bug and the configuration file needs to be changed. You will know the details when you install it.
Install the node environment and use node -v to check the node version. Node needs a newer version to support the promise of es6 and the await/async syntax of es7. Now the node version will come with npm, so there is no need to go there. Install npm.
Project structure
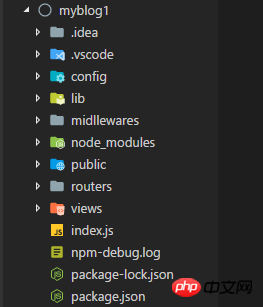
1.config stores the default file (database connection configuration)
2 .lib stores database files
3.middlewares stores middleware that determines whether to log in and register or not
4.public stores static files, js, and files that reference the bootstrap framework
5.routers stores routing files
6.views stores template files
7.index is the main file of the program, defining interfaces and database interfaces , referencing modules, etc.
8.package.json project configuration file, including project name, author, dependencies, modules, etc.
The project was developed with vscode and is very comfortable to use. Friends who haven’t tried it yet, please go and try it now.
Project initialization: cd myblog1 -> npm init At this time, the package.json file has been created.
Since koa2 is a lightweight framework, small and compact, in order to promote our development efficiency and convenience, we need to install some koa2 module middleware:
npm install i koa koa-bodyparser koa-mysql-session koa-router koa-session-minimal koa-static koa-views md5 moment mysql ejs koa-static-cache --save-dev
Use of each module
koa node framework
koa-bodyparser form parsing middleware
koa-mysql-session, koa-session-minimal middleware for processing databases
koa-router routing middleware
koa-static static resources Loading middleware
ejs template engine
md5 password encryption
moment time middleware
mysql Database
koa-views template rendering middleware
koa-static-cache file cache
Basic framework construction of the project
Configure database connection
Create a new default.js in the config folder:
const config = {
 //启动端口
port: 8080,
 //数据库配置
 database: {
 DATABASE: 'nodesql',
 USERNAME: 'root',
 PASSWORD: '123456',
 PORT: '3306',
HOST: 'localhost'
 }
}
module.exports = config;Then create a new mysql in the lib folder. js:
var mysql = require('mysql');
var config = require('../config/default.js')
//建立数据库连接池
var pool = mysql.createPool({
 host: config.database.HOST,
 user: config.database.USERNAME,
 password: config.database.PASSWORD,
 database: config.database.DATABASE
});
let query = function(sql, values) {
return new Promise((resolve, reject)=>{
 pool.getConnection(function (err,connection) {
  if(err){ reject(err);
  }else{
connection.query(sql,values,(err,rows)=>{
   if(err){
   reject(err);
   }else{
   resolve(rows);
   }
 connection.release(); //为每一个请求都建立一个connection使用完后调用connection.release(); 直接释放资源。
      //query用来操作数据库表
  })
  }
  })
})}Here a database connection pool is established and a function that operates the database table is encapsulated. If you don’t understand the database connection, please go to Baidu.
Create the entry file
Create a new index.js in the main directory, which is the project entry file:
const koa = require("koa"); //node框架
const path = require("path");
const bodyParser = require("koa-bodyparser"); //表单解析中间件
const ejs = require("ejs"); //模板引擎
const session = require("koa-session-minimal"); //处理数据库的中间件
const MysqlStore = require("koa-mysql-session"); //处理数据库的中间件
const router = require("koa-router"); //路由中间件
const config = require('./config/default.js'); //引入默认文件
const views = require("koa-views"); //模板呈现中间件
const koaStatic = require("koa-static"); //静态资源加载中间件
const staticCache = require('koa-static-cache')
const app = new koa();

//session存储配置,将session存储至数据库
const sessionMysqlConfig = {
 user: config.database.USERNAME,
 password: config.database.PASSWORD,
 database: config.database.DATABASE,
 host: config.database.HOST,
}

//配置session中间件
app.use(session({
 key: 'USER_SID',
 store: new MysqlStore(sessionMysqlConfig)
}))

//配置静态资源加载中间件
app.use(koaStatic(
 path.join(__dirname , './public')
))

//配置服务端模板渲染引擎中间件
app.use(views(path.join(__dirname, './views'),{
 extension: 'ejs'
}))

//使用表单解析中间件
app.use(bodyParser({
 "formLimit":"5mb",
 "jsonLimit":"5mb",
 "textLimit":"5mb"
}));

//使用新建的路由文件
//登录
app.use(require('./routers/signin.js').routes())
//注册
app.use(require('./routers/signup.js').routes())
//退出登录
app.use(require('./routers/signout.js').routes())
//首页
app.use(require('./routers/home.js').routes())
//个人主页
app.use(require('./routers/personal').routes())
//文章页
app.use(require('./routers/articles').routes())
//资源分享
app.use(require('./routers/share').routes())
//个人日记
app.use(require('./routers/selfNote').routes())
//监听在8080端口
app.listen(8080)

console.log(`listening on port ${config.port}`)
The above codes are all commented, so I won’t explain them one by one. Since the resource sharing and personal diary have not been written yet, I will temporarily share them together... instead.
Next, add database operation statements to mysql.js, create tables, add, delete, modify, and query.
var users = `create table if not exists users(
 id INT(200) NOT NULL AUTO_INCREMENT,
 name VARCHAR(100) NOT NULL,
 pass VARCHAR(40) NOT NULL,
 avator VARCHAR(100) DEFAULT 'default.jpg',
 job VARCHAR(40),
 company VARCHAR(40),
 introdu VARCHAR(255),
 userhome VARCHAR(100),
 github VARCHAR(100),
 PRIMARY KEY (id)
);`

var posts = `create table if not exists posts(
 id INT(200) NOT NULL AUTO_INCREMENT,
 name VARCHAR(100) NOT NULL,
 title VARCHAR(100) NOT NULL,
 content TEXT NOT NULL,
 uid INT(200) NOT NULL,
 moment VARCHAR(40) NOT NULL,
 comments VARCHAR(255) NOT NULL DEFAULT '0',
 pv VARCHAR(40) NOT NULL DEFAULT '0',
 likes INT(200) NOT NULL DEFAULT '0',
 type VARCHAR(20) NOT NULL,
 avator VARCHAR(100),
 collection INT(200) NOT NULL DEFAULT '0',
 PRIMARY KEY (id) ,
 FOREIGN KEY (uid) REFERENCES users(id)
 ON DELETE CASCADE

);`

var comment= `create table if not exists comment(
 id INT(200) NOT NULL AUTO_INCREMENT,
 name VARCHAR(100) NOT NULL,
 content TEXT NOT NULL,
 moment VARCHAR(40) NOT NULL,
 postid INT(200) NOT NULL,
 avator VARCHAR(100),
 PRIMARY KEY ( id ),
 FOREIGN KEY (postid) REFERENCES posts(id)
 ON DELETE CASCADE
);`

var likes = `create table if not exists likes(
 id INT(200) NOT NULL AUTO_INCREMENT,
 name VARCHAR(100) NOT NULL,
 postid INT(200) NOT NULL,
 PRIMARY KEY (id),
 FOREIGN KEY (postid) REFERENCES posts(id)
 ON DELETE CASCADE
);`
 var collection = `create table if not exists collection(
 id INT(200) NOT NULL AUTO_INCREMENT,
 uid VARCHAR(100) NOT NULL,
 postid INT(200) NOT NULL,
 PRIMARY KEY (id),
 FOREIGN KEY (postid) REFERENCES posts(id)
 ON DELETE CASCADE
 );`
 var follow = `create table if not exists follow(
  id INT(200) NOT NULL AUTO_INCREMENT,
  uid INT(200) NOT NULL,
  fwid INT(200) NOT NULL DEFAULT '0',
  PRIMARY KEY (id),
  FOREIGN KEY (uid) REFERENCES users(id)
  ON DELETE CASCADE
 )
 `

let createTable = function(sql){
 return query(sql, []);
}

//建表
createTable(users);
createTable(posts);
createTable(comment);
createTable(likes);
createTable(collection);
createTable(follow);
//createTable(follower);
//注册用户
let insertData = function(value){
 let _sql = "insert into users(name,pass) values(?,?);"
 return query(_sql,value);
}
//更新头像
let updateUserImg = function(value){
 let _sql = "update users set avator=? where id=?"
 return query(_sql,value);
}
//更新用户信息
let updateUser = function(value){
 let _sql = "update users set name=?,job=?,company=?,introdu=?,userhome=?,github=? where id=?"
 return query(_sql,value);
}
//发表文章
let insertPost = function(value){
 let _sql = "insert into posts(name,title,content,uid,moment,type,avator) values(?,?,?,?,?,?,?);"
 return query(_sql,value);
}

//更新文章评论数
let updatePostComment = function(value){
 let _sql = "update posts set comments=? where id=?"
 return query(_sql,value);
}
.......总共六张表:用户表、文章表、文章评论表、文章收藏表、文章点赞表、用户关注表。
这里引用了外键,但是现在的开发不推荐使用外键了,所以你们可以自行修改,这里在项目第一次启动时会出现数据库创建失败(由于外键原因),只要重新启动就ok了,如果对mysql还不了解的,这里附送大家一个传送门:mysql入门视频教程 密码:c2q7 。
前端页面开发
项目基本结构搭建好后,就可以进行前端页面的编写了。用node开发web时我们一般会配合模板引擎,这个项目我采用的是ejs,除了ejs之外较为常用的还有jade,但是jade相对ejs来说的话代码结构不够清晰。关于ejs语法,这里做个简单的介绍:
header.ejs
Myblog
nav.ejs
login.ejs
footer.ejs
header为页面头部结构,nav为页面导航条,login为登录、注册内容、footer为页面顶部结构。可以看到我在ejs文件里有很多的if else 判断语句,这是根据session来判断用户是否登录渲染不同的内容。现在我们需要我们的页面编写样式:分别是home.css和index.css
为了增强对原生js的理解,在项目里我用了大量的原生ajax(显然jquery封装的ajax比较好哈哈),因此这里先编写一个原生ajax请求:
ajax.js
var xhr = null;
 function ajax(method,url,data,types) { //封装一个ajax方法
 // var text;
 if(window.XMLHttpRequest){
  xhr = new XMLHttpRequest();
 }else if(window.ActiveXObject){
  xhr = new ActiveXObject("Microsoft.XMLHTTP");
 }else {
  alert('你的浏览器不支持ajax');
  return false;
 }

 xhr.onerror = function (err) {
  alert("some err have hapened:",err);
 }
 xhr.open(method,url,true);
 if(method=="post"){
  xhr.setRequestHeader("Content-type",types);
  // xhr.setRequestHeader("Conent-Type",'application/json'"application/x-www-form-urlencoded")
 }
 try{
  setTimeout(()=>{
  xhr.send(data);
 },0);
 }catch(err) {
  alert("some error have hapened in font:",err);
 }
 return xhr;
}实现登录注册
前端基本页面开发好后,我们就可以写后台登录接口了:
注册:signup.js
var router = require('koa-router')();
var userModel = require('../lib/mysql.js');
var md5 = require('md5')

 // 注册页面

 // post 注册
router.post('/signup', async(ctx, next) => {
 console.log(ctx.request.body)
 var user = {
 name: ctx.request.body.username,
 pass: ctx.request.body.pass,
 repeatpass: ctx.request.body.repeatpass
 }
 let flag = 0;
 await userModel.findDataByName(user.name)
 .then(result => {
  console.log(result)
  if (result.length) {

   //处理err
   console.log('用户已存在')
   ctx.body = {
   code: 1
   };

  } else if (user.pass !== user.repeatpass || user.pass == '') {
  ctx.body = { //应把这个逻辑放到前端
   code: 2
  };

  } else {
  flag = 1;

  }
 })
 if(flag==1){
 let res = await userModel.insertData([user.name, md5(user.pass + 'asd&$BH&*') ])
 console.log(res.insertId)
 await userModel.findDataByName(user.name)
 .then((result)=>{

  // var res = JSON.parse(JSON.stringify(result))
  console.log(result[0]['avator'])
  ctx.session.id = res.insertId;
  ctx.session.user=user.name;
  ctx.session.avator = 'default.jpg';
  ctx.body = {
  code: 3
  };
  console.log('注册成功')
  })
 }

})

module.exports = router密码采用md5加密,注册后为用户创建session并将其添加到数据库,写完别忘了在最后加上module.exports = router将接口暴露出来。
登录:signin.js
var router = require('koa-router')();
var userModel = require('../lib/mysql.js')
var md5 = require('md5')

router.post('/signin', async(ctx, next) => {
 console.log(ctx.request.body)
 var name = ctx.request.body.username;
 var pass = ctx.request.body.pass;

 await userModel.findDataByName(name)
 .then(result => {

  var res = JSON.parse(JSON.stringify(result))

  if (name === res[0]['name']&&(md5(pass + 'asd&$BH&*') === res[0]['pass'])) {
   console.log('登录成功')
   ctx.body = {
   code: 1,
   }

   ctx.session.user = res[0]['name']
   ctx.session.id = res[0]['id']
   ctx.session.avator = res[0]['avator']

  }else if(md5(pass + 'asd&$BH&*') != res[0]['pass']){
  ctx.body = {
   code: 2 //密码错误
  }
  }
 }).catch(err => {
  ctx.body = {
  code: 3 //账号不存在+
  }
  console.log('用户名或密码错误!')

 })

})

module.exports = router退出登录:signout.js
//使用新建的路由文件
//登录
app.use(require('./routers/signin.js').routes())
//注册
app.use(require('./routers/signup.js').routes())
//退出登录
app.use(require('./routers/signout.js').routes())登录注册完成,由于学习繁忙,内容只能一点一点写了,后续内容持续更新。
相关推荐:
node+express+jade制作简单网站指南_node.js
The above is the detailed content of node+koa2+mysql+bootstrap builds a front-end forum. For more information, please follow other related articles on the PHP Chinese website!
 Is python front-end or back-end?
 How to implement instant messaging on the front end
 The difference between front-end and back-end
 Introduction to the relationship between php and front-end
 Top 10 most secure digital currency exchanges in 2024
 Can Douyin short videos be restored after being deleted?
 Detailed explanation of Symbol class in JS
 What file is resource?


 0
0 1
1 252
252

![[Web front-end] Node.js quick start](https://img.php.cn/upload/course/000/000/067/662b5d34ba7c0227.png)


