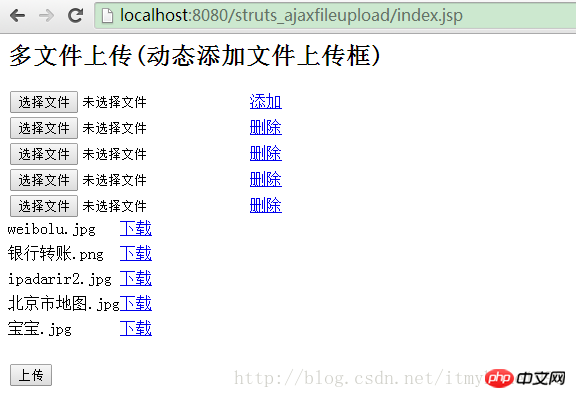
This time I will show you how to dynamically add a file upload box with AjaxFileUpload. What are the precautions for AjaxFileUpload to dynamically add a file upload box? The following is a practical case. Let’s take a look. one time.
But it is only a fixed number of files. If the demand is not sure how many files there are, then we need to dynamically add a file upload box to achieve flexibility.Based on the basic framework of the previous article, the basic framework remains unchanged, and the following aspects are mainly modified
1. jQuery implements dynamic addition and deletion of file upload boxes 2. Get the ID of the file upload box3. Convert the ID array into the required Object array in ajaxfileupload.jsSolve the above problems in sequence1. Implement dynamic addition and deletion of file upload boxes
<body>
 <form action="" enctype="multipart/form-data">
 <h2>
  多文件上传
 </h2>
 <input type="file" id="file1" name="file" /><a id="add" href="javascript:void();" rel="external nofollow" onclick="addFile();">添加</a>
 <span>
  <table id="down">
  </table>
 </span>
 </br>
 <input type="button" onclick="fileUpload();" value="上传">
 </form>
</body>
<script type="text/javascript">
//添加附件
function addFile(){
var fileLength = $("input[name=file]").length+1;
var inputFile = "<p id='addFile"+fileLength+"'><input type='file' id='file"+fileLength+"' name='file' />"
+"<a href='javascript:void();' onclick='delFile("+fileLength+");'>删除</a></p>";
$("#add").after(inputFile);
}
//删除附件
function delFile(id){
$("#addFile"+id).remove();
}
</script>2. Obtain the ID of the file upload box
Because We don’t know how many upload boxes there are. Each time an upload box is added, its id attribute is incremented in the form of file1 and file2. You can use each loop to splice charactersvar files = "";
//获取所有 <input type="file" id="file1" name="file" /> 的ID属性值
$("input[name=file]").each(function(){
files = files + $(this).attr("id")+",";
})
//将字符最后一逗号(,)截取掉
files = files.substring(0,files.length-1);var files = "file1,file2,file3";
console.info(typeof(files)); to view files as string Type
3. Convert the ID array into the required Object array in ajaxfileupload.js
Because what we need is something likevar files = ['file1','file2','file3'];
var files = "file1,file2,file3";
var oldElement = jQuery('#' + fileElementId);
var newElement = jQuery(oldElement).clone();
jQuery(oldElement).attr('id', fileId);
jQuery(oldElement).before(newElement);
jQuery(oldElement).appendTo(form);var t = '';
if(typeof(fileElementId) == 'string'){
/*
* 将传过来的值 如:"file1,file2,file3" 转换为:['file1','file2','file3']
*/
var s = fileElementId.split(",");
for(var i in s){
t = t + "'"+s[i]+"'"+",";
}
t = "["+t+"]";
t = t.replace(",]", "]")
}
fileElementId= eval('('+ t +')'); //将string类型转换为Object类型 ## I believe you have mastered the method after reading the case in this article. For more exciting information, please pay attention to other related articles on the php Chinese website!
Recommended reading:
Practical summary of Ajax and jsonp in the projectHow to use AjaxFileUpload to implement multiple file uploadsThe above is the detailed content of How to dynamically add a file upload box with AjaxFileUpload. For more information, please follow other related articles on the PHP Chinese website!


