If you are a front-end developer, writing web programs based on NodeJS is no longer news to you. Both NodeJS and web programs rely heavily on the JavaScript language. First, we need to realize one thing: Node is not a silver bullet. That said, it's not the best solution for every project. Anyone can create a server based on Node, but this requires you to have a deep understanding of the language in which web programs are written.
Before the emergence of Node.js, web applications were often based on the client/server model. When the server requests resources, the server will respond to the request and return the corresponding resources. The server will only respond when it receives a client request, and will close the connection with the client after the response.
This design pattern needs to consider efficiency issues, because each request requires processing time and resources. Therefore, the server should close the connection after each processing of the requested resource in order to respond to other requests.
What will the server look like if thousands of requests are sent to the server at the same time? When you ask this question, you don't want to see a request have to wait for other requests to be responded before it can take its turn, because the delay is too long.
Imagine when you want to open FaceBook, but because thousands of people have made requests to the server before you, you need to wait 5 minutes to see the content. Is there a solution to handle hundreds or thousands of requests simultaneously? Fortunately, we have the tool thread.
Threads are the way the system can process multiple tasks in parallel. Each request to the server starts a new thread, and each thread gets everything it needs to run the code.
This sounds strange? Let's take a look at this example:
Imagine a restaurant with only one chef serving food. As the demand for food increases, things get worse and worse. People had to wait a long time before all previous orders were processed. And the only way we can think of is to add more waiters to solve this problem, right? This allows us to handle more customers at the same time.
Every thread is a new waiter, and the customer is the browser. I guess it's not difficult for you to understand this.
But this system has a side effect. When the number of requests reaches a certain number, too many threads will occupy all system memory and resources. Returning to our example, hiring more and more people to serve food will inevitably increase labor costs and take up more kitchen space.
Of course, it would be great for us if the server immediately cuts off the connection and releases all resources after responding to the client's request.
Multi-threaded systems are good at handling CPU-intensive operations because these operations require a lot of logic to be processed, and computing these logics takes more time. If each request is processed by a new thread, the main thread can be freed up to handle some important calculations, which can also make the entire system faster.
Allowing the main thread not to be busy with all calculation operations is a good way to improve efficiency, but can we go further than this?
Imagine that we now have a multi-threaded server running in a Ruby on rails environment. We need it to read the file and send it to the browser that requested the file. The first thing to know is that Ruby does not read files directly, but instead tells the file system to read the specified file and return its contents. As the name suggests, a file system is a program on your computer that is specifically used to access files.
After Ruby sends a notification to the file system, it will wait for it to complete the operation of reading the file, rather than turning around to handle other tasks. When the file system processing task is completed, Ruby will restart to collect the file contents and send them to the browser.
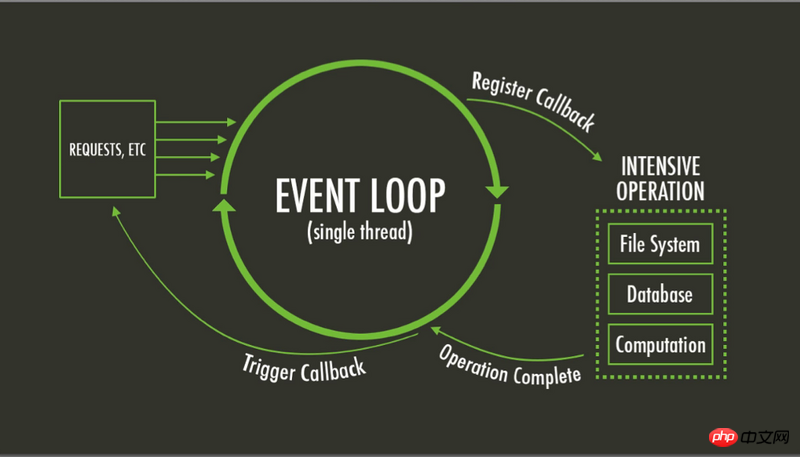
This method will obviously cause blocking, and NodeJS was born to solve this pain point. If we use Node to send notifications to the file system, Node will handle other requests while the file system is reading the file. After the task of reading the file is completed, the file system will notify Node to read the resource and return it to the browser. In fact, the internal implementation here relies on Node's event loop.
The core of Node is JavaScript and the event loop.

Simply put, an event loop is a program that waits for events and then triggers them when the required events occur. Another important point is that Node, like JavaScript, is single-threaded.
Remember the restaurant example we gave? Regardless of the number of customers, there is always only one chef cooking food in the restaurant opened by Node.
Unlike other languages, NodeJS does not need to open a new thread for each request. It will receive all requests and then delegate most tasks to other systems. <span style="font-size: 14px;">Libuv</span> is a library that relies on the OS kernel to handle these tasks efficiently. When these workers hidden behind the scenes have processed the events delegated to them, they will trigger the callback functions bound to these events to notify NodeJS.
Here we come into contact with the concept of callbacks. Callback is not difficult to understand. It is a function that is passed as a parameter by other functions and will be called under certain circumstances.
What NodeJS developers do most is to write event processing functions, and these processing functions will be called after specific NodeJS events occur.
Although NodeJS is single-threaded, it is much faster than multi-threaded systems. This is because programs are often not just time-consuming mathematical operations and logical processing. Most of the time they just write files, handle network requests, or apply for permissions from consoles and external devices. These are problems NodeJS is good at handling: when NodeJS handles these things, it will quickly delegate these events to a specialized system and move on to handle the next event.
If you dig deeper, you may realize that NodeJS is not good at handling CPU-intensive operations. Because CPU-intensive operations take up a lot of main thread resources. For a single-threaded system, the ideal situation is to avoid these operations to free the main thread to handle other things.
Another key point is that in JavaScript, only the code you write is not executed concurrently. That is, your code can only work on one thing at a time, while other workers, such as the file system, can handle the work at hand in parallel.
If you still can’t understand, you can take a look at the following example:
A long time ago there was a king who had a thousand officials. . The king wrote a list of tasks for officials to do, and the list was very, very, very long. There is a prime minister who delegates tasks to all other officials according to a list. Each time he completed a task, he reported the results to the king, who would then give him another list. Because while the officials were working, the king was also busy writing other lists.
What this example is about is that even if there are many officials processing tasks in parallel, the king can only do one thing at a time. Here, the king is your code, and the officials are the system workers hidden behind NodeJS. So, everything happens in parallel except your code.
Okay, let’s continue this NodeJS journey.
Writing a web application with NodeJS is equivalent to writing an event callback. Let's take a look at the following example:
Create a new folder and enter it
Execute the <span style="font-size: 14px;">npm init</span> command and press Enter until you create a package.json file in the root directory of the folder.
Create a new file named server.js, copy and paste the following code:
<span style="font-size: 14px;">//server.js<br>const http = require('http'),<br> server = http.createServer();<br><br>server.on('request',(request,response)=>{<br> response.writeHead(200,{'Content-Type':'text/plain'});<br> response.write('Hello world');<br> response.end();<br>});<br><br>server.listen(3000,()=>{<br> console.log('Node server created at port 3000');<br>});<br></span>In the command line, enter <span style="font-size: 14px;">node server.js</span>, you will see the following output:
<span style="font-size: 14px;">node server.js<br>//Node server started at port 3000<br></span>
Open your browser and go to <span style="font-size: 14px;">localhost:3000</span>, you should be able to see a <span style="font-size: 14px;">Hello world</span>information.
首先,我们引入了http模块。这个模块提供了处理htpp操作的接口,我们调用<span style="font-size: 14px;">createServer()</span>方法来创建一个服务器。
之后,我们为request事件绑定了一个事件回调,传递给on方法的第二个参数。这个回调函数有2个参数对象,request代表接收到的请求,response代表响应的数据。
不仅仅是处理request事件,我们也可以让Node去做其他事情。
<span style="font-size: 14px;">//server.js<br>const http = require('http'),<br>server = http.createServer((request,response)=>{<br> response.writeHead(200,{'Content-Type':'text/plain'});<br> response.write('Hello world');<br> response.end();<br>});<br>server.listen(3000,()=>{<br> console.log('Node server created at port 3000');<br>});<br></span>在当面的代码里,我们传给createServer()一个回调函数,Node把它绑定在request事件上。这样我们只需要关心request和response对象了。
我们使用<span style="font-size: 14px;">response.writeHead()</span>来设置返回报文头部字段,比如状态码和内容类型。而<span style="font-size: 14px;">response.write()</span>是对web页面进行写入操作。最后使用<span style="font-size: 14px;">response.end()</span>来结束这个响应。
最后,我们告知服务器去监听3000端口,这样我们可以在本地开发时查看我们web应用的一个demo。listen这个方法要求第二个参数是一个回调函数,服务器一启动,这个回调函数就会被执行。
Node是一个单线程事件驱动的运行环境,也就是说,在Node里,任何事都是对事件的响应。
前文的例子可以改写成下面这样:
<span style="font-size: 14px;">//server.js<br>const http = require('http'),<br> <br>makeServer = function (request,response){<br> response.writeHead(200,{'Content-Type':'text/plain'});<br> response.write('Hello world');<br> response.end();<br>},<br> <br>server = http.createServer(makeServer);<br><br>server.listen(3000,()=>{<br> console.log('Node server created at port 3000');<br></span><span style="font-size: 14px;">makeServer</span>是一个回调函数,由于JavaScript把函数当作一等公民,所以他们可以被传给任何变量或是函数。如果你还不了解JavaScript,你应该花点时间去了解什么是事件驱动程序。
当你开始编写一些重要的JavaScript代码时,你可能会遇到“回调地狱”。你的代码变得难以阅读因为大量的函数交织在一起,错综复杂。这时你想要找到一种更先进、有效的方法来取代回调。看看Promise吧,Eric Elliott 写了一篇文章来讲解什么是Promise,这是一个好的入门教程。
一个服务器会存储大量的文件。当浏览器发送请求时,会告知服务器他们需要的文件,而服务器会将相应的文件返回给客户端。这就叫做路由。
在NodeJS中,我们需要手动定义自己的路由。这并不麻烦,看看下面这个基本的例子:
<span style="font-size: 14px;">//server.js<br>const http = require('http'),<br> url = require('url'),<br> <br>makeServer = function (request,response){<br> let path = url.parse(request.url).pathname;<br> console.log(path);<br> if(path === '/'){<br> response.writeHead(200,{'Content-Type':'text/plain'});<br> response.write('Hello world');<br> }<br> else if(path === '/about'){<br> response.writeHead(200,{'Content-Type':'text/plain'});<br> response.write('About page');<br> }<br> else if(path === '/blog'){<br> response.writeHead(200,{'Content-Type':'text/plain'});<br> response.write('Blog page');<br> }<br> else{<br> response.writeHead(404,{'Content-Type':'text/plain'});<br> response.write('Error page');<br> }<br> response.end();<br> },<br>server = http.createServer(makeServer);<br>server.listen(3000,()=>{<br> console.log('Node server created at port 3000');<br>});<br></span>粘贴这段代码,输入<span style="font-size: 14px;">node server.js</span>命令来运行。在浏览器中打开<span style="font-size: 14px;">localhost:3000</span>和<span style="font-size: 14px;">localhost:3000/abou</span>,然后在试试打开<span style="font-size: 14px;">localhost:3000/somethingelse</span>,是不是跳转到了我们的错误页面?
虽然这样满足了我们启动服务器的基本要求,但是要为服务器上每一个网页都写一遍代码实在是太疯狂了。事实上没有人会这么做,这个例子只是让你了解路由是怎么工作的。
如果你有注意到,我们引入了url这个模块,它能让我们处理url更加方便。
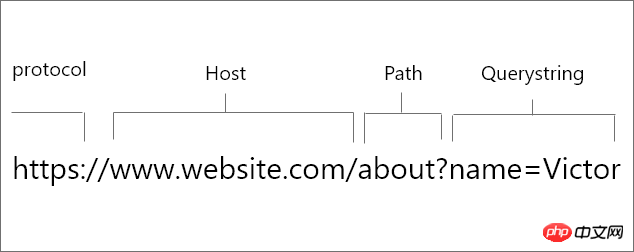
为parse()方法传入一个url字符串参数,这个方法会将url拆分成<span style="font-size: 14px;">protocol</span>、<span style="font-size: 14px;">host</span>、<span style="font-size: 14px;">path</span>和<span style="font-size: 14px;">querystring</span>等部分。如果你不太了解这些单词,可以看看下面这张图:

所以当我们执行<span style="font-size: 14px;">url.parse(request.url).pathname</span>语句时,我们得到一个url路径名,或者是url本身。这些都是我们用来进行路由请求的必要条件。不过这件事还有个更简单的方法。
如果你之前做过功课,你一定听说过Express。这是一个用来构建web应用以及API的NodeJS框架,它也可以用来编写NodeJS应用。接着往下看,你会明白为什么我说它让一切变得更简单。
在你的终端或是命令行中,进入电脑的根目录,输入<span style="font-size: 14px;">npm install express --save</span>来安装Express模块包。要在项目中使用Express,我们需要引入它。
<span style="font-size: 14px;">const express = require('express');<br></span>欢呼吧,生活将变得更美好。
现在,让我们用express进行基本的路由。
<span style="font-size: 14px;">//server.js<br>const express = require('express'),<br> server = express();<br><br>server.set('port', process.env.PORT || 3000);<br><br>//Basic routes<br>server.get('/', (request,response)=>{<br> response.send('Home page');<br>});<br><br>server.get('/about',(request,response)=>{<br> response.send('About page');<br>});<br><br>//Express error handling middleware<br>server.use((request,response)=>{<br> response.type('text/plain');<br> response.status(505);<br> response.send('Error page');<br>});<br><br>//Binding to a port<br>server.listen(3000, ()=>{<br> console.log('Express server started at port 3000');<br>});<br></span>译者注:这里不是很理解为什么代码中错误状态码是505。
现在的代码是不是看上去更加清晰了?我相信你很容易就能理解它。
首先,当我们引入express模块后,得到的是一个函数。调用这个函数后就可以开始启动我们的服务器了。
接下来,我们用<span style="font-size: 14px;">server.set()</span>来设置监听端口。而<span style="font-size: 14px;">process.env.PORT</span>是程序运行时的环境所设置的。如果没有这个设置,我们默认它的值是3000.
然后,观察上面的代码,你会发现Express里的路由都遵循一个格式:
<span style="font-size: 14px;">server.VERB('route',callback);<br></span>这里的VERB可以是GET、POST等动作,而pathname是跟在域名后的字符串。同时,callback是我们希望接收到一个请求后触发的函数。
最后我们再调用<span style="font-size: 14px;">server.listen()</span>,还记得它的作用吧?
以上就是Node程序里的路由,下面我们来挖掘一下Node如何调用数据库。
很多人喜欢用JavaScript来做所有事。刚好有一些数据库满足这个需求,比如MongoDB、CouchDB等待。这些数据库都是NoSQL数据库。
一个NoSQL数据库以键值对的形式作为数据结构,它以文档为基础,数据都不以表格形式保存。
我们来可以看看MongoDB这个NoSQL数据库。如果你使用过MySQL、SQLserver等关系型数据库,你应该熟悉数据库、表格、行和列等概念。 MongoDB与他们相比并没有特别大的区别,不过还是来比较一下吧。
译者注:这儿应该有个表格显示MongoDB与MySQL的区别,但是原文里没有显示。
为了让数据更加有组织性,在向MongoDB插入数据之前,我们可以使用Mongoose来检查数据类型和为文档添加验证规则。它看上去就像Mongo与Node之间的中介人。
由于本文篇幅较长,为了保证每一节都尽可能的简短,请你先阅读官方的MongoDB安装教程。
此外,Chris Sevilleja写了一篇Easily Develop Node.js and MongoDB Apps with Mongoose,我认为这是一篇适合入门的基础教程。
API是应用程序向别的程序发送数据的通道。你有没有登陆过某些需要你使用facebook账号登录的网页?facebook将某些函数公开给这些网站使用,这些就是API。
一个RESTful API应该不以服务器/客户端的状态改变而改变。通过使用一个REST接口,不同的客户端,即使它们的状态各不相同,但是在访问相同的REST终端时,应该做出同一种动作,并且接收到相同的数据。
API终端是API里返回数据的一个函数。
编写一个RESTful API涉及到使用JSON或是XML格式传输数据。让我们在NodeJS里试试吧。我们接下来会写一个API,它会在客户端通过AJAX发起请求后返回一个假的JSON数据。这不是一个理想的API,但是能帮助我们理解在Node环境中它是怎么工作的。
创建一个叫node-api的文件夹;
通过命令行进入这个文件夹,输入<span style="font-size: 14px;">npm init</span>。这会创建一个收集依赖的文件;
输入<span style="font-size: 14px;">npm install --save express</span>来安装express;
在根目录新建3个文件:<span style="font-size: 14px;">server.js</span>,<span style="font-size: 14px;">index.html</span>和<span style="font-size: 14px;">users.js</span>;
复制下面的代码到相应的文件:
<span style="font-size: 14px;">//users.js<br>module.exports.users = [<br> {<br> name: 'Mark',<br> age : 19,<br> occupation: 'Lawyer',<br> married : true,<br> children : ['John','Edson','ruby']<br> },<br> <br> {<br> name: 'Richard',<br> age : 27,<br> occupation: 'Pilot',<br> married : false,<br> children : ['Abel']<br> },<br> <br> {<br> name: 'Levine',<br> age : 34,<br> occupation: 'Singer',<br> married : false,<br> children : ['John','Promise']<br> },<br> <br> {<br> name: 'Endurance',<br> age : 45,<br> occupation: 'Business man',<br> married : true,<br> children : ['Mary']<br> },<br>]<br></span>这是我们传给别的应用的数据,我们导出这份数据让所有程序都可以使用。也就是说,我们将users这个数组保存在<span style="font-size: 14px;">modules.exports</span>对象中。
<span style="font-size: 14px;">//server.js<br>const express = require('express'),<br> server = express(),<br> users = require('./users');<br><br>//setting the port.<br>server.set('port', process.env.PORT || 3000);<br><br>//Adding routes<br>server.get('/',(request,response)=>{<br> response.sendFile(__dirname + '/index.html');<br>});<br><br>server.get('/users',(request,response)=>{<br> response.json(users);<br>});<br><br>//Binding to localhost://3000<br>server.listen(3000,()=>{<br> console.log('Express server started at port 3000');<br>});<br></span>我们执行<span style="font-size: 14px;">require('express')</span>语句然后使用<span style="font-size: 14px;">express()</span>创建了一个服务变量。如果你仔细看,你还会发现我们引入了别的东西,那就是<span style="font-size: 14px;">users.js</span>。还记得我们把数据放在哪了吗?要想程序工作,它是必不可少的。
express有许多方法帮助我们给浏览器传输特定类型的内容。<span style="font-size: 14px;">response.sendFile()</span>会查找文件并且发送给服务器。我们使用<span style="font-size: 14px;">__dirname</span>来获取服务器运行的根目录路径,然后我们把字符串<span style="font-size: 14px;">index.js</span>加在路径后面保证我们能够定位到正确的文件。
<span style="font-size: 14px;">response.json()</span>向网页发送JSON格式内容。我们把要分享的users数组传给它当参数。剩下的代码我想你在之前的文章中已经很熟悉了。
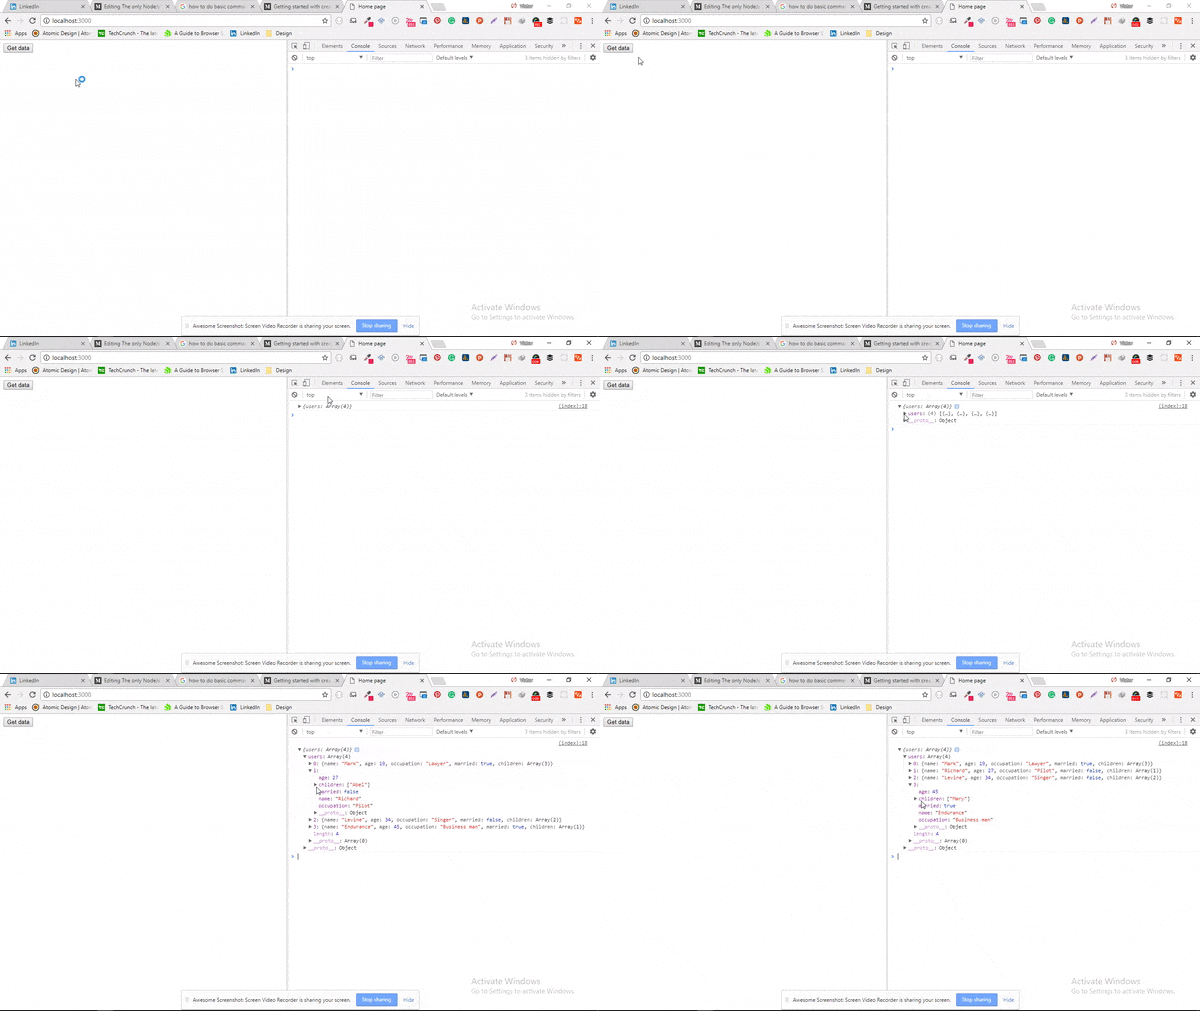
<span style="font-size: 14px;">//index.html<br><br><!DOCTYPE html><br><html><br><head><br> <meta charset="utf-8"><br> <title>Home page</title><br></head><br><body><br> <button>Get data</button><br><script src="https://code.jquery.com/jquery-3.2.1.min.js" integrity="sha256-hwg4gsxgFZhOsEEamdOYGBf13FyQuiTwlAQgxVSNgt4=" crossorigin="anonymous"></script><br> <br> <script type="text/javascript"><br> <br> const btn = document.querySelector('button');<br> btn.addEventListener('click',getData);<br> function getData(e){<br> $.ajax({<br> url : '/users',<br> method : 'GET',<br> success : function(data){<br> console.log(data);<br> },<br> <br> error: function(err){<br> console.log('Failed');<br> }<br> });<br> } <br> </script><br></body><br></html><br></span>在文件夹根目录中执行<span style="font-size: 14px;">node server.js</span>,现在打开你的浏览器访问<span style="font-size: 14px;">localhost:3000</span>,按下按钮并且打开你的浏览器控制台。

在<span style="font-size: 14px;">btn.addEventListent('click',getData);</span>这行代码里,getData通过AJAX发出一个GET请求,它使用了<span style="font-size: 14px;">$.ajax({properties})</span>函数来设置<span style="font-size: 14px;">url</span>,<span style="font-size: 14px;">success</span>和<span style="font-size: 14px;">error</span>等参数。
在实际生产环境中,你要做的不仅仅是读取JSON文件。你可能还想对数据进行增删改查等操作。express框架会将这些操作与特定的http动词绑定,比如POST、GET、PUT和DELETE等关键字。
要想深入了解使用express如何编写API,你可以去阅读Chris Sevilleja写的Build a RESTful API with Express 4。
计算机网络是计算机之间分享接收数据的连接。要在NodeJS中进行连网操作,我们需要引入<span style="font-size: 14px;">net</span>模块。
<span style="font-size: 14px;">const net = require('net');<br></span>在TCP中必须有两个终端,一个终端与指定端口绑定,而另一个则需要访问这个指定端口。
如果你还有疑惑,可以看看这个例子:
以你的手机为例,一旦你买了一张sim卡,你就和sim的电话号码绑定。当你的朋友想要打电话给你时,他们必须拨打这个号码。这样你就相当于一个TCP终端,而你的朋友是另一个终端。
现在你明白了吧?
为了更好地吸收这部分知识,我们来写一个程序,它能够监听文件并且当文件被更改后会通知连接到它的客户端。
创建一个文件夹,命名为<span style="font-size: 14px;">node-network</span>;
创建3个文件:<span style="font-size: 14px;">filewatcher.js</span>、<span style="font-size: 14px;">subject.txt</span>和<span style="font-size: 14px;">client.js</span>。把下面的代码复制进<span style="font-size: 14px;">filewatcher.js</span>。
<span style="font-size: 14px;">//filewatcher.js<br><br>const net = require('net'),<br> fs = require('fs'),<br> filename = process.argv[2],<br> <br>server = net.createServer((connection)=>{<br> console.log('Subscriber connected');<br> connection.write(`watching ${filename} for changes`);<br> <br>let watcher = fs.watch(filename,(err,data)=>{<br> connection.write(`${filename} has changed`);<br> });<br> <br>connection.on('close',()=>{<br> console.log('Subscriber disconnected');<br> watcher.close();<br> });<br> <br>});<br>server.listen(3000,()=>console.log('listening for subscribers'));<br></span>接下来我们提供一个被监听的文件,在<span style="font-size: 14px;">subject.txt</span>写下下面一段话:
<span style="font-size: 14px;">Hello world, I'm gonna change<br></span>
然后,新建一个客户端。下面的代码复制到<span style="font-size: 14px;">client.js</span>。
<span style="font-size: 14px;">const net = require('net');<br>let client = net.connect({port:3000});<br>client.on('data',(data)=>{<br> console.log(data.toString());<br>});<br></span>最后,我们还需要两个终端。第一个终端里我们运行<span style="font-size: 14px;">filename.js</span>,后面跟着我们要监听的文件名。
<span style="font-size: 14px;">//subject.txt会保存在filename变量中<br>node filewatcher.js subject.txt<br>//监听订阅者<br></span>
在另一个终端,也就是客户端,我们运行<span style="font-size: 14px;">client.js</span>。
<span style="font-size: 14px;">node client.js<br></span>
现在,修改<span style="font-size: 14px;">subject.txt</span>,然后看看客户端的命令行,注意到多出了一条额外信息:
<span style="font-size: 14px;">//subject.txt has changed.<br></span>
网络的一个主要的特征就是许多客户端都可以同时接入这个网络。打开另一个命令行窗口,输入<span style="font-size: 14px;">node client.js</span>来启动另一个客户端,然后再修改<span style="font-size: 14px;">subject.txt</span>文件。看看输出了什么?
如果你没有理解,不要担心,让我们重新过一遍。
我们的<span style="font-size: 14px;">filewatcher.js</span>做了三件事:
<span style="font-size: 14px;">net.createServer()</span>创建一个服务器并向许多客户端发送信息。
通知服务器有客户端连接,并且告知客户端有一个文件被监听。
最后,使用wactherbianl监听文件,并且当客户端端口连接时关闭它。
再来看一次<span style="font-size: 14px;">filewatcher.js</span>。
<span style="font-size: 14px;">//filewatcher.js<br><br>const net = require('net'),<br> fs = require('fs'),<br> filename = process.argv[2],<br> <br>server = net.createServer((connection)=>{<br> console.log('Subscriber connected');<br> connection.write(`watching ${filename} for changes`);<br> <br>let watcher = fs.watch(filename,(err,data)=>{<br> connection.write(`${filename} has changed`);<br> });<br> <br>connection.on('close',()=>{<br> console.log('Subscriber disconnected');<br> watcher.close();<br> });<br> <br>});<br>server.listen(3000,()=>console.log('listening for subscribers'));<br></span>我们引入两个模块:fs和net来读写文件和执行网络连接。你有注意到<span style="font-size: 14px;">process.argv[2]</span>吗?process是一个全局变量,提供NodeJS代码运行的重要信息。<span style="font-size: 14px;">argv[]</span>是一个参数数组,当我们获取<span style="font-size: 14px;">argv[2]</span>时,希望得到运行代码的第三个参数。还记得在命令行中,我们曾输入文件名作为第三个参数吗?
<span style="font-size: 14px;">node filewatcher.js subject.txt<br></span>
此外,我们还看到一些非常熟悉的代码,比如<span style="font-size: 14px;">net.createServer()</span>,这个函数会接收一个回调函数,它在客户端连接到端口时触发。这个回调函数只接收一个用来与客户端交互的对象参数。
<span style="font-size: 14px;">connection.write()</span>方法向任何连接到3000端口的客户端发送数据。这样,我们的<span style="font-size: 14px;">connetion</span>对象开始工作,通知客户端有一个文件正在被监听。
wactcher包含一个方法,它会在文件被修改后发送信息给客户端。而且在客户端断开连接后,触发了close事件,然后事件处理函数会向服务器发送信息让它关闭watcher停止监听。
<span style="font-size: 14px;">//client.js<br>const net = require('net'),<br> client = net.connect({port:3000});<br>client.on('data',(data)=>{<br> console.log(data.toString());<br>});<br></span><span style="font-size: 14px;">client.js</span>很简单,我们引入net模块并且调用connect方法去访问3000端口,然后监听每一个data事件并打印出数据。
当我们的<span style="font-size: 14px;">filewatcher.js</span>每执行一次<span style="font-size: 14px;">connection.write()</span>,我们的客户端就会触发一次data事件。
以上只是网络如何工作的一点皮毛。主要就是一个端点广播信息时会触发所有连接到这个端点的客户端上的data事件。
如果你想要了解更多Node的网络知识,可以看看官方NodeJS的文档:net模块。你也许还需要阅读Building a Tcp service using Node。
相关推荐:
The above is the detailed content of Learn more about NodeJS. For more information, please follow other related articles on the PHP Chinese website!


