


The development of front-end technology is really fast. Grunt was still popular in 15 years, but now with the extensive use of gulp and the increasing popularity of webpack, grunt will basically be eliminated. . The progress of learning cannot keep up with the progress of technological development. It is really an indescribable feeling. This article will introduce the installation of grunt that may be outdated
npm install -g grunt-cli
 After the above command is executed, the
 command will be added to the system path, and you can execute this command in any directory in the future. [Note] Installation
does not mean Grunt is installed. The task of the Grunt CLI is simple: call Grunt in the same directory as Gruntfile. The advantage of this is that it allows multiple versions of Grunt to be installed on the same system at the same time. Each time you run grunt, use the
grunt can be run in any subdirectory of the project. If a locally installed Grunt is found, the CLI loads it, passes the configuration information in Gruntfile, and then executes the specified task Package
package.json
and package.json: This file is npm is used to store a project's metadata in order to publish this project as an npm module. You can list grunt and Grunt plug-ins that the project depends on in this file and place them in the devDependencies configuration section
Gruntfile: This file is named Gruntfile.js
orGruntfile.coffee, used to configure or define tasks and load Grunt plug-ins [package.json] package.json
Gruntfile
, and should be submitted together with the project's source code. Runningnpm install in the above directory (the directory where package.json is located) will automatically install the appropriate dependencies based on each dependency listed in the package.json file. Version dependencies Commonly used package.json configuration is as follows{ "name": "my-project-name", "version": "0.1.0", "devDependencies": {"grunt": "~0.4.5","grunt-contrib-jshint": "~0.10.0","grunt-contrib-nodeunit": "~0.4.1","grunt-contrib-uglify": "~0.5.0"
}
}Copy after login
package.json
file The easiest way is to use the, but also automatically adds it to the devDependencies configuration section, as shown belownpm install grunt-contrib-jshint --save-dev
Copy after login[Gruntfile]
Gruntfile.coffee
file is a valid JavaScript or CoffeeScript file and should be placed in the project root directory, along with thepackage.json file At the same directory level, and join the source code manager together with the project source code Gruntfile consists of the following parts:
Gruntfile
listed below, the project metadata (metadata) in theuglify task is configured to minify the source code file and dynamically generate a file header comment based on the above metadata. When the grunt command is executed on the command line, the uglify task will be executed by defaultmodule.exports = function(grunt) { // Project configuration. grunt.initConfig({
pkg: grunt.file.readJSON('package.json'),
uglify: {
options: {
banner: '/*! <%= pkg.name %> <%= grunt.template.today("yyyy-mm-dd") %> */\n' },
build: {
src: 'src/<%= pkg.name %>.js',
dest: 'build/<%= pkg.name %>.min.js' }
}
}); // 加载包含 "uglify" 任务的插件。
grunt.loadNpmTasks('grunt-contrib-uglify'); // 默认被执行的任务列表。
grunt.registerTask('default', ['uglify']);
};Copy after login 1. wrapper function
module.exports = function(grunt) { // Do grunt-related things in here}; 2. Project and Task configuration
grunt.initConfig
method in ##Gruntfile. This configuration is mainly attributes named after the task name, and can also contain other arbitrary data. Once these attributes representing arbitrary data conflict with attributes required by the task, they will be ignored
grunt.initConfig({
  concat: {// 这里是concat任务的配置信息。  },
  uglify: {// 这里是uglify任务的配置信息  },  // 任意数据。
  my_property: 'whatever',
  my_src_files: ['foo/*.js', 'bar/*.js'],
}); 在一个任务配置中,options属性可以用来指定覆盖内置属性的默认值。此外,每一个目标(target)中还可以拥有一个专门针对此目标(target)的options属性。目标(target)级的平options将会覆盖任务级的options。options对象是可选的,如果不需要,可以忽略
grunt.initConfig({
concat: {
options: { // 这里是任务级的Options,覆盖默认值 },
foo: {
options: {// "foo" target options may go here, overriding task-level options. },
},
bar: { // No options specified; this target will use task-level options. },
},
});Copy after login
在下面的案例中,grunt.file.readJSON('package.json') 将存储在package.json文件中的JSON元数据引入到grunt config中。 由于<% %>模板字符串可以引用任意的配置属性,因此可以通过这种方式来指定诸如文件路径和文件列表类型的配置数据,从而减少一些重复的工作
与大多数task一样,grunt-contrib-uglify插件中的uglify 任务要求它的配置被指定在一个同名属性中。在这里有一个例子, 我们指定了一个banner选项(用于在文件顶部生成一个注释),紧接着是一个单一的名为build的uglify目标,用于将一个js文件压缩为一个目标文件
// Project configuration.grunt.initConfig({
pkg: grunt.file.readJSON('package.json'),
uglify: {
options: {
banner: '/*! <%= pkg.name %> <%= grunt.template.today("yyyy-mm-dd") %> */\n'},
build: {
src: 'src/<%= pkg.name %>.js',
dest: 'build/<%= pkg.name %>.min.js'}
}
});Copy after login
3、加载grunt插件和任务
像 concatenation、[minification]、grunt-contrib-uglify 和 linting这些常用的任务(task)都已经以grunt插件的形式被开发出来了。只要在 package.json 文件中被列为dependency(依赖)的包,并通过npm install安装之后,都可以在Gruntfile中以简单命令的形式使用:
// 加载能够提供"uglify"任务的插件。grunt.loadNpmTasks('grunt-contrib-uglify');Copy after login
[注意] grunt --help 命令将列出所有可用的任务
4、自定义任务
通过定义 default 任务,可以让Grunt默认执行一个或多个任务。在下面的这个案例中,执行 grunt 命令时如果不指定一个任务的话,将会执行uglify任务。这和执行grunt uglify 或者 grunt default的效果一样。default任务列表数组中可以指定任意数目的任务(可以带参数)
// Default task(s).grunt.registerTask('default', ['uglify']);Copy after login
合并
本节将介绍合并插件grunt-contrib-concat的实例应用
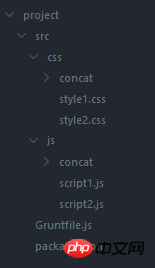
1、首先,建立项目结构。 根目录为'project',存在一个'src'的文件夹,该文件夹下又包含'css'和'js'这两个文件夹。其中,'css'文件夹有一个空的'concat'文件夹,一个'style1.css'文件,以及一个'style2.css'文件;类似地,'js'文件夹有一个空的'concat'文件夹,一个'script1.js'文件,以及一个'script2.js'文件


由于需要用到grunt来实现合并,所以需要在项目根目录下,新建'package.json'和'Gruntfile.js'文件

最终的目录结构如下所示
2、填充文件内容
合并的目的是把'style1.css'和'style2.css'的内容合并到'css/src/concat'文件夹下,把'script1.js'和'script2.js'的内容合并到'js/src/concat'文件夹下
style1.css的文件内容如下
body{margin: 0;}Copy after login
style2.css的文件内容如下
ul{margin: 0;padding: 0;list-style:none;
}Copy after login
script1.js的文件内容如下
console.log('a');Copy after login
script2.js的文件内容如下
console.log('b');Copy after login
3、设置Grunt的package.json及Gruntfile.js文件
由于需要用到grunt及grunt-contrib-concat插件,所以package.json的文件内容如下
{ "name": "project", "version": "1.0.0", "devDependencies": {"grunt": "^1.0.1","grunt-contrib-concat": "^1.0.1"
}
}Copy after login
Gruntfile.js的配置文件如下
module.exports = function(grunt) {
grunt.initConfig({
pkg: grunt.file.readJSON('package.json'),
concat: {
options: {stripBanners: true,
banner: '/*! <%= pkg.name %> - v<%= pkg.version %> - ' +'<%= grunt.template.today("yyyy-mm-dd") %> */' },
myCSSDist: {
src: ['src/css/*.css'],
dest: 'src/css/concat/<%= pkg.name %>-<%= pkg.version %>.css' },
myJSDist: {
src: ['src/js/*.js'],
dest: 'src/js/concat/<%= pkg.name %>-<%= pkg.version %>.js' },
},
});
grunt.loadNpmTasks('grunt-contrib-concat');
grunt.registerTask('default', ['concat']);
};Copy after login
4、效果演示
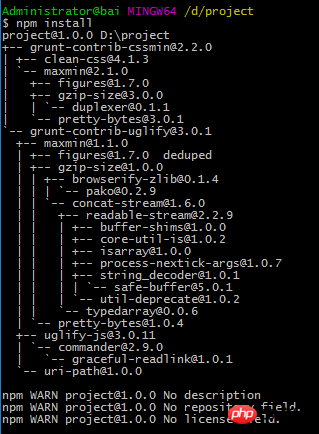
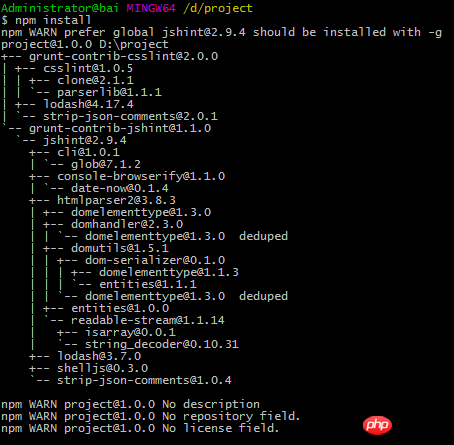
通过在命令行中使用npm install命令来安装插件
npm install
Copy after login
然后执行命令grunt

在'css/concat'文件夹下生成一个'project-1.0.0.css'的文件,内容如下
body{margin: 000-Copy after login
在'js/concat'文件夹下生成一个'project-1.0.0.js'的文件,内容如下
/*! project - v1.0.0 - 2017-05-27 */console.log('a');console.log('b');Copy after login
压缩
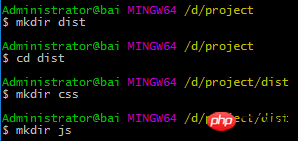
接下来,我们对合并后的project-1.0.0.css和project-1.0.0.js文件进行压缩,压缩名称加一个'.min'前缀,并分别保存到'project'目录下的'dist'目录下'css'文件夹和'js'文件夹
由于需要用到grunt-contrib-cssmin和grunt-contrib-uglify插件,所以package.json的文件内容如下
{ "name": "project", "version": "1.0.0", "devDependencies": {"grunt": "^1.0.1","grunt-contrib-concat": "^1.0.1","grunt-contrib-cssmin": "^2.2.0","grunt-contrib-uglify": "^3.0.1"
}
}Copy after login
Gruntfile.js的配置文件如下
module.exports = function(grunt) {
grunt.initConfig({
pkg: grunt.file.readJSON('package.json'),
concat: {
options: {
stripBanners: true,
banner: '/*! <%= pkg.name %> - v<%= pkg.version %> - ' +'<%= grunt.template.today("yyyy-mm-dd") %> */' },
myCSSDist: {
src: ['src/css/*.css'],
dest: 'src/css/concat/<%= pkg.name %>-<%= pkg.version %>.css' },
myJSDist: {
src: ['src/js/*.js'],
dest: 'src/js/concat/<%= pkg.name %>-<%= pkg.version %>.js' },
},
cssmin:{
options: {
stripBanners: true,
banner: '/* <%= grunt.template.today("yyyy-mm-dd") %> */'
},
build:{
src: 'src/css/concat/<%= pkg.name %>-<%= pkg.version %>.css',
dest: 'dist/css/<%= pkg.name %>-<%= pkg.version %>.min.css'
}
},
uglify:{
options: {
stripBanners: true,
banner: '/* <%= grunt.template.today("yyyy-mm-dd") %> */'
},
build:{
src: 'src/js/concat/<%= pkg.name %>-<%= pkg.version %>.js',
dest: 'dist/js/<%= pkg.name %>-<%= pkg.version %>.min.js'
}
}
});
grunt.loadNpmTasks('grunt-contrib-concat');
grunt.loadNpmTasks('grunt-contrib-cssmin');
grunt.loadNpmTasks('grunt-contrib-uglify');
grunt.registerTask('default', ['concat','cssmin','uglify']);
};Copy after login
通过在命令行中使用npm install命令来安装插件
然后执行命令grunt
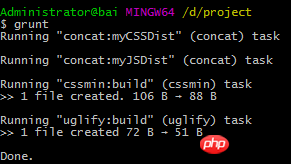
在'dist/css/'文件夹下生成一个'project-1.0.0.min.css'的文件,内容如下
/*! project - v1.0.0 - 2017-05-27 */body{margin:0}ul{margin:0;padding:0;list-style:none}Copy after login
在'dist/js/'文件夹下生成一个'project-1.0.0.min.js'的文件,内容如下
/* 2017-05-27 */console.log("a"),console.log("b");Copy after login
检查
前面的博文已经介绍过jshint和csslint。如果要使用grunt中的插件,则需要在根目录下建立 .csslintrc 和 .jshintrc 文件,并设置它们的内容如下
//.csslintrc{"adjoining-classes":false,"box-sizing":false,"box-model":false,"compatible-vendor-prefixes": false,"floats":false,"font-sizes":false,"grandients":false,"important":false,"known-properties":false,"outline-none":false,"qualified-headings":false,"regex-selectors":false,"shorthand":false,"text-indent":false,"unique-headings":false,"universal-selector":false,"unqualified-attributes":false}//.jshintrc{"boss": false,"curly": true,"eqeqeq": true,"eqnull": true,"expr": true,"immed":true,"newcap":true,"noempty":true,"noarg":true,"undef":true,"regexp":true,"browser":false,"devel":true,"node":true}Copy after login
由于需要用到grunt-contrib-csslint和grunt-contrib-jshint插件,所以package.json的文件内容如下
{ "name": "project", "version": "1.0.0", "devDependencies": {"grunt": "^1.0.1","grunt-contrib-concat": "^1.0.1","grunt-contrib-cssmin": "^2.2.0","grunt-contrib-uglify": "^3.0.1","grunt-contrib-csslint": "^2.0.0","grunt-contrib-jshint": "^1.1.0"
}
}Copy after login
Gruntfile.js的配置文件如下
module.exports = function(grunt) {
grunt.initConfig({
pkg: grunt.file.readJSON('package.json'),
concat: {
options: {
stripBanners: true,
banner: '/*! <%= pkg.name %> - v<%= pkg.version %> - ' +'<%= grunt.template.today("yyyy-mm-dd") %> */' },
myCSSDist: {
src: ['src/css/*.css'],
dest: 'src/css/concat/<%= pkg.name %>-<%= pkg.version %>.css' },
myJSDist: {
src: ['src/js/*.js'],
dest: 'src/js/concat/<%= pkg.name %>-<%= pkg.version %>.js' },
},
cssmin:{
options: {
stripBanners: true,
banner: '/* <%= grunt.template.today("yyyy-mm-dd") %> */'
},
build:{
src: 'src/css/concat/<%= pkg.name %>-<%= pkg.version %>.css',
dest: 'dist/css/<%= pkg.name %>-<%= pkg.version %>.min.css'
}
},
uglify:{
options: {
stripBanners: true,
banner: '/* <%= grunt.template.today("yyyy-mm-dd") %> */'
},
build:{
src: 'src/js/concat/<%= pkg.name %>-<%= pkg.version %>.js',
dest: 'dist/js/<%= pkg.name %>-<%= pkg.version %>.min.js'
}
},
jshint:{
options:{
jshintrc:'.jshintrc' },
build:['Gruntfile.js','src/js/*.js']
},
csslint:{
options:{
csslintrc:'.csslintrc' },
build:['src/css/*.css']
}
});
grunt.loadNpmTasks('grunt-contrib-concat');
grunt.loadNpmTasks('grunt-contrib-cssmin');
grunt.loadNpmTasks('grunt-contrib-uglify');
grunt.loadNpmTasks('grunt-contrib-jshint');
grunt.loadNpmTasks('grunt-contrib-csslint');
grunt.registerTask('default', ['jshint','csslint','concat','cssmin','uglify']);
};Copy after login
通过在命令行中使用npm install命令来安装插件
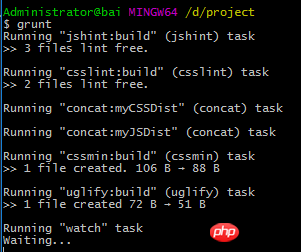
然后执行命令grunt

可以看到'script1.js'文件中第1行缺少分号,修改后再执行命令grunt

监控
grunt构建工具的自动化主要体现在grunt-contrib-watch插件上,该插件主要用于监听并执行对应的任务
package.json的文件内容如下
{ "name": "project", "version": "1.0.0", "devDependencies": {"grunt": "^1.0.1","grunt-contrib-concat": "^1.0.1","grunt-contrib-csslint": "^2.0.0","grunt-contrib-cssmin": "^2.2.0","grunt-contrib-jshint": "^1.1.0","grunt-contrib-uglify": "^3.0.1","grunt-contrib-watch": "^1.0.0"
}
}Copy after login
Gruntfile.js的配置文件如下
module.exports = function(grunt) {
grunt.initConfig({
pkg: grunt.file.readJSON('package.json'),
concat: {
options: {
stripBanners: true,
banner: '/*! <%= pkg.name %> - v<%= pkg.version %> - ' +'<%= grunt.template.today("yyyy-mm-dd") %> */' },
myCSSDist: {
src: ['src/css/*.css'],
dest: 'src/css/concat/<%= pkg.name %>-<%= pkg.version %>.css' },
myJSDist: {
src: ['src/js/*.js'],
dest: 'src/js/concat/<%= pkg.name %>-<%= pkg.version %>.js' },
},
cssmin:{
options: {
stripBanners: true,
banner: '/* <%= grunt.template.today("yyyy-mm-dd") %> */'
},
build:{
src: 'src/css/concat/<%= pkg.name %>-<%= pkg.version %>.css',
dest: 'dist/css/<%= pkg.name %>-<%= pkg.version %>.min.css'
}
},
uglify:{
options: {
stripBanners: true,
banner: '/* <%= grunt.template.today("yyyy-mm-dd") %> */'
},
build:{
src: 'src/js/concat/<%= pkg.name %>-<%= pkg.version %>.js',
dest: 'dist/js/<%= pkg.name %>-<%= pkg.version %>.min.js'
}
},
jshint:{
options:{
jshintrc:'.jshintrc' },
build:['Gruntfile.js','src/js/*.js']
},
csslint:{
options:{
csslintrc:'.csslintrc' },
build:['src/css/*.css']
},
watch:{
build:{
files: ['src/js/*.js','src/css/*.css'],
tasks: ['jshint','csslint','concat','cssmin','uglify'],
options:{spawn:false}
}
}
});
grunt.loadNpmTasks('grunt-contrib-concat');
grunt.loadNpmTasks('grunt-contrib-cssmin');
grunt.loadNpmTasks('grunt-contrib-uglify');
grunt.loadNpmTasks('grunt-contrib-jshint');
grunt.loadNpmTasks('grunt-contrib-csslint');
grunt.loadNpmTasks('grunt-contrib-watch');
grunt.registerTask('default', ['jshint','csslint','concat','cssmin','uglify','watch']);
};Copy after login
通过在命令行中使用npm install命令来安装插件

然后执行命令grunt
修改'scrpt1.js'文件内容后,命令行自动显示如下

变动更新
contrib-watch插件会监听需要处理的文件的变动,一旦有变动就会自动执行相应处理。但是它有一个问题,就是每当监听到一处变动时,就会大费周章地把所有被监听的文件都处理一遍
而newer插件的作用是处理contrib-watch插件的毛病,让watch在监听到某个文件变动时,仅仅对变动的文件进行事务处理
package.json的文件内容如下
{ "name": "project", "version": "1.0.0", "devDependencies": {"grunt": "^1.0.1","grunt-contrib-concat": "^1.0.1","grunt-contrib-csslint": "^2.0.0","grunt-contrib-cssmin": "^2.2.0","grunt-contrib-jshint": "^1.1.0","grunt-contrib-uglify": "^3.0.1","grunt-contrib-watch": "^1.0.0","grunt-contrib-requirejs": "^1.0.0","grunt-newer":"^1.3.0"
}
}Copy after loginCopy after login
Gruntfile.js的配置文件如下
module.exports = function(grunt) {
grunt.initConfig({
pkg: grunt.file.readJSON('package.json'),
concat: {
options: {
stripBanners: true,
banner: '/*! <%= pkg.name %> - v<%= pkg.version %> - ' +'<%= grunt.template.today("yyyy-mm-dd") %> */' },
myCSSDist: {
src: ['src/css/*.css'],
dest: 'src/css/concat/<%= pkg.name %>-<%= pkg.version %>.css' },
myJSDist: {
src: ['src/js/*.js'],
dest: 'src/js/concat/<%= pkg.name %>-<%= pkg.version %>.js' },
},
cssmin:{
options: {
stripBanners: true,
banner: '/* <%= grunt.template.today("yyyy-mm-dd") %> */'
},
build:{
src: 'src/css/concat/<%= pkg.name %>-<%= pkg.version %>.css',
dest: 'dist/css/<%= pkg.name %>-<%= pkg.version %>.min.css'
}
},
uglify:{
options: {
stripBanners: true,
banner: '/* <%= grunt.template.today("yyyy-mm-dd") %> */'
},
build:{
src: 'src/js/concat/<%= pkg.name %>-<%= pkg.version %>.js',
dest: 'dist/js/<%= pkg.name %>-<%= pkg.version %>.min.js'
}
},
jshint:{
options:{
jshintrc:'.jshintrc' },
build:['Gruntfile.js','src/js/*.js']
},
csslint:{
options:{
csslintrc:'.csslintrc' },
build:['src/css/*.css']
},
watch:{
build:{
files: ['src/js/*.js','src/css/*.css'],
tasks: ['newer:jshint','newer:csslint','newer:concat','newer:cssmin','newer:uglify'],
options:{spawn:false}
}
}
});
grunt.loadNpmTasks('grunt-contrib-concat');
grunt.loadNpmTasks('grunt-contrib-cssmin');
grunt.loadNpmTasks('grunt-contrib-uglify');
grunt.loadNpmTasks('grunt-contrib-jshint');
grunt.loadNpmTasks('grunt-contrib-csslint');
grunt.loadNpmTasks('grunt-contrib-watch');
grunt.loadNpmTasks('grunt-newer');
grunt.registerTask('default', ['newer:jshint','newer:csslint','newer:concat','newer:cssmin','newer:uglify','watch']);
};Copy after login
执行命令grunt
grunt
Copy after login
由于'script1.js'的内容发生了变化,所以重新合并了js文件,project-1.0.0.min.js的内容如下
/* 2017-06-09 */console.log("a"),console.log("b");Copy after login
由于css的内容没有发生变化,所以project-1.0.0.min.css的内容如下
/*! project - v1.0.0 - 2017-05-29 */body{margin:0}ul{list-style:none;margin:0;padding:0}Copy after login
模块化
下面说明grunt如何与requireJS配合使用,需要使用contrib-requirejs插件
npm install grunt-contrib-requirejs
Copy after login
该插件的使用与r.js的使用类似,不需要建立单独的build.js文件,而是在Gruntfile.js中配置
设置如下项目结构,src为开发环境,dist为上线环境

在r.js中,可以使用'dir'配置项,将项目目录复制到一个新的地方。但是,在实际项目开发中,有许多文件与requirejs无关,也会被复制。所以,不应该使用'dir',而应该使用'out'配置项,只是将入口文件main.js打包到一个新的地方
一般地,jQuery并不打包到main.js文件中。如果使用相对路径,打包前的main.js(开发环境)与jQuery存在路径依赖关系。打包后的main.js已经处于新的环境(上线环境),但此时仍然与开发环境的jQuery存在路径依赖关系,不符合逻辑
所以,jQuery应该是上线环境的地址。由于打包后,main.js的config也会打包进行,新的main.js的位置发生变化,jQuery的相对路径也会变化。所以config应该写在index.html页面中。这样,在jQuery或main.js的路径发生变化时,可以进行改动
因此,script1.js和script2.js这两个文件的内容如下
//script.jsdefine(['jquery'],function (){return $('div').height();
})//s2.jsdefine(['jquery'],function (){return $('div').width();
})Copy after login
main.js的内容如下
//main.jsrequire(['module/script1','module/script2'], function(a,b){
console.log(a);
console.log(b);
});Copy after login
index.html代码如下
Document
Copy after login
package.json的文件内容如下
{ "name": "project", "version": "1.0.0", "devDependencies": {"grunt": "^1.0.1","grunt-contrib-concat": "^1.0.1","grunt-contrib-csslint": "^2.0.0","grunt-contrib-cssmin": "^2.2.0","grunt-contrib-jshint": "^1.1.0","grunt-contrib-uglify": "^3.0.1","grunt-contrib-watch": "^1.0.0","grunt-contrib-requirejs": "^1.0.0","grunt-newer":"^1.3.0"
}
}Copy after loginCopy after login
【contrib-requirejs插件配置】
由于该插件打包后的文件,内容还是使用原来的路径关系。但是,开发和线上的路径并不一致。所以,要把可能会变化的路径设置为'baseUrl',其他的路径保持一致
[注意]contrib-requirejs插件不能与newer插件混用
requirejs: {
compile: {
options: {
baseUrl: 'src/js',
paths:{
jquery:'../../dist/js/jquery' },
name: 'main',
out:'dist/js/main.js',
exclude: ['jquery']
}
}
}Copy after login
Gruntfile.js的配置文件如下
module.exports = function(grunt) {
grunt.initConfig({
pkg: grunt.file.readJSON('package.json'),
concat: {
options: {
stripBanners: true,
banner: '/*! <%= pkg.name %> - v<%= pkg.version %> - ' +'<%= grunt.template.today("yyyy-mm-dd") %> */' },
myCSSDist: {
src: ['src/css/*.css'],
dest: 'src/css/concat/<%= pkg.name %>-<%= pkg.version %>.css' }
},
cssmin:{
options: {
stripBanners: true,
banner: '/* <%= grunt.template.today("yyyy-mm-dd") %> */'
},
build:{
src: 'src/css/concat/<%= pkg.name %>-<%= pkg.version %>.css',
dest: 'dist/css/<%= pkg.name %>-<%= pkg.version %>.min.css'
}
},
jshint:{
options:{
jshintrc:'.jshintrc' },
build:['Gruntfile.js','src/js/*.js']
},
csslint:{
options:{
csslintrc:'.csslintrc' },
build:['src/css/*.css']
},
requirejs: {
compile: {
options: {
baseUrl: 'src/js',
paths:{
jquery:'../../dist/js/jquery' },
name: 'main',
out:'dist/js/main.js',
exclude: ['jquery']
}
}
},
watch:{
build:{
files: ['src/js/*.js','src/css/*.css'],
tasks: ['newer:jshint','newer:csslint','newer:concat','newer:cssmin','newer:uglify','requirejs'],
options:{spawn:false}
}
}
});
grunt.loadNpmTasks('grunt-contrib-concat');
grunt.loadNpmTasks('grunt-contrib-cssmin');
grunt.loadNpmTasks('grunt-contrib-jshint');
grunt.loadNpmTasks('grunt-contrib-csslint');
grunt.loadNpmTasks('grunt-contrib-requirejs');
grunt.loadNpmTasks('grunt-contrib-watch');
grunt.loadNpmTasks('grunt-newer');
grunt.registerTask('default', ['newer:jshint','newer:csslint','newer:concat','newer:cssmin','requirejs','watch']);
};Copy after login
执行命令grunt

更改index.html页面如下,依然能正常显示
Document
Copy after login
The above is the detailed content of What is Grunt? Detailed introduction to him. For more information, please follow other related articles on the PHP Chinese website!
 httpstatus500 error solution
 What are the reasons why a mobile phone has an empty number?
 How to unlock the password lock on your Apple phone if you forget it
 What is the difference between original screen and assembled screen?
 How to solve dns_probe_possible
 There is an extra blank page in Word and I cannot delete it.
 Windows driver wizard function
 How to solve website restore error


![[Web front-end] Node.js quick start](https://img.php.cn/upload/course/000/000/067/662b5d34ba7c0227.png)


