The previous article introduced you to the jQuery EasyUI tutorial-Draggable plug-in. In addition to using the Draggable plug-in to drag any element, you can also call the Droppable UI plug-in to drag the dragged element. Place any element into the specified area, similar to a shopping cart effect.
Okay, let’s learn jQuery-Droppable (placement) next!
Use $.fn.droppable.defaults to override the default value object.
Use case:
Create a drop area through two methods: tags and Javascript.
1. Create a placement area through labels.
<div id=”dd” class=”easyui-droppable” data-options=”accept:’#d1,#d3′”
style=”width:100px;height:100px;”></div>
2. Use Javascript to create a drop area.
<div id=”dd” style=”width:100px;height:100px;”></div>
$(‘#dd’).droppable({
accept:’#d1,#d3′
});Properties:

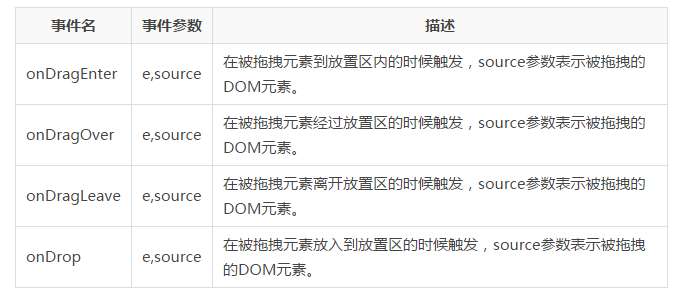
Events:

Methods:

The above is the content of the jQuery EasyUI tutorial-Droppable (placement). For more related content, please pay attention to the PHP Chinese website (m.sbmmt.com)!


