

Four years of college and about to graduate!
This is my last blog during college, to summarize and share my graduation project. The title of my thesis is "Backend Design of Gas Pipeline Network Equipment and Instrument Purchase, Sales and Inventory Management System". Since I am the only one taking the technical route in our major, I completed the design and development of the entire system by myself, which took nearly a total of One month later, I finally got excellent results.
I won’t discuss the paper here, nor write down specific implementation details. I will mainly talk about how to build your own system framework and system implementation step by step, and share your own experiences. Novices can learn from each other, and the experts can treat them as themselves. It’s time to throw some bricks and mortar! !
At the end of the blog, all documents related to system development will be attached, but excluding the graduation thesis. This article has generally included the content of the thesis!

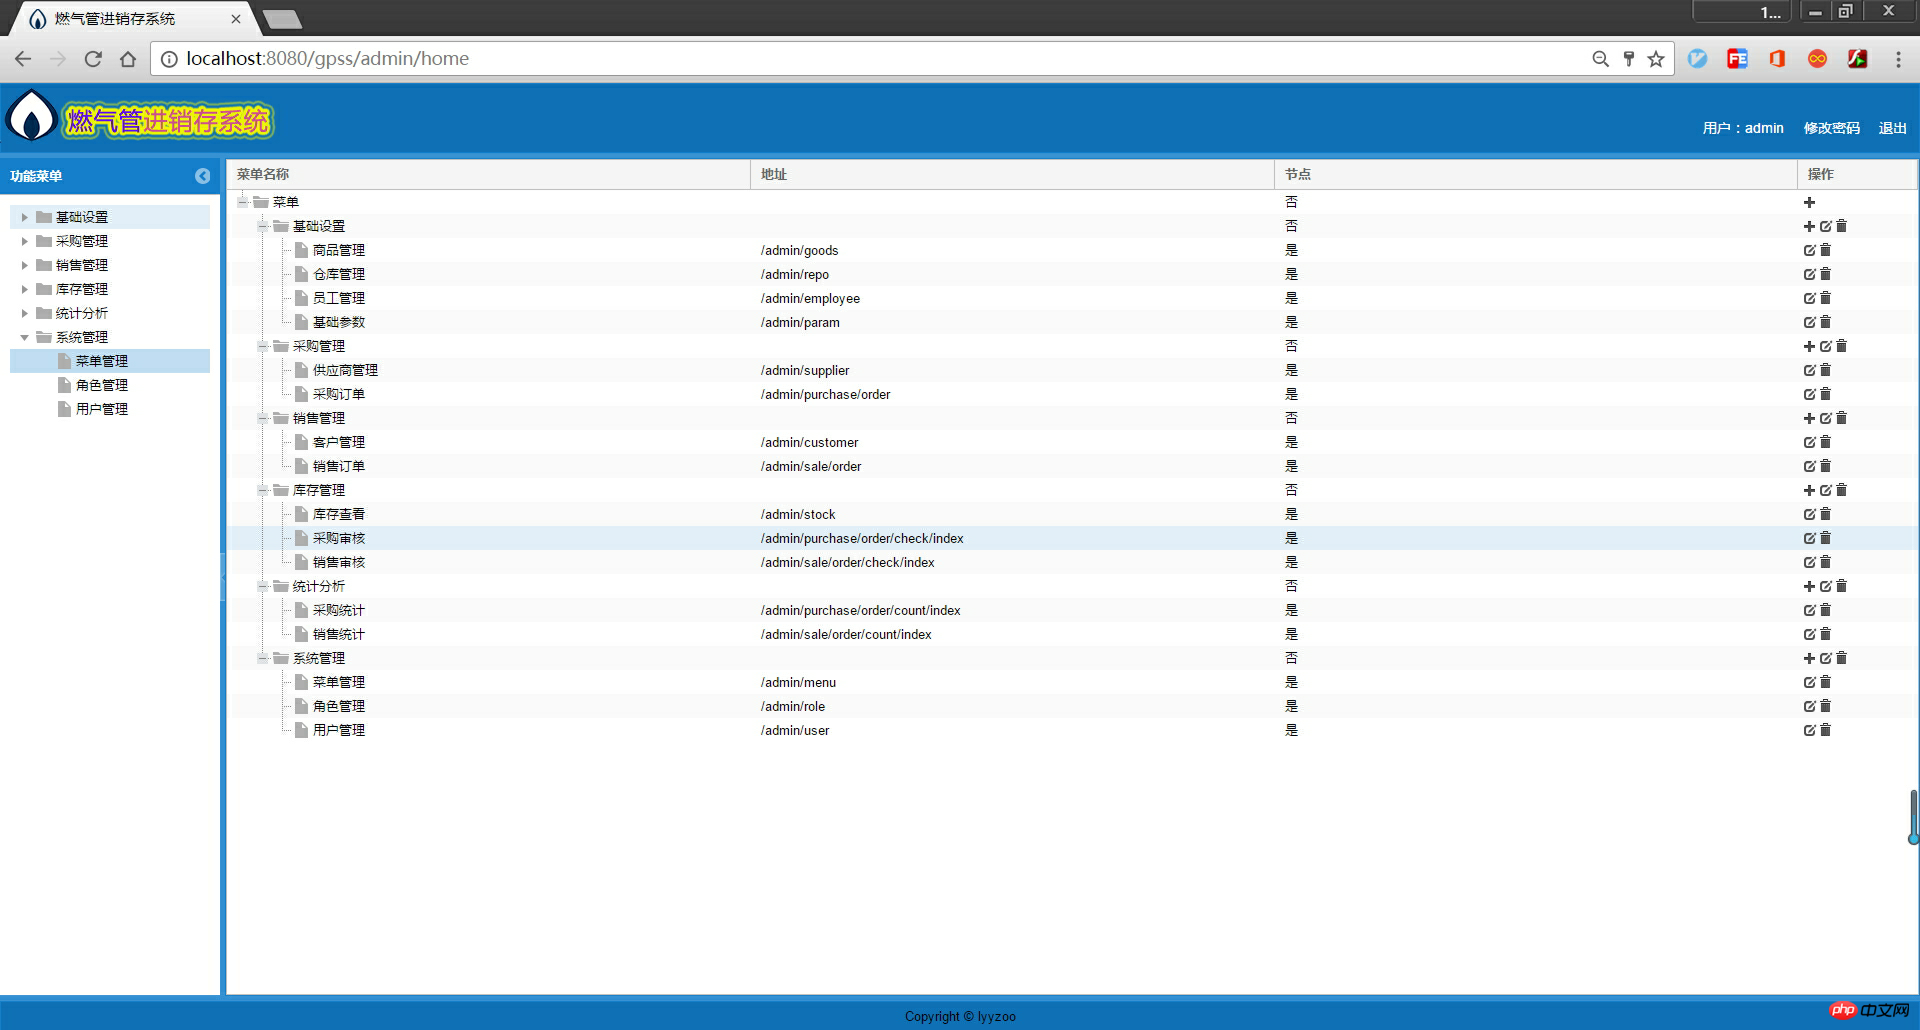

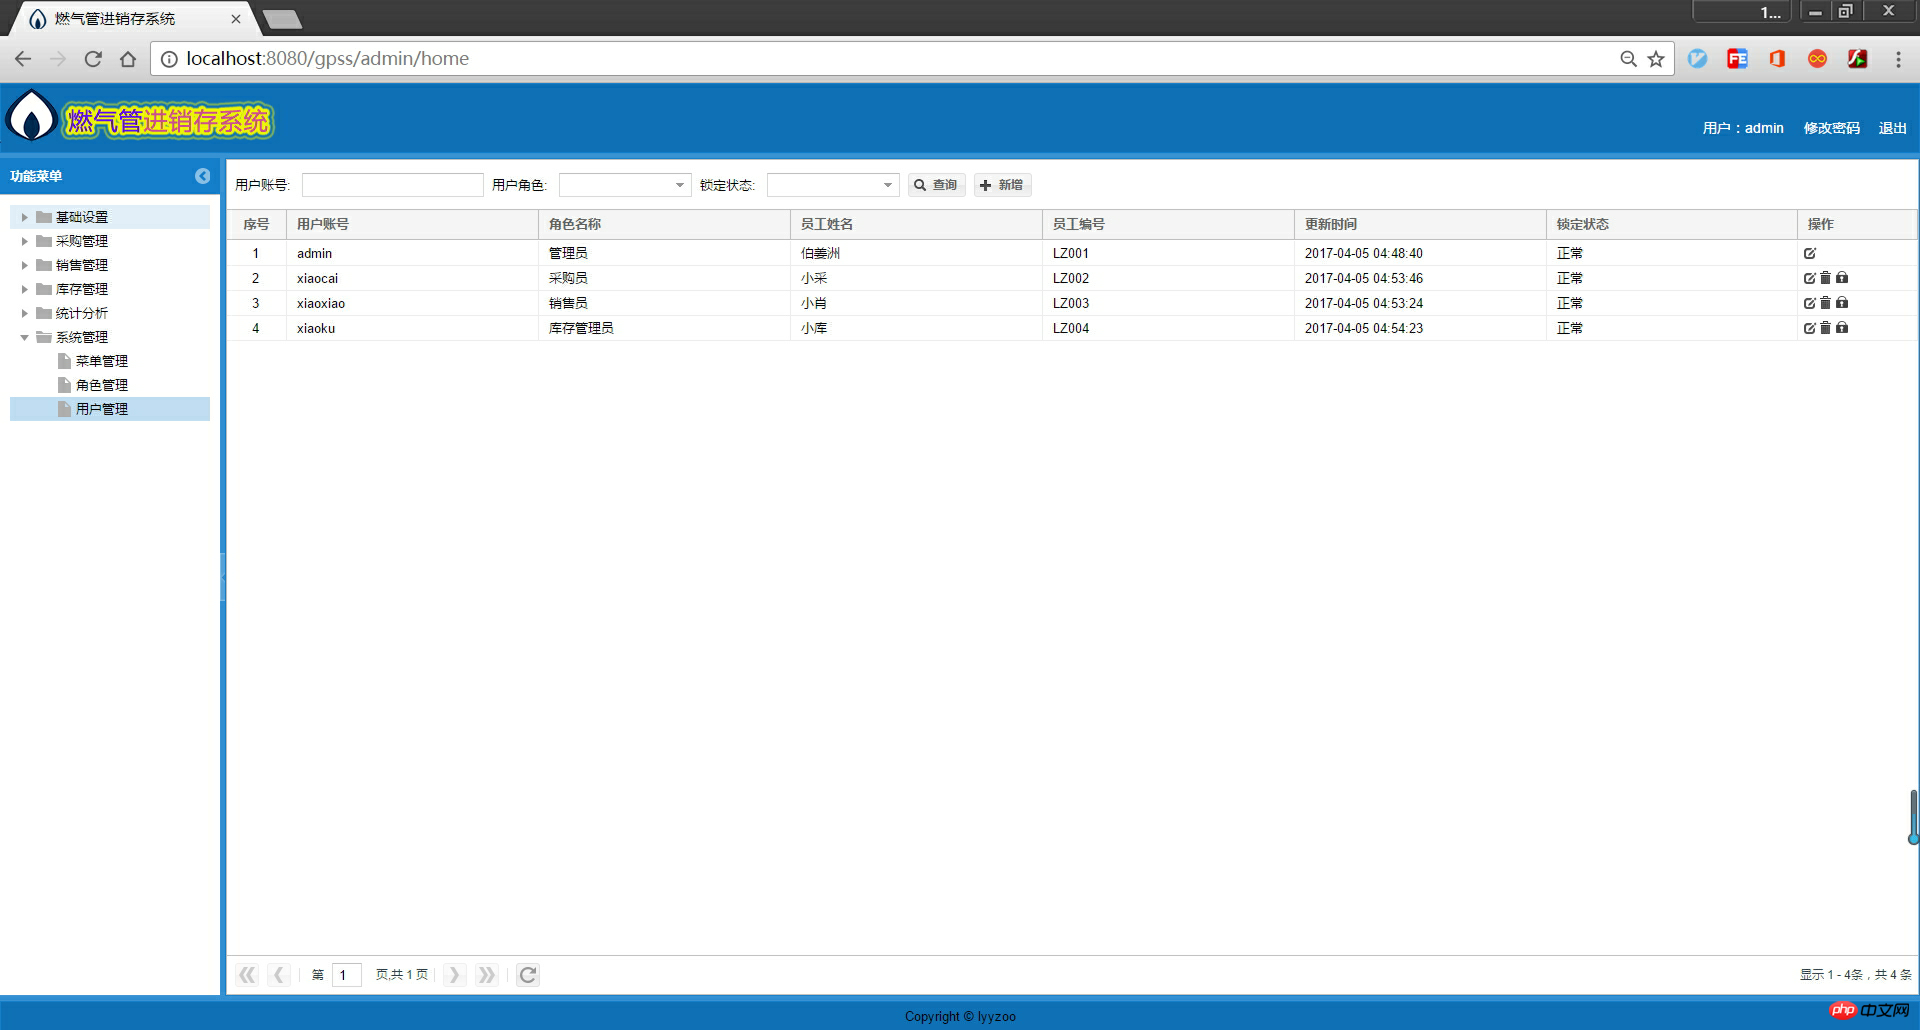
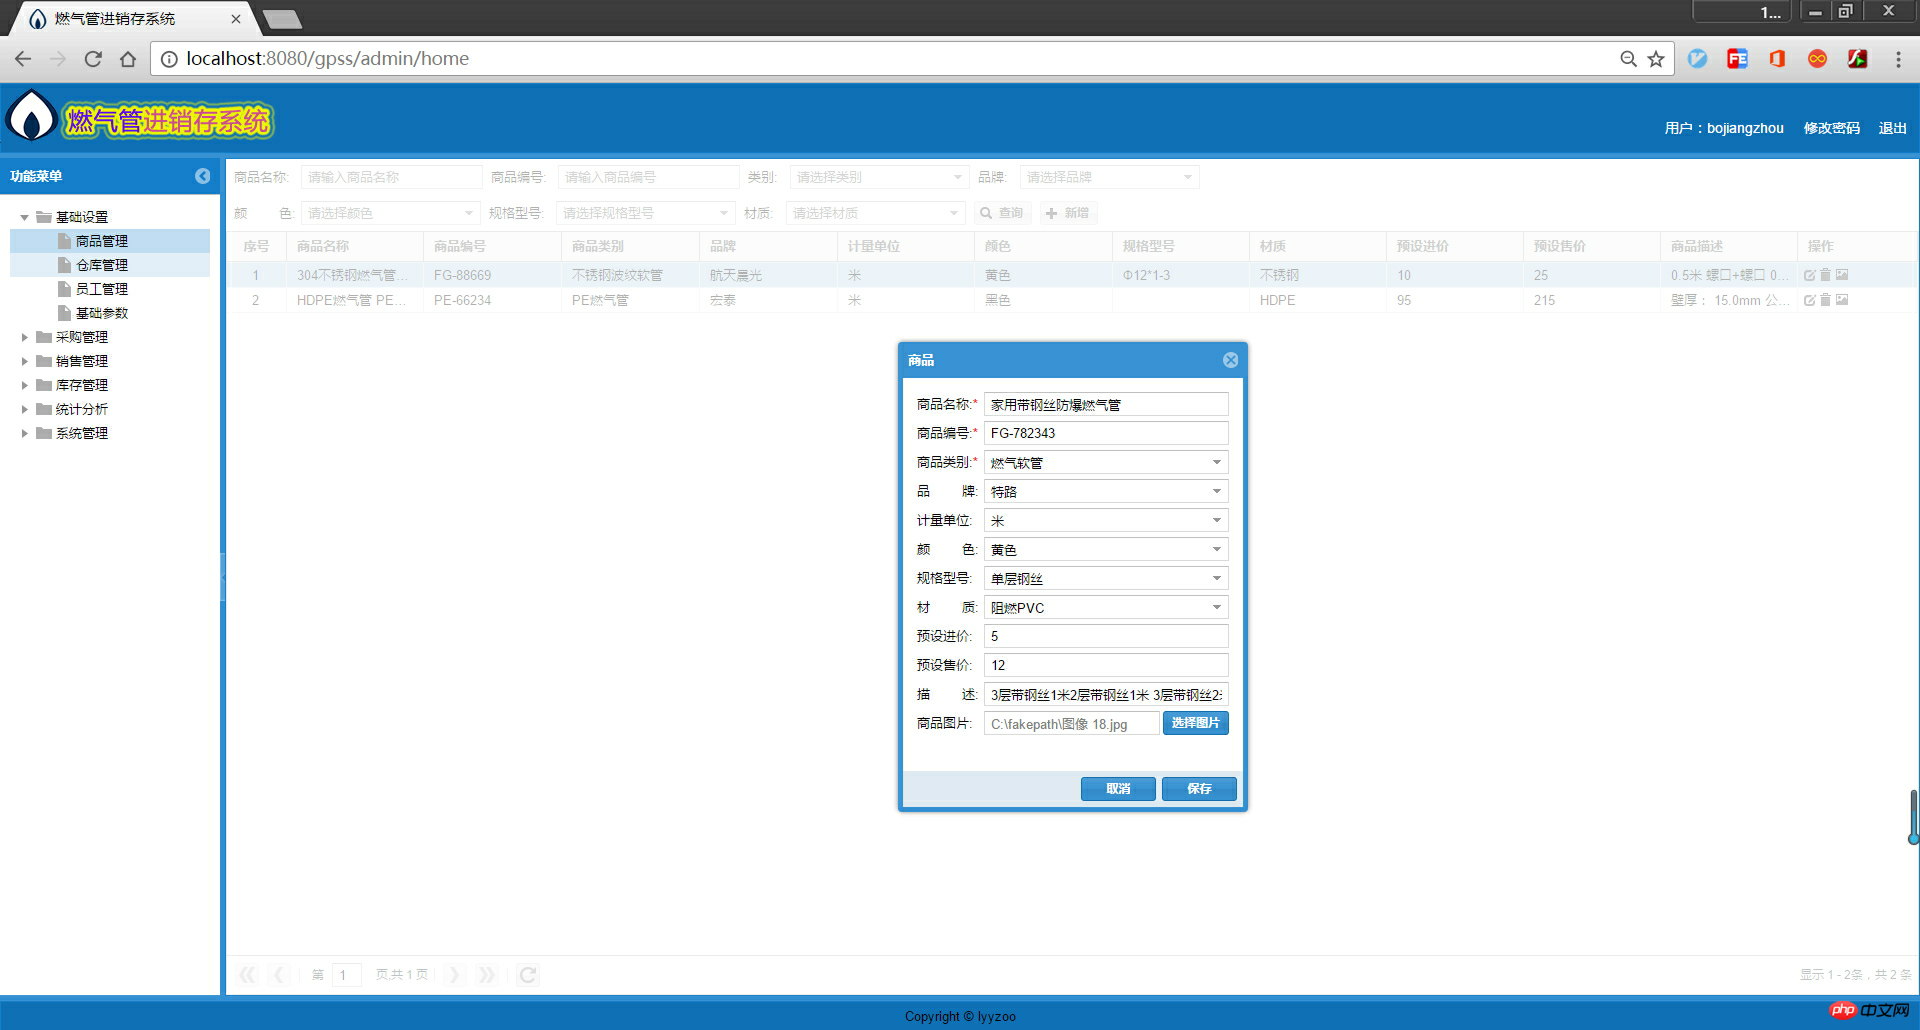


The above simply shows the screenshot of the completed system test. You can download the war package and deploy it to your own tomcat Look, the text begins below.
When developing a (simple) system, the first thing I want to do is to analyze the system requirements and figure out why you want to build this system, what functional modules this system has, and what functions each function implements.
Of course, my main purpose here is to complete my graduation project and hand in my graduation thesis. But I did not develop this system simply to complete a graduation project. The main idea is to take the development of this purchase, sales and inventory management system as an example to explain in detail the entire development process of a system from confirmation of requirements, technology selection, architecture design, system implementation to test deployment. Comprehensive use of the knowledge, technology, and experience gained from internships, etc., to fully and better implement a system. Building a basic system framework and forming certain specifications, and then developing on this basis can save a lot of work such as building the framework, adding dependencies, configuration, etc.
The main work and significance of this development are as follows:
① Learn to analyze user needs from the user's perspective, complete needs analysis and design, etc.
② Proficient in using various related development and design tools, and open source software.
③Proficient in the development technology of Spring+SpringMVC+Hibernate+ExtJs.
④ Proficient in using the maven version management tool.
⑤From the perspective of the enterprise, try to build your own underlying basic framework.
⑥Establish a complete gas pipe purchase, sale and inventory management system, conduct tests and analyze the results.
⑦ Deploy the system to the Internet to implement real web applications.
First of all, to analyze the needs of the system, the first thing you need to understand is what is the purchase, sale and inventory system. The purchase, sale and inventory system is also called the supply chain management system. The most basic content is Purchasing, inventory, sales, returns management. The purchasing, selling and inventory system tracks and manages the purchasing, warehousing and sales in the production and operation of the enterprise. Every step is tracked and recorded from the purchase order, to the goods being put into the warehouse and the goods being sold out of the warehouse. Effectively solve business problems such as distribution management of enterprises. So what is the difference between the gas pipe purchase, sales and inventory system? In fact, the purchase, sale and inventory system already has the purchase, sale and inventory function of general commodities, and gas pipes are a commodity. Taking this as a starting point, we began to design system functional modules.
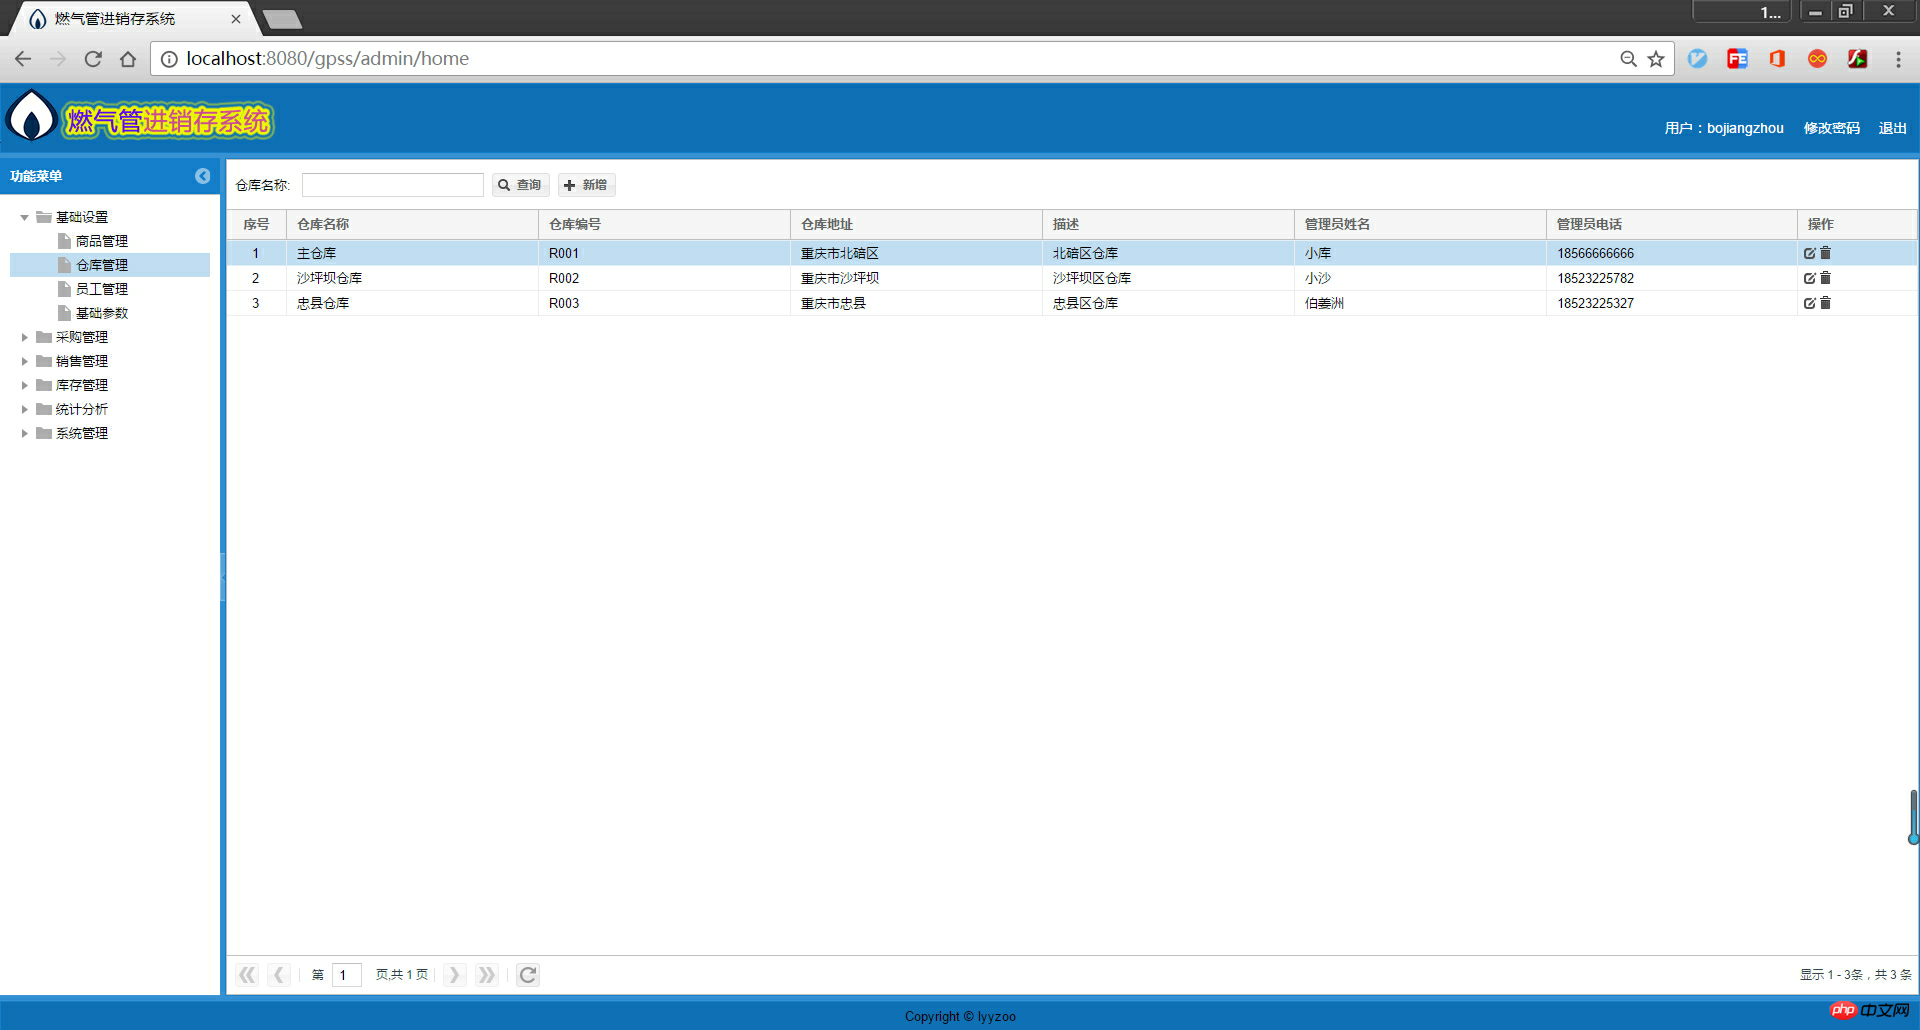
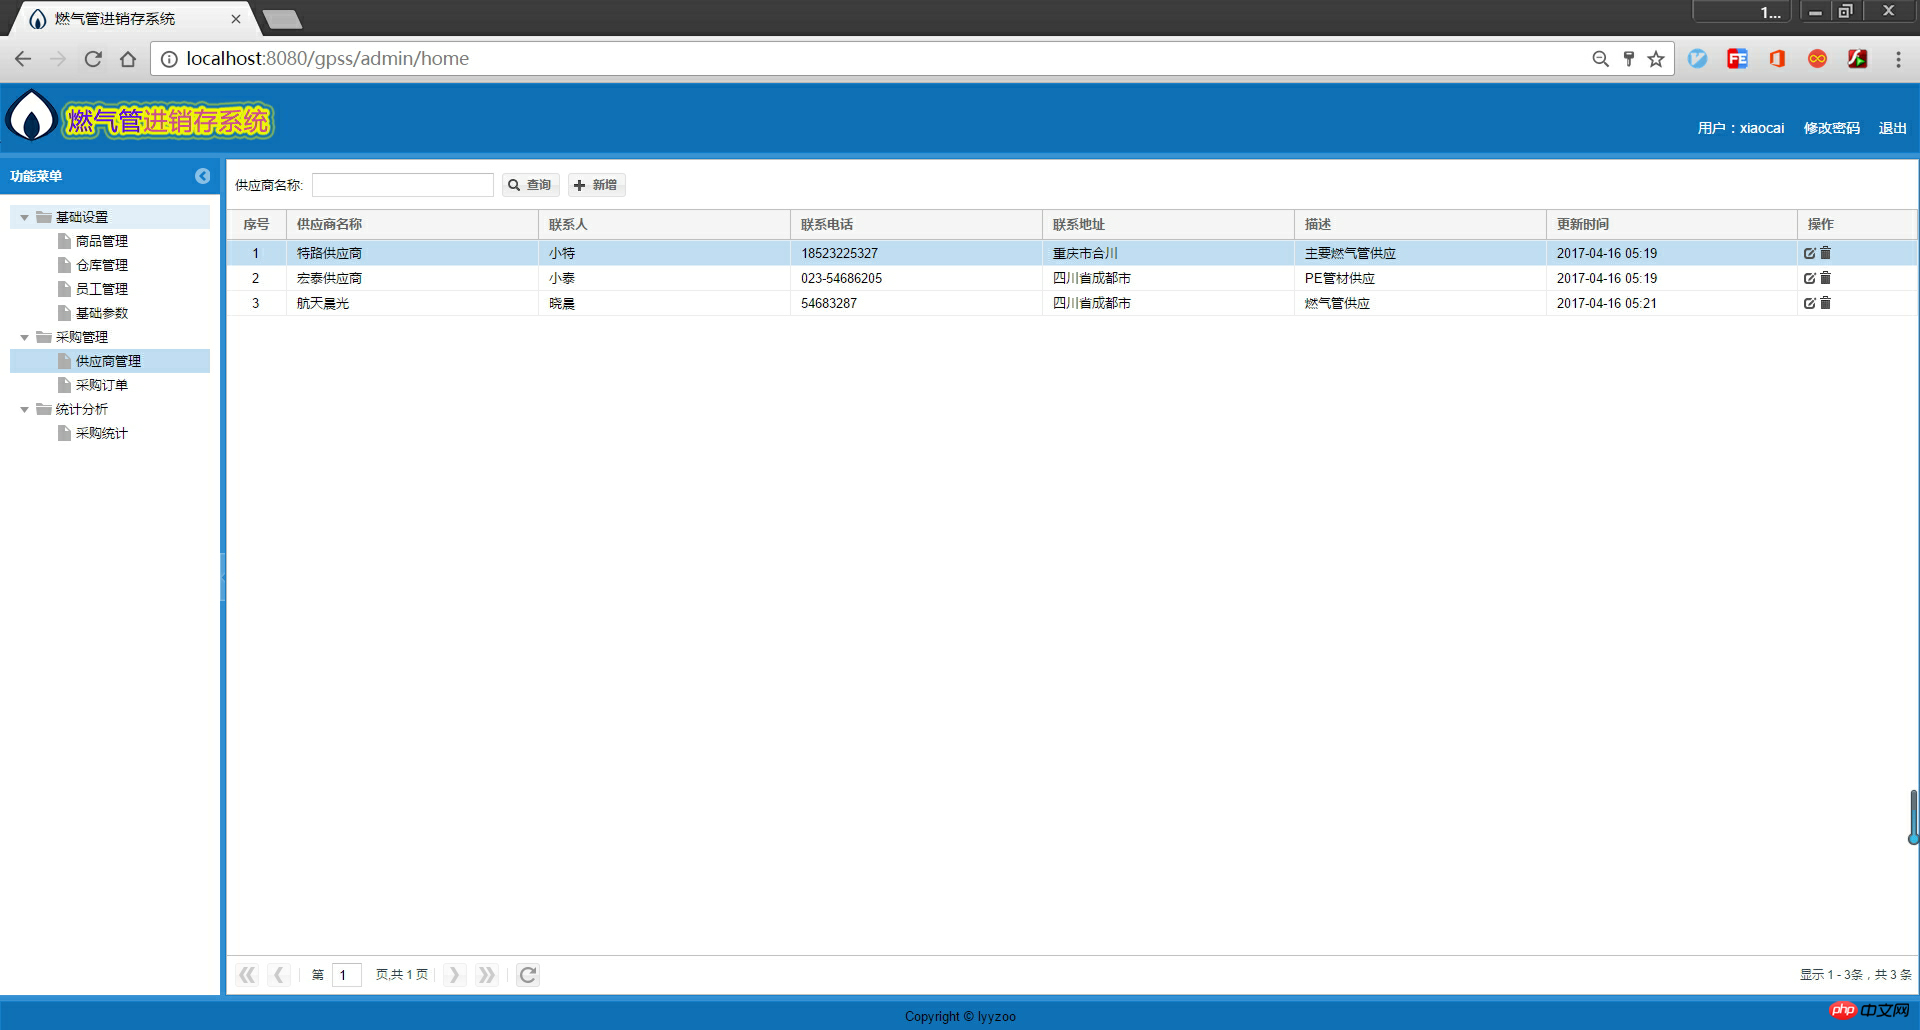
The system is divided into six major modules, namely basic settings, procurement management, sales management, inventory management, statistical analysis, and system management. The roles set by the system include admin, buyer, salesperson, inventory administrator, etc.
System module structure (designed using xmind):

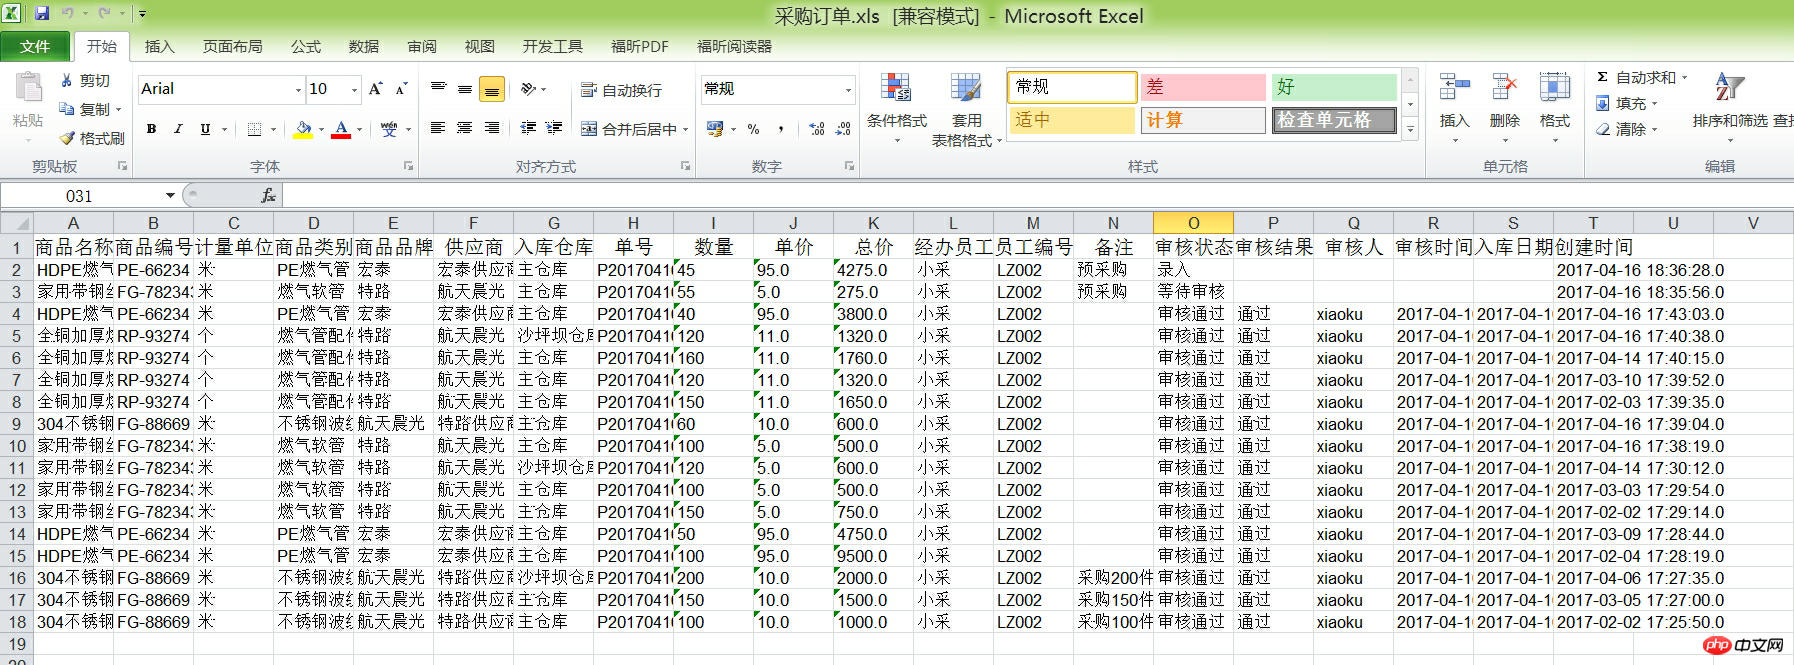
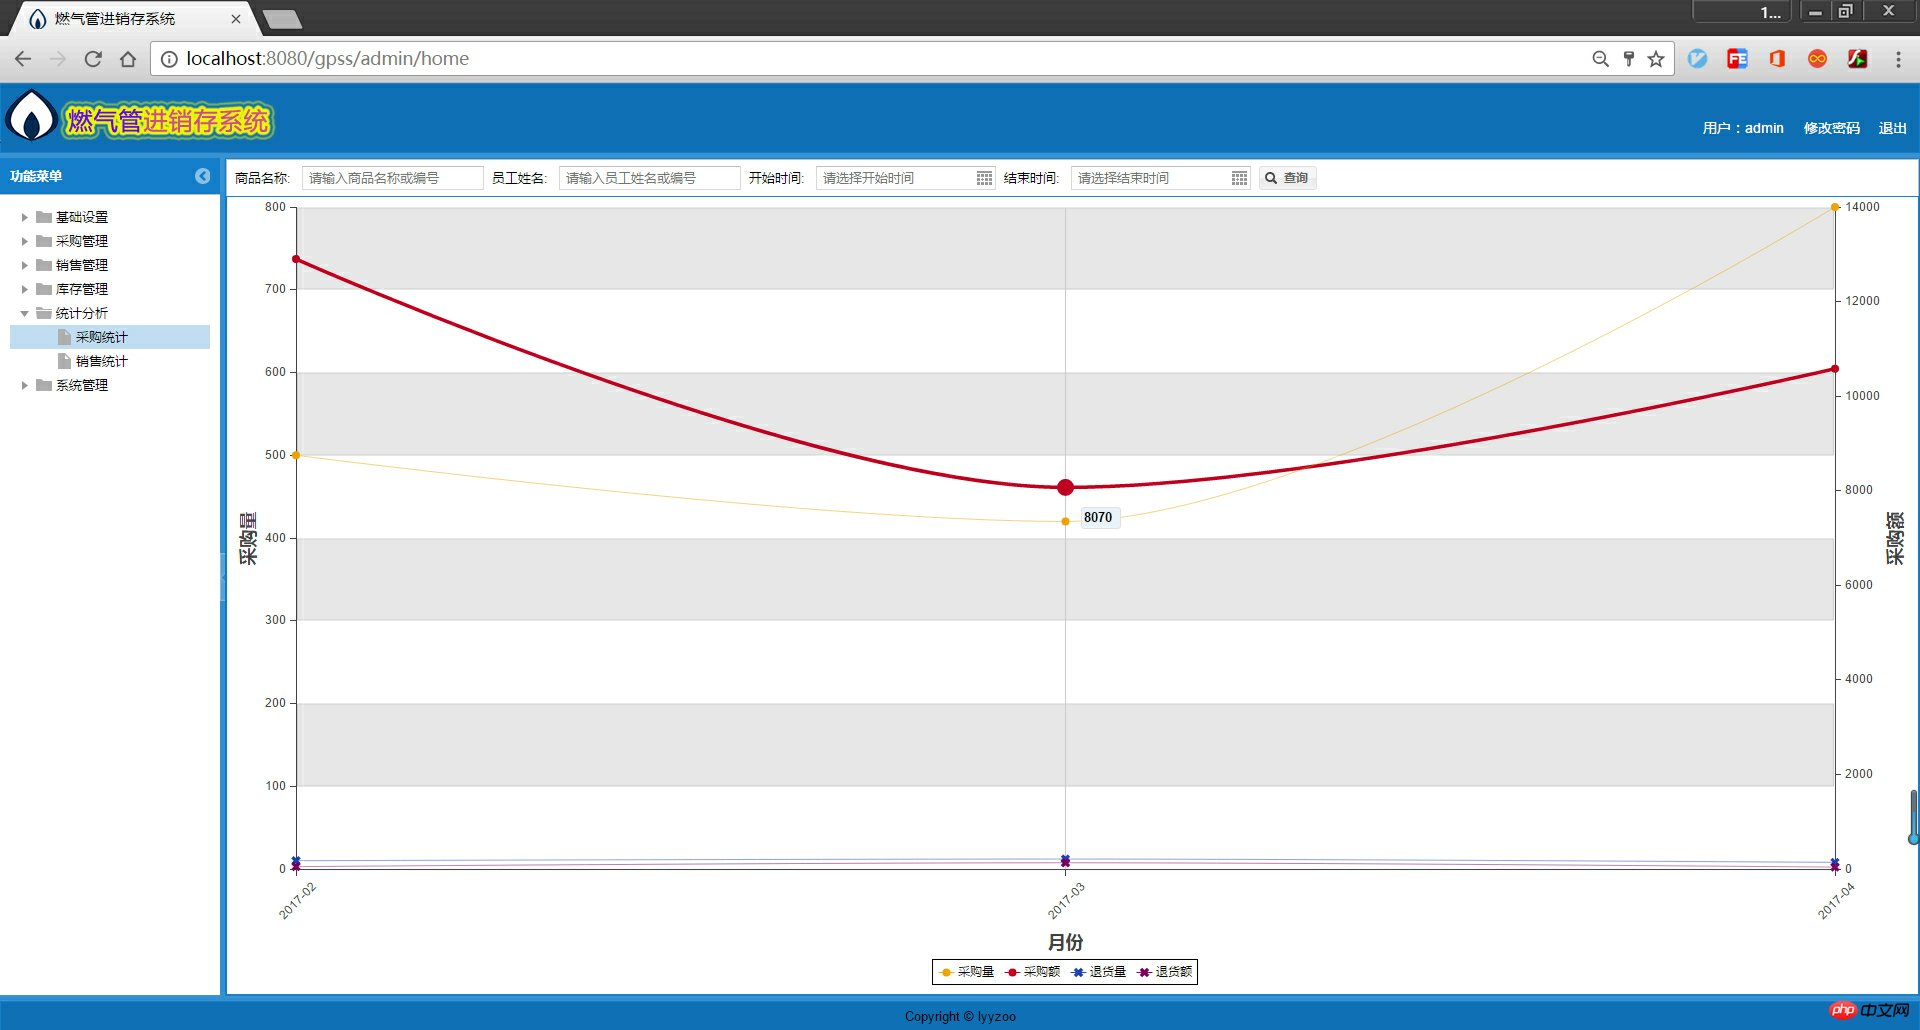
An overall process of the system, starting from the first use Initially, the system sets up a super administrator (admin) who has all the permissions of the system. Log in to the system as admin, set roles (system administrator, buyer, salesperson, inventory administrator), and assign corresponding permissions. Then enter user management and enter system users. General administrators log in to the system and enter basic data; buyers need to enter suppliers, purchase orders, and return orders; salespeople need to enter sales orders and return orders. Inventory administrators need to conduct purchase review and sales review in inventory management. If the purchase review is passed, the goods will be put into the warehouse and the inventory will be increased; if the sales review is passed, the goods will be shipped out of the warehouse and the inventory will be reduced. Administrators can also view monthly purchasing statistics and sales statistics.
Overall system process (designed using visio):

Briefly describe the development environment of this system:
Development platform: windows 8.1
Java version: jdk 1.8
Project management tool: Maven
Development tools: Intellij IDEA
Database: MySql 5.1
Server: Tomcat 8.5
Development framework: Spring4 + SpringMVC + Hibernate5
Front-end Framework: ExtJs 4.2 + Jsp
Modeling tools: PowerDesigner, Visio
##1.maven Maven is an automated build tool maintained by the Apache Software Foundation, focusing on Serves project construction and dependency management for the Java platform. It provides a central warehouse that can help us automatically download components and third-party open source libraries. You only need to rely on a jar package in your project in a coordinate manner, and Maven will automatically download it from the central warehouse, and at the same time download other jar packages that this jar package depends on, and you can download the source code for reading. After using maven, only one copy of each jar package itself is saved in the local warehouse, which greatly saves storage space, makes the project lighter, and avoids confusion caused by too many duplicate files. At the same time, Maven can automatically import all other jar packages that the current jar package depends on for us, without manual participation, saving a lot of time and energy. Using maven, you can automatically complete the entire process of cleaning, compilation, testing, packaging, and deployment with just one simple command. Our projects are generally divided into development environments and production environments. Different environments correspond to different configuration files. Using maven, you can configure two environments. When packaging, specify the running environment, and you can replace the corresponding configuration files to This reduces manual operations and possible operational errors. 2.Intellij IDEA IDEA is an integrated environment for Java language development. Intellij is recognized as one of the best Java development tools. IDEA is relatively strong in automatic code prompting, refactoring, debugging, and integration of various version tools (maven, svn, etc.). I switched to idea development during my internship. I have been using eclipse before. Compared with eclipse, idea has more advantages in debugging and automatic code prompts. Projects have a more friendly directory structure in idea, especially multi-project projects. Of course, Eclipse is easier to use than Idea. Using Idea can increase your development speed, but only if you need to remember a lot of shortcut keys. Use the debugging function of idea. For example, you only need to press the shortcut key Alt+F8, and then enter the expression to quickly evaluate the value; during debugging, idea will display the value of the variable in different colors behind the variable. You can clearly know every step of debugging, which is very convenient. Using IDEA well can improve our development speed to a great extent.ExtJs can be used to develop rich client ajax applications. It is a front-end ajax framework written in javascript that has nothing to do with back-end technology. It is mainly used to create front-end user interfaces and has powerful data processing. functions, as well as chart statistics, etc. At the same time, ExtJs has many personalized themes for you to choose from, making it a good choice for developing backend management systems.
Before designing and coding the purchase, sale and inventory system, first design an own underlying framework. This underlying framework can be used as A basis for the development of other specific projects, so that there is no need to do a lot of repetitive work every time a project is developed. This underlying framework mainly includes a development specification and some common tool classes. More importantly, it introduces various frameworks by category, such as Spring, Hibernate, and various configuration files. At the same time, if some new functions are added during development in the future, they can be added to this bottom layer and continuously improved.
Before carrying out framework design, in order to make the software development process smooth and improve the reliability, readability and maintainability of the code, the first thing that needs to be determined is the development specifications. Well, as the saying goes, there is no rule without rules, and the same is true for software development. Here are some simple rules to follow.
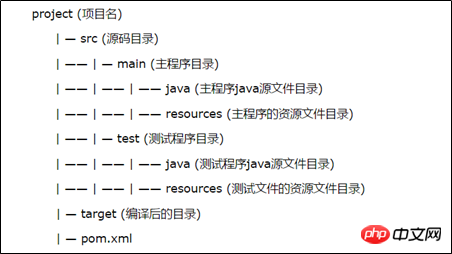
The first thing you need to comply with are some basic specifications. Generally speaking, companies use domain names as the basis for all naming, such as file names, package names, etc. Therefore, I applied for a domain name [www.lyyzoo.com] as my personal domain name. Then use D:/lyyzoo-repo as the root directory for development, that is, the personal code warehouse. All future projects will be built in this directory. All project development uses Maven to manage projects, so the directory structure is a standard Maven specification directory.
Maven’s agreed directory structure:
①Naming
> All naming requirements See the meaning of the name, try to ensure that the meaning of the variable is known through the variable name, and try to add comments where comments are needed.
> Package names are all lowercase, in the form of domain name + module, such as: com.lyyzoo.service
> Class naming adopts Pascal naming method, starting with a capital letter, each Capitalize the first letter of a word.
> The method name adopts Camel naming method, starting with a lowercase letter, and the first letter of each word is lowercase; getter and setter are automatically generated using Lombok, just add the @Data annotation.
> Variable names adopt Camel naming method, starting with a lowercase letter, and the first letter of each word is capitalized. Variable names should not be too long and can be in the form of abbreviations, but the meaning of the name must be clear.
> Constant names are all capitalized, and each word is separated by "_".
②Layering
Projects are divided into functional modules. Different projects establish different projects and use maven dependencies for management. The basic layers of the package include controller (control layer), service (business layer), dao (data access layer), and entity (model layer).
The bottom layer of the entire project focuses on some common and basic things, which are integrated together for future reuse. First, create a maven project named lyyzoo, lyyzoo will serve as the underlying root directory. There are two main sub-modules under lyyzoo, namely lyyzoo-base and lyyzoo-starter. lyyzoo-base is a basic module and is used for some simple Java and JavaEE programs; lyyzoo-starter is related to JavaEE and will depend on lyyzoo- base, and also introduces third-party frameworks such as Spring and Hibernate. Then add specific submodules to each module. Which module needs to be used in future development, just add that module in the dependencies.
The underlying module structure diagram:
The following is the relationship between each POM: 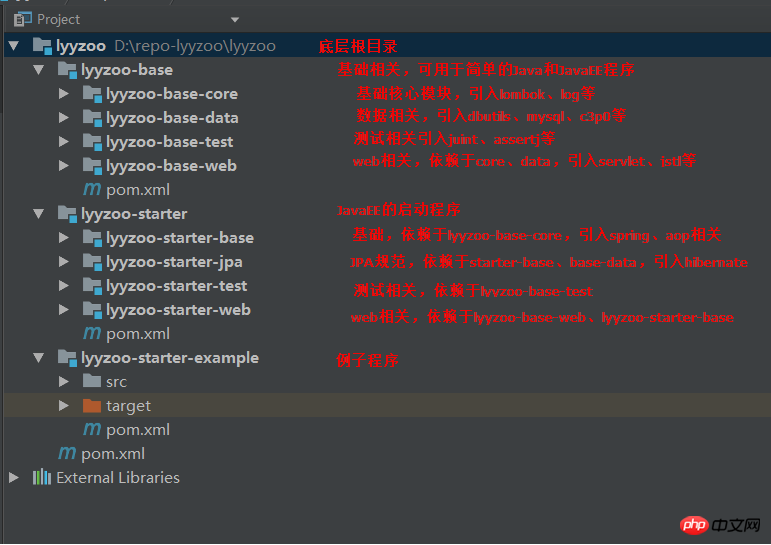
② lyyzoo-base > pom.xml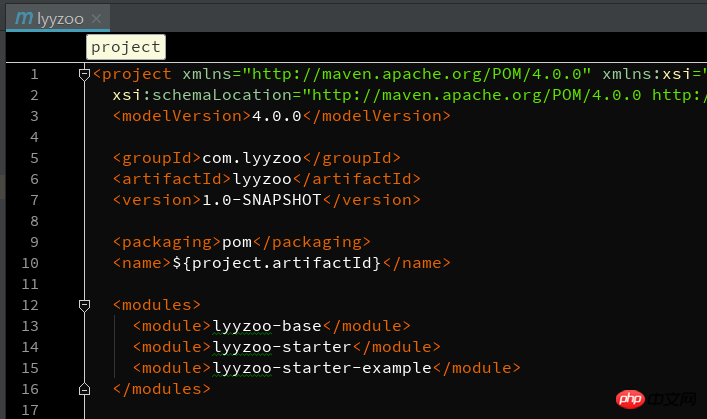
③ lyyzoo-starter > pom.xml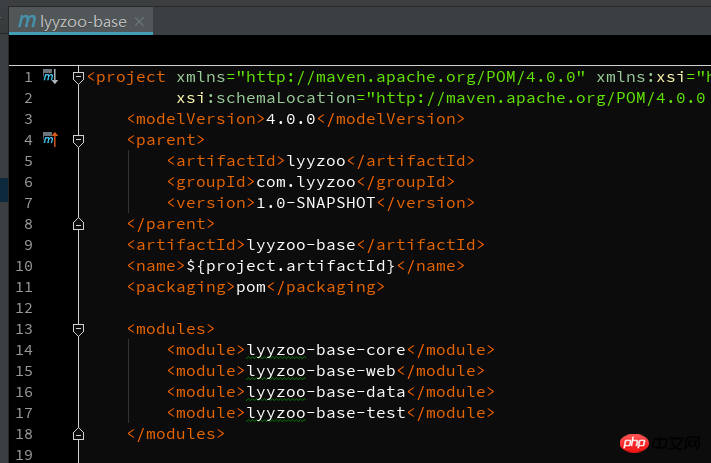
2.2 Dependency Management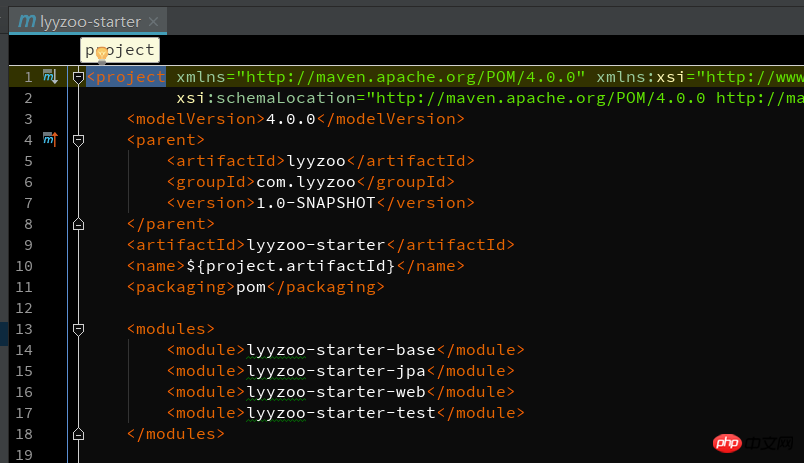
First, pull out all the version numbers and put them in


1 <properties> 2 <!-- Global --> 3 <lyyzoo.version>1.0-SNAPSHOT</lyyzoo.version> 4 <java.version>1.8</java.version> 5 <maven.compiler.source>${java.version}</maven.compiler.source> 6 <maven.compiler.target>${java.version}</maven.compiler.target> 7 <project.build.sourceEncoding>UTF-8</project.build.sourceEncoding> 8 <!-- lombok --> 9 <lombok.version>1.16.14</lombok.version>10 <!-- log -->11 <slf4j.version>1.7.7</slf4j.version>12 <logback.version>1.1.3</logback.version>13 <!-- jdbc -->14 <mysql.version>5.1.38</mysql.version>15 <!-- -->16 <c3p0.version>0.9.5.2</c3p0.version>17 <!-- test -->18 <junit.version>4.12</junit.version>19 <!-- servlet -->20 <servlet.version>3.1.0</servlet.version>21 <!-- spring -->22 <spring.version>4.2.6.RELEASE</spring.version>23 <aspectjrt.version>1.7.3</aspectjrt.version>24 <aspectjweaver.version>1.7.3</aspectjweaver.version>25 <!-- hibernate -->26 <hibernate.version>5.0.1.Final</hibernate.version>27 <hibernate.jpa.version>1.0.0.Final</hibernate.jpa.version>28 </properties> Next, introduce dependency management, which will be used by other projects in lyyzoo The dependencies of all third-party jar packages are added to
① First, you need to introduce other modules under lyyzoo, such as lyyzoo-base-core, lyyzoo-starter-base and other modules.


1 <!-- lyyzoo --> 2 <dependency> 3 <groupId>com.lyyzoo</groupId> 4 <artifactId>lyyzoo-base-core</artifactId> 5 <version>${lyyzoo.version}</version> 6 </dependency> 7 <dependency> 8 <groupId>com.lyyzoo</groupId> 9 <artifactId>lyyzoo-base-data</artifactId>10 <version>${lyyzoo.version}</version>11 </dependency>12 <dependency>13 <groupId>com.lyyzoo</groupId>14 <artifactId>lyyzoo-starter-base</artifactId>15 <version>${lyyzoo.version}</version>16 </dependency>17 <dependency>18 <groupId>com.lyyzoo</groupId>19 <artifactId>lyyzoo-starter-jpa</artifactId>20 <version>${lyyzoo.version}</version>21 </dependency>② JDBC related, the related jar package is c3p0, which is used for database connection pool; mysql driver package; dbutils, which simply encapsulates JDBC and is simple and convenient to use.

 ##
## 1 <!-- jdbc --> 2 <dependency> 3 <groupId>com.mchange</groupId> 4 <artifactId>c3p0</artifactId> 5 <version>${c3p0.version}</version> 6 </dependency> 7 <dependency> 8 <groupId>mysql</groupId> 9 <artifactId>mysql-connector-java</artifactId>10 <version>${mysql.version}</version>11 </dependency>12 <dependency>13 <groupId>commons-dbutils</groupId>14 <artifactId>commons-dbutils</artifactId>15 <version>1.5</version>16 </dependency>

1 <!-- log --> 2 <dependency> 3 <groupId>org.slf4j</groupId> 4 <artifactId>slf4j-api</artifactId> 5 <version>${slf4j.version}</version> 6 </dependency> 7 <dependency> 8 <groupId>ch.qos.logback</groupId> 9 <artifactId>logback-classic</artifactId>10 <version>${logback.version}</version>11 </dependency>12 <!-- slf4j -->13 <dependency>14 <groupId>org.slf4j</groupId>15 <artifactId>log4j-over-slf4j</artifactId>16 <version>${slf4j.version}</version>17 </dependency>

1 <!-- springframework --> 2 <dependency> 3 <groupId>org.springframework</groupId> 4 <artifactId>spring-aop</artifactId> 5 <version>${spring.version}</version> 6 </dependency> 7 <dependency> 8 <groupId>org.springframework</groupId> 9 <artifactId>spring-aspects</artifactId>10 <version>${spring.version}</version>11 </dependency>12 <dependency>13 <groupId>org.springframework</groupId>14 <artifactId>spring-beans</artifactId>15 <version>${spring.version}</version>16 </dependency>17 <dependency>18 <groupId>org.springframework</groupId>19 <artifactId>spring-context</artifactId>20 <version>${spring.version}</version>21 </dependency>22 <dependency>23 <groupId>org.springframework</groupId>24 <artifactId>spring-context-support</artifactId>25 <version>${spring.version}</version>26 </dependency>27 <dependency>28 <groupId>org.springframework</groupId>29 <artifactId>spring-core</artifactId>30 <version>${spring.version}</version>31 </dependency>32 <dependency>33 <groupId>org.springframework</groupId>34 <artifactId>spring-jdbc</artifactId>35 <version>${spring.version}</version>36 </dependency>37 <dependency>38 <groupId>org.springframework</groupId>39 <artifactId>spring-jms</artifactId>40 <version>${spring.version}</version>41 </dependency>42 <dependency>43 <groupId>org.springframework</groupId>44 <artifactId>spring-orm</artifactId>45 <version>${spring.version}</version>46 </dependency>47 <dependency>48 <groupId>org.springframework</groupId>49 <artifactId>spring-tx</artifactId>50 <version>${spring.version}</version>51 </dependency>52 <dependency>53 <groupId>org.springframework</groupId>54 <artifactId>spring-web</artifactId>55 <version>${spring.version}</version>56 </dependency>57 <dependency>58 <groupId>org.springframework</groupId>59 <artifactId>spring-webmvc</artifactId>60 <version>${spring.version}</version>61 </dependency>

1 <dependency> 2 <groupId>org.hibernate</groupId> 3 <artifactId>hibernate-c3p0</artifactId> 4 <version>${hibernate.version}</version> 5 </dependency> 6 <dependency> 7 <groupId>org.hibernate.common</groupId> 8 <artifactId>hibernate-commons-annotations</artifactId> 9 <version>${hibernate.version}</version>10 </dependency>11 <dependency>12 <groupId>org.hibernate</groupId>13 <artifactId>hibernate-core</artifactId>14 <version>${hibernate.version}</version>15 </dependency>16 <dependency>17 <groupId>org.hibernate</groupId>18 <artifactId>hibernate-entitymanager</artifactId>19 <version>${hibernate.version}</version>20 </dependency>
所有的依赖添加好后,就需要为各个子模块添加具体的依赖了,根据每个子模块的功能,添加相关的依赖,而不是将所有的依赖一次性加入。这样我们就可以根据自己开发的项目的需要,添加模块依赖,而不是一次性加入所有jar包,避免冗余,增大项目的体积。下面以lyyzoo-base-data和lyyzoo-starter-jpa为例说明。
lyyzoo-base-data模块是基础数据相关,主要与数据库打交道,那么就需要引入mysql驱动、数据库连接池c3p0等,pom.xml如下:


1 <project xmlns="http://maven.apache.org/POM/4.0.0" xmlns:xsi="http://www.w3.org/2001/XMLSchema-instance" 2 xsi:schemaLocation="http://maven.apache.org/POM/4.0.0 "> 3 <modelVersion>4.0.0</modelVersion> 4 <parent> 5 <groupId>com.lyyzoo</groupId> 6 <artifactId>lyyzoo-base</artifactId> 7 <version>1.0-SNAPSHOT</version> 8 </parent> 9 <artifactId>lyyzoo-base-data</artifactId>10 <name>${project.artifactId}</name>11 <packaging>jar</packaging>12 13 <dependencies>14 <!-- dbutils -->15 <dependency>16 <groupId>commons-dbutils</groupId>17 <artifactId>commons-dbutils</artifactId>18 </dependency>19 <!-- jdbc -->20 <dependency>21 <groupId>mysql</groupId>22 <artifactId>mysql-connector-java</artifactId>23 </dependency>24 <dependency>25 <groupId>com.mchange</groupId>26 <artifactId>c3p0</artifactId>27 </dependency>28 <!-- test -->29 <dependency>30 <groupId>com.lyyzoo</groupId>31 <artifactId>lyyzoo-base-test</artifactId>32 <scope>test</scope>33 </dependency>34 </dependencies>35 </project>lyyzoo-starter-jpa是Java持久化相关,所以主要引入hibernate相关的依赖,同时,starter-jpa会依赖base-data及starter-base,pom.xml如下:


1 <project xmlns="http://maven.apache.org/POM/4.0.0" xmlns:xsi="http://www.w3.org/2001/XMLSchema-instance" 2 xsi:schemaLocation="http://maven.apache.org/POM/4.0.0 "> 3 <modelVersion>4.0.0</modelVersion> 4 <parent> 5 <groupId>com.lyyzoo</groupId> 6 <artifactId>lyyzoo-starter</artifactId> 7 <version>1.0-SNAPSHOT</version> 8 </parent> 9 <artifactId>lyyzoo-starter-jpa</artifactId>10 <name>${project.artifactId}</name>11 <packaging>jar</packaging>12 13 <dependencies>14 <dependency>15 <groupId>com.lyyzoo</groupId>16 <artifactId>lyyzoo-base-data</artifactId>17 </dependency>18 <dependency>19 <groupId>com.lyyzoo</groupId>20 <artifactId>lyyzoo-starter-base</artifactId>21 </dependency>22 <dependency>23 <groupId>org.hibernate</groupId>24 <artifactId>hibernate-c3p0</artifactId>25 </dependency>26 <dependency>27 <groupId>org.hibernate.common</groupId>28 <artifactId>hibernate-commons-annotations</artifactId>29 </dependency>30 <dependency>31 <groupId>org.hibernate</groupId>32 <artifactId>hibernate-core</artifactId>33 </dependency>34 <dependency>35 <groupId>org.hibernate</groupId>36 <artifactId>hibernate-ehcache</artifactId>37 </dependency>38 <dependency>39 <groupId>org.hibernate.javax.persistence</groupId>40 <artifactId>hibernate-jpa-2.1-api</artifactId>41 </dependency>42 <dependency>43 <groupId>org.hibernate</groupId>44 <artifactId>hibernate-validator</artifactId>45 </dependency>46 <dependency>47 <groupId>com.lyyzoo</groupId>48 <artifactId>lyyzoo-starter-test</artifactId>49 <scope>test</scope>50 </dependency>51 </dependencies>52 </project>有了前面的基础之后,接下来进行重点的类结构设计。底层需要做的最重要的工作就是将一些通用的类抽象出来,以便于以后重用,从而提高开发效率。例如返回结果和分页类的封装、通用的工具类、JDBC相关的操作等。
说明一下,整个底层很大一部分是从之前实习的公司(这个就不说了)直接拿过来的,有些则更改了。相信我拿取的这部分代码并不会涉及机密问题,不用于商业用途,仅仅只是学习,应该没多大问题。
lyyzoo-base-core 目录结构:
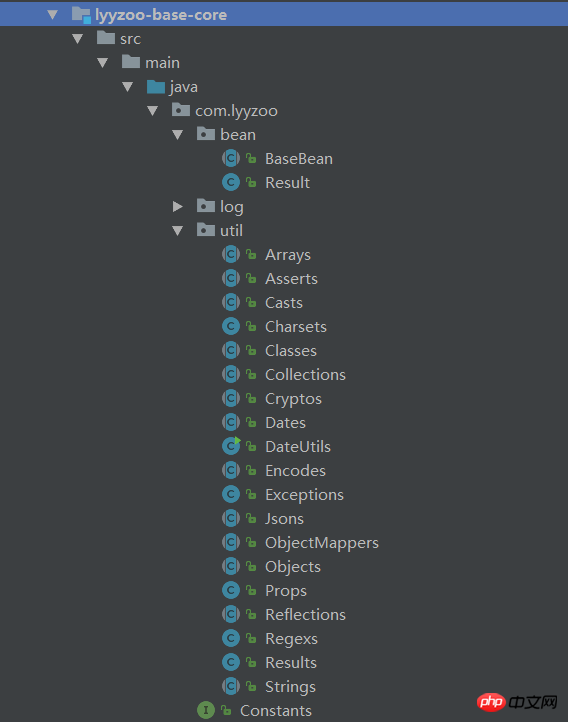
lyyzoo-base-core是基础核心,封装了返回结果和加入了一些常用的工具类。
com.lyyzoo.bean包下封装了BaseBean和Result,BaseBean是Bean类的一个基础类,实现了序列化,重写了toString()方法,如下:


1 package com.lyyzoo.bean; 2 3 import org.apache.commons.lang3.builder.ToStringBuilder; 4 import org.apache.commons.lang3.builder.ToStringStyle; 5 6 import java.io.Serializable; 7 8 /** 9 * BaseBean 实现序列化 <p>10 *11 * @author bojiangzhou12 * @date 2017-03-2713 */14 public abstract class BaseBean implements Serializable {15 16 /**17 * ToStringBuilder – 用于辅助实现Object.toString()方法<p>18 */19 public String toString() {20 return ToStringBuilder.reflectionToString(this, ToStringStyle.MULTI_LINE_STYLE);21 }22 23 }Result则封装了返回的结果,这里主要与ExtJs相对应,ExtJs进行ajax请求时,返回success=true,会进入success()方法;返回success=false,会进入failure()方法。同时,封装了返回消息、标识、错误信息等,便于前端拿到相应数据。


1 package com.lyyzoo.bean; 2 3 import lombok.Data; 4 5 import java.util.Map; 6 7 /** 8 * 封装返回结果<p> 9 *10 * @author bojiangzhou11 * @date 2017-03-2712 */13 @Data14 public class Result extends BaseBean {15 private static final long serialVersionUID = 1L;16 17 /**18 * 成功标志19 */20 public boolean success;21 /**22 * 返回标示23 */24 public Integer code;25 /**26 * 相关消息27 */28 public String msg;29 /**30 * 相关数据31 */32 public Object data;33 /**34 * 错误详细35 */36 public Map<String, Object> errors;37 38 public Result() {39 40 }41 42 public Result(boolean success) {43 this.success = success;44 }45 46 public Result(boolean success, Integer code, Object data, String msg) {47 this(success);48 this.code = code;49 this.data = data;50 this.msg = msg;51 }52 53 public Result(Integer code, Map<String, Object> errors, String msg) {54 this.success = false;55 this.code = code;56 this.errors = errors;57 this.msg = msg;58 }59 60 public boolean isSuccess() {61 return this.success;62 }63 64 public boolean hasErrors() {65 if (this.errors != null && this.errors.size() > 0) {66 return true;67 }68 return false;69 }70 }其它的主要是一些工具类,例如Arrays继承了org.apache.commons.lang3.ArrayUtils,使得Arrays具有了丰富的操作集合的工具。再如Dates,Dates里封装了大量的对日期操作的方法,比如格式化日期、获取某个日期当天的开始时间和结束时间等。
lyyzoo-starter-base 目录结构:
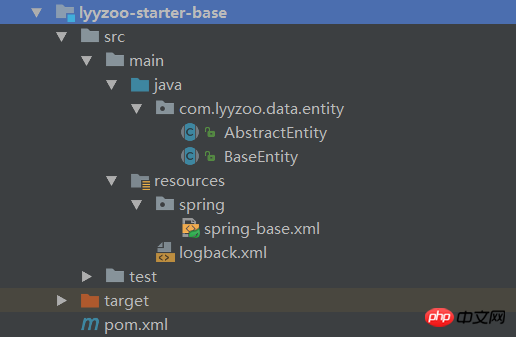
lyyzoo-starter-base是web应用程序的一个基础,主要封装了基础实体类以及spring-base和日志的配置。实体的顶层是AbstractEntity


1 package com.lyyzoo.data.entity; 2 3 import com.lyyzoo.bean.BaseBean; 4 5 import java.io.Serializable; 6 7 /** 8 * 抽象实体类 重写equals和hashCode方法 9 *10 * @author bojiangzhou11 * @date 2017-03-2812 */13 @SuppressWarnings("serial")14 public abstract class AbstractEntity<ID extends Serializable> extends BaseBean implements Serializable {15 16 public abstract ID getId();17 18 @Override19 public boolean equals(Object obj) {20 21 if (null == obj) {22 return false;23 }24 if (this == obj) {25 return true;26 }27 if (!getClass().equals(obj.getClass())) {28 return false;29 }30 31 AbstractEntity<?> that = (AbstractEntity<?>) obj;32 33 return null == this.getId() ? false : this.getId().equals(that.getId());34 }35 36 @Override37 public int hashCode() {38 int hashCode = 17;39 40 hashCode += null == getId() ? 0 : getId().hashCode() * 31;41 42 return hashCode;43 }44 45 }BaseEntity则继承AbstractEntity,BaseEntity作为其它实体的父类存在,BaseEntity定义了主键ID的生成策略。代码如下:


1 package com.lyyzoo.data.entity; 2 3 import lombok.Data; 4 5 import javax.persistence.GeneratedValue; 6 import javax.persistence.GenerationType; 7 import javax.persistence.Id; 8 import javax.persistence.MappedSuperclass; 9 10 /**11 * 统一定义id的entity基类.12 * <p/>13 * 抽象实体基类,提供统一的ID,和相关的基本功能14 * <p/>15 */16 @Data17 @MappedSuperclass18 @SuppressWarnings("serial")19 public abstract class BaseEntity extends AbstractEntity<Long> {20 21 /**22 * id 字段23 */24 @Id25 protected Long id;26 27 @Id28 @GeneratedValue(strategy = GenerationType.IDENTITY)29 public Long getId() {30 return this.id;31 }32 33 public void setId(Long id) {34 this.id = id;35 }36 }spring-base.xml是基础配置,主要配置了扫描系统的配置文件、注解等。


1 <?xml version="1.0" encoding="UTF-8"?> 2 <beans xmlns:xsi="http://www.w3.org/2001/XMLSchema-instance" 3 xmlns="http://www.springframework.org/schema/beans" 4 xmlns:beans="http://www.springframework.org/schema/beans" 5 xmlns:context="http://www.springframework.org/schema/context" 6 xmlns:aop="http://www.springframework.org/schema/aop" 7 xmlns:tx="http://www.springframework.org/schema/tx" 8 xmlns:util="http://www.springframework.org/schema/util" 9 xmlns:mvc="http://www.springframework.org/schema/mvc"10 xmlns:jee="http://www.springframework.org/schema/jee"11 xmlns:jdbc="http://www.springframework.org/schema/jdbc"12 xmlns:tool="http://www.springframework.org/schema/tool"13 xmlns:dwr="http://www.directwebremoting.org/schema/spring-dwr"14 xsi:schemaLocation="15 http://www.springframework.org/schema/beans/spring-beans.xsd16 http://www.springframework.org/schema/context/spring-context.xsd17 http://www.springframework.org/schema/aop/spring-aop.xsd18 http://www.springframework.org/schema/tx/spring-tx.xsd19 http://www.springframework.org/schema/util/spring-util.xsd20 http://www.springframework.org/schema/mvc/spring-mvc.xsd21 http://www.springframework.org/schema/jee/spring-jee.xsd22 http://www.springframework.org/schema/jdbc/spring-jdbc.xsd23 http://www.springframework.org/schema/tool/spring-tool.xsd24 http://www.directwebremoting.org/schema/spring-dwr-3.0.xsd"25 >26 27 <description>Spring Base Config</description>28 29 <!-- 加载config.properties -->30 <context:property-placeholder location="classpath*:/config/*.properties" file-encoding="UTF-8" />31 32 <!-- 使用annotation 自动注册bean, 并保证@Required、@Autowired的属性被注入 -->33 <context:component-scan base-package="com.lyyzoo">34 <context:exclude-filter type="annotation" expression="org.springframework.stereotype.Controller"/>35 <context:exclude-filter type="annotation" expression="org.springframework.web.bind.annotation.ControllerAdvice"/>36 </context:component-scan>37 38 <!-- 支持上传文件 -->39 <bean id="multipartResolver" class="org.springframework.web.multipart.commons.CommonsMultipartResolver"/>40 41 </beans>
lyyzoo-starter-jpa 目录结构:
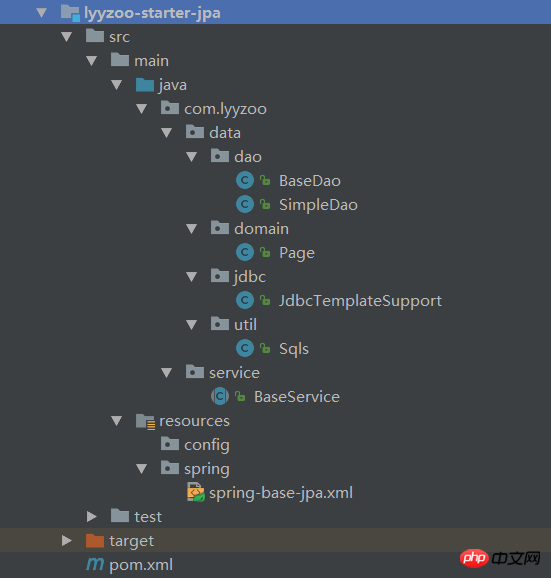
lyyzoo-starter-jpa集成了持久化相关的操作,配置等。
首先需要做持久化相关的配置(spring-base-jpa.xml),如数据源、SessionFactory、事务管理等。数据源使用c3p0,数据源相关配置如数据库驱动、地址等写到到配置文件中。配置Hibernate SessionFactory的同时,增加了JdbcTemplate。事务管理器使用Hibernate的事务管理。总的配置如下:


1 <?xml version="1.0" encoding="UTF-8"?> 2 <beans xmlns:xsi="http://www.w3.org/2001/XMLSchema-instance" 3 xmlns="http://www.springframework.org/schema/beans" 4 xmlns:beans="http://www.springframework.org/schema/beans" 5 xmlns:tx="http://www.springframework.org/schema/tx" 6 xmlns:aop="http://www.springframework.org/schema/aop" 7 xmlns:context="http://www.springframework.org/schema/context" 8 xmlns:mvc="http://www.springframework.org/schema/mvc" 9 xmlns:util="http://www.springframework.org/schema/util" 10 xmlns:jee="http://www.springframework.org/schema/jee" 11 xmlns:jdbc="http://www.springframework.org/schema/jdbc" 12 xmlns:tool="http://www.springframework.org/schema/tool" 13 xmlns:dwr="http://www.directwebremoting.org/schema/spring-dwr" 14 xsi:schemaLocation=" 15 http://www.springframework.org/schema/beans/spring-beans.xsd 16 http://www.springframework.org/schema/context/spring-context.xsd 17 http://www.springframework.org/schema/aop/spring-aop.xsd 18 http://www.springframework.org/schema/tx/spring-tx.xsd 19 http://www.springframework.org/schema/util/spring-util.xsd 20 http://www.springframework.org/schema/mvc/spring-mvc.xsd 21 http://www.springframework.org/schema/jee/spring-jee.xsd 22 http://www.springframework.org/schema/jdbc/spring-jdbc.xsd 23 http://www.springframework.org/schema/tool/spring-tool.xsd 24 http://www.directwebremoting.org/schema/spring-dwr-3.0.xsd" 25 > 26 27 <description>Spring Jpa</description> 28 29 <!-- 使用C3P0 --> 30 <bean id="dataSource" class="com.mchange.v2.c3p0.ComboPooledDataSource"> 31 <property name="driverClass" value="${jdbc.driver}"/> 32 <property name="jdbcUrl" value="${jdbc.url}"/> 33 <property name="user" value="${jdbc.username}"/> 34 <property name="password" value="${jdbc.password}"/> 35 36 <!-- default: 3 --> 37 <!-- 初始化时获取三个连接,取值应在minPoolSize与maxPoolSize之间。--> 38 <property name="initialPoolSize" value="${c3p0.initialPoolSize:5}"/> 39 40 <!-- default: 3 --> 41 <!-- 连接池保留最小连接数--> 42 <property name="minPoolSize" value="${c3p0.minPoolSize:5}"/> 43 44 <!-- default: 15 --> 45 <!-- 连接池保留最大连接数。--> 46 <property name="maxPoolSize" value="${c3p0.maxPoolSize:15}"/> 47 48 <!-- default: 0(秒) = 永不丢弃--> 49 <!-- 最大空闲时间,600 秒内未使用则连接被丢弃。--> 50 <property name="maxIdleTime" value="${c3p0.maxIdleTime:600}"/> 51 </bean> 52 53 <!-- sessionFactory --> 54 <bean id="sessionFactory" class="org.springframework.orm.hibernate5.LocalSessionFactoryBean"> 55 <property name="dataSource" ref="dataSource" /> 56 <property name="hibernateProperties" > 57 <props> 58 <prop key="dialect">${hibernate.dialect}</prop> 59 <prop key="show_sql">${hibernate.show.sql}</prop> 60 <prop key="hbm2ddl.auto">${hibernate.hbm2ddl.auto}</prop> 61 </props> 62 </property> 63 <!-- 扫描hibernate注解实体 --> 64 <property name="packagesToScan"> 65 <list> 66 <value>com.lyyzoo.*.entity</value> 67 </list> 68 </property> 69 </bean> 70 71 <!-- jdbcTemplate --> 72 <bean id="jdbcTemplate" class="org.springframework.jdbc.core.JdbcTemplate"> 73 <property name="dataSource" ref="dataSource"/> 74 </bean> 75 <bean id="namedParameterJdbcTemplate" class="org.springframework.jdbc.core.namedparam.NamedParameterJdbcTemplate"> 76 <constructor-arg ref="dataSource"/> 77 </bean> 78 <bean id="jdbcTemplateSupport" class="com.lyyzoo.data.jdbc.JdbcTemplateSupport"> 79 <property name="dataSource" ref="dataSource"/> 80 <property name="namedParameterJdbcTemplate" ref="namedParameterJdbcTemplate"/> 81 </bean> 82 83 <!-- 事务管理器 --> 84 <bean id="transactionManager" class="org.springframework.orm.hibernate5.HibernateTransactionManager"> 85 <property name="sessionFactory" ref="sessionFactory" /> 86 </bean> 87 88 <!-- 事务通知属性 --> 89 <tx:advice id="transactionManagerAdvice" transaction-manager="transactionManager"> 90 <tx:attributes> 91 <tx:method name="get*" read-only="true" /> 92 <tx:method name="load*" read-only="true" /> 93 <tx:method name="find*" read-only="true" /> 94 <tx:method name="list*" read-only="true" /> 95 <tx:method name="page*" read-only="true" /> 96 <tx:method name="query*" read-only="true" /> 97 <tx:method name="*" propagation="REQUIRED" /> 98 </tx:attributes> 99 </tx:advice>100 101 <!-- AOP 事务 -->102 <aop:config proxy-target-class="true">103 <aop:pointcut id="serviceMethod" expression="execution(* com.lyyzoo..*Service.*(..))"/>104 <aop:advisor pointcut-ref="serviceMethod" advice-ref="transactionManagerAdvice"/>105 </aop:config>106 107 <!-- 扫描注解 -->108 <context:component-scan base-package="com.lyyzoo" />109 110 </beans>然后在com.lyyzoo.data.domain包下,Page封装了分页相关的属性,如当前页数据、页码、每页大小、总页数等。com.lyyzoo.data.util包下,Sqls封装了操作sql语句的工具,比如根据传入的查询语句,返回查询总数的sql语句。在com.lyyzoo.data.jdbc包下,JdbcTemplateSupport封装了比较复杂的查询,比如根据传入的参数、分页条件等,自动查询数据、总数并封装到Page里返回。com.lyyzoo.data.dao包下,SimpleDao封装了基于Hibernate SessionFactory的简单的增删改查操作,如save(),get()等方法。dao包下,BaseDao继承SimpleDao,并代理了JdbcTemplateSupport,使得BaseDao具有SimpleDao和JdbcTemplateSupport的功能,BaseDao则作为其它dao的一个父类存在。最后,在com.lyyzoo.service包下,BaseService代理了BaseDao,进行了进一步的封装,BaseService是其它service类的父类,其它service就可以直接调用save、get、page等内置方法。
lyyzoo-starter-web自然跟web相关,在com.lyyzoo.web包下,BaseController作为controller类的父类,主要封装了返回结果集等信息。还有web相关配置,如视图解析器等内容:


1 <?xml version="1.0" encoding="UTF-8"?> 2 <beans xmlns:xsi="http://www.w3.org/2001/XMLSchema-instance" 3 xmlns="http://www.springframework.org/schema/beans" 4 xmlns:beans="http://www.springframework.org/schema/beans" 5 xmlns:tx="http://www.springframework.org/schema/tx" 6 xmlns:aop="http://www.springframework.org/schema/aop" 7 xmlns:context="http://www.springframework.org/schema/context" 8 xmlns:mvc="http://www.springframework.org/schema/mvc" 9 xmlns:task="http://www.springframework.org/schema/task"10 xmlns:util="http://www.springframework.org/schema/util"11 xmlns:jee="http://www.springframework.org/schema/jee"12 xmlns:jdbc="http://www.springframework.org/schema/jdbc"13 xmlns:tool="http://www.springframework.org/schema/tool"14 xmlns:dwr="http://www.directwebremoting.org/schema/spring-dwr"15 xsi:schemaLocation="16 http://www.springframework.org/schema/beans/spring-beans.xsd17 http://www.springframework.org/schema/context/spring-context.xsd18 http://www.springframework.org/schema/aop/spring-aop.xsd19 http://www.springframework.org/schema/tx/spring-tx.xsd20 http://www.springframework.org/schema/util/spring-util.xsd21 http://www.springframework.org/schema/mvc/spring-mvc-3.2.xsd22 http://www.springframework.org/schema/task/spring-task-3.2.xsd23 http://www.springframework.org/schema/jee/spring-jee.xsd24 http://www.springframework.org/schema/jdbc/spring-jdbc.xsd25 http://www.springframework.org/schema/tool/spring-tool.xsd26 http://www.directwebremoting.org/schema/spring-dwr-3.0.xsd"27 >28 29 <description>Spring Web</description>30 31 <!-- 加载config.properties -->32 <context:property-placeholder location="classpath*:/config/*.properties" file-encoding="UTF-8" />33 34 <!-- 扫描Controller以及ControllerAdvice -->35 <context:component-scan base-package="com.lyyzoo" use-default-filters="false">36 <context:include-filter type="annotation" expression="org.springframework.stereotype.Controller"/>37 <context:include-filter type="annotation" expression="org.springframework.web.bind.annotation.ControllerAdvice"/>38 </context:component-scan>39 40 <!-- 静态资源映射 -->41 <mvc:resources location="/static/" mapping="/static/**"/>42 43 <!-- 容器默认的DefaultServletHandler处理 所有静态内容与无RequestMapping处理的URL--> 44 <mvc:default-servlet-handler />45 46 <!-- 支持@Controller注解 -->47 <mvc:annotation-driven />48 49 <!-- 视图解析器 -->50 <bean id="jspViewResolver" class="org.springframework.web.servlet.view.InternalResourceViewResolver">51 <property name="prefix" value="/WEB-INF/view"/>52 <property name="suffix" value=".jsp"/>53 </bean>54 55 </beans>
类结构图参考《底层类结构.vsd》

在开始开发一个系统之前,首先需要做的就是根据需求分析设计系统的实体对象以及对应的数据库表结构,这是开发的基础。
根据前面的需求分析设计的功能模块,实体对象可以分为5个模块,分别是系统模块(system)、基础模块(base)、采购模块(purchase)、销售模块(sale)、库存模块(stock)。下面是实体清单:
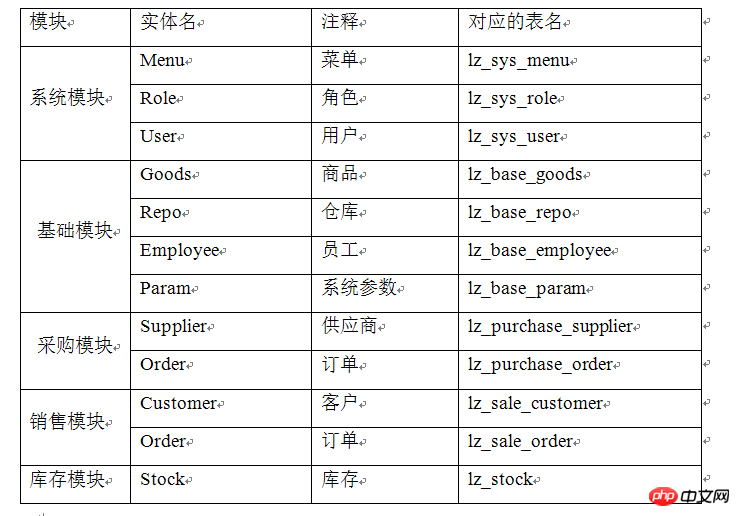
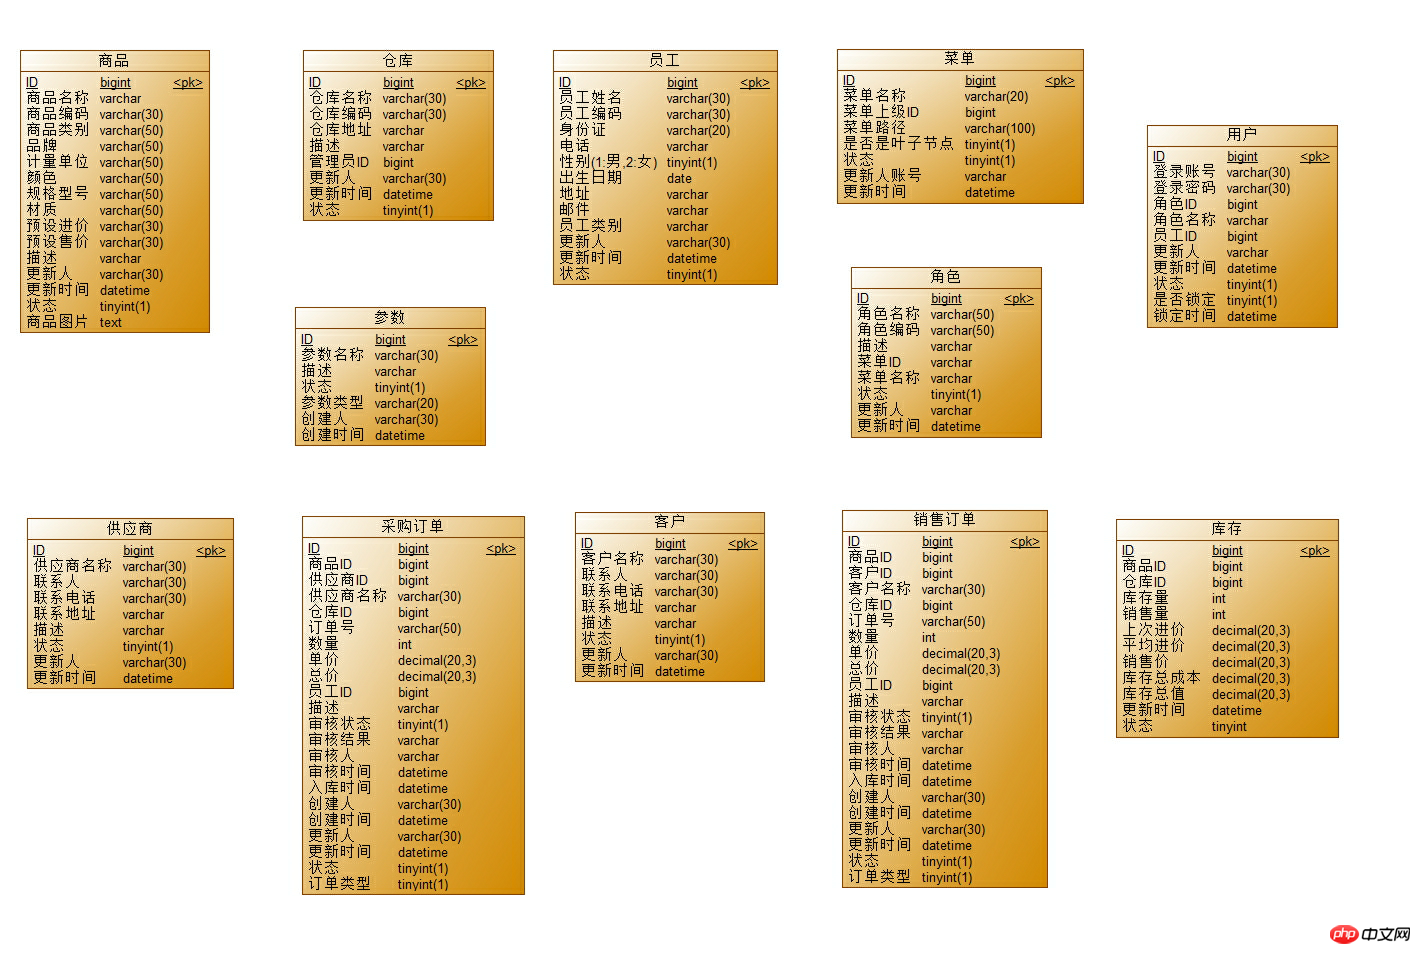
有了清单之后,利用PowerDesigner进行数据库物理模型设计。由于拥有对数据库的完全控制权,所以不对表设置约束,所有的约束在程序代码中进行控制。下面列出各个实体的属性即对应的表,具体可参考《数据库物理模型.pdm》。物理模型设计完成后,创建名为gpss的数据库,然后创建各个表。
数据库模型:
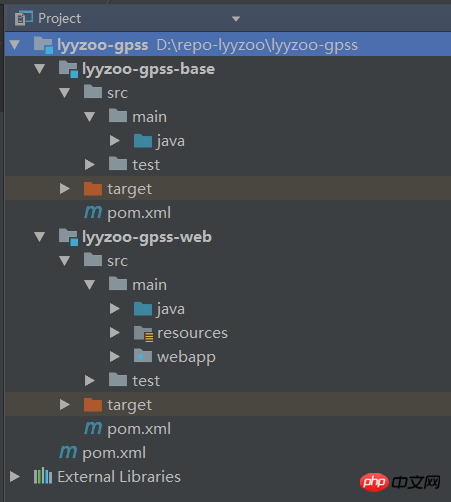
需求分析做完了,技术没问题,底层架构也设计好了,数据库设计好了,前面的所有准备工作做完了,下面就要进行燃气管进销存系统的编码实现了。首先要做的工作就是创建工程,项目名拟为gpss,即燃气管进销存(Gas Purchase Sale Stock)的缩写,工程名则为lyyzoo-gpss。
在IDEA中创建lyyzoo-gpss的maven工程,继承lyyzoo。同时,在lyyzoo-gpss下创建两个子模块,分别为lyyzoo-gpss-base和lyyzoo-gpss-web,base模块包含了系统的dao、entity、service等层次,主要为java文件;web则包含了controller层、jsp、js等web相关资源文件。
lyyzoo-gpss目录结构:
lyyzoo-gpss > pom.xml:


1 <project xmlns="http://maven.apache.org/POM/4.0.0" xmlns:xsi="http://www.w3.org/2001/XMLSchema-instance" 2 xsi:schemaLocation="http://maven.apache.org/POM/4.0.0 "> 3 <modelVersion>4.0.0</modelVersion> 4 <parent> 5 <groupId>com.lyyzoo</groupId> 6 <artifactId>lyyzoo</artifactId> 7 <version>1.0-SNAPSHOT</version> 8 </parent> 9 <groupId>com.lyyzoo.gpss</groupId>10 <artifactId>lyyzoo-gpss</artifactId>11 <name>lyyzoo :: gpss</name>12 <packaging>pom</packaging>13 14 <modules>15 <module>lyyzoo-gpss-base</module>16 <module>lyyzoo-gpss-web</module>17 </modules>18 19 <profiles>20 <!-- 开发环境 -->21 <profile>22 <id>dev</id>23 <activation>24 <property>25 <name>env</name>26 <value>dev</value>27 </property>28 </activation>29 </profile>30 <!-- 线上环境 -->31 <profile>32 <id>online</id>33 <activation>34 <property>35 <name>env</name>36 <value>online</value>37 </property>38 </activation>39 </profile>40 </profiles>41 <build>42 <plugins>43 <plugin>44 <groupId>com.juvenxu.portable-config-maven-plugin</groupId>45 <artifactId>portable-config-maven-plugin</artifactId>46 <version>1.1.5</version>47 <executions>48 <execution>49 <goals>50 <goal>replace-package</goal>51 </goals>52 </execution>53 </executions>54 <configuration>55 <portableConfig>src/main/resources/portable/config-${env}.xml</portableConfig>56 </configuration>57 </plugin>58 </plugins>59 </build>60 61 </project>lyyzoo-gpss-base主要是dao层、service层、model层的集成,所以需要依赖于底层lyyzoo-starter-jpa、lyyzoo-starter-web。
lyyzoo-gpss-base > pom.xml:


1 <project xmlns="http://maven.apache.org/POM/4.0.0" xmlns:xsi="http://www.w3.org/2001/XMLSchema-instance" 2 xsi:schemaLocation="http://maven.apache.org/POM/4.0.0 "> 3 <modelVersion>4.0.0</modelVersion> 4 <parent> 5 <groupId>com.lyyzoo.gpss</groupId> 6 <artifactId>lyyzoo-gpss</artifactId> 7 <version>1.0-SNAPSHOT</version> 8 </parent> 9 <artifactId>lyyzoo-gpss-base</artifactId>10 <name>lyyzoo :: gpss :: base</name>11 <packaging>jar</packaging>12 13 <dependencies>14 <dependency>15 <groupId>com.lyyzoo</groupId>16 <artifactId>lyyzoo-starter-jpa</artifactId>17 </dependency>18 <dependency>19 <groupId>com.lyyzoo</groupId>20 <artifactId>lyyzoo-starter-web</artifactId>21 </dependency>22 </dependencies>23 24 </project>
lyyzoo-gpss-web是web相关,是controller层所在。依赖于lyyzoo-gpss-base、lyyzoo-starter-base等。
lyyzoo-gpss-web > pom.xml:


1 <project xmlns="http://maven.apache.org/POM/4.0.0" xmlns:xsi="http://www.w3.org/2001/XMLSchema-instance" 2 xsi:schemaLocation="http://maven.apache.org/POM/4.0.0 "> 3 <modelVersion>4.0.0</modelVersion> 4 <parent> 5 <groupId>com.lyyzoo.gpss</groupId> 6 <artifactId>lyyzoo-gpss</artifactId> 7 <version>1.0-SNAPSHOT</version> 8 </parent> 9 <artifactId>lyyzoo-gpss-web</artifactId>10 <name>lyyzoo :: gpss :: web</name>11 <packaging>war</packaging>12 13 <dependencies>14 <dependency>15 <groupId>com.lyyzoo.gpss</groupId>16 <artifactId>lyyzoo-gpss-base</artifactId>17 <version>${project.version}</version>18 </dependency>19 <dependency>20 <groupId>com.lyyzoo</groupId>21 <artifactId>lyyzoo-starter-base</artifactId>22 </dependency>23 <dependency>24 <groupId>com.lyyzoo</groupId>25 <artifactId>lyyzoo-starter-jpa</artifactId>26 </dependency>27 <dependency>28 <groupId>com.lyyzoo</groupId>29 <artifactId>lyyzoo-starter-web</artifactId>30 </dependency>31 <dependency>32 <groupId>com.lyyzoo</groupId>33 <artifactId>lyyzoo-starter-test</artifactId>34 </dependency>35 36 37 </dependencies>38 39 40 <build>41 <finalName>gpss</finalName>42 <outputDirectory>src/main/webapp/WEB-INF/classes</outputDirectory>43 </build>44 45 </project>工程建好后,首要要做的就是系统的配置工作了,如web.xml,这应该算是web项目的起点了。进入lyyzoo-gpss-web/src/main/webapp/WEB-INF/web.xml,进行web的配置,主要的一些配置有加载系统的配置文件、Spring、字符过滤器、SpringMVC等配置。
一些基础的配置如下:


1 <?xml version="1.0" encoding="UTF-8"?> 2 <web-app xmlns="http://java.sun.com/xml/ns/javaee" 3 xmlns:xsi="http://www.w3.org/2001/XMLSchema-instance" 4 xsi:schemaLocation="http://java.sun.com/xml/ns/javaee 5 " 6 version="3.0"> 7 8 <display-name>lyyzoo :: gpss</display-name> 9 10 <!-- 加载配置文件 -->11 <context-param>12 <param-name>contextConfigLocation</param-name>13 <param-value>classpath*:/spring/spring-base*.xml</param-value>14 </context-param>15 16 <!-- Spring -->17 <listener>18 <listener-class>org.springframework.web.context.ContextLoaderListener</listener-class>19 </listener>20 21 <!-- 编码过滤器 -->22 <filter>23 <filter-name>encodingFilter</filter-name>24 <filter-class>org.springframework.web.filter.CharacterEncodingFilter</filter-class>25 <init-param>26 <param-name>encoding</param-name>27 <param-value>UTF-8</param-value>28 </init-param>29 <init-param>30 <param-name>forceEncoding</param-name>31 <param-value>true</param-value>32 </init-param>33 </filter>34 <filter-mapping>35 <filter-name>encodingFilter</filter-name>36 <url-pattern>/*</url-pattern>37 </filter-mapping>38 39 <!-- 访问控制 -->40 <filter>41 <filter-name>VisitFilter</filter-name>42 <filter-class>com.lyyzoo.gpss.filter.VisitFilter</filter-class>43 </filter>44 <filter-mapping>45 <filter-name>VisitFilter</filter-name>46 <url-pattern>/admin/*</url-pattern>47 </filter-mapping>48 49 <!-- Spring MVC -->50 <servlet>51 <servlet-name>SpringMVC</servlet-name>52 <servlet-class>org.springframework.web.servlet.DispatcherServlet</servlet-class>53 <init-param>54 <param-name>contextConfigLocation</param-name>55 <param-value>classpath*:/spring/spring-web*.xml</param-value>56 </init-param>57 <load-on-startup>1</load-on-startup>58 </servlet>59 <servlet-mapping>60 <servlet-name>SpringMVC</servlet-name>61 <url-pattern>/</url-pattern>62 </servlet-mapping>63 64 <!-- 错误页面 -->65 <error-page>66 <error-code>404</error-code>67 <location>/error/404</location>68 </error-page>69 <error-page>70 <error-code>500</error-code>71 <location>/error/500</location>72 </error-page>73 <error-page>74 <exception-type>java.lang.Throwable</exception-type>75 <location>/error/500</location>76 </error-page>77 78 <!-- 首页 -->79 <welcome-file-list>80 <welcome-file>/</welcome-file>81 </welcome-file-list>82 83 </web-app>
接着,配置系统将会用到的一些属性,如JDBC驱动、数据库用户名和密码等。在lyyzoo-gpss-web/src/main/resources/config下,创建config.properties配置文件,这个配置文件中的属性将会被底层spring配置的文件所引用。
比如JDBC的属性:


1 #################################### 2 # DATABASE 3 #################################### 4 # local_db 5 jdbc.driver=net.sf.log4jdbc.DriverSpy 6 jdbc.url=jdbc:log4jdbc:mysql://localhost:3306/gpss?useUnicode=true&characterEncoding=utf-8&autoReconnect=true&failOverReadOnly=false 7 jdbc.username=root 8 jdbc.password=root 9 10 # 初始化连接11 c3p0.initialPoolSize=512 # 连接池保留最小连接数13 c3p0.minPoolSize=514 # 连接池保留最大连接数15 c3p0.maxPoolSize=1516 # 最大空闲时间17 c3p0.maxIdleTime=60018 19 #hibernate20 hibernate.dialect=org.hibernate.dialect.MySQL5Dialect21 hibernate.show.sql=false22 hibernate.hbm2ddl.auto=update
但是上面的配置只是本机的一个开发环境,如果我将项目发布到生产环境,那就至少需要重新修改数据库地址、用户名和密码。这样是比较麻烦的,所以,在lyyzoo-gpss-web/src/main/portable下创建两个xml文件,分别为开发环境和生产环境的:config-dev.xml和config-online.xml。
config-online.xml:


1 <?xml version="1.0" encoding="utf-8" ?> 2 3 <portable-config> 4 <config-file path="WEB-INF/classes/config/config.properties"> 5 6 <!-- JDBC --> 7 <replace key="jdbc.driver"><![CDATA[com.mysql.jdbc.Driver]]></replace> 8 <replace key="jdbc.url"><![CDATA[jdbc:mysql://192.168.1.91:30112/fff2f025c2b04?useUnicode=true&characterEncoding=utf-8]]></replace> 9 <replace key="jdbc.username">a6564a1169d94</replace>10 <replace key="jdbc.password">d3e6d1aea5e04</replace>11 12 <!-- hibernate -->13 <replace key="hibernate.show.sql">false</replace>14 <replace key="hibernate.hbm2ddl.auto">none</replace>15 16 <!-- debug -->17 <replace key="app.debug">false</replace>18 <replace key="app.env">online</replace>19 <replace key="logback.level">INFO</replace>20 <replace key="jdbc.resultsettable">ERROR</replace>21 22 23 </config-file>24 </portable-config>
然后配置一个“不同环境打包”的maven插件——“portable-config-maven-plugin”,通过该插件,就可以在打包的时候加上需要打包的环境,例如指定online环境,在打包时就会将config-online.xml中的属性替换到config.properties里,这样一来就不必我们手动去替换了。配置好之后,我们在打包时可以使用命令[mvn clean package –Denv=online]打包线上环境的war包。
maven环境配置,在lyyzoo-gpss > pom.xml中配置两个环境:


1 <profiles> 2 <!-- 开发环境 --> 3 <profile> 4 <id>dev</id> 5 <activation> 6 <property> 7 <name>env</name> 8 <value>dev</value> 9 </property>10 </activation>11 </profile>12 <!-- 线上环境 -->13 <profile>14 <id>online</id>15 <activation>16 <property>17 <name>env</name>18 <value>online</value>19 </property>20 </activation>21 </profile>22 </profiles>
不同环境打包插件(portable-config-maven-plugin)的配置:


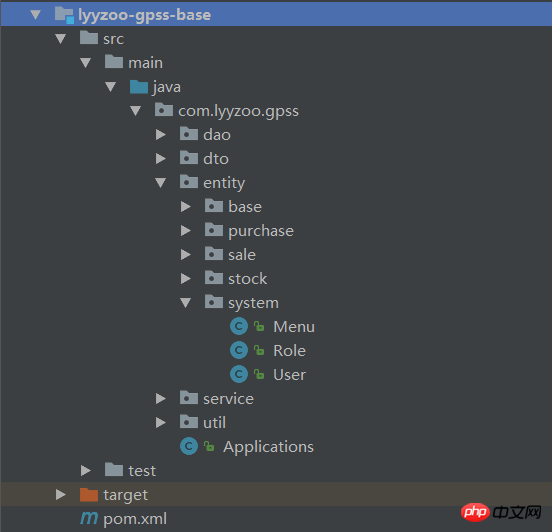
1 <build> 2 <plugins> 3 <plugin> 4 <groupId>com.juvenxu.portable-config-maven-plugin</groupId> 5 <artifactId>portable-config-maven-plugin</artifactId> 6 <version>1.1.5</version> 7 <executions> 8 <execution> 9 <goals>10 <goal>replace-package</goal>11 </goals>12 </execution>13 </executions>14 <configuration>15 <portableConfig>src/main/resources/portable/config-${env}.xml</portableConfig>16 </configuration>17 </plugin>18 </plugins>19 </build>工程建好后,创建包的结构。按照一般的分层方式,分为dao层、entity层、service层,同时,每层下按模块划分为system、base、purchase、sale、stock。然后在entity下根据表设计创建实体类。
lyyzoo-gpss-base 目录结构:
然后是lyyzoo-gpss-web模块,该模块主要是controller层,以及静态资源文件、jsp文件等。com.lyyzoo.gpss.web作为controller层的包,同样,在web下按系统模块划分。
lyyzoo-gpss-web 目录结构:

lyyzoo-gpss-web/src/main/webapp/static作为静态文件的根目录,static/lib目录作为三方类库的根目录,如ExtJs、jQuery、其它的插件等。static/css是系统css文件的根目录;static/img是图片的根目录;static/js是系统js文件根目录,/js下同样按模块划分。
静态资源文件目录结构:

jsp文件不能直接让用户访问,需要放到/WEB-INF下,与配置的spring视图解析器相对应,所有的jsp文件放到/WEB-INF/view目录下,view目录下按模块划分,index.jsp是系统的登录页面。/WEB-INF/layout/目录下,将jsp中需要引入的一些资源等做了整合,如ExtJs的文件、meta描述信息、taglib等,整合后,jsp中如果需要引入整合jsp即可,可减少很多重复的工作。
taglib.jsp中引入了标签和设置了资源的路径:


1 <%@ page contentType="text/html;charset=UTF-8" language="java" %> 2 3 <%-- 引入标签 --%> 4 <%@taglib prefix="c" uri="" %> 5 <%@taglib prefix="fn" uri="" %> 6 <%@taglib prefix="fmt" uri="" %> 7 <%@taglib prefix="sf" uri="" %> 8 9 <%-- 资源路径 --%>10 <c:set var="CTX" value="${pageContext.request.contextPath}" />11 <c:set var="STATIC_CTX_URL" value="${CTX}/static" />12 <c:set var="LIB" value="${STATIC_CTX_URL}/lib" />13 <c:set var="JS" value="${STATIC_CTX_URL}/js"/>14 <c:set var="CSS" value="${STATIC_CTX_URL}/css"/>15 <c:set var="IMG" value="${STATIC_CTX_URL}/img"/>meta.jsp中主要设置了一些meta描述信息和ICO图标:


1 <%@ page contentType="text/html;charset=UTF-8" language="java" %> 2 <%@ include file="/WEB-INF/layout/taglib.jsp" %> 3 4 <meta charset="utf-8"> 5 <meta http-equiv="X-UA-Compatible" content="IE=9,chrome=1"> 6 7 <meta name="description" content=""> 8 <meta name="author" content=""> 9 <meta name="renderer" content="webkit">10 <%-- 图标 --%>11 <link type="image/x-icon" href="${IMG}/favicon.ico" rel="icon">extjs-neptune.jsp则引入了ExtJs相关的css和js文件,以及jQuery等:


1 <%@ page contentType="text/html;charset=UTF-8" language="java" %> 2 <%@ include file="/WEB-INF/layout/taglib.jsp" %> 3 4 <link rel="stylesheet" type="text/css" href="${LIB}/ext/4.2.2/theme/ext-theme-neptune/ext-theme-neptune-all.css?1.1.11"/> 5 <link rel="stylesheet" type="text/css" href="${LIB}/ext/4.2.2/icons/icon.css?1.1.11"/> 6 7 <script type="text/javascript" src="${LIB}/ext/4.2.2/ext-all.js?1.1.11"></script> 8 <script type="text/javascript" src="${LIB}/ext/4.2.2/locale/ext-lang-zh_CN.js?1.1.11"></script> 9 <script type="text/javascript" src="${LIB}/jquery/2.1.1/jquery.js?1.1.11"></script>10 <script type="text/javascript" src="${JS}/Global.js?1.1.11"></script>11 12 <script type="text/javascript">13 window.CTX = "${CTX}";14 window.STATIC_CTX_URL = "${STATIC_CTX_URL}";15 window.LIB = "${LIB}";16 window.JS = "${JS}";17 window.CSS = "${CSS}";18 window.IMG = "${IMG}";19 </script>WEB-INF目录结构:

首先创建一个BaseController,BaseController继承底层的BaseController,增加了HttpSession,以及获取当前登录用户的方法,这样其它的controller继承该BaseController后,就可以非常方便的获得当前session和登录用户了。
BaseController代码如下:


1 package com.lyyzoo.gpss.web; 2 3 import com.lyyzoo.gpss.entity.system.User; 4 import org.springframework.beans.factory.annotation.Autowired; 5 6 import javax.servlet.http.HttpSession; 7 8 /** 9 *10 * <p>11 *12 * @author bojiangzhou13 * @date 2017-04-0214 */15 public class BaseController extends com.lyyzoo.web.BaseController {16 17 @Autowired18 protected HttpSession session;19 20 public User getCurrentUser(){21 return (User) session.getAttribute("currentUser");22 }23 24 public Long getCurrentUserId(){25 return getCurrentUser().getId();26 }27 28 public String getCurrentUserAccount(){29 return getCurrentUser().getAccount();30 }31 32 }创建HomeController作为登录和主页的处理器。主要包含的方法有访问登录页面,访问登录后的主页,以及登录处理等。Controller需要加上@Controller标注该类为controller,使用@RequestMapping()支持访问rest形式的地址访问。HomeController中注入UserService,用于处理用户登录相关的业务。
用户进入登录界面,jsp页面以的形式请求验证码,验证码使用工具类生成,以流的形式输出,生成的验证码保存到session中。用户输入登录账号、密码和验证码登录系统。首先前台会检测输入是否为空等,传到后台,从session中取出验证码判断验证码是否正确,不正确则刷新验证码并且需要用户重新输入验证码。验证码通过后,使用登录账号和密码查找数据库,如果有,则将该用户保存到session中,跳转到管理页面,登录成功。否则提示用户名或密码错误。
HomeController代码如下:


1 package com.lyyzoo.gpss.web; 2 3 import com.lyyzoo.gpss.entity.system.User; 4 import com.lyyzoo.gpss.service.system.UserService; 5 import com.lyyzoo.gpss.util.VCodeGenerator; 6 import com.lyyzoo.util.Cryptos; 7 import com.lyyzoo.util.Strings; 8 import org.springframework.beans.BeanUtils; 9 import org.springframework.beans.factory.annotation.Autowired; 10 import org.springframework.stereotype.Controller; 11 import org.springframework.web.bind.annotation.PathVariable; 12 import org.springframework.web.bind.annotation.RequestMapping; 13 import org.springframework.web.bind.annotation.RequestMethod; 14 15 import javax.imageio.ImageIO; 16 import javax.servlet.http.HttpServletResponse; 17 import javax.servlet.http.HttpSession; 18 import java.awt.image.BufferedImage; 19 import java.io.IOException; 20 21 /** 22 * <p> 23 * 24 * @author bojiangzhou 25 * @date 2017-03-29 26 */ 27 @Controller 28 @RequestMapping("") 29 public class HomeController extends BaseController { 30 31 @Autowired 32 private UserService userService; 33 34 /** 35 * 到首页/登录页面 36 */ 37 @RequestMapping(value = {"", "/", "/index", "/login"}) 38 public String index(){ 39 return "/index"; 40 } 41 42 /** 43 * 管理员主页 44 */ 45 @RequestMapping("/admin/home") 46 public String toHome(){ 47 return "/home/home"; 48 } 49 50 /** 51 * 登录 52 */ 53 @RequestMapping(value = "/login", method = RequestMethod.POST) 54 public String login(String account, String password, String vcode, HttpSession session){ 55 String redirect = REDIRECT("/login"); 56 //基本验证 57 if(Strings.isNullOrEmpty(account)){ 58 session.setAttribute("errorMsg", "账号必须填写!"); 59 return redirect; 60 } 61 if(Strings.isNullOrEmpty(password)){ 62 session.setAttribute("errorMsg", "密码必须填写!"); 63 return redirect; 64 } 65 if(Strings.isNullOrEmpty(vcode)){ 66 session.setAttribute("errorMsg", "验证码必须填写!"); 67 return redirect; 68 } 69 //验证码 70 String sessionVcode = (String) session.getAttribute("vcode"); 71 if(!vcode.equalsIgnoreCase(sessionVcode)){ 72 session.setAttribute("errorMsg", "验证码错误!"); 73 return redirect; 74 } 75 //验证用户名和密码 76 password = Cryptos.encryptMd5(password); 77 User loginUser = userService.login(account, password); 78 if(loginUser == null){ 79 session.setAttribute("errorMsg", "账号或密码错误!"); 80 return redirect; 81 } 82 if(loginUser.getIsLocked() == User.IsLocked.YES){ 83 session.setAttribute("errorMsg", "账号已锁定,不能登录!"); 84 return redirect; 85 } 86 87 //保存到session的时候清除密码 88 User currentUser = new User(); 89 BeanUtils.copyProperties(loginUser, currentUser); 90 currentUser.setPassword(null); 91 92 //登录成功 93 session.setAttribute("currentUser", currentUser); 94 95 return REDIRECT("/admin/home"); 96 } 97 98 /** 99 * 获取验证码100 */101 @RequestMapping("/vcode")102 public void getVCode(HttpSession session, HttpServletResponse response) throws IOException {103 //创建验证码生成器对象104 VCodeGenerator vcGenerator = new VCodeGenerator();105 //生成验证码106 String vcode = vcGenerator.generatorVCode();107 //将验证码保存在session域中,以便判断验证码是否正确108 session.setAttribute("vcode", vcode);109 //生成验证码图片110 BufferedImage vImg = vcGenerator.generatorRotateVCodeImage(vcode, true);111 //输出图像112 ImageIO.write(vImg, "gif", response.getOutputStream());113 }114 115 /**116 * 退出系统117 */118 @RequestMapping("/logoff")119 public String logoff(HttpSession session){120 session.invalidate();121 return REDIRECT("/");122 }123 124 @RequestMapping("/function")125 public String function(){126 return "/home/function";127 }128 129 @RequestMapping("/welcome")130 public String welcome(){131 return "/home/welcome";132 }133 134 /**135 * 错误页面136 * @param code137 * @return138 */139 @RequestMapping("/error/{code}")140 public String error(@PathVariable String code) {141 return "/error/" + code;142 }143 144 145 146 }UserService中根据用户名和密码获取用户:


1 package com.lyyzoo.gpss.service.system; 2 3 @Service 4 public class UserService extends BaseService<User> { 5 @Autowired 6 private UserDao userDao; 7 /** 8 * 获取登录用户 9 */10 public User login(String account, String password){11 Map<String, Object> filter = new HashMap<>();12 filter.put("account", account);13 filter.put("password", password);14 filter.put("state", Applications.Flag.YES);15 16 User loginUser = get(filter);17 return loginUser;18 }19 }
After the system development is completed, it first needs to be tested locally as a whole. Starting from logging in, each module, each function, and each process is tested in detail.
First test if the user is not logged in, the user cannot access the management page. Enter the access address directly in the address bar to see if it jumps to the login page. Then at least test whether the account related to each role is logged in normally. After logging in, whether the menu owned by each role is displayed normally.
For testing other modules, use the account corresponding to each role to log in to the system and test the corresponding functions. For example, the administrator enters the system to enter basic data, product information, warehouse information, etc. The purchasing administrator enters supplier information, enters purchase orders, and submits them for review. The sales administrator enters customer information, enters sales orders, and submits them for review. The inventory manager reviews the purchase order, and if the review passes, the inventory will increase; if the sales order passes the review, the inventory will decrease. Check the inventory information and perform the corresponding operations to see if the inventory amount is correct. The test results can be viewed in system test screenshots.
System fault tolerance testing mainly tests the behavior of the system under abnormal conditions by inputting some wrong data types and out-of-range values. The system does a better job in this regard. If the user enters some illegal data, it will immediately remind the user to enter the correct data. First, the legality of the data entered by the user and whether it must be entered will be judged in the frontend. After the data is transmitted to the backend, it will also be judged in the code whether the data is correct before it is saved to the database. The Jdbc used by the system can also prevent SQL injection and other problems to a certain extent. If some unpredictable exceptions occur in the system, the user will be prompted with a friendly interface so that technicians can maintain the system in a timely manner.
Generally speaking, the entire testing process went smoothly, and there were some minor problems, which were fixed immediately. All functions have been implemented, and the system can meet a basic purchase, sale and inventory process, and can be expanded in the future.
I use Mopo Cloud to deploy the project. Mopo Cloud is easy to use and free within a certain limit. It is more suitable for deployment and testing. First, create a Java application named gpss on Mobo Cloud, then create a mysql service, bind it to the Java application, and copy the database connection to the configuration file. Export the local gpss database and import it into the created mysql application. Then use the mvn clean package –Denv=online command in IDEA to package the war package for the online environment and publish the war package to Mobo Cloud. Start the project, then access and test, everything is normal. You can access the domain name to view it. Since the compatibility issue of ext has not been solved well, it is recommended to use Google Chrome to view it. Later, we will learn how to deploy to clouds such as Alibaba Cloud.
By designing and completing this gas pipe purchase, sales and inventory system step by step, I have a better understanding of the software architecture, design, framework, coding, and I am more proficient in using various tools and familiar with the software development process. This system is a product of the knowledge learned in four years of college. Starting from getting the thesis proposition, understanding the proposition, consulting relevant information, conducting demand analysis, designing functional modules, and designing databases; and then combining my work experience during the internship and the company The architectural design builds its own bottom layer. System development is carried out on this underlying basis.
After nearly a month of graduation project, I have mastered relevant knowledge in all aspects of software development, become familiar with the entire process, and tested my knowledge level in four years of university. Obviously there are still many shortcomings. For example, although the SSH framework is used in this system, there are still many things that are not clear about the principle implementation of the framework. Personally, I believe that when learning, you must know what is happening and why. Especially for technology, you need to understand its underlying principles in order to improve your abilities. These will be gradually improved in future work.
This is basically the end of writing. This is my last blog for four years in college. From now on, I will study at work.
I am very happy because I am leaving school and can go to work to find money; I am very sad because I am leaving school and the most comfortable time in my life may be my college time.
I like my school very much - Southwest University, located at the foot of Jinyun Mountain, with beautiful environment and beautiful women, haha!
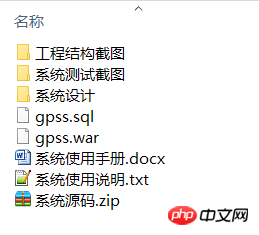
Finally, the system development related documents are shared: Gas Pipeline Network Equipment Purchase, Sales and Inventory System
The compressed package directory is as follows:
The above is the detailed content of Graduation project purchase, sale and inventory management system - starting from the basic construction. For more information, please follow other related articles on the PHP Chinese website!


![[Web front-end] Node.js quick start](https://img.php.cn/upload/course/000/000/067/662b5d34ba7c0227.png)


