
--------------------- -------------------------------------------------- -------------------------------------------------- -------------------------------------------------- --
The implementation of TreeMap is the implementation of the red-black tree algorithm, so to understand TreeMap you must have a certain understanding of red-black trees. In fact, this blog post The name is: Analyze the implementation of TreeMap based on the red-black tree algorithm, but in order to be consistent with the Java improvement series of blog posts, it is better to call it TreeMap. Through this blog post, you can get the following knowledge points:
1. The basic concept of red-black trees.
2. The implementation process of adding nodes and deleting nodes in red-black tree.
3. The complex process of left rotation and right rotation of the red-black tree.
4. How does TreeMap in Java use put and deleteEntry to add and delete nodes in the red-black tree.
I think you must have a deeper understanding of TreeMap through this blog post. Okay, let’s briefly popularize the knowledge of red-black trees.
Red-black trees are also known as Red-black binary tree, it is first of all a binary tree, it embodies all the characteristics of binary trees. At the same time, the red-black tree is a self-balancing sorted binary tree.
## We know that a basic binary tree needs to satisfy a basic property - that is, the value of any node in the tree is greater than its left child node and less than its right child node. . According to this basic property, the retrieval efficiency of the tree is greatly improved. We know that the process of generating a binary tree is very easy to be unbalanced. The worst case scenario is one-sided (only right/left subtree). This will inevitably lead to a greatly reduced retrieval efficiency of the binary tree (O(n)), so in order to maintain the binary tree For balance, experts have proposed various implementation algorithms, such as: AVL, SBT, spread tree, TREAP, red-black tree, etc.A balanced binary tree must have the following characteristics: it is an empty tree or the absolute value of the height difference between its left and right subtrees does not exceed 1, and both left and right subtrees are one A balanced binary tree. That is to say, for any sub-node of the binary tree, the heights of its left and right sub-trees are similar.
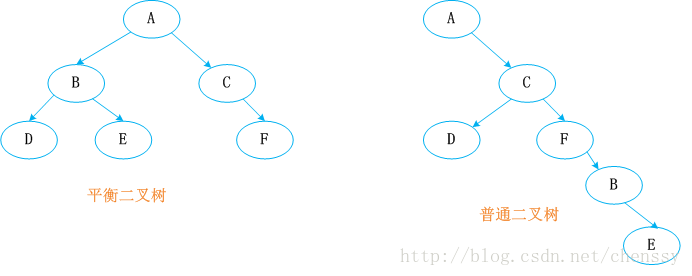
## The red-black tree, as its name implies, is a balanced binary tree with red or black nodes. It maintains the balance of the binary tree through color constraints. For an effective red-black binary tree, we must add the following rules:
##
1. Each node can only be red or black
## #2. The root node is black
3. Each leaf node (NIL node, empty node) is black.
###4. If a node is red, then its two children The nodes are all black. That is to say, two adjacent red nodes cannot appear on a path. ##
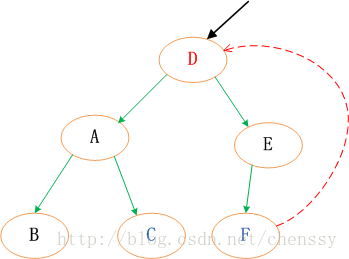
#5. All paths from any node to each of its leaves Both contain the same number of black nodes. ## These constraints enforce a key property of red-black trees: the longest possible path from root to leaf is no more than the shortest The possible path is twice as long. The result is a tree that is roughly balanced. Because the worst-case time for operations such as inserting, deleting, and looking up a value is required to be proportional to the height of the tree, this theoretical upper limit on the height allows red-black trees to be efficient in the worst case, unlike ordinary binary search tree. Therefore, the red-black tree is complex and efficient, and its retrieval efficiency is O(log n). The picture below shows a typical red-black binary tree. ##For red and black binary trees, it is mainly It includes three basic operations: left rotation, right rotation, and coloring.
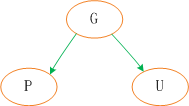
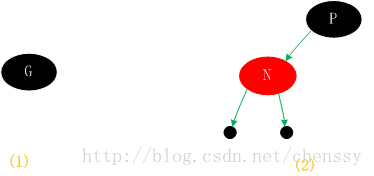
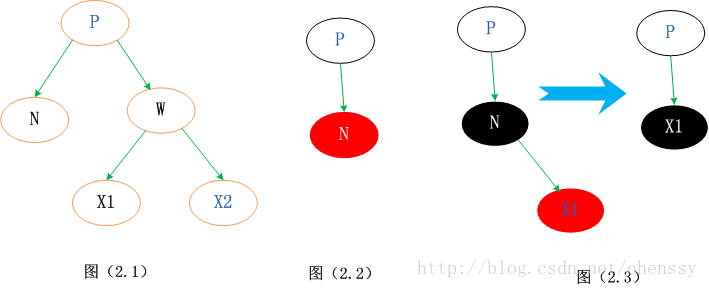
## ## : ## 1, ##Analysis of red-black tree data structure ##3、red-black tree 对于叶子节点Entry是TreeMap的内部类,它有几个重要的属性: 注:前面只是开胃菜,下面是本篇博文的重中之重,在下面两节我将重点讲解treeMap的put()、delete()方法。通过这两个方法我们会了解红黑树增加、删除节点的核心算法。 在了解TreeMap的put()方法之前,我们先了解红黑树增加节点的算法。 红黑树在新增节点过程中比较复杂,复杂归复杂它同样必须要依据上面提到的五点规范,同时由于规则1、2、3基本都会满足,下面我们主要讨论规则4、5。假设我们这里有一棵最简单的树,我们规定新增的节点为N、它的父节点为P、P的兄弟节点为U、P的父节点为G。 对于新节点的插入有如下三个关键地方: 1、插入新节点总是红色节点 。 2、如果插入节点的父节点是黑色, 能维持性质 。 3、如果插入节点的父节点是红色, 破坏了性质. 故插入算法就是通过重新着色或旋转, 来维持性质 。 为了保证下面的阐述更加清晰和根据便于参考,我这里将红黑树的五点规定再贴一遍: 1、每个节点都只能是红色或者黑色 2、根节点是黑色 3、每个叶节点(NIL节点,空节点)是黑色的。 4、如果一个结点是红的,则它两个子节点都是黑的。也就是说在一条路径上不能出现相邻的两个红色结点。 5、从任一节点到其每个叶子的所有路径都包含相同数目的黑色节点。 一、为跟节点 If the newly inserted node N has no parent node, it can be directly inserted as a node. At the same time Set the color to black. (As shown in Figure 1 (1)) ## 2. The parent node is black ## In this case, the new node N is also inserted directly, and the color is Red, because according to rule 4 it will have two black leaf nodes, the value is null. At the same time, since the new node N is red, the path through its child nodes will still contain the same number of black nodes, which also satisfies Rule 5. (As shown in Figure 1 (2))
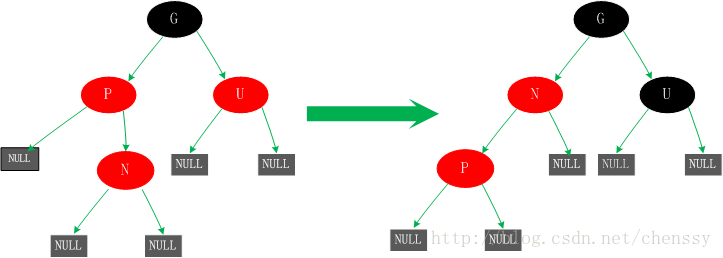
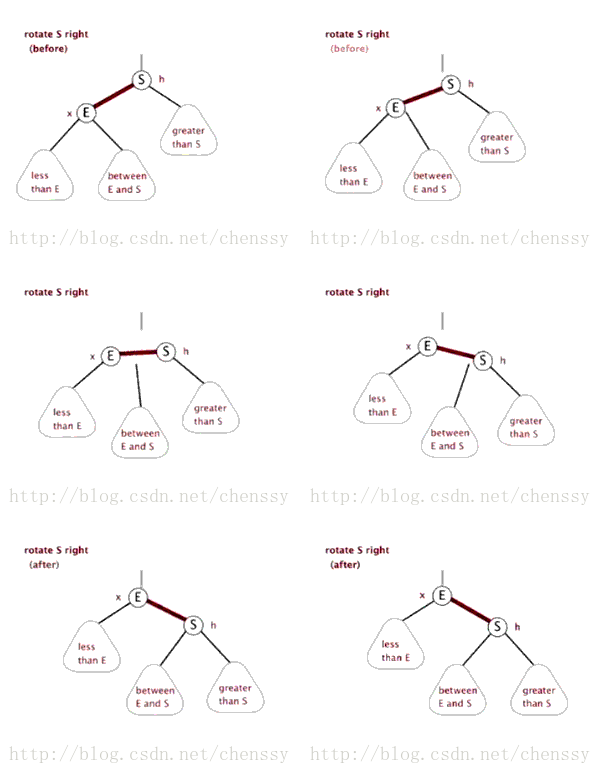
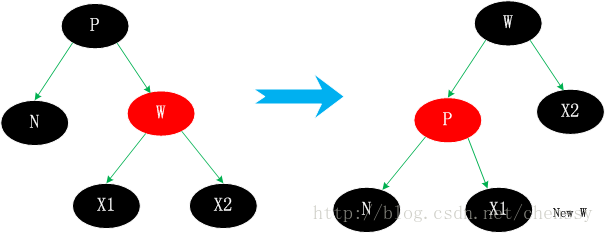
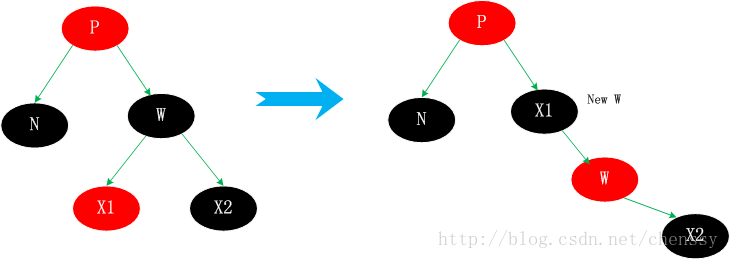
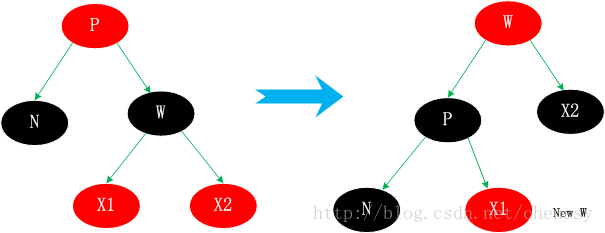
## 3. If the parent node P and P’s sibling node U are both red In this case, if you insert it directly, there will definitely be an imbalance. How to deal with it? The P and U nodes turn black, and the G node turns red. At this time, since the paths passing through nodes P and U must pass through G, the number of black nodes on these paths is still the same. But after the above processing, the parent node of the G node may also be red. At this time, we need to treat the G node as a new node recursively. ## In this case, we perform a left rotation on the new nodes N and P. The results produced here are actually not completed and are not balanced (violating Rule 4). This is what we need to do in case 5. five, The parent node P is red, the uncle node U is black or missing, and the new node N is the left child of the parent node P This situation may be caused by situation 4, or it may not be. In this case, the P node is first rotated right as the center. In the tree generated after the rotation, the node P is the parent node of the nodes N and G. But this tree is not standardized and violates rule 4, so we exchange the colors of the P and G nodes to make them meet the specifications. At the beginning, all paths need to pass through G and their number of black nodes is the same, but now all paths pass through P, and P is the only black node in the entire tree, so the adjusted tree also meets specification 5. The above shows the five situations of adding new nodes to the red-black tree. These five situations cover With all the new possibilities, no matter how complex the red-black tree is, it can be generated according to these five situations. Let's analyze how TreeMap in Java implements red-black trees. 在TreeMap的put()的实现方法中主要分为两个步骤,第一:构建排序二叉树,第二:平衡二叉树。 对于排序二叉树的创建,其添加节点的过程如下: 1、以根节点为初始节点进行检索。 2、与当前节点进行比对,若新增节点值较大,则以当前节点的右子节点作为新的当前节点。否则以当前节点的左子节点作为新的当前节点。 3、循环递归2步骤知道检索出合适的叶子节点为止。 4、将新增节点与3步骤中找到的节点进行比对,如果新增节点较大,则添加为右子节点;否则添加为左子节点。 按照这个步骤我们就可以将一个新增节点添加到排序二叉树中合适的位置。如下: 上面代码中do{}代码块是实现排序二叉树的核心算法,通过该算法我们可以确认新增节点在该树的正确位置。找到正确位置后将插入即可,这样做了其实还没有完成,因为我知道TreeMap的底层实现是红黑树,红黑树是一棵平衡排序二叉树,普通的排序二叉树可能会出现失衡的情况,所以下一步就是要进行调整。fixAfterInsertion(e); 调整的过程务必会涉及到红黑树的左旋、右旋、着色三个基本操作。代码如下: 对这段代码的研究我们发现,其处理过程完全符合红黑树新增节点的处理过程。所以在看这段代码的过程一定要对红黑树的新增节点过程有了解。在这个代码中还包含几个重要的操作。左旋(rotateLeft())、右旋(rotateRight())、着色(setColor())。 左旋:rotateLeft() 所谓左旋转,就是将新增节点(N)当做其父节点(P),将其父节点P当做新增节点(N)的左子节点。即:G.left ---> N ,N.left ---> P。 右旋:rotateRight() 所谓右旋转即,P.right ---> G、G.parent ---> P。 左旋、右旋的示意图如下: (左旋) (右旋) (图片来自://m.sbmmt.com/) 着色:setColor() 着色就是改变该节点的颜色,在红黑树中,它是依靠节点的颜色来维持平衡的。 针对于红黑树的增加节点而言,删除显得更加复杂,使原本就复杂的红黑树变得更加复杂。同时删除节点和增加节点一样,同样是找到删除的节点,删除之后调整红黑树。但是这里的删除节点并不是直接删除,而是通过走了“弯路”通过一种捷径来删除的:找到被删除的节点D的子节点C,用C来替代D,不是直接删除D,因为D被C替代了,直接删除C即可。所以这里就将删除父节点D的事情转变为了删除子节点C的事情,这样处理就将复杂的删除事件简单化了。子节点C的规则是:右分支最左边,或者 左分支最右边的。 红-黑二叉树删除节点,最大的麻烦是要保持 各分支黑色节点数目相等。 因为是删除,所以不用担心存在颜色冲突问题——插入才会引起颜色冲突。 红黑树删除节点同样会分成几种情况,这里是按照待删除节点有几个儿子的情况来进行分类: 1、没有儿子,即为叶结点。直接把父结点的对应儿子指针设为NULL,删除儿子结点就OK了。 2、只有一个儿子。那么把父结点的相应儿子指针指向儿子的独生子,删除儿子结点也OK了。 3、有两个儿子。这种情况比较复杂,但还是比较简单。上面提到过用子节点C替代代替待删除节点D,然后删除子节点C即可。 下面就论各种删除情况来进行图例讲解,但是在讲解之前请允许我再次啰嗦一句,请时刻牢记红黑树的5点规定: 1. Each node can only be red or black ## 2. The root node is black Each leaf node (NIL node, empty node) is black. ## #4. If a node is red, then its two children The nodes are all black. That is to say, two adjacent red nodes cannot appear on a path. #5. All paths from any node to each of its leaves Both contain the same number of black nodes. ## I doubt whether you are suitable for IT. O(∩_∩)O~) # , since deleting nodes is more complicated, let’s agree on the rules here: The deleted node explained must be the successor node (N) of the actual node to be deleted, such as C mentioned above. can be The node is the leftmost child node of the right tree of the node to be deleted. Here we stipulate that the actual deleted node is N, the parent node is P, the sibling node is W, and the two child nodes of the sibling node are X1 and X2. As shown below (2.1). # Now we analyze and deal with the three situations mentioned above. Situation 1. No child node (red node) In this case, the node can be deleted directly without affecting the structure of the tree. Because the node is a leaf node, it cannot have child nodes -----if the child node is black, it violates the principle of the number of black nodes (Provision 5), and if it is red, it violates the "color" principle (Provision 4). As shown in the figure above (2.2). ## Case 2, there is a child node## This situation is also very simple to deal with, just replace the node to be deleted with a child node, and then delete the child node. As shown in the picture above (2.3) ##Case 3, there are two child nodes ## 1. N’s sibling node W is red 2. N’s brother w is black, and w’s two children are both black. 3. N’s brother w is black, w’s left child is red, and w’s right child The child is black. 4. N’s brother w is black, and w’s right child is red. ## Case 3.1, N’s sibling node W is red W is red, then its child nodes X1 and X2 must all be black, and the parent node P is also black. The processing strategy is: change the color of W and P, and then perform a left rotation. This treatment allows the red and black properties to continue to be maintained. The new brother of N, new w, is a child of w before the rotation and is black. After this treatment, situation 3.1 will be transformed into one of 3.2, 3.3, and 3.4. as follows: Case 3.2. N’s brother w is black, and w’s two children are both black. In this case, its parent node can be red It can be black. Since W is black, this causes the N subtree to have one less black node than its brother W subtree. At this time, we can set W to red. In this way, the black nodes of the N subtree and the W subtree are consistent, maintaining balance. as follows Change W from black to red, which will cause the new node new N to have one less black node than its sibling node. But if new x is red, we directly convert new x to black to maintain the balance of the entire tree. Otherwise, situation 3.2 will transform into one of situations 3.1, 3.3, and 3.4. Case 3.3, N’s brother w is black, The left child of w is red, and the right child of w is black. #In this case, the node W and its left The child nodes perform color exchange, and then perform a right rotation on W. # At this time, N’s new brother X1 (new w) is a black node with a red right child, so situation 3 is transformed into situation 4. ## Case 3.4. N’s brother w is black, and w’s The right child is red. Exchange the colors of W and parent node P , and perform a left rotation operation on P at the same time. This fills in the missing black node on the left. At the same time, set the right child node X2 of W to black. In this way, a balance is achieved between left and right. 总结 个人认为这四种情况比较难理解,首先他们都不是单一的某种情况,他们之间是可以进行互转的。相对于其他的几种情况,情况3.2比较好理解,仅仅只是一个颜色的转变,通过减少右子树的一个黑色节点使之保持平衡,同时将不平衡点上移至N与W的父节点,然后进行下一轮迭代。情况3.1,是将W旋转将其转成情况2、3、4情况进行处理。而情况3.3通过转变后可以化成情况3.4来进行处理,从这里可以看出情况3.4应该最终结。情况3.4、右子节点为红色节点,那么将缺失的黑色节点交由给右子节点,通过旋转达到平衡。 通过上面的分析,我们已经初步了解了红黑树的删除节点情况,相对于增加节点而言它确实是选的较为复杂。下面我将看到在Java TreeMap中是如何实现红黑树删除的。 通过上面的分析我们确认删除节点的步骤是:找到一个替代子节点C来替代P,然后直接删除C,最后调整这棵红黑树。下面代码是寻找替代节点、删除替代节点。 (1)除是寻找替代节点replacement,其实现方法为successor()。如下: (2)处是删除该节点过程。它主要分为上面提到的三种情况,它与上面的if…else if… else一一对应 。如下: 1、有两个儿子。这种情况比较复杂,但还是比较简单。上面提到过用子节点C替代代替待删除节点D,然后删除子节点C即可。 2、没有儿子,即为叶结点。直接把父结点的对应儿子指针设为NULL,删除儿子结点就OK了。 3、只有一个儿子。那么把父结点的相应儿子指针指向儿子的独生子,删除儿子结点也OK了。 删除完节点后,就要根据情况来对红黑树进行复杂的调整:fixAfterDeletion()。 这是红黑树在删除节点后,对树的平衡性进行调整的过程,其实现过程与上面四种复杂的情况一一对应,所以在这个源码的时候一定要对着上面提到的四种情况看。 ## This blog post is indeed a bit long. This blog post must be quite rewarding. At the same time, this blog post devotes a lot of space to explaining the implementation process of red-black trees, and talks less about Java's TreeMap. However, I think that if you understand the implementation process of red-black trees, you can easily master TreeMap, which is a piece of cake. At the same time, I wrote this blog post for four days and read and referenced a lot of blog posts. At the same time, it is inevitable that there will be some reference points, and I would like to express my gratitude to them here. LZ started learning data structures in his sophomore year. I thought I had done a good job. Now I find that I still have too much to learn about data structures. At the same time, I have once again experienced the charm of algorithms! ! ! The above is the content of Java Improvement Chapter (27)-----TreeMap. For more related content, please pay attention to the PHP Chinese website (m.sbmmt.com)! 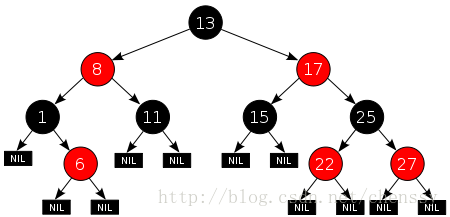
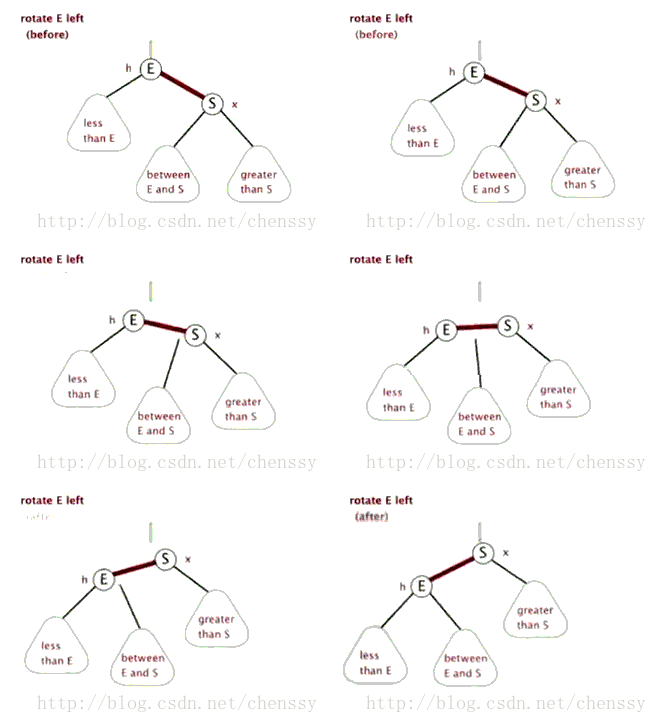
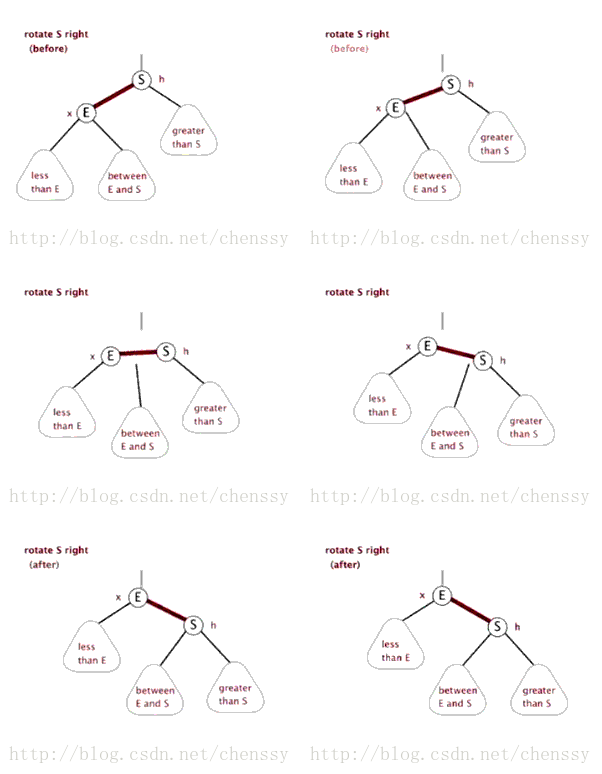
#Left-handed rotation From: //m.sbmmt.com/)
References in this section ://m.sbmmt.com/Baidu Encyclopedia
## ##TreeMap is defined as follows:
public class TreeMap<K,V>    extends AbstractMap<K,V>    implements NavigableMap<K,V>, Cloneable, java.io.Serializable</strong></span><p><span style="font-size:14px;"><strong><span style="color:#f3a447;"><span style="font-size:14px;"> <strong><span style="font-size:14px;"></span>TreeMap inherits AbstractMap and implements NavigableMap, Cloneable and Serializable interface. Among them, AbstractMap indicates that TreeMap is a Map that supports key-value collections, and NavigableMap (more) means that it supports a series of navigation methods and has the navigation method to return the closest matching item for a given search target. </strong></span></span></strong></span></p>
<p>          <span style="font-size:14px;"><span style="font-size:14px;"><strong>TreeMap also contains the following important attributes: <span style="font-size:14px;"></span><p style="padding: 5px; border: 1px solid rgb(204, 204, 204); background-color: rgb(245, 245, 245);" class="cnblogs_code"></p>
<pre class="brush:php;toolbar:false">//比较器,因为TreeMap是有序的,通过comparator接口我们可以对TreeMap的内部排序进行精密的控制
        private final Comparator<? super K> comparator;        //TreeMap红-黑节点,为TreeMap的内部类
        private transient Entry<K,V> root = null;        //容器大小
        private transient int size = 0;        //TreeMap修改次数
        private transient int modCount = 0;        //红黑树的节点颜色--红色
        private static final boolean RED = false;        //红黑树的节点颜色--黑色
        private static final boolean BLACK = true;
//键        K key;        //值        V value;        //左孩子
        Entry<K,V> left = null;        //右孩子
        Entry<K,V> right = null;        //父亲
        Entry<K,V> parent;        //颜色
        boolean color = BLACK;
三、TreeMap put()方法
红黑树增加节点

4. If the parent node P is red , the uncle node U is black or missing, and the new node N is the right child of the P node

TreeMap put()方法实现分析
public V put(K key, V value) {
           //用t表示二叉树的当前节点
            Entry<K,V> t = root;
            //t为null表示一个空树,即TreeMap中没有任何元素,直接插入
            if (t == null) {
                //比较key值,个人觉得这句代码没有任何意义,空树还需要比较、排序?
                compare(key, key); // type (and possibly null) check
                //将新的key-value键值对创建为一个Entry节点,并将该节点赋予给root
                root = new Entry<>(key, value, null);
                //容器的size = 1,表示TreeMap集合中存在一个元素
                size = 1;
                //修改次数 + 1
                modCount++;
                return null;
            }
            int cmp;     //cmp表示key排序的返回结果
            Entry<K,V> parent;   //父节点
            // split comparator and comparable paths
            Comparator<? super K> cpr = comparator;    //指定的排序算法
            //如果cpr不为空,则采用既定的排序算法进行创建TreeMap集合
            if (cpr != null) {
                do {
                    parent = t;      //parent指向上次循环后的t
                    //比较新增节点的key和当前节点key的大小
                    cmp = cpr.compare(key, t.key);
                    //cmp返回值小于0,表示新增节点的key小于当前节点的key,则以当前节点的左子节点作为新的当前节点
                    if (cmp < 0)
                        t = t.left;
                    //cmp返回值大于0,表示新增节点的key大于当前节点的key,则以当前节点的右子节点作为新的当前节点
                    else if (cmp > 0)
                        t = t.right;
                    //cmp返回值等于0,表示两个key值相等,则新值覆盖旧值,并返回新值
                    else
                        return t.setValue(value);
                } while (t != null);
            }
            //如果cpr为空,则采用默认的排序算法进行创建TreeMap集合
            else {
                if (key == null)     //key值为空抛出异常
                    throw new NullPointerException();
                /* 下面处理过程和上面一样 */
                Comparable<? super K> k = (Comparable<? super K>) key;
                do {
                    parent = t;
                    cmp = k.compareTo(t.key);
                    if (cmp < 0)
                        t = t.left;
                    else if (cmp > 0)
                        t = t.right;
                    else
                        return t.setValue(value);
                } while (t != null);
            }
            //将新增节点当做parent的子节点
            Entry<K,V> e = new Entry<>(key, value, parent);
            //如果新增节点的key小于parent的key,则当做左子节点
            if (cmp < 0)
                parent.left = e;
          //如果新增节点的key大于parent的key,则当做右子节点
            else
                parent.right = e;
            /*
             *  上面已经完成了排序二叉树的的构建,将新增节点插入该树中的合适位置
             *  下面fixAfterInsertion()方法就是对这棵树进行调整、平衡,具体过程参考上面的五种情况
             */
            fixAfterInsertion(e);
            //TreeMap元素数量 + 1
            size++;
            //TreeMap容器修改次数 + 1
            modCount++;
            return null;
}/**
* 新增节点后的修复操作
* x 表示新增节点
*/
private void fixAfterInsertion(Entry<K,V> x) {
x.color = RED; //新增节点的颜色为红色
//循环 直到 x不是根节点,且x的父节点不为红色
while (x != null && x != root && x.parent.color == RED) {
//如果X的父节点(P)是其父节点的父节点(G)的左节点
if (parentOf(x) == leftOf(parentOf(parentOf(x)))) {
//获取X的叔节点(U)
Entry<K,V> y = rightOf(parentOf(parentOf(x)));
//如果X的叔节点(U) 为红色(情况三)
if (colorOf(y) == RED) {
//将X的父节点(P)设置为黑色
setColor(parentOf(x), BLACK);
//将X的叔节点(U)设置为黑色
setColor(y, BLACK);
//将X的父节点的父节点(G)设置红色
setColor(parentOf(parentOf(x)), RED);
x = parentOf(parentOf(x));
}
//如果X的叔节点(U为黑色);这里会存在两种情况(情况四、情况五)
else {
//如果X节点为其父节点(P)的右子树,则进行左旋转(情况四)
if (x == rightOf(parentOf(x))) {
//将X的父节点作为X
x = parentOf(x);
//右旋转
rotateLeft(x);
}
//(情况五)
//将X的父节点(P)设置为黑色
setColor(parentOf(x), BLACK);
//将X的父节点的父节点(G)设置红色
setColor(parentOf(parentOf(x)), RED);
//以X的父节点的父节点(G)为中心右旋转
rotateRight(parentOf(parentOf(x)));
}
}
//如果X的父节点(P)是其父节点的父节点(G)的右节点
else {
//获取X的叔节点(U)
Entry<K,V> y = leftOf(parentOf(parentOf(x)));
//如果X的叔节点(U) 为红色(情况三)
if (colorOf(y) == RED) {
//将X的父节点(P)设置为黑色
setColor(parentOf(x), BLACK);
//将X的叔节点(U)设置为黑色
setColor(y, BLACK);
//将X的父节点的父节点(G)设置红色
setColor(parentOf(parentOf(x)), RED);
x = parentOf(parentOf(x));
}
//如果X的叔节点(U为黑色);这里会存在两种情况(情况四、情况五)
else {
//如果X节点为其父节点(P)的右子树,则进行左旋转(情况四)
if (x == leftOf(parentOf(x))) {
//将X的父节点作为X
x = parentOf(x);
//右旋转
rotateRight(x);
}
//(情况五)
//将X的父节点(P)设置为黑色
setColor(parentOf(x), BLACK);
//将X的父节点的父节点(G)设置红色
setColor(parentOf(parentOf(x)), RED);
//以X的父节点的父节点(G)为中心右旋转
rotateLeft(parentOf(parentOf(x)));
}
}
}
//将根节点G强制设置为黑色
root.color = BLACK;
}private void rotateLeft(Entry<K,V> p) {
if (p != null) {
//获取P的右子节点,其实这里就相当于新增节点N(情况四而言)
Entry<K,V> r = p.right;
//将R的左子树设置为P的右子树
p.right = r.left;
//若R的左子树不为空,则将P设置为R左子树的父亲
if (r.left != null)
r.left.parent = p;
//将P的父亲设置R的父亲
r.parent = p.parent;
//如果P的父亲为空,则将R设置为跟节点
if (p.parent == null)
root = r;
//如果P为其父节点(G)的左子树,则将R设置为P父节点(G)左子树
else if (p.parent.left == p)
p.parent.left = r;
//否则R设置为P的父节点(G)的右子树
else
p.parent.right = r;
//将P设置为R的左子树
r.left = p;
//将R设置为P的父节点
p.parent = r;
}
}private void rotateRight(Entry<K,V> p) {
if (p != null) {
//将L设置为P的左子树
Entry<K,V> l = p.left;
//将L的右子树设置为P的左子树
p.left = l.right;
//若L的右子树不为空,则将P设置L的右子树的父节点
if (l.right != null)
l.right.parent = p;
//将P的父节点设置为L的父节点
l.parent = p.parent;
//如果P的父节点为空,则将L设置根节点
if (p.parent == null)
root = l;
//若P为其父节点的右子树,则将L设置为P的父节点的右子树
else if (p.parent.right == p)
p.parent.right = l;
//否则将L设置为P的父节点的左子树
else
p.parent.left = l;
//将P设置为L的右子树
l.right = p;
//将L设置为P的父节点
p.parent = l;
}
}
private static <K,V> void setColor(Entry<K,V> p, boolean c) {
        if (p != null)
            p.color = c;
} 四、TreeMap delete()方法
红黑树删除节点
## 

TreeMap deleteEntry()方法实现分析
private void deleteEntry(Entry<K,V> p) {
        modCount++;      //修改次数 +1
        size--;          //元素个数 -1

        /*
         * 被删除节点的左子树和右子树都不为空,那么就用 p节点的中序后继节点代替 p 节点
         * successor(P)方法为寻找P的替代节点。规则是右分支最左边,或者 左分支最右边的节点
         * ---------------------(1)
         */
        if (p.left != null && p.right != null) {
            Entry<K,V> s = successor(p);
            p.key = s.key;
            p.value = s.value;
            p = s;
        }

        //replacement为替代节点,如果P的左子树存在那么就用左子树替代,否则用右子树替代
        Entry<K,V> replacement = (p.left != null ? p.left : p.right);

        /*
         * 删除节点,分为上面提到的三种情况
         * -----------------------(2)
         */
        //如果替代节点不为空
        if (replacement != null) {
            replacement.parent = p.parent;
            /*
             *replacement来替代P节点
             */
            //若P没有父节点,则跟节点直接变成replacement
            if (p.parent == null)
                root = replacement;
            //如果P为左节点,则用replacement来替代为左节点
            else if (p == p.parent.left)
                p.parent.left  = replacement;
          //如果P为右节点,则用replacement来替代为右节点
            else
                p.parent.right = replacement;

            //同时将P节点从这棵树中剔除掉
            p.left = p.right = p.parent = null;

            /*
             * 若P为红色直接删除,红黑树保持平衡
             * 但是若P为黑色,则需要调整红黑树使其保持平衡
             */
            if (p.color == BLACK)
                fixAfterDeletion(replacement);
        } else if (p.parent == null) {     //p没有父节点,表示为P根节点,直接删除即可
            root = null;
        } else {      //P节点不存在子节点,直接删除即可
            if (p.color == BLACK)         //如果P节点的颜色为黑色,对红黑树进行调整
                fixAfterDeletion(p);

            //删除P节点
            if (p.parent != null) {
                if (p == p.parent.left)
                    p.parent.left = null;
                else if (p == p.parent.right)
                    p.parent.right = null;
                p.parent = null;
            }
        }
}static <K,V> TreeMap.Entry<K,V> successor(Entry<K,V> t) {
if (t == null)
return null;
/*
* 寻找右子树的最左子树
*/
else if (t.right != null) {
Entry<K,V> p = t.right;
while (p.left != null)
p = p.left;
return p;
}
/*
* 选择左子树的最右子树
*/
else {
Entry<K,V> p = t.parent;
Entry<K,V> ch = t;
while (p != null && ch == p.right) {
ch = p;
p = p.parent;
}
return p;
}
}private void fixAfterDeletion(Entry<K,V> x) {
// 删除节点需要一直迭代,知道 直到 x 不是根节点,且 x 的颜色是黑色
while (x != root && colorOf(x) == BLACK) {
if (x == leftOf(parentOf(x))) { //若X节点为左节点
//获取其兄弟节点
Entry<K,V> sib = rightOf(parentOf(x));
/*
* 如果兄弟节点为红色----(情况3.1)
* 策略:改变W、P的颜色,然后进行一次左旋转
*/
if (colorOf(sib) == RED) {
setColor(sib, BLACK);
setColor(parentOf(x), RED);
rotateLeft(parentOf(x));
sib = rightOf(parentOf(x));
}
/*
* 若兄弟节点的两个子节点都为黑色----(情况3.2)
* 策略:将兄弟节点编程红色
*/
if (colorOf(leftOf(sib)) == BLACK &&
colorOf(rightOf(sib)) == BLACK) {
setColor(sib, RED);
x = parentOf(x);
}
else {
/*
* 如果兄弟节点只有右子树为黑色----(情况3.3)
* 策略:将兄弟节点与其左子树进行颜色互换然后进行右转
* 这时情况会转变为3.4
*/
if (colorOf(rightOf(sib)) == BLACK) {
setColor(leftOf(sib), BLACK);
setColor(sib, RED);
rotateRight(sib);
sib = rightOf(parentOf(x));
}
/*
*----情况3.4
*策略:交换兄弟节点和父节点的颜色,
*同时将兄弟节点右子树设置为黑色,最后左旋转
*/
setColor(sib, colorOf(parentOf(x)));
setColor(parentOf(x), BLACK);
setColor(rightOf(sib), BLACK);
rotateLeft(parentOf(x));
x = root;
}
}
/**
* X节点为右节点与其为做节点处理过程差不多,这里就不在累述了
*/
else {
Entry<K,V> sib = leftOf(parentOf(x));
if (colorOf(sib) == RED) {
setColor(sib, BLACK);
setColor(parentOf(x), RED);
rotateRight(parentOf(x));
sib = leftOf(parentOf(x));
}
if (colorOf(rightOf(sib)) == BLACK &&
colorOf(leftOf(sib)) == BLACK) {
setColor(sib, RED);
x = parentOf(x);
} else {
if (colorOf(leftOf(sib)) == BLACK) {
setColor(rightOf(sib), BLACK);
setColor(sib, RED);
rotateLeft(sib);
sib = leftOf(parentOf(x));
}
setColor(sib, colorOf(parentOf(x)));
setColor(parentOf(x), BLACK);
setColor(leftOf(sib), BLACK);
rotateRight(parentOf(x));
x = root;
}
}
}
setColor(x, BLACK);
} 5. Write at the end


