この記事は、angular の学習を続けるのに役立ちます。ツールヒントを例としてカスタム命令について学習します。皆さんのお役に立てれば幸いです。

前回の記事では、Angular 関連コンテンツの概要を説明しました。カスタム命令の部分では記述できるようになりましたが、実際のシナリオではまだ標準化された管理が必要です。
Angular は、Angular.js のアップグレードされたバージョンです。 [関連チュートリアルの推奨事項: "angular チュートリアル"]
そこで、この記事では、Tooltip を使用してカスタム命令の内容を説明します。
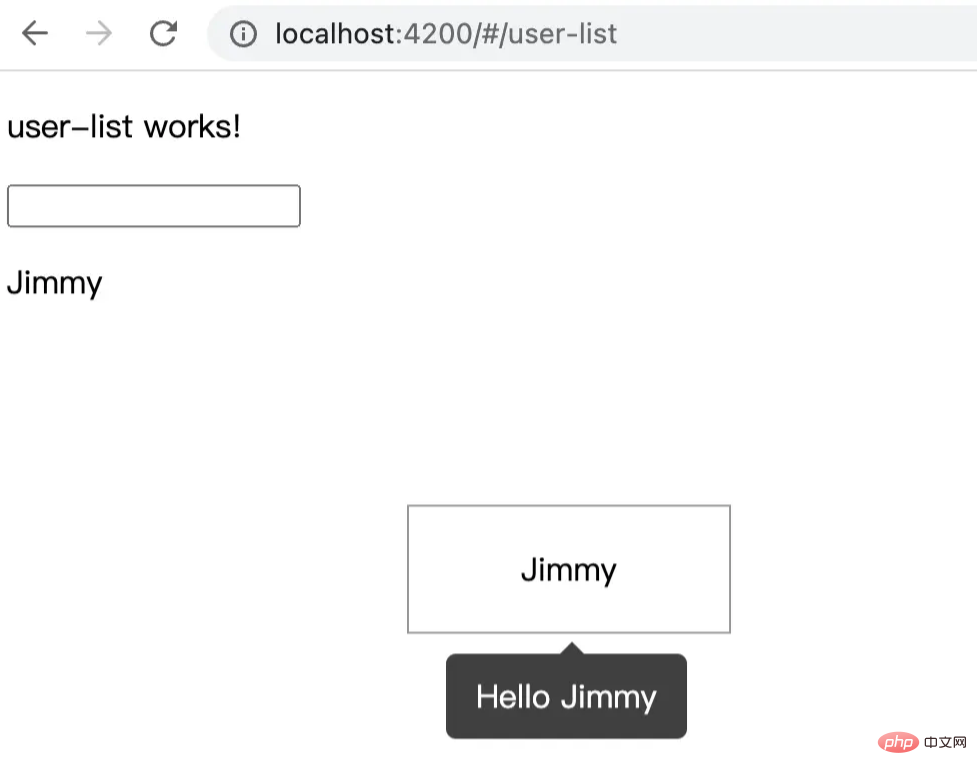
オンライン レンダリングは次のとおりです:

ディレクトリ構造
はBasedより上です記事に実装されているコード プロジェクトで、コマンド ラインを実行します。
# 进入 directives 文件夹
$ cd directives

# 创建 tooltip 文件夹
$ mkdir tooltip

# 进入 tooltip 文件夹
$ cd tooltip

# 创建 tooltip 组件
$ ng generate component tooltip

# 创建 tooltip 指令
$ ng generate directive tooltip
上記のコマンド ラインを実行すると、次のような app/directive/tooltip のファイル ディレクトリ構造が得られます。
tooltip
├── tooltip                                           // tooltip 组件
│    ├── user-list.component.html                     // 页面骨架
│    ├── user-list.component.scss                     // 页面独有样式
│    ├── user-list.component.spec.ts                  // 测试文件
│    └── user-list.component.ts                       // javascript 文件
├── tooltip.directive.spec.ts                         // 测试文件
└── tooltip.directive.ts                              // 指令文件
まあ、ここでは主に管理を容易にするために、コンポーネントを tooltip と同じレベルに置きます。もちろん、これは人によって異なりますが、パブリック コンポーネント components フォルダーに置くことができます。
ツールチップ コンポーネントの書き込み
html ファイルには、次のものが含まれます。
<div class="caret"></div>
<div class="tooltip-content">{{data.content}}</div>スタイル ファイル .scss には次のものがあります:
$black: #000000;
$white: #ffffff;
$caret-size: 6px;
$tooltip-bg: transparentize($black, 0.25); // transparentize 是 sass 的语法
$grid-gutter-width: 30px;
$body-bg-color: $white;
$app-anim-time: 200ms;
$app-anim-curve: ease-out;
$std-border-radius: 5px;
$zindex-max: 100;

// :host 伪类选择器,给组件元素本身设置样式
:host {
  position: fixed;
  padding: $grid-gutter-width/3 $grid-gutter-width/2;
  background-color: $tooltip-bg;
  color: $body-bg-color;
  opacity: 0;
  transition: all $app-anim-time $app-anim-curve;
  text-align: center;
  border-radius: $std-border-radius;
  z-index: $zindex-max;
}

.caret { // 脱字符
  width: 0;
  height: 0;
  border-left: 6px solid transparent;
  border-right: 6px solid transparent;
  border-bottom: 6px solid $tooltip-bg;
  position: absolute;
  top: -$caret-size;
  left: 50%;
  margin-left: -$caret-size/2;
  border-bottom-color: $tooltip-bg;
}まあ~、
cssは魔法のようなものです。後で説明する記事を用意しますsass関連コンテンツ...
そして、javascript ファイル tooltip.component.ts の内容は次のとおりです。
import {
  Component,
  ElementRef, // 元素指向
  HostBinding,
  OnDestroy,
  OnInit
} from '@angular/core';

@Component({
  selector: 'app-tooltip', // 标识符,表明我这个组件叫做啥,这里是 app-tooltip
  templateUrl: './tooltip.component.html', // 本组件的骨架
  styleUrls: ['./tooltip.component.scss'] // 本组件的私有样式
})
export class TooltipComponent implements OnInit {

  public data: any; // 在 directive 上赋值
  private displayTimeOut:any;

  // 组件本身 host 绑定相关的装饰器
  @HostBinding('style.top')  hostStyleTop!: string;
  @HostBinding('style.left') hostStyleLeft!: string;
  @HostBinding('style.opacity') hostStyleOpacity!: string;

  constructor(
    private elementRef: ElementRef
  ) { }

  ngOnInit(): void {
    this.hostStyleTop = this.data.elementPosition.bottom + 'px';

    if(this.displayTimeOut) {
      clearTimeout(this.displayTimeOut)
    }

    this.displayTimeOut = setTimeout((_: any) => {
      // 这里计算 tooltip 距离左侧的距离,这里计算公式是:tooltip.left + 目标元素的.width - (tooltip.width/2)
      this.hostStyleLeft = this.data.elementPosition.left + this.data.element.clientWidth / 2 - this.elementRef.nativeElement.clientWidth / 2 + 'px'
      this.hostStyleOpacity = '1';
      this.hostStyleTop = this.data.elementPosition.bottom + 10 + 'px'
    }, 500)
  }


  // 组件销毁
  ngOnDestroy() {
    // 组件销毁后,清除定时器,防止内存泄露
    if(this.displayTimeOut) {
      clearTimeout(this.displayTimeOut)
    }
  }
}ツールチップの指示の作成
#これがこの記事の焦点です。コード上の具体的な指示にマークを付けます~
関連ファイルtooltip.directive.ts 内容は次のとおりです:
import {
ApplicationRef, // 全局性调用检测
ComponentFactoryResolver, // 创建组件对象
ComponentRef, // 组件实例的关联和指引,指向 ComponentFactory 创建的元素
Directive, ElementRef,
EmbeddedViewRef, // EmbeddedViewRef 继承于 ViewRef,用于表示模板元素中定义的 UI 元素。
HostListener, // DOM 事件监听
Injector, // 依赖注入
Input
} from '@angular/core';
import { TooltipComponent } from './tooltip/tooltip.component';
@Directive({
selector: '[appTooltip]'
})
export class TooltipDirective {
@Input("appTooltip") appTooltip!: string;
private componentRef!: ComponentRef<TooltipComponent>;
// 获取目标元素的相关位置,比如 left, right, top, bottom
get elementPosition() {
return this.elementRef.nativeElement.getBoundingClientRect();
}
constructor(
protected elementRef: ElementRef,
protected appRef: ApplicationRef,
protected componentFactoryResolver: ComponentFactoryResolver,
protected injector: Injector
) { }
// 创建 tooltip
protected createTooltip() {
this.componentRef = this.componentFactoryResolver
.resolveComponentFactory(TooltipComponent) // 绑定 tooltip 组件
.create(this.injector);
this.componentRef.instance.data = { // 绑定 data 数据
content: this.appTooltip,
element: this.elementRef.nativeElement,
elementPosition: this.elementPosition
}
this.appRef.attachView(this.componentRef.hostView); // 添加视图
const domElem = (this.componentRef.hostView as EmbeddedViewRef<any>).rootNodes[0] as HTMLElement;
document.body.appendChild(domElem);
}
// 删除 tooltip
protected destroyTooltip() {
if(this.componentRef) {
this.appRef.detachView(this.componentRef.hostView); // 移除视图
this.componentRef.destroy();
}
}
// 监听鼠标移入
@HostListener('mouseover')
OnEnter() {
this.createTooltip();
}
// 监听鼠标移出
@HostListener('mouseout')
OnOut() {
this.destroyTooltip();
}
}この時点で、99% 関数は完了しました。ページ。ページ
を呼び出します
次のコンテンツを user-list.component.html に追加します:
<p style="margin-top: 100px;">
<!-- [appTooltip]="'Hello Jimmy'" 是重点 -->
<span
[appTooltip]="'Hello Jimmy'"
style="margin-left: 200px; width: 160px; text-align: center; padding: 20px 0; display: inline-block; border: 1px solid #999;"
>Jimmy</span>
</p>TooltipDirective このディレクティブは app.module.ts で宣言されているため、直接呼び出すことができます。現在の効果は次のとおりです。

私たちが実装した tooltip は下中央の表示で、通常、次のようなフレームワークを使用します。 angular ant design の tooltip の bottom 属性。他の属性については、読者が興味がある場合は拡張できます。
この時点で、作成した命令ファイルを適切に維持できます。
プログラミング関連の知識について詳しくは、プログラミング入門をご覧ください。 !
以上がカスタム命令を理解するための例としてツールチップを使用した Angular 学習の詳細内容です。詳細については、PHP 中国語 Web サイトの他の関連記事を参照してください。