
この記事では、WeChat アプレット開発におけるネットワーク リクエストのカプセル化について紹介し、二次カプセル化の理由と具体的なカプセル化の実装について説明します。

WeChat ミニ プログラムを開発する場合、ネットワーク リクエストの操作が必然的に含まれます。ミニ プログラムは API を提供します。ネイティブ ネットワークによって要求されたものは次のとおりです:
wx.request({ url: 'https://test.com/******', //仅为示例,并非真实的接口地址 data: { x: '', y: '' }, header: { 'content-type': 'application/json' // 默认值 }, success (res) { console.log(res.data) } })
その中に:
url: 要求されたバックエンド インターフェイス アドレス;
data: リクエスト インターフェイスによって運ばれる必要があるパラメータ;
header: リクエスト ヘッダーを設定します、content-typeのデフォルトは application/json、
success: リクエストが成功した後のコールバックです。res にはリクエストが成功した後に返されるデータが含まれます。
wx.request の使用方法の詳細については、公式の紹介文をご覧ください。
公式 API が提供されているのに、なぜ再度カプセル化する必要があるのでしょうか?
最初のポイントはコードの重複を避けることです
コードの重複を避けることは、主に次の点に反映されています:
1) 当社はバックエンド インターフェイスを呼び出します。ログイン インターフェイスに加えて、他のインターフェイスのリクエストでは、リクエスト ヘッダーにトークンを追加する必要があります。カプセル化では、ネットワークリクエストを行うたびにトークンを渡す必要があり、非常に面倒です。
2) ネットワーク リクエストを行う場合、多くの場合、ロード中であることをユーザーに通知するロード ボックスを提供する必要があります。次の図に示すように:
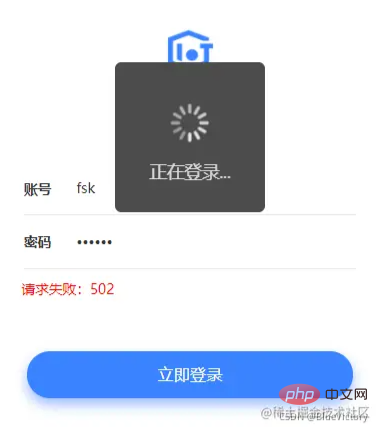
カプセル化がない場合、各ネットワーク リクエストで読み込みボックスをポップアップする必要がある場合は、次のコードを繰り返し記述する必要があります。
リクエストが開始されたら、ローディングボックス。
リクエストが終了したら、読み込みボックスを非表示にします。

2 番目のポイント、回避コールバック地獄
ページに複数のネットワーク リクエストがあり、リクエストに特定の順序がある場合、wx.request は非同期操作であり、最も直接的な結果は次のようになります。
onLoad: function () { wx.request({ url: 'https://test.com/api/test01', success:res=>{ wx.request({ url: 'https://test.com/api/test02', success: res=>{ wx.request({ url: 'https://test.com/api/test03', success: res=>{ testDataList: res.content } }) } }) } }) },
ロシアのマトリョーシカ人形に似ていませんか?
この書き方を避けるために、当然カプセル化されており、ここではPromiseを使用しています。
Prolise の概要については、Liao Xuefeng の公式 Web サイトにアクセスして詳細をご覧ください。
https://www.liaoxuefeng.com/wiki/1022910821149312/1023024413276544
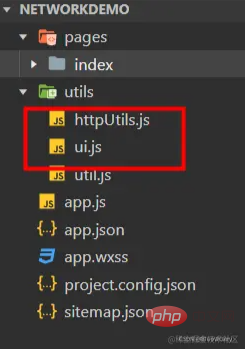
1) httpUtils.js
ネットワーク リクエストのカプセル化、具体的なコードは次のとおりです:const ui = require('./ui'); const BASE_URL = 'https://www.wanandroid.com' /** * 网络请求request * obj.data 请求接口需要传递的数据 * obj.showLoading 控制是否显示加载Loading 默认为false不显示 * obj.contentType 默认为 application/json * obj.method 请求的方法 默认为GET * obj.url 请求的接口路径 * obj.message 加载数据提示语 */ function request(obj) { return new Promise(function(resolve, reject) { if(obj.showLoading){ ui.showLoading(obj.message? obj.message : '加载中...'); } var data = {}; if(obj.data) { data = obj.data; } var contentType = 'application/json'; if(obj.contentType){ contentType = obj.contentType; } var method = 'GET'; if(obj.method){ method = obj.method; } wx.request({ url: BASE_URL + obj.url, data: data, method: method, //添加请求头 header: { 'Content-Type': contentType , 'token': wx.getStorageSync('token') //获取保存的token }, //请求成功 success: function(res) { console.log('===============================================================================================') console.log('== 接口地址:' + obj.url); console.log('== 接口参数:' + JSON.stringify(data)); console.log('== 请求类型:' + method); console.log("== 接口状态:" + res.statusCode); console.log("== 接口数据:" + JSON.stringify(res.data)); console.log('===============================================================================================') if (res.statusCode == 200) { resolve(res); } else if (res.statusCode == 401) {//授权失效 reject("登录已过期"); jumpToLogin();//跳转到登录页 } else { //请求失败 reject("请求失败:" + res.statusCode) } }, fail: function(err) { //服务器连接异常 console.log('===============================================================================================') console.log('== 接口地址:' + url) console.log('== 接口参数:' + JSON.stringify(data)) console.log('== 请求类型:' + method) console.log("== 服务器连接异常") console.log('===============================================================================================') reject("服务器连接异常,请检查网络再试"); }, complete: function() { ui.hideLoading(); } }) }); } //跳转到登录页 function jumpToLogin(){ wx.reLaunch({ url: '/pages/login/login', }) } module.exports = { request, }
2) ui.js
は主に、wx UI 操作の単純なカプセル化です。コードは次のとおりです:export const showToast = function(content,duration) { if(!duration) duration = 2000 wx.showToast({ title: content, icon: 'none', duration: duration, }) } var isShowLoading = false export const showLoading = function(title) { if(isShowLoading) return wx.showLoading({ title: title?title:'', mask:true, success:()=>{ isShowLoading = true } }) } export const hideLoading = function() { if(!isShowLoading) return isShowLoading = false wx.hideLoading() }
3) 特定の呼び出し
は、index.js でネットワーク リクエストを作成しました。具体的なコードは次のとおりです:// index.js const httpUtils = require('../../utils/httpUtils') const ui = require('../../utils/ui') Page({ data: { str:null, }, onLoad() { }, //获取接口数据 getNetInfo(){ let obj = { method: "POST", showLoading: true, url:`/user/register?username=pppooo11&password=pppooo&repassword=pppooo`, message:"正在注册..." } httpUtils.request(obj).then(res=>{ this.setData({ str:JSON.stringify(res) }) ui.showToast(res.data.errorMsg) }).catch(err=>{ console.log('ERROR') }); } })
コードは github にアップロードされています。興味がある場合は、クリックしてダウンロードできます。 https://github.com/YMAndroid/NetWorkDemoプログラミング関連の知識については、
プログラミング入門をご覧ください。 !
以上がミニプログラムでネットワークリクエストを再カプセル化する方法の詳細内容です。詳細については、PHP 中国語 Web サイトの他の関連記事を参照してください。
