
この記事ではCSSで三角マークを実装する方法を紹介しますので、困っている方は参考にしてください。
早速、まずコードを見てみましょう~
コードは次のとおりです:
CssMark.html
<!DOCTYPE html>
<html>
<head>
<meta http-equiv="Content-Type" content="text/html; charset=utf-8"/>
    <title></title>
  <link rel="stylesheet" type="text/css" href="CssMark.css" />
  </head>
  <body>
  <div class="TriMarkPre0"></div>
  <br />
  <div class="TriMarkPre1"></div>
  <br/>
  <div class="TriMarkPre2"></div>
  <br />
  <div class="TriMark"></div>
  </body>
</html>CssMark .css
.TriMarkPre0 {
  position: static;
  width: 100px;
  height: 100px;
  border: 10px solid transparent;
  border-color: #0058e2;
}
.TriMarkPre1 {
  position: static;
  width: 100px;
  height: 100px;
  border: 10px solid transparent;
  border-left-color: #0058e2;
}
.TriMarkPre2 {
  position: static;
  width: 0px;
  height: 0px;
  border: 10px solid transparent;
  border-left-color: #0058e2;
}
.TriMark {
  position: static;
  width: 0px;
  height: 0px;
  border: 5px solid transparent;
  border-left-color: #0058e2;
}詳細コード説明
作成手順1:
以下のコードは100×100ピクセルの領域の外枠を描画するコードです。これが一般的なコードです。
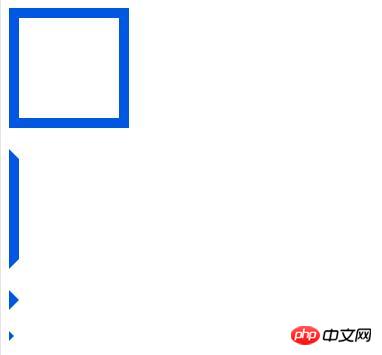
実行結果画像の上部にあるボックスがこのコードに相当します。
<div class="TriMarkPre0"></div>
.TriMarkPre0 {
  position: static;
  width: 100px;
  height: 100px;
  border: 10px solid transparent;
  border-color: #0058e2;
}作成手順2:
以下のコードを使用して、エリア枠の左側のみを描画します。左側を描くと角の部分が斜めにカットされているのが分かります。 (4 辺を描画する場合は、各線が重ならないように半分だけ描画します。)
このコードは、結果の画像の 2 番目の台形を横に実行するコードに対応します。
<div class="TriMarkPre1"></div>
.TriMarkPre1 {
  position: static;
  width: 100px;
  height: 100px;
  border: 10px solid transparent;
  border-left-color: #0058e2;
}Complete:
次のコードを使用して三角形のマーカーを描画できます。
前の行の左側のコードの高さを下げると、行間の部分が消え、三角マークとして表示されます。
実行結果画像の3枚目がこのコードに相当します。
<div class="TriMarkPre2"></div>
.TriMarkPre2 {
  position: static;
  width: 0px;
  height: 0px;
  border: 10px solid transparent;
  border-left-color: #0058e2;
}線の境界線の幅を狭くすることで、三角形マーカーのサイズを変更できます。
実行結果画像の4枚目がこのコードに相当します。
<div class="TriMark"></div>
.TriMark {
  position: static;
  width: 0px;
  height: 0px;
  border: 5px solid transparent;
  border-left-color: #0058e2;
}実行結果:
HTMLファイルを表示すると以下の画像が表示されます。
追加:
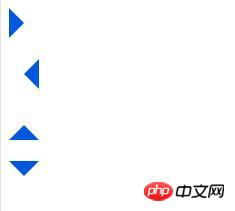
境界線の位置を変更することで、三角形の方向を変更できます。描く。
コードは次のとおりです:
CssMark2.html
<!DOCTYPE html>
<html>
<head>
<meta http-equiv="Content-Type" content="text/html; charset=utf-8"/>
    <title></title>
  <link rel="stylesheet" type="text/css" href="CssMark.css" />
  </head>
  <body>
  <div class="TriMarkRight"></div>
  <br />
  <div class="TriMarkLeft"></div>
  <br />
  <div class="TriMarkTop"></div>
  <br />
  <div class="TriMarkBotom"></div>
  </body>
</html>CssMark.css
.TriMarkRight {
  position: static;
  width: 0px;
  height: 0px;
  border: 15px solid transparent;
  border-left-color: #0058e2;
}
.TriMarkLeft {
  position: static;
  width: 0px;
  height: 0px;
  border: 15px solid transparent;
  border-right-color: #0058e2;
}
.TriMarkTop {
  position: static;
  width: 0px;
  height: 0px;
  border: 15px solid transparent;
  border-bottom-color: #0058e2;
}
.TriMarkBotom {
  position: static;
  width: 0px;
  height: 0px;
  border: 15px solid transparent;
  border-top-color: #0058e2;
}効果は次のとおりです:
以上がCSSで三角マークを実装する方法の紹介の詳細内容です。詳細については、PHP 中国語 Web サイトの他の関連記事を参照してください。
