ZKEACMS.Core は .Net Core MVC に基づいて開発されたオープンソース CMS です。この記事では主に .Net Core の ZKEACMS について詳しく説明します。興味のある方は参考にしてください。 ZKEACMS の概要
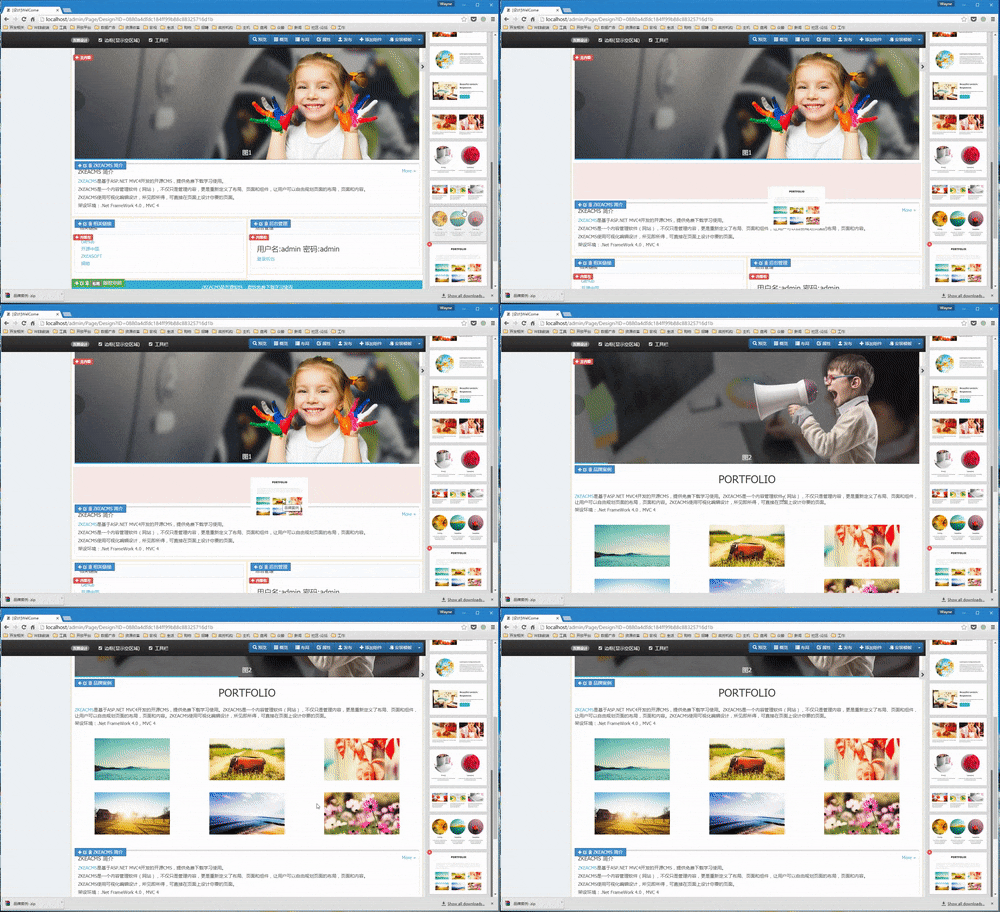
ZKEACMS.Core は、.Net Core MVC に基づいて開発されたオープンソース CMS です。 ZKEACMS を使用すると、ユーザーはページ レイアウトを自由に計画し、ビジュアル編集を使用して「表示されているものがそのまま得られる」ようにデザインし、コンテンツをページ上に直接ドラッグ アンド ドロップすることができます。 ZKEACMS はプラグイン設計、モジュール分離を使用し、水平拡張を通じて CMS の機能を強化します。
レスポンシブデザイン
ZKEACMSは、
Bootstrap
プログラムの設計と原則を見てみましょう
プロジェクト構造
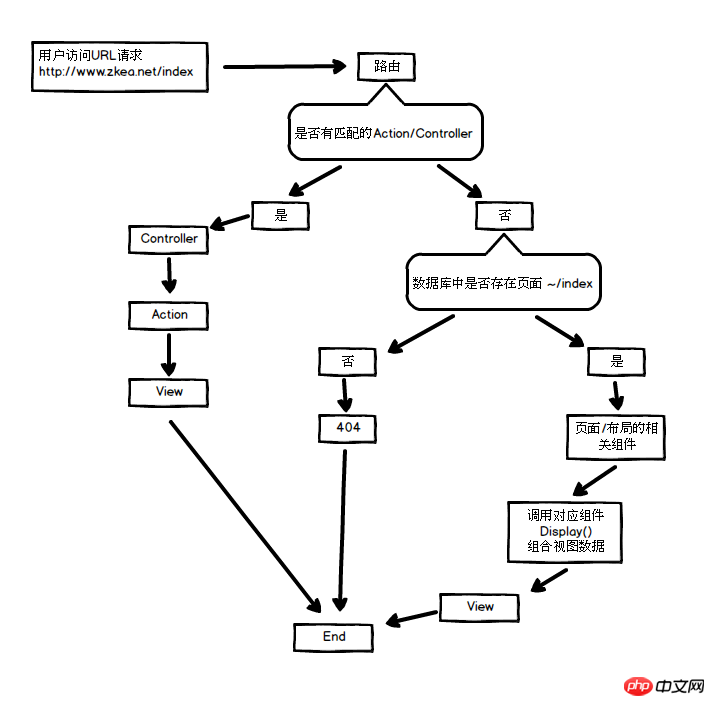
は ZKEACMS で重要な役割を果たします。一致するルートが見つかった場合、そのルートに対応するコントローラー -> アクション -> が最初に実行されます。一致するルートがない場合は、そのルートが優先的に使用され、最も低い「キャッチオール」ルートがユーザーのリクエストを処理し、最終的に応答を返します。
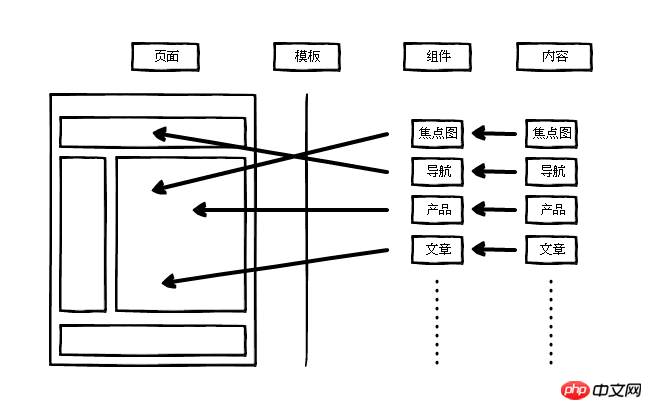
ユーザー自身が作成したページの処理には、優先度が最も低い「すべてキャプチャ」ルートが使用されます。リクエストが受信されると、まずデータベースを検索してページが存在するかどうかを確認し、存在しない場合は 404 が返されます。ページを見つけたら、ページのすべてのコンポーネントとコンテンツを見つけて、各コンポーネントの「Display」メソッドを均一に呼び出して、対応する「ViewModel」とビュー「View」を取得し、最終的にページのレイアウトに従ってそれらを表示します。ページ。
widgetService.GetAllByPage(filterContext.HttpContext.RequestServices, page).Each(widget =>
{
  if (widget != null)
  {
    IWidgetPartDriver partDriver = widget.CreateServiceInstance(filterContext.HttpContext.RequestServices);
    WidgetViewModelPart part = partDriver.Display(widget, filterContext);
    lock (layout.ZoneWidgets)
    {
      if (layout.ZoneWidgets.ContainsKey(part.Widget.ZoneID))
      {
        layout.ZoneWidgets[part.Widget.ZoneID].TryAdd(part);
      }
      else
      {
        layout.ZoneWidgets.Add(part.Widget.ZoneID, new WidgetCollection { part });
      }
    }
    partDriver.Dispose();
  }
});foreach (var widgetPart in Model.ZoneWidgets[zoneId].OrderBy(m => m.Widget.Position).ThenBy(m => m.Widget.WidgetName))
{
<p style="@widgetPart.Widget.CustomStyle">
<p class="widget @widgetPart.Widget.CustomClass">
@if (widgetPart.Widget.Title.IsNotNullAndWhiteSpace())
{
<p class="panel panel-default">
<p class="panel-heading">
@widgetPart.Widget.Title
</p>
<p class="panel-body">
@Html.DisPlayWidget(widgetPart)
</p>
</p>
}
else
{
@Html.DisPlayWidget(widgetPart)
}
</p>
</p>
}プラグインの「最も重要な」クラス、PluginBase
inherit
PluginBase は、プラグイン初期化のエントリ ポイントとして、プログラムの開始時にこれらのクラスをロードし、いくつかの重要な初期化作業を実行します。public abstract class PluginBase : ResourceManager, IRouteRegister, IPluginStartup
{
public abstract IEnumerable<RouteDescriptor> RegistRoute(); //注册该插件所需要的路由 可返回空
public abstract IEnumerable<AdminMenu> AdminMenu(); //插件在后端提供的菜单 可返回空
public abstract IEnumerable<PermissionDescriptor> RegistPermission(); //注册插件的权限
public abstract IEnumerable<Type> WidgetServiceTypes(); //返回该插件中提供的所有组件的类型
public abstract void ConfigureServices(IServiceCollection serviceCollection); //IOC 注册对应的接口与实现
public virtual void InitPlug(); //初始化插件,在程序启动时调用该方法
}public void ConfigureServices(IServiceCollection services)
{
services.UseEasyFrameWork(Configuration).LoadEnablePlugins(plugin =>
{
var cmsPlugin = plugin as PluginBase;
if (cmsPlugin != null)
{
cmsPlugin.InitPlug();
}
}, null);
}エンティティ Enity
各コンポーネントは、コンポーネントに関連するいくつかの情報を格納するために使用されるエンティティに対応します。エンティティは BasicWidget クラスから継承する必要があります。 たとえば、HTML コンポーネントのエンティティ クラス:
[ViewConfigure(typeof(HtmlWidgetMetaData)), Table("HtmlWidget")]
public class HtmlWidget : BasicWidget
{
  public string HTML { get; set; }
}
class HtmlWidgetMetaData : WidgetMetaData<HtmlWidget>
{
  protected override void ViewConfigure()
  {
    base.ViewConfigure();
    ViewConfig(m => m.HTML).AsTextArea().AddClass("html").Order(NextOrder());
  }
}エンティティ クラスでは、メタデータ構成 [ViewConfigure(typeof(HtmlWidgetMetaData))] を使用して、簡単な設定でフォーム ページとリスト ページの表示を制御します。テキストまたはドロップダウン ボックスに設定されている場合は、長さなどの確認が必要です。 ここでの実装方法は、新しい ModelMetadataDetailsProviderProvider を MVC に追加することです。この Provider の機能は、これらのメタデータの構成情報を取得し、MVC に送信することです。
services.AddMvc(option =>
  {
    option.ModelMetadataDetailsProviders.Add(new DataAnnotationsMetadataProvider());
})WidgetService は、Service を通じてデータを取得し、ページ テンプレートに送信します。サービスは WidgetService
たとえば、HTML コンポーネントの Service:
public class HtmlWidgetService : WidgetService<HtmlWidget, CMSDbContext>
{
  public HtmlWidgetService(IWidgetBasePartService widgetService, IApplicationContext applicationContext)
    : base(widgetService, applicationContext)
  {
  }

  public override DbSet<HtmlWidget> CurrentDbSet
  {
    get
    {
      return DbContext.HtmlWidget;
    }
  }
}View エンティティ ViewModel
ViewModel は、エンティティ (Entity) が ViewModel としてビューに渡され、要件を満たさない場合には必要ありません。 、新しい ViewModel を作成し、この ViewModel を渡すことができます。これには、Display メソッドをオーバーライドする必要があります
public override WidgetViewModelPart Display(WidgetBase widget, ActionContext actionContext)
{
  //do some thing
  return widget.ToWidgetViewModelPart(new ViewModel());
}Template (テンプレート) は、コンテンツを表示するために使用されます。テンプレートに必要な「モデル」はサービスを通じて収集され、最終的にテンプレートが表示します。
动态编译分散的模板
插件的资源都在各自的文件夹下面,默认的视图引擎(ViewEngine)并不能找到这些视图并进行编译。MVC4版本的ZKEACMS是通过重写了ViewEngine来得以实现。.net core mvc 可以更方便实现了,实现自己的 ConfigureOptions<RazorViewEngineOptions> ,然后通过依赖注入就行。
public class PluginRazorViewEngineOptionsSetup : ConfigureOptions<RazorViewEngineOptions>
{
  public PluginRazorViewEngineOptionsSetup(IHostingEnvironment hostingEnvironment, IPluginLoader loader) :
    base(options => ConfigureRazor(options, hostingEnvironment, loader))
  {

  }
  private static void ConfigureRazor(RazorViewEngineOptions options, IHostingEnvironment hostingEnvironment, IPluginLoader loader)
  {
    if (hostingEnvironment.IsDevelopment())
    {
      options.FileProviders.Add(new DeveloperViewFileProvider());
    }
    loader.GetPluginAssemblies().Each(assembly =>
    {
      var reference = MetadataReference.CreateFromFile(assembly.Location);
      options.AdditionalCompilationReferences.Add(reference);
    });
    loader.GetPlugins().Where(m => m.Enable && m.ID.IsNotNullAndWhiteSpace()).Each(m =>
    {
      var directory = new DirectoryInfo(m.RelativePath);
      if (hostingEnvironment.IsDevelopment())
      {
        options.ViewLocationFormats.Add($"/Porject.RootPath/{directory.Name}" + "/Views/{1}/{0}" + RazorViewEngine.ViewExtension);
        options.ViewLocationFormats.Add($"/Porject.RootPath/{directory.Name}" + "/Views/Shared/{0}" + RazorViewEngine.ViewExtension);
        options.ViewLocationFormats.Add($"/Porject.RootPath/{directory.Name}" + "/Views/{0}" + RazorViewEngine.ViewExtension);
      }
      else
      {
        options.ViewLocationFormats.Add($"/{Loader.PluginFolder}/{directory.Name}" + "/Views/{1}/{0}" + RazorViewEngine.ViewExtension);
        options.ViewLocationFormats.Add($"/{Loader.PluginFolder}/{directory.Name}" + "/Views/Shared/{0}" + RazorViewEngine.ViewExtension);
        options.ViewLocationFormats.Add($"/{Loader.PluginFolder}/{directory.Name}" + "/Views/{0}" + RazorViewEngine.ViewExtension);
      }
    });
    options.ViewLocationFormats.Add("/Views/{0}" + RazorViewEngine.ViewExtension);
  }
}看上面代码您可能会产生疑惑,为什么要分开发环境。这是因为ZKEACMS发布和开发的时候的文件夹目录结构不同造成的。为了方便开发,所以加入了开发环境的特别处理。接下来就是注入这个配置:
services.TryAddEnumerable(ServiceDescriptor.Transient
EntityFrameWork
ZKEACMS for .net core 使用EntityFrameWork作为数据库访问。数据库相关配置 EntityFrameWorkConfigure
public class EntityFrameWorkConfigure : IOnConfiguring
{
  public void OnConfiguring(DbContextOptionsBuilder optionsBuilder)
  {
    optionsBuilder.UseSqlServer(Easy.Builder.Configuration.GetSection("ConnectionStrings")["DefaultConnection"]);
  }
}对Entity的配置依然可以直接写在对应的类或属性上。如果想使用 Entity Framework Fluent API,那么请创建一个类,并继承自 IOnModelCreating
class EntityFrameWorkModelCreating : IOnModelCreating
{
  public void OnModelCreating(ModelBuilder modelBuilder)
  {
    modelBuilder.Entity<LayoutHtml>().Ignore(m => m.Description).Ignore(m => m.Status).Ignore(m => m.Title);
  }
}主题
ZKEACMS 使用Bootstrap3作为基础,使用LESS,定议了许多的变量,像边距,颜色,背景等等,可以通过简单的修改变量就能“编译”出一个自己的主题。
或者也可以直接使用已经有的Bootstrap3的主题作为基础,然后快速创建主题。
最后
关于ZKEACMS还有很多,如果您也感兴趣,欢迎加入我们。
ZKEACMS for .net core 就是要让建网站变得更简单,快速。页面的修改与改版也变得更轻松,便捷。
【相关推荐】
3. .NET Core CLI工具文档dotnet-publish
以上が.Net Core 用の ZKEACMS の詳細な紹介の詳細内容です。詳細については、PHP 中国語 Web サイトの他の関連記事を参照してください。