


The curve method that comes with Canvas2D
Recently I have been studying the calculation of 3D soft bodies, so I am trying to catch up on some knowledge. It often involves some numerical analysis, mainly various interpolation algorithms of curves. Suddenly I remembered that Canvas2D itself can also draw curves, using quadratic and cubic Bezier curves. In fact, I have never used this method, so let’s try it now ~
This article only talks about simple curve drawing, and I won’t talk about a lot of complicated principles. Moreover, the principle of Bezier Curve is very simple. You can understand it by looking at Wikipedia. In fact, many simple curve drawings in drawing tools use Bezier curves. If you have used the curves in the drawing tools that come with Windows, you must be familiar with them. You can first drag out a straight line, and then click a certain position to distort the straight line. The initial dragging action is to determine the two vertices of the curve, and the clicking action is to add an intermediate point. The drawing tool that comes with Windows uses a cubic Bezier curve, and you can add two intermediate points. The Bezier curve is different from general polynomial interpolation. Its middle point is only used as a control point, not a vertex that the curve must pass through. And it can also make closed curves. Canvas2D provides two methods for drawing curves
quadraticCurveTo: Quadratic Bezier Curve
bezierCurveTo: Cubic Bezier Curve
Lines are drawn starting from the current position. You can use the moveTo method to specify the current position. . After you have the starting position of the curve, you also need the middle point and the ending position. Just pass these position coordinates to the drawing function. For example, a quadratic Bezier curve requires an intermediate point and an end position, so two coordinates need to be passed to the quadraticCurveTo function. The coordinates are composed of x and y, which means this function has 4 parameters. bezierCurveTo is the same, except that it has two intermediate points. Let’s use it below

This gives four points according to the Z-shaped trajectory and draws ordinary straight lines and Bezier curves. This is just an ordinary curve. The great thing about the Bezier curve is that it can draw closed curves, such as this piece of code
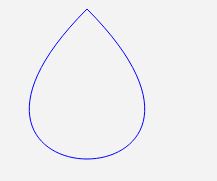
Set the starting and ending positions of the cubic Bezier curve to the same point to draw a closed curve. Because the interpolation direction of the Bezier curve does not follow the coordinate axis, a closed curve can be drawn. If we want polynomial interpolation to draw a closed curve, we have to convert the parameters and use the polar coordinate system to complete.
The examples I use are all cubic Bezier curves. In fact, the second step is the same, but without the middle point, I can’t draw what I want. I won’t go on too much, that’s it for this article = =. .
 What are the production methods of html5 animation production?
 The difference between HTML and HTML5
 Usage of instr function in oracle
 computer virus
 What are the website building functions?
 Introduction to the opening location of win8 running
 The difference between xls and xlsx
 Is OuYi Exchange legal?


![[Web front-end] Node.js quick start](https://img.php.cn/upload/course/000/000/067/662b5d34ba7c0227.png)


