


This article mainly introduces the tutorial of using HTML5 Canvas to fill the color and texture of the picture, including the filling effect of color gradient, etc. Friends who need it can refer to it
Fill color
Art is inseparable from color. Today we will introduce filling color and experience the charm of color.
Fill colors are mainly divided into two types:
1. Basic color
2. Gradient color (divided into linear gradient and radial gradient)
Let’s look at them one by one .
Fill basic color
The Canvas fillStyle property is used to set the basic color and fill of the shape on the canvas. fillStyle uses simple color names. This seems very simple, for example:
JavaScript CodeCopy content to clipboard
context.fillStyle = "red";
Here are the available color strings from the HTML4 specification List of values, sixteen in total. Since HTML5 does not modify the exclusive colors, HTML4 colors can be displayed correctly in HTML5.
All these color values can be applied to the strokeStyle property and fillStyle property.
Okay, let me summarize the method of filling basic colors: (can also be used for strokeStyle attribute)
(1) Use color string filling.
JavaScript CodeCopy content to clipboard
context.fillStyle = "red";
(2) Use hexadecimal number string padding.
JavaScript CodeCopy the content to the clipboard
context.fillStyle = "#FF0000";
(3) Fill in the abbreviation form of the hexadecimal number string.
JavaScript CodeCopy content to the clipboard
context.fillStyle = "#F00";
(4) Use the rgb() method to set the color.
JavaScript CodeCopy content to the clipboard
context.fillStyle = "rgb(255,0,0)";
(5) Use the rgba() method to set the color.
JavaScript CodeCopy content to the clipboard
context.fillStyle = "rgba(255,0,0,1)";
The last parameter of this method is the alpha value, and the transparency range is 1 (opaque) ~ 0 ( transparent).
(6) Use the hsl() method to set the color.
JavaScript CodeCopy content to clipboard
context.fillStyle = "hsl(0,100%,50%)";
HSL stands for hue (H), saturation (S), lightness (L) ) the colors of the three channels.
(7) Use the hsla() method to set the color.
JavaScript CodeCopy the content to the clipboard
context.fillStyle = "hsla(0,100%,50%,1)";
The above 7 lines of code are all filled with "#FF0000" in red.
Fill Gradient Shape
There are two basic options for creating a gradient fill on the canvas: linear or radial. Linear gradients create a horizontal, vertical, or diagonal fill pattern. Radial gradients create a radial fill from a center point. There are three steps to filling a gradient shape: add a gradient line, add a key color to the gradient line, and apply the gradient. Here are some examples of them.
Linear Gradient
Three-step strategy:
Add gradient line:
JavaScript CodeCopy content to clipboard
var grd = context.createLinearGradient(xstart,ystart,xend,yend);
Add a key color to the gradient line (similar to a color breakpoint):
JavaScript CodeCopy content to the clipboard
grd.addColorStop(stop,color);
here Stop passes a floating point number from 0 to 1, which represents the proportion of the distance from the breakpoint to (xstart, ystart) to the entire gradient length.
Apply gradient:
JavaScript CodeCopy the content to the clipboard
context.fillStyle = grd; context.strokeStyle = grd;
Write a code to take a look.
JavaScript CodeCopy content to clipboard
填充线性渐变
Run result: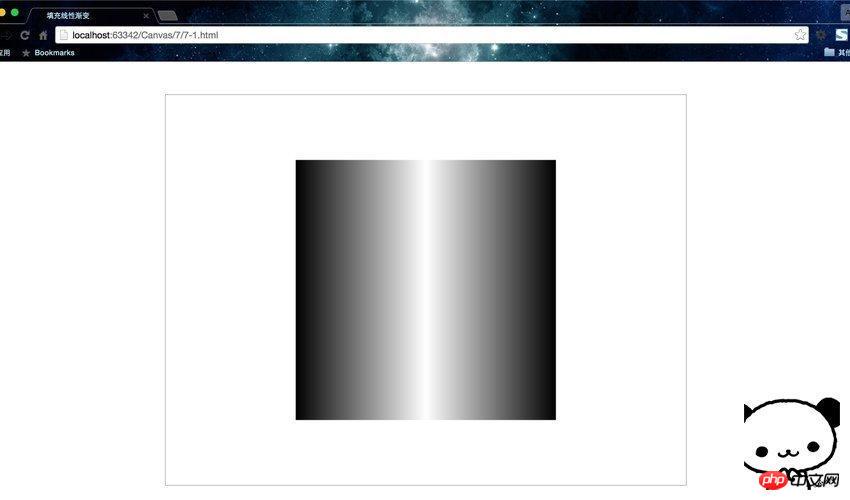
I think so It is necessary to make an illustration so that everyone can understand the gradient at one time.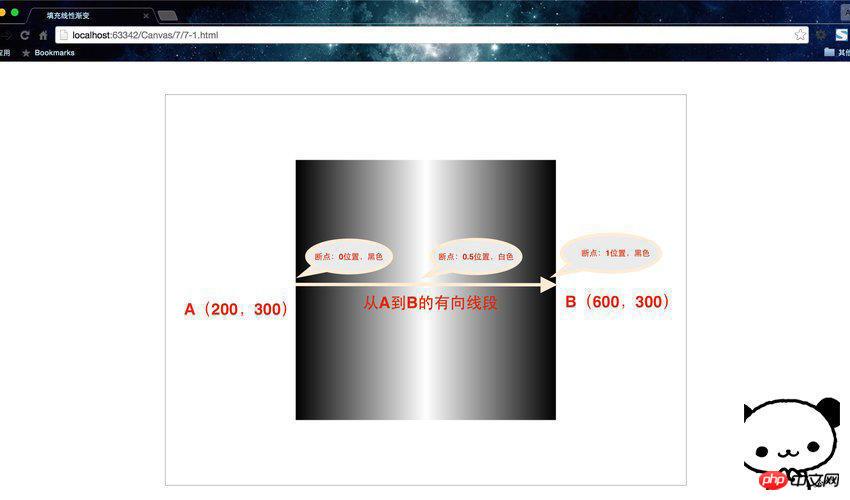
为了方便理解,建议把渐变线看成是一个有向线段。如果熟悉PS等绘图工具,用过其中的渐变色设置,应该会很好理解。
这里渐变线的起点和终点不一定要在图像内,颜色断点的位置也是一样的。但是如果图像的范围大于渐变线,那么在渐变线范围之外,就会自动填充离端点最近的断点的颜色。
这里配合两个补充函数再举一例。
绘制矩形的快捷方法
JavaScript Code复制内容到剪贴板
fillRect(x,y,width,height)、stroke(x,y,width,height)。这两个函数可以分别看做rect()与fill()以及rect()与stroke()的组合。因为rect()仅仅只是规划路径而已,而这两个方法确实实实在在的绘制。填充线性渐变
运行结果: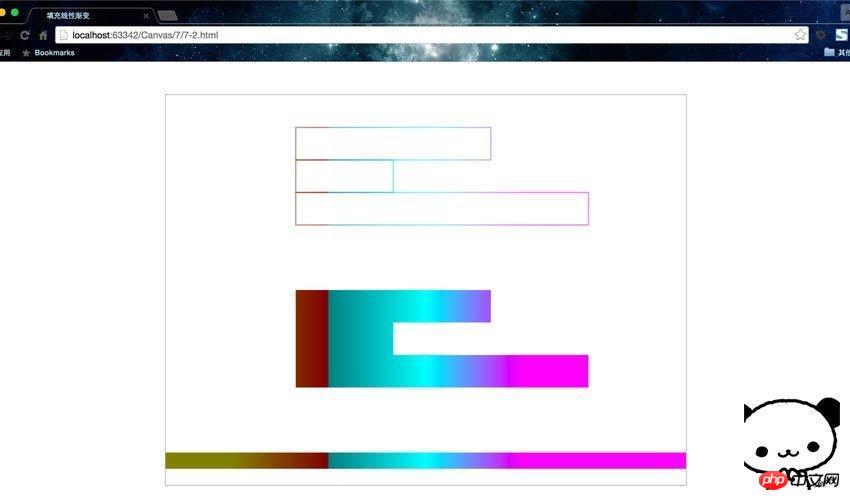
这两个页面都是水平渐变,但是要清楚线性渐变不一定是水平的,方向可以是任意的,通过渐变线的端点来设置方向。
径向渐变
同样是三步走战略,只不过是第一步的所用方法变了。
添加渐变圆:
JavaScript Code复制内容到剪贴板
vargrd = context.createRadialGradient(x0,y0,r0,x1,y1,r1);
为渐变线添加关键色(类似于颜色断点):
JavaScript Code复制内容到剪贴板
grd.addColorStop(stop,color);
应用渐变:
JavaScript Code复制内容到剪贴板
context.fillStyle = grd; context.strokeStyle = grd;
线性渐变是基于两个端点定义的,但是径向渐变是基于两个圆定义的。
我们把示例7-2改写一下。
JavaScript Code复制内容到剪贴板
填充径向渐变
运行结果:
怎么感觉这个颜色搭配那么的……算了,这个就叫做艺术。
createRadialGradient(x0,y0,r0,x1,y1,r1);方法规定了径向渐变开始和结束的范围,即两圆之间的渐变。
总结一下,这节课我们学习了fillStyle、createLinearGradient()、createRadialGradient()、addColorStop()、fillRect()、strokeRect()等属性和方法,详细介绍了填充基本色、线性渐变、径向渐变。
好了,现在学会了上色,那么尽情的使用色彩,绘制出属于我们自己的艺术品吧!
填充纹理
createPattern()简介
纹理其实就是图案的重复,填充图案通过createPattern()函数进行初始化。它需要传进两个参数createPattern(img,repeat-style),第一个是Image对象实例,第二个参数是String类型,表示在形状中如何显示repeat图案。可以使用这个函数加载图像或者整个画布作为形状的填充图案。
有以下4种图像填充类型:
1.平面上重复:repeat;
2.x轴上重复:repeat-x;
3.y轴上重复:repeat-y;
4.不使用重复:no-repeat;
其实createPattern()的第一个参数还可以传入一个canvas对象或者video对象,这里我们只讲解Image对象,其余的大家自己尝试。
创建并填充图案
首先看一下怎么加载图像:
创建Image对象
为Image对象指定图片源
代码如下:
JavaScript Code复制内容到剪贴板
var img = new Image(); //创建Image对象 img.src = "8-1.jpg"; //为Image对象指定图片源
扩展:HTML中的相对路径
'./目录或文件名' 或者 '目录或文件名' 是指当前操作的文件所在目录的路径
'../目录或文件名' 是指当前所操作的文件所在目录的上一级目录的路径
之后填充纹理:
JavaScript Code复制内容到剪贴板
var pattern = context.createPattern(img,"repeat"); context.fillStyle = pattern;
我们直接看一段完整的程序,这里我要重复填充这个萌萌的长颈鹿作为纹理。需要注意的是,选择图片时一定要选择那种左右互通,上下互通的图片做为纹理,这样看上去才不会有不自然的短接处。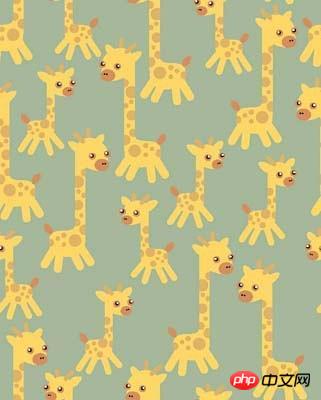
下面提供代码。
JavaScript Code复制内容到剪贴板
填充纹理
运行结果: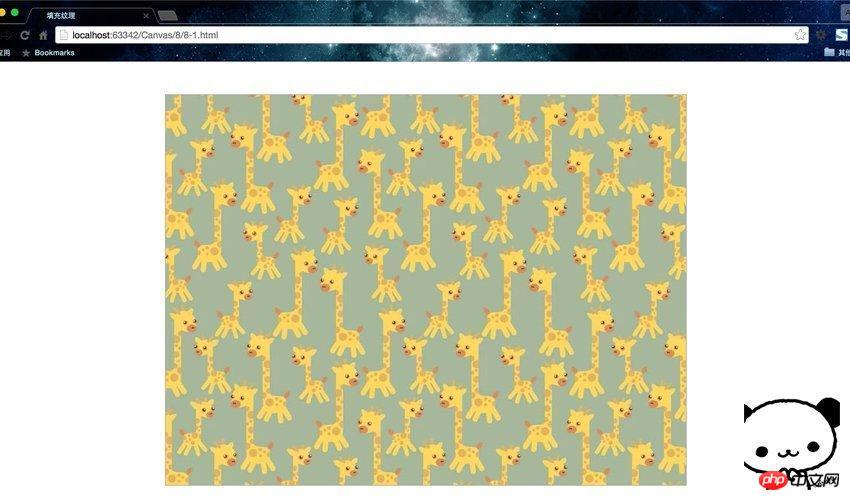
The onload event of Image is used here. Its function is to preload the image, that is, immediately after the image is loaded, the code body of the subsequent function will be removed. This is necessary, if not written, the canvas will display a black screen. Because the texture is filled without waiting for the image to be loaded, the browser cannot find the image.
"repeat" is used here. Children's shoes can also try using the other three values to see what different effects there will be. You can also find other pictures to try filling in and see the effect.
Related recommendations:
HTML5 implementation of previewing local images
##
The above is the detailed content of Fill images with color and texture using HTML5 Canvas. For more information, please follow other related articles on the PHP Chinese website!
 What are the production methods of html5 animation production?
 The difference between HTML and HTML5
 How to check computer IP
 Introduction to the usage of stickline function
 How to repair sql database
 How to read database in html
 Can windows.old be deleted?
 How to use a few thousand to make hundreds of thousands in the currency circle


![[Web front-end] Node.js quick start](https://img.php.cn/upload/course/000/000/067/662b5d34ba7c0227.png)


