

This time I will bring you H5 to realize the rotating three-dimensional Rubik's Cube. What are theprecautionsfor H5 to realize the rotating three-dimensional Rubik's Cube. The following is a practical case, let's take a look.
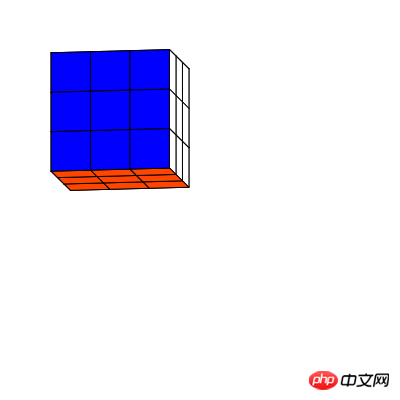
The following is the preview screen.
##Production process
First you need to downloadHtml5Open source library lufylegend-1.4.0
The Rubik's Cube is divided into 6 faces, each face is composed of 9 small rectangles. Now I encapsulate each small rectangle as a class, Because what is being built now is a 3D Rubik's Cube, so to draw each small rectangle, you need to know the 4 fixed points of the small rectangle, and these 4 fixed points will transform according to the rotation angle of the space, so in order to calculate these 4 For fixed-point coordinates, you need to know the angle of rotation of the Rubik's Cube around the x-axis and z-axis. So, create a rectangle class as followsfunction Rect(pointA,pointB,pointC,pointD,angleX,angleZ,color){ base(this,LSprite,[]); this.pointZ=[(pointA[0]+pointB[0]+pointC[0]+pointD[0])/4,(pointA[1]+pointB[1]+pointC[1]+pointD[1])/4,(pointA[2]+pointB[2]+pointC[2]+pointD[2])/4]; this.z = this.pointZ[2]; this.pointA=pointA,this.pointB=pointB,this.pointC=pointC,this.pointD=pointD,this.angleX=angleX,this.angleZ=angleZ,this.color=color; } Rect.prototype.setAngle = function(a,b){ this.angleX = a; this.angleZ = b; this.z=this.getPoint(this.pointZ)[2]; };
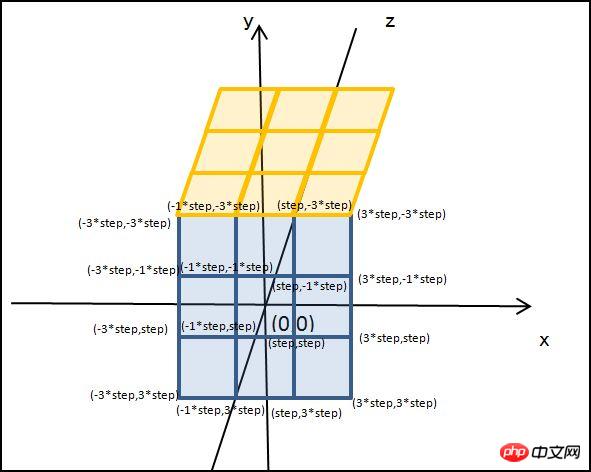
for(var x=0;x<3;x++){ for(var y=0;y<3;y++){ z = 3; var rect = new Rect([-3*step + x*2*step,-3*step + y*2*step,-3*step + z*2*step],[-step + x*2*step,-3*step + y*2*step,-3*step + z*2*step],[-step + x*2*step,-step + y*2*step,-3*step + z*2*step],[-3*step + x*2*step,-step + y*2*step,-3*step + z*2*step],0,0,"#FF0000"); backLayer.addChild(rect); } }
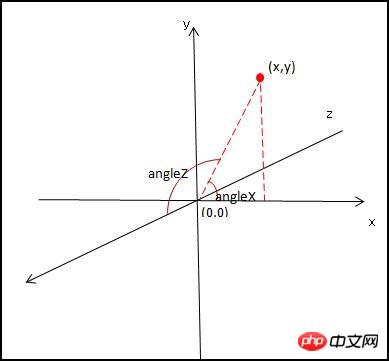
Rect.prototype.getPoint = function(p){ var u2,v2,w2,u=p[0],v=p[1],w=p[2]; u2 = u * Math.cos(this.angleX) - v * Math.sin(this.angleX); v2 = u * Math.sin(this.angleX) + v * Math.cos(this.angleX); w2 = w; u = u2; v = v2; w = w2; u2 = u; v2 = v * Math.cos(this.angleZ) - w * Math.sin(this.angleZ); w2 = v * Math.sin(this.angleZ) + w * Math.cos(this.angleZ); u = u2; v = v2; w = w2; return [u2,v2,w2]; };
Rect.prototype.draw = function(layer){ this.graphics.clear(); this.graphics.drawVertices(1,"#000000",[this.getPoint(this.pointA),this.getPoint(this.pointB),this.getPoint(this.pointC),this.getPoint(this.pointD)],true,this.color); };
array.
Finally, the complete code is given. There is very little code and a total of 91 lines of JS code.1, index.html
    3D魔方
  loading……
2, Rect class
function Rect(pointA,pointB,pointC,pointD,angleX,angleZ,color){ base(this,LSprite,[]); this.pointZ=[(pointA[0]+pointB[0]+pointC[0]+pointD[0])/4,(pointA[1]+pointB[1]+pointC[1]+pointD[1])/4,(pointA[2]+pointB[2]+pointC[2]+pointD[2])/4]; this.z = this.pointZ[2]; this.pointA=pointA,this.pointB=pointB,this.pointC=pointC,this.pointD=pointD,this.angleX=angleX,this.angleZ=angleZ,this.color=color; } Rect.prototype.draw = function(layer){ this.graphics.clear(); this.graphics.drawVertices(1,"#000000",[this.getPoint(this.pointA),this.getPoint(this.pointB),this.getPoint(this.pointC),this.getPoint(this.pointD)],true,this.color); }; Rect.prototype.setAngle = function(a,b){ this.angleX = a; this.angleZ = b; this.z=this.getPoint(this.pointZ)[2]; }; Rect.prototype.getPoint = function(p){ var u2,v2,w2,u=p[0],v=p[1],w=p[2]; u2 = u * Math.cos(this.angleX) - v * Math.sin(this.angleX); v2 = u * Math.sin(this.angleX) + v * Math.cos(this.angleX); w2 = w; u = u2; v = v2; w = w2; u2 = u; v2 = v * Math.cos(this.angleZ) - w * Math.sin(this.angleZ); w2 = v * Math.sin(this.angleZ) + w * Math.cos(this.angleZ); u = u2; v = v2; w = w2; return [u2,v2,w2]; };
Three, Main.js
init(50,"mylegend",400,400,main); var a = 0,b=0,backLayer,step = 20,key = null; function main(){ backLayer = new LSprite(); addChild(backLayer); backLayer.x = 120,backLayer.y = 120; //后 for(var x=0;x<3;x++){ for(var y=0;y<3;y++){ z = 0; var rect = new Rect([-3*step + x*2*step,-3*step + y*2*step,-3*step + z*2*step],[-step + x*2*step,-3*step + y*2*step,-3*step + z*2*step],[-step + x*2*step,-step + y*2*step,-3*step + z*2*step],[-3*step + x*2*step,-step + y*2*step,-3*step + z*2*step],0,0,"#FF4500"); backLayer.addChild(rect); } } //前 for(var x=0;x<3;x++){ for(var y=0;y<3;y++){ z = 3; var rect = new Rect([-3*step + x*2*step,-3*step + y*2*step,-3*step + z*2*step],[-step + x*2*step,-3*step + y*2*step,-3*step + z*2*step],[-step + x*2*step,-step + y*2*step,-3*step + z*2*step],[-3*step + x*2*step,-step + y*2*step,-3*step + z*2*step],0,0,"#FF0000"); backLayer.addChild(rect); } } //上 for(var x=0;x<3;x++){ for(var z=0;z<3;z++){ y = 0; var rect = new Rect([-3*step + x*2*step,-3*step + y*2*step,-3*step + z*2*step],[-step + x*2*step,-3*step + y*2*step,-3*step + z*2*step],[-step + x*2*step,-3*step + y*2*step,-step + z*2*step],[-3*step + x*2*step,-3*step + y*2*step,-step + z*2*step],0,0,"#FFFFFF"); backLayer.addChild(rect); } } //下 for(var x=0;x<3;x++){ for(var z=0;z<3;z++){ y = 3; var rect = new Rect([-3*step + x*2*step,-3*step + y*2*step,-3*step + z*2*step],[-step + x*2*step,-3*step + y*2*step,-3*step + z*2*step],[-step + x*2*step,-3*step + y*2*step,-step + z*2*step],[-3*step + x*2*step,-3*step + y*2*step,-step + z*2*step],0,0,"#FFFF00"); backLayer.addChild(rect); } } //左 for(var y=0;y<3;y++){ for(var z=0;z<3;z++){ x = 0; var rect = new Rect([-3*step + x*2*step,-3*step + y*2*step,-3*step + z*2*step],[-3*step + x*2*step,-3*step + y*2*step,-step + z*2*step],[-3*step + x*2*step,-step + y*2*step,-step + z*2*step],[-3*step + x*2*step,-step + y*2*step,-3*step + z*2*step],0,0,"#008000"); backLayer.addChild(rect); } } //右 for(var y=0;y<3;y++){ for(var z=0;z<3;z++){ x = 3; var rect = new Rect([-3*step + x*2*step,-3*step + y*2*step,-3*step + z*2*step],[-3*step + x*2*step,-3*step + y*2*step,-step + z*2*step],[-3*step + x*2*step,-step + y*2*step,-step + z*2*step],[-3*step + x*2*step,-step + y*2*step,-3*step + z*2*step],0,0,"#0000FF"); backLayer.addChild(rect); } } backLayer.addEventListener(LEvent.ENTER_FRAME,onframe); } function onframe(){ a += 0.1 , b += 0.1; backLayer.childList = backLayer.childList.sort(function(a,b){return a.z - b.z;}); for(key in backLayer.childList){ backLayer.childList[key].setAngle(a,b); backLayer.childList[key].draw(backLayer); } }
spring mvc+localResizeIMG implements H5 image compression and upload
Detailed explanation of canvas drawing api usage
The above is the detailed content of H5 realizes rotating three-dimensional Rubik's cube. For more information, please follow other related articles on the PHP Chinese website!
 What are the production methods of html5 animation production?
 The difference between HTML and HTML5
 How to open Computer Network and Sharing Center
 What should I do if my computer won't turn on?
 Steps to delete one of dual systems
 Introduction to javascript special effects code
 Litecoin price today
 Introduction to the meaning of += in C language


![[Web front-end] Node.js quick start](https://img.php.cn/upload/course/000/000/067/662b5d34ba7c0227.png)


