

This time I will bring you a detailed explanation of the use of canvas's drawing api. What are the things to note when using canvas's drawing api? The following is a practical case, let's take a look.Canvas can draw many wonderful styles and beautiful effects. Through a few simple APIs, you can present ever-changing effects on the canvas. You can also create web games. Next, I will summarize what is related to drawing. API.
When painting, canvas is equivalent to the canvas, and context is equivalent to the brush.
1. Draw linesmoveTo(x0,y0): Move the current brush (ictx) to the position (x0,y0) .
lineTo(x1,y1): Draw a straight line from the current position (x0, y0) to (x1, y1).
beginPath(): Open a path or reset the current path.
closePath(): Return to the starting point of the path from the current point, which is the position, avoidance and path of the previous beginPath.
stroke(): draw. This
functionmust be added before the picture can be drawn, so this must be placed at the end.
Effect: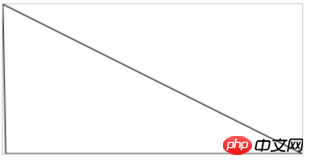 It should be noted here that if closepath is placed after the stroke function, it will not be drawn into a closed line, because before closing , has been drawn, so the straight line on the left will not be drawn.
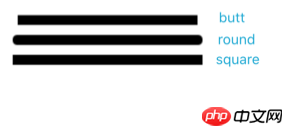
2. Line stylelineCap: Line endpoint style, butt, round, square. through miterLimet can also be used to set the maximum length of the inflection point junction.
 miterLimet: If the miter length exceeds the value of miterLimit, the corners will be displayed with the "bevel" type of lineJoin.
lineWidth: line width
strokeStyle: line color, gradient (defined gradient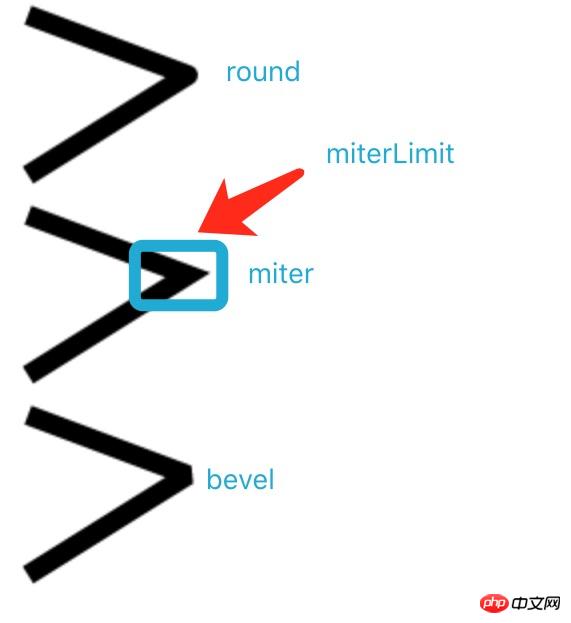 object
var iCanvas=document.getElementById("iCanvas"); var ictx=iCanvas.getContext("2d"); ictx.beginPath(); ictx.strokeStyle="#0000ff"; ictx.lineWidth=20; ictx.lineCap="round"; ictx.moveTo(10,10); ictx.lineTo(80,80); ictx.stroke(); ictx.beginPath();//在这里必须beginPath,不然一直会以第一个为基础会话,在最后的stroke的时候,会再次画一条黑色的斜线,一共3条线。 ictx.strokeStyle="#000000"; ictx.lineCap="butt"; ictx.lineWidth=10; ictx.moveTo(80,10); ictx.lineTo(10,80); ictx.stroke();
arcTo(x1,y1,x2,y2,radius): draw two The curve before the tangent.
ictx.beginPath(); ictx.moveTo(20,20); // 创建开始点 ictx.lineTo(100,20); // 创建水平线 ictx.arcTo(150,20,150,70,50); // 创建弧 ictx.lineTo(150,120); // 创建垂直线 ictx.stroke();
quadraticCurveTo(x1,y1,x2,y2): quadratic Bezier curve. (x1, y1) The coordinates of the control point, (x2, y2) the coordinates of the end point
bezierCurveTo(x1,y1,x2,y2,x,y): cubic Bezier curve. (x1, y1) The coordinates of control point 1, (x2, y2) The coordinates of control point 2 (x, y) The coordinates of the end point.
Bezier curves are very useful when drawing some very smooth curves.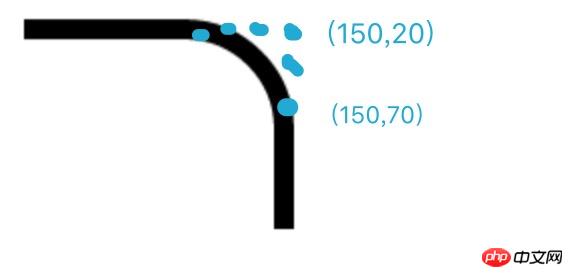
fillRect(x,y,width ,height): Draw a filled rectangle: (x, y) starting point, width, height rectangle width and height
strokeRect(): Draw a rectangular wireframe clearRect(): Clear the rectangle.ictx.fillStyle="#0000ff";//设定填充颜色 ictx.fillRect(20,20,150,100); ictx.strokeRect(180,20,100,100);
fillStyle:设置填充的颜色,渐变或模式(patten);
strokeStyle:画笔的颜色,渐变或者模式
6.绘制阴影
shadowColor:阴影yanse
shadowBlur:模糊级别
shadowOffsetX:阴影的水平距离
shadowOffsetY:阴影的垂直距离
ictx.shadowBlur=20; ictx.shadowColor="#456"; ictx.shadowOffsetX=-10; ictx.shadowOffsetY=30;//先设置阴影再画矩形 ictx.fillStyle="#108997"; ictx.fillRect(20,20,100,80); ictx.stroke();

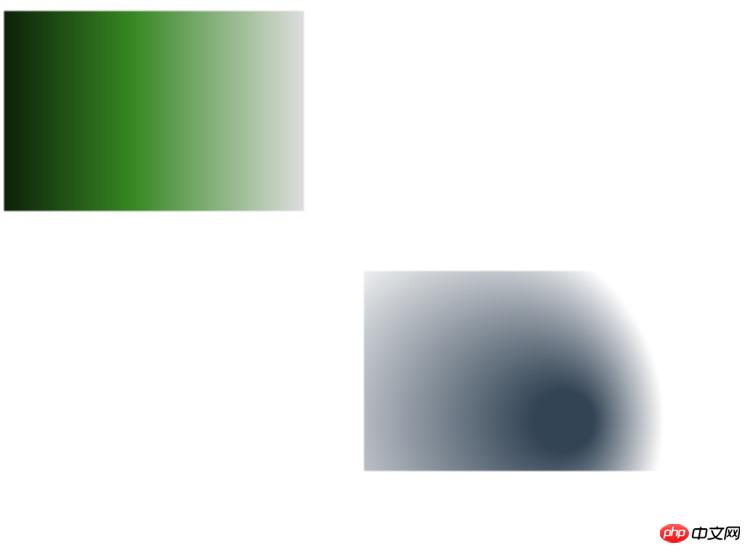
7.绘制渐变
createLinearGradient(x1,y1,x2,y2):绘制线性渐变,(x1,y1)是渐变的起始点,(x2,y2)是渐变的终点,位置不同可以制作出垂直或者水平渐变。
createRadialGradient(x1,y1,r1,x2,y2,r2):径向渐变:,(x1,y1)是渐变的起始点圆心,r1是半径,(x2,y2)是渐变的终点,r2是结束点半径;
两种渐变都需要使用
addColorStop(stop,color)来设置渐变过程,stop是0.0到1.0的值。
var grd=ictx.createLinearGradient(0,0,170,0); grd.addColorStop(0,"#000"); grd.addColorStop(0.5,"#378923"); grd.addColorStop(1,"#ddd"); ictx.fillStyle=grd;//这里渐变是一个对象,用来向fillstyle传值 ictx.fillRect(20,20,150,100); var grd=ictx.createRadialGradient(300,225,15,250,225,100); grd.addColorStop(0,"#345"); grd.addColorStop(1,"#fff"); ictx.fillStyle=grd; ictx.fillRect(200,150,150,100);
8.填充背景
createPattern(image,"repeat|repeat-x|repeat-y|no-repeat"):image是一个图片对象,后面的参数是用来设定图片的重复方式。
9.其他相关API
fill():填充当前路径。
isPointInPath():ictx.isPointInPath(x,y);判断这个点是否位于当前路径
清除画布方法:获取画布的宽高,icanvas.height,icanvas.width;然后使用clearRect();
修改画布的宽高:icanvas.width='200';icanvas.width='300'的方法。
globalAlpha:设置透明度,只能是0~1的数字,如果透明度不一样,在画第二幅之前重新设置即可。
toDataURL:icanvas.toDataURL(type,encoderOptions),这个函数返回一个image的base64的URI,参数都是可选的,type可以设置图片类型如image/jpeg,image/webp,默认是image/png;encoderOptions是一个0~1的数字,用来设置image/jpeg,image/webp的图片质量,其他格式的type设置这个参数无效。
10.剪裁
clip():从画布中剪裁任意形状和尺寸的画布,之后所有的绘图都会被限制在剪裁的区域内。这个方法通常和绘制矩形,圆形等路径一起使用,在这些方法后面,剪切这个图像,后来画的就必须在这个剪切后的画布上了。
ictx.arc(100,100,50,(Math.PI/180)*0,(Math.PI/180)*360,true); ictx.stroke(); ictx.clip(); ictx.fillStyle="green"; ictx.fillRect(0,0,150,100);
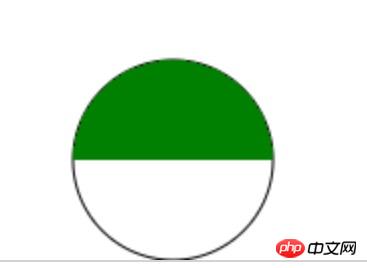
如果还想操作外部的画布,在剪切前使用save()函数保存,剪切后使用restore()函数恢复到之前保存的状态,但是中间做的操作不会消失哈。
相信看了本文案例你已经掌握了方法,更多精彩请关注php中文网其它相关文章!
推荐阅读:
The above is the detailed content of Detailed explanation of the use of canvas's drawing api. For more information, please follow other related articles on the PHP Chinese website!
 What are the production methods of html5 animation production?
 Get window handle method
 The difference between rest api and api
 Can Douyin recharge phone bills be refunded?
 How to optimize a single page
 python eval
 Advantages of plc control system
 What is the difference between 4g and 5g mobile phones?


![[Web front-end] Node.js quick start](https://img.php.cn/upload/course/000/000/067/662b5d34ba7c0227.png)


