A recent project just used this effect, which is a bit like a scratch card. On a mobile device, a certain picture is scratched off to display another a picture. The renderings are as follows:
 Please click on the right for DEMO:DEMO
This This method is quite common on the Internet. I originally wanted to just find a demo online and apply his method. After applying it, I found that it was stuck on Android. Because of customer requirements, Android is not required to be particularly smooth, at least. It can be played, but the demo I found online is too laggy, making it impossible to play. So I just wanted to write one myself, and this article is just for recording the research process.
The first thing that comes to mind is to use the HTML5 canvas to achieve this scraping effect. In the canvas API, the clearRect method can be used to clear pixels. However, The clearRect method clears the rectangular area. After all, the eraser used by most people is round, so the powerful function of the clipping area is introduced, which is the clip method. The usage is very simple:
ctx.save()
ctx.beginPath()
ctx.arc(x2,y2,a,0,2*Math.PI);
ctx.clip()
ctx.clearRect(0,0,canvas.width,canvas.height);
ctx.restore();
The above code realizes the erasure of the circular area, that is, first implements a circular path, and then erases this path As a clipping area, just clear the pixels. One thing to note is that you need to save the drawing environment first. After clearing the pixels, you need to reset the drawing environment. If you do not reset, future drawings will be limited to that clipping area.
Now that the erasing effect is there, now it’s time to write the erasing effect of moving the mouse. I’ll use the mouse to describe it below, because the mobile version is similar, just replace mousedown with touchstart. Just replace mousemove with touchmove, mouseup with touchend, and get coordinate points from e.clientX to e.targetTouches[0].pageX.
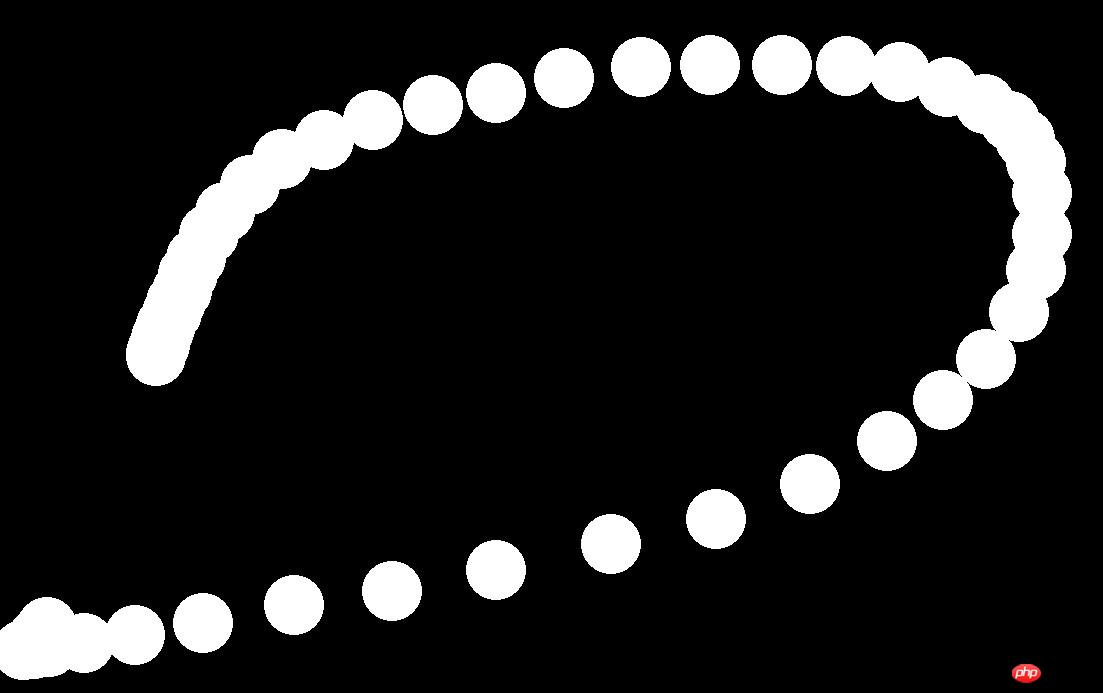
To implement mouse movement erasure, I just thought of erasing the circular area where the mouse is located in the triggered mousemove event when the mouse moves. After writing it out, I found that when the mouse moves When the speed is very fast, the erased area will be inconsistent, and the following effect will appear. This is obviously not the eraser effect we want.

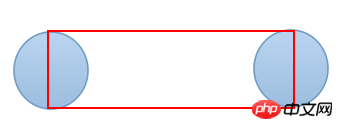
Since all the points are incoherent, the next thing to do is to connect these points. If it is implemented If you use the drawing function, you can directly connect two points through lineTo and then draw. However, the clipping area in the erasure effect requires a closed path. If you simply connect two points, you cannot form a clipping area. Then I thought of using calculation methods to calculate the four endpoint coordinates of the rectangles in the two erasing areas, which is the red rectangle in the picture below:

The calculation method is also very simple, because we can know the coordinates of the two endpoints of the line connecting the two clipping areas, and how wide the line we want, the coordinates of the four endpoints of the rectangle become It’s easy to find, so we have the following code:
var asin = a*Math.sin(Math.atan((y2-y1)/(x2-x1)));
var acos = a*Math.cos(Math.atan((y2-y1)/(x2-x1)))
var x3 = x1+asin;var y3 = y1-acos;
var x4 = x1-asin;
var y4 = y1+acos;
var x5 = x2+asin;var y5 = y2-acos;
var x6 = x2-asin;var y6 = y2+acos;
coordinate of. In this way, the clipping area is a circle plus a rectangle. The code is organized as follows: For the partial erasure effect, when you erase a certain number of pixels, all the image content will be automatically displayed. I use imgData to achieve this effect. The code is as follows:
 hastouch = "ontouchstart"
 window?:= hastouch?"touchstart":"mousedown"=
 hastouch?"touchmove":"mousemove"=
 hastouch?"touchend":"mouseup"= hastouch?e.targetTouches[0].pageX:e.clientX-=
 hastouch?e.targetTouches[0].pageY:e.clientY-0,2*0,0= hastouch?e.targetTouches[0].pageX:e.clientX-=
 hastouch?e.targetTouches[0].pageY:e.clientY- asin = a*Math.sin(Math.atan((y2-y1)/(x2-x1)));
 acos = a*Math.cos(Math.atan((y2-y1)/(x2-x1)))
 x3 = x1+ y3 = y1- x4 = x1- y4 = y1+ x5 = x2+ y5 = y2- x6 = x2- y6 = y2+0,2*0,00,0==
此处注意,我是把检查像素这段代码方法mouseup事件里面的,因为这个计算量相对来说还是不小,如果用户狂点鼠标,就会狂触发mouseup事件,也就是会疯狂的触发那个循环计算像素,计算量大到阻塞进程,导致界面卡住的情况,缓解办法如下:加个timeout,延迟执行像素计算,而在每一次点击的时候再清除timeout,也就是如果用户点击很快,这个计算也就触发不了了,还有一个提升的办法就是抽样检查,我上面的写法是逐个像素检查,逐个像素检查的话像素量太大,肯定会卡的,所以可以采用抽样检查,比如每隔30个像素检查一次,修改后的代码如下:
timeout = setTimeout(function(){
var imgData = ctx.getImageData(0,0,canvas.width,canvas.height);
var dd = 0;
for(var x=0;x<imgData.width;x+=30){
for(var y=0;y<imgData.height;y+=30){
var i = (y*imgData.width + x)*4;
if(imgData.data[i+3] >0){
                dd++
            }
        }
    }    if(dd/(imgData.width*imgData.height/900)<0.4){
        canvas.className = "noOp";
    }
},100)这样就可以较大限度的防止用户狂点击了,如果有其他更好的检查方法欢迎给出意见,谢谢。
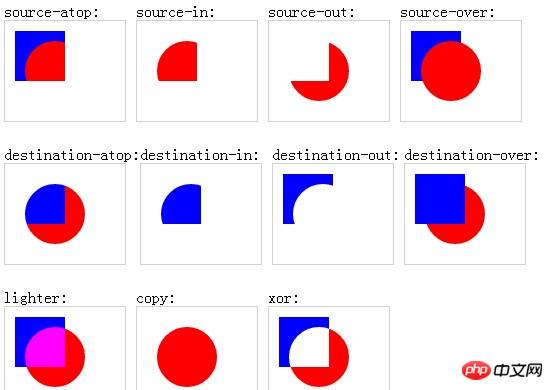
到了这一步就都写完了,然后就是测试的时候了,结果并不乐观,在android上还是卡啊卡啊,所以又得另想办法,最终发现了绘图环境中的globalCompositeOperation这个属性,这个属性的默认值是source-over,也就是,当你在已有像素上进行绘图时会叠加,但是还有一个属性是destination-out,官方解释就是:在源图像外显示目标图像。只有源图像外的目标图像部分才会被显示,源图像是透明的。好像不太好理解,但是其实自己测试一下就会发现很简单,也就是在已有像素的基础上进行绘图时,你绘制的区域里的已有像素都会被置为透明,直接看张图更容易理解:
 globalCompositeOperation属性效果图解。
有了这个属性后,就意味着不需要用到clip,也就不需要用sin、cos什么的计算剪辑区域,直接用条粗线就行了,这样一来就能够很大限度的降低了计算量,同时减少了绘图环境API的调用,性能提升了,在android上运行应该也会流畅很多,下面是修改后的代码:
 hastouch = "ontouchstart"  window?:= hastouch?"touchstart":"mousedown"= hastouch?"touchmove":"mousemove"= hastouch?"touchend":"mouseup"=
 hastouch?e.targetTouches[0].pageX:e.clientX-= hastouch?e.targetTouches[0].pageY:e.clientY-= "round"= "round"= a*2= "destination-out"1,0,2*
 imgData = ctx.getImageData(0,0 dd = 0( x=0;x<imgData.width;x+=30(
 y=0;y<imgData.height;y+=30 i = (y*imgData.width + x)*4(imgData.data[i+3] > 0++(dd/(imgData.width*imgData.height/900)<0.4){
canvas.className = "noOp"= hastouch?e.targetTouches[0].pageX:e.clientX-= hastouch?e.targetTouches[0].pageY:e.clientY-==擦除那部分代码就这么一点,也就相当于画图功能,直接设置line属性后通过lineTo进行绘制线条,只要事前把globalCompositeOperation设成destination-out,你所进行的一切绘制,都变成了擦除效果。鼠标滑动触发的事件里面代码也少了很多,绘图对象的调用次数减少了,计算也减少了,性能提升大大滴。
改好代码后就立即用自己的android机子测试了一下,果然如此,跟上一个相比,流畅了很多,至少达到了客户要求的能玩的地步了。
The above is the detailed content of Detailed explanation of the sample code for implementing the erasing effect of the eraser in HTML5 (picture). For more information, please follow other related articles on the PHP Chinese website!
 What are the production methods of html5 animation production?
 The difference between HTML and HTML5
 What does class mean in c language?
 C language data structure
 How to solve Permission denied
 Association rules apriori algorithm
 What is the name of the telecommunications app?
 What are the advantages and disadvantages of decentralization


