(Continued from above) Tabletop games are usually created with a core physics engine. Therefore, to simulate a soft object in the 3D world requires a complete physics simulator and establish a believable behavior.
WebGL and JavaScript are not yet luxurious enough to run a full-fledged physics simulator. So in this game we have to find a way to create the effect of wind.
We embed “wind sensitivity” information for each object in the 3D model. Each vertex of the 3D model has a "wind attribute" that specifies how much the vertex should be affected by wind speed. So, this specifies the wind sensitivity of the 3D object. Then we need to create the "wind" itself.
We do this by creating images containing Perlin noise. This image is intended to cover the wind over a defined area. So, a good way to think about it is to imagine clouds covering a frame like noise in a specific rectangular area of a 3D scene. The gray value of each pixel in this image specifies how strong the wind force is in the 3D area at a specific moment.
To create the effect of wind, the image moves at a constant speed and in a specific direction, the direction of the wind. And to ensure that the "wind area" doesn't affect anything in the scene, we wrap the wind image around the boundary, limiting it to the area of the effect.
A simple 3D tutorial on wind
Now, let us create a wind effect in a simple 3D scene through Three.js.
We will create the wind in a simple "procedural grass".
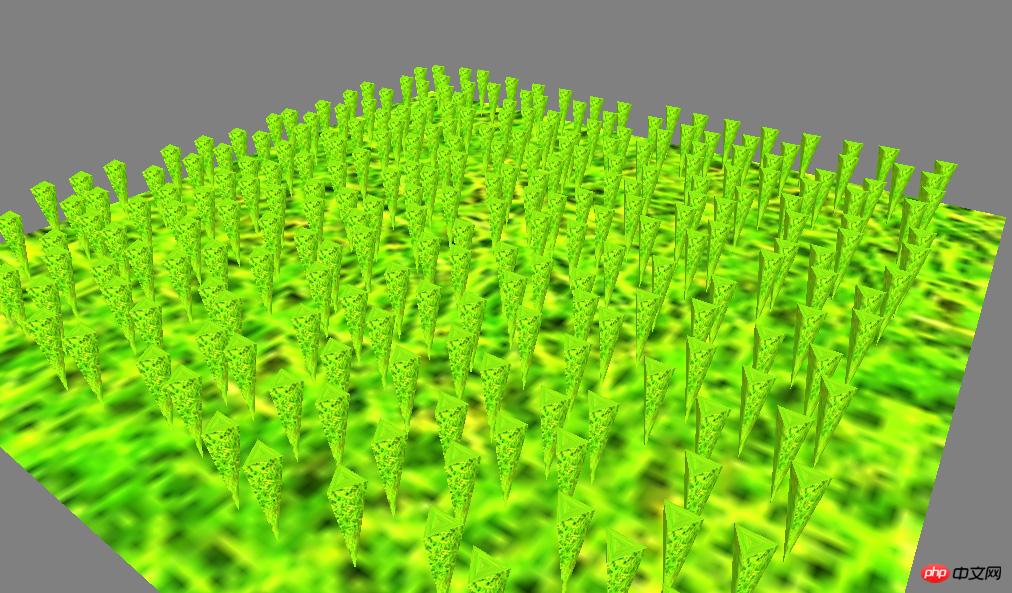
First, let’s create the scene. We will have a simple, flat textured ground. Each blade of grass will then be simply represented by an inverted cone.

Ground covered with grass
Here’s how to create this simple scene using CoffeeScript in Thress.js.
First we need to set up Three.js and combine it with the camera, mouse, and some lights:
<br>
constructor: ->

   @clock =  new THREE.Clock()

   @container = document.createElement( 'p' );
   document.body.appendChild( @container );

   @renderer = new THREE.WebGLRenderer();
   @renderer.setSize( window.innerWidth, window.innerHeight );
   @renderer.setClearColorHex( 0x808080, 1 )
   @container.appendChild(@renderer.domElement);

   @camera = new THREE.PerspectiveCamera( 50, window.innerWidth / window.innerHeight, 1, 5000 );
   @camera.position.x = 5;
   @camera.position.y = 10;
   @camera.position.z = 40;

   @controls = new THREE.OrbitControls( @camera, @renderer.domElement );
   @controls.enabled = true

   @scene = new THREE.Scene();
   @scene.add( new THREE.AmbientLight 0xFFFFFF )

   directional = new THREE.DirectionalLight 0xFFFFFF
   directional.position.set( 10,10,10)
   @scene.add( directional )

   # Demo data
   @grassTex = THREE.ImageUtils.loadTexture("textures/grass.png");
   @initGrass()
   @initTerrain()

   # Stats
   @stats = new Stats();
   @stats.domElement.style.position = 'absolute';
   @stats.domElement.style.top = '0px';
   @container.appendChild( @stats.domElement );
   window.addEventListener( 'resize', @onWindowResize, false );
@animate()The initGrass and initTerrain function calls fill the scene with grass and ground respectively:
<br/>
initGrass:->
   mat = new THREE.MeshPhongMaterial( { map: @grassTex } )
   NUM = 15
   for i in [0..NUM] by 1
       for j in [0..NUM] by 1
           x = ((i/NUM) - 0.5) * 50 + THREE.Math.randFloat(-1,1)
           y = ((j/NUM) - 0.5) * 50 + THREE.Math.randFloat(-1,1)
           @scene.add( @instanceGrass( x, 2.5, y, 5.0, mat ) )

instanceGrass:(x,y,z,height,mat)->
   geometry = new THREE.CylinderGeometry( 0.9, 0.0, height, 3, 5 )
   mesh = new THREE.Mesh( geometry, mat )
   mesh.position.set( x, y, z )
return meshHere we create a grid consisting of 15*15 grass. We added a random number to the position of each blade of grass so that they wouldn't look weird because they were arranged too neatly.
This terrain is just a horizontal plane placed at the roots of these grasses (Y = 2.5).
<br/>
initTerrain:->
  @plane = new THREE.Mesh( new THREE.PlaneGeometry(60, 60, 2, 2), new THREE.MeshPhongMaterial({ map: @grassTex }))
  @plane.rotation.x = -Math.PI/2
@scene.add( @plane )So what we have done so far is simply created a Three.js scene and added some grass, a procedurally generated inverted cone created, and a simple ground.
Nothing special so far.
<br/>
Now it’s time to add the wind. First thing, we want to embed wind sensitivity information into the 3D model of the grass.
We need to embed this information into each vertex of the Xiaocao 3D model as a custom attribute. The rule we're going to use is: The bottom of each grass model (the top of the cone) has a wind sensitivity of 0 because it's stuck to the ground. The top of the grass model (the base of the cone) has the greatest wind sensitivity because it is farther from the ground.
The following is how to rewrite the instanceGrass function to add wind sensitivity as a custom parameter to the grass's 3D model.
<br/>
instanceGrass:(x,y,z,height)->

  geometry = new THREE.CylinderGeometry( 0.9, 0.0, height, 3, 5 )

  for i in [0..geometry.vertices.length-1] by 1
      v = geometry.vertices[i]
      r = (v.y / height) + 0.5
      @windMaterial.attributes.windFactor.value[i] = r * r * r

  # Create mesh
  mesh = new THREE.Mesh( geometry, @windMaterial )
  mesh.position.set( x, y, z )
return mesh<br>
The above is the detailed content of How to develop excellent HTML5 games - Detailed explanation of Disney's 'Finding Road to Oz' game technology (2). For more information, please follow other related articles on the PHP Chinese website!
 What are the production methods of html5 animation production?
 The difference between HTML and HTML5
 Where does the subscript of php array start?
 Comparative analysis of win10 home version and professional version
 eclipse tutorial
 How to solve the problem that the device manager cannot be opened
 Usage of getproperty
 securefx cannot connect


