


The download package of the HTML5 open source engine lufylegend-1.7.1 version contains the lufylegend.ui-0.1.0.js file, which is a dedicated UI component of the lufylegend.js engine. I am in the api As mentioned in the introduction, this UI component is specially prepared for lazy people, including buttons, radio buttons, multi-select boxes, combo boxes, scroll bars and other UIs.
Let me talk about the drawing process of these UIs in detail, so that everyone can better understand and expand new UI components.
First, let’s take a look at the drawing of the LButtonSample1 button.
You can use the LButton class to add a button in the lufylegend.js engine, but you need to pass in the visual objects of the two states of button popping up and button pressing, which can be LSprite or LBitmap Friends who want a prettier button can use a beautiful picture. The general method is as follows
btn01 = new LButton(new LBitmap(new LBitmapData(imglist["replay_button_up"])),
new LBitmap(new LBitmapData(imglist["replay_button_over"])));
Of course, you can also use the graphics property of the LSprite object to draw a graphic. The general method is as follows
	var up = new LSprite();
	up.graphics.drawRect(1,"black",[0, 0, 100, 30],true,"#999999");
	var txt = new LTextField();
	txt.x = 10;
	txt.y = 5;
	txt.text = "测试按钮";
	up.addChild(txt);
	var over = new LSprite();
	over.graphics.drawRect(1,"black",[0, 0, 100, 30],true,"#cccccc");
	var txt1 = new LTextField();
	txt1.x = 10;
	txt1.y = 5;
	txt1.text = "测试按钮";
	over.addChild(txt1);
	var btn = new LButton(up,over);
The above code just draws two rectangles of different colors, which is of course not beautiful enough. The LButtonSample1 object is created based on this method.
Look at the constructor code of LButtonSample1
function LButtonSample1(name,size,font,color){
	var s = this;
	if(!size)size=16;
	if(!color)color = "white";
	if(!font)font = "黑体";
	s.backgroundCorl = "black";
	var btn_up = new LSprite();
	btn_up.shadow = new LSprite();
	btn_up.back = new LSprite();
	btn_up.addChild(btn_up.shadow);
	btn_up.addChild(btn_up.back);
	labelText = new LTextField();
	labelText.color = color;
	labelText.font = font;
	labelText.size = size;
	labelText.x = size*0.5;
	labelText.y = size*0.5;
	labelText.text = name;
	btn_up.back.addChild(labelText);
	var shadow = new LDropShadowFilter(4,45,"#000000",10);
	btn_up.shadow.filters = [shadow];

	var btn_down = new LSprite();
	btn_down.x = btn_down.y = 1;
	labelText = new LTextField();
	labelText.color = color;
	labelText.font = font;
	labelText.size = size;
	labelText.x = size*0.5;
	labelText.y = size*0.5;
	labelText.text = name;
	btn_down.addChild(labelText);
	base(s,LButton,[btn_up,btn_down]);
	s.width = labelText.getWidth() + size;
	s.height = 2.2*size;
	s.backgroundSet = null;
	btn_up.shadow.graphics.drawRoundRect(0,"#000000",[1,1,s.width-2,s.height-2,s.height*0.1],true,"#000000");
	s.addEventListener(LEvent.ENTER_FRAME,s._onDraw);
}You can see that it inherits from LButton, so it has all the methods and properties of LButton, and also uses btn_up and btn_down as the two states of the button. Passed to its parent class LButton.
btn_up is the pop-up state of the button. It contains two LSprite objects (shadow and back) and a LTextField object. The shadow is used to set the shadow effect on the button, and the LTextField object is used to display the button text.
The button drawing process is in the _onDraw function, as follows.
LButtonSample1.prototype._onDraw = function(s){
	if(s.backgroundSet == s.backgroundCorl)return;
	s.backgroundSet = s.backgroundCorl;
	var grd=LGlobal.canvas.createLinearGradient(0,s.y-s.height*0.5,0,s.y+s.height*2);
	grd.addColorStop(0,"white");
	grd.addColorStop(1,s.backgroundCorl);

	var grd2=LGlobal.canvas.createLinearGradient(0,s.y-s.height,0,s.y+s.height*2);
	grd2.addColorStop(0,"white");
	grd2.addColorStop(1,s.backgroundCorl);

	s.bitmap_up.back.graphics.clear();
	s.bitmap_over.graphics.clear();
	s.bitmap_up.back.graphics.drawRect(1,s.backgroundCorl,[0,0,s.width,s.height],true,grd);
	s.bitmap_up.back.graphics.drawRect(0,s.backgroundCorl,[1,s.height*0.5,s.width-2,s.height*0.5-1],true,grd2);
	s.bitmap_over.graphics.drawRect(1,s.backgroundCorl,[0,0,s.width,s.height],true,grd);
	s.bitmap_over.graphics.drawRect(0,s.backgroundCorl,[1,s.height*0.5,s.width-2,s.height*0.5-1],true,grd2);
};In the _onDraw function, the colors of the two new gradients are displayed, and then two ordinary rectangles are drawn in the two states of the button. In this way, a button is drawn successfully. The usage method is as follows .
	var button02 = new LButtonSample1("测试按钮2");
	button02.backgroundCorl = "#008800";
	button02.x = 150;
	button02.y = 10;
layer.addChild(button02);Effect

function LButtonSample2(name,size,font,color){
	var s = this;
	base(s,LButtonSample1,[name,size,font,color]);
}LButtonSample2.prototype._onDraw = function(s){
if(s.backgroundSet == s.backgroundCorl)return;
s.backgroundSet = s.backgroundCorl;
var grd=LGlobal.canvas.createLinearGradient(0,s.y-s.height*0.5,0,s.y+s.height*2);
grd.addColorStop(0,"white");
grd.addColorStop(1,s.backgroundCorl);
var grd2=LGlobal.canvas.createLinearGradient(0,s.y-s.height,0,s.y+s.height*2);
grd2.addColorStop(0,"white");
grd2.addColorStop(1,s.backgroundCorl);
s.bitmap_up.back.graphics.clear();
s.bitmap_over.graphics.clear();
s.bitmap_up.back.graphics.drawRoundRect(1,s.backgroundCorl,[0,0,s.width,s.height,s.height*0.1],true,grd);
s.bitmap_up.back.graphics.drawRoundRect(0,s.backgroundCorl,[1,s.height*0.5,s.width-2,s.height*0.5-1,s.height*0.1],true,grd2);
s.bitmap_over.graphics.drawRoundRect(1,s.backgroundCorl,[0,0,s.width,s.height,s.height*0.1],true,grd);
s.bitmap_over.graphics.drawRoundRect(0,s.backgroundCorl,[1,s.height*0.5,s.width-2,s.height*0.5-1,s.height*0.1],true,grd2);
};var button04 = new LButtonSample2("测试按钮4");
button04.backgroundCorl = "blue";
button04.x = 10;
button04.y = 70;
layer.addChild(button04);
function LRadioChild(value,layer,layerSelect){
	var s = this;
	base(s,LSprite,[]);
	s.value = value;

	if(!layer){
		layer = new LSprite();
		layer.graphics.drawArc(2,"#000000",[0,0,10,0,2*Math.PI],true,"#D3D3D3");
	}
	if(!layerSelect){
		layerSelect = new LSprite();
		layerSelect.graphics.drawArc(0,"#000000",[0,0,4,0,2*Math.PI],true,"#000000");
	}
	s.layer = layer;
	s.layerSelect = layerSelect;
	s.addChild(s.layer);
	s.addChild(s.layerSelect);
	s.layerSelect.visible = false;
	s.checked = false;
	s.addEventListener(LMouseEvent.MOUSE_UP,s._onChange);
}
LRadioChild.prototype._onChange = function(e,s){
	s.parent.setValue(s.value);
};
LRadioChild.prototype.setChecked = function(v){
	this.layerSelect.visible = this.checked = v;
};function LRadio(){
base(this,LSprite,[]);
}
LRadio.prototype.setChildRadio = function(value,x,y,layer,layerSelect){
var s = this;
var child = new LRadioChild(value,layer,layerSelect);
child.x = x;
child.y = y;
s.addChild(child);
};
LRadio.prototype.push = function(value){
this.addChild(value);
};
LRadio.prototype.setValue = function(value){
var s=this,child,k;
for(k in s.childList){
child = s.childList[k];
child.setChecked(false);
if(child.value == value){
s.value = value;
child.setChecked(true);
}
}
};var radio = new LRadio(); radio.x = 50; radio.y = 130; radio.setChildRadio(1,0,0); radio.setChildRadio(2,50,0); radio.setChildRadio(3,100,0); layer.addChild(radio);
##4, Multi-select box LCheckBox
function LCheckBox(layer,layerSelect){
	var s = this;
	base(s,LSprite,[]);

	if(!layer){
		layer = new LSprite();
		layer.graphics.drawRect(2,"#000000",[0,0,20,20],true,"#D3D3D3");
	}
	if(!layerSelect){
		layerSelect = new LSprite();
		layerSelect.graphics.drawLine(5,"#000000",[2,10,10,18]);
		layerSelect.graphics.drawLine(5,"#000000",[10,18,18,2]);
	}
	s.layer = layer;
	s.layerSelect = layerSelect;
	s.addChild(s.layer);
	s.addChild(s.layerSelect);
	s.layerSelect.visible = s.checked = false;
	s.addEventListener(LMouseEvent.MOUSE_UP,s._onChange);
}
LCheckBox.prototype._onChange = function(e,s){
	s.checked = !s.checked;
	s.layerSelect.visible = s.checked;
};
LCheckBox.prototype.setChecked = function(value){
	s.checked = value;
	s.layerSelect.visible = s.checked;
};As you can see, its principle is the same as LRadioChild. The multi-select box is also controlled through two overlapping visual objects. state.
The usage method is as follows:
	var check1 = new LCheckBox();
	check1.x = 50;
	check1.y= 160;
	layer.addChild(check1);
	var check2 = new LCheckBox();
	check2.x = 100;
	check2.y= 160;
	layer.addChild(check2);
Effect

##5, combo box LComboBox
function LComboBox(size,color,font,layer,layerUp,layerDown){
	var s = this;
	base(s,LSprite,[]);
	s.list = [];
	s.selectIndex = 0;
	s.value = null;
	s.selectWidth = 100;
	if(!size)size=16;
	if(!color)color = "black";
	if(!font)font = "黑体";
	s.size = size;
	s.color = color;
	s.font = font;
	s.refreshFlag = false;

	if(!layer){
		s.refreshFlag = true;
		layer = new LSprite();
		layerUp = new LSprite();
		layerDown = new LSprite();
		s.layer = layer;
		s.layerUp = layerUp;
		s.layerDown = layerDown;
		s.refresh();
	}
	s.addChild(layer);
	s.addChild(layerUp);
	s.addChild(layerDown);
	s.layer = layer;
	s.layerUp = layerUp;
	s.layerDown = layerDown;

	s.runing = false;

	s.textLayer = new LSprite();
	s.textLayer.x = 5;
	s.textLayer.y = s.size * 0.4;
	s.addChild(s.textLayer);
	s.layerUp.addEventListener(LMouseEvent.MOUSE_UP,s._onChangeUp);
	s.layerDown.addEventListener(LMouseEvent.MOUSE_UP,s._onChangeDown);
}LComboBox.prototype.setChild = function(child){
var s = this;
if(!child || !child.value || !child.label)trace("the child must be an object like:{label:a,value:b}");
var text = new LTextField();
text.size = s.size;
text.color = s.color;
text.font = s.font;
text.text = child.label;
text.y = (s.size * 1.5 >>> 0) * s.list.length;
s.textLayer.addChild(text);
if(s.list.length == 0){
s.value = child.value;
}
s.list.push(child);
s.selectWidth = 100;
s.refresh();
};LComboBox.prototype._onChangeDown = function(e,b){
var s = b.parent;
if(s.runing)return;
if(s.selectIndex >= s.list.length - 1)return;
s.runing = true;
for(k in s.list){
s.textLayer.childList[k].visible = true;
}
s.selectIndex++;
s.value = s.list[s.selectIndex].value;
var mask = new LSprite();
mask.graphics.drawRect(2,"#000000",[0,0,s.selectWidth,s.size*2]);
s.textLayer.mask = mask;
var my = s.textLayer.y - (s.size * 1.5 >>> 0);
var fun = function(layer){
var s = layer.parent;
layer.mask = null;
s.runing = false;
s.refresh();
};
LTweenLite.to(s.textLayer,0.3,
{
y:my,
onComplete:fun,
ease:Strong.easeOut
});
};
LComboBox.prototype._onChangeUp = function(e,b){
var s = b.parent;
if(s.runing)return;
if(s.selectIndex <= 0)return;
s.runing = true;
for(k in s.list){
s.textLayer.childList[k].visible = true;
}
s.selectIndex--;
s.value = s.list[s.selectIndex].value;
var mask = new LSprite();
mask.graphics.drawRect(2,"#000000",[0,0,s.selectWidth,s.size*2]);
s.textLayer.mask = mask;
var my = s.textLayer.y + (s.size * 1.5 >>> 0);
var fun = function(layer){
var s = layer.parent;
layer.mask = null;
s.runing = false;
s.refresh();
};
LTweenLite.to(s.textLayer,0.3,
{
y:my,
onComplete:fun,
ease:Strong.easeOut
});
};LComboBox.prototype.refresh = function(){
var s = this,k;
for(k in s.list){
s.textLayer.childList[k].visible = false;
if(s.value == s.list[k].value)s.textLayer.childList[k].visible = true;
if(s.selectWidth < s.textLayer.childList[k].getWidth() + s.size){
s.selectWidth = s.textLayer.childList[k].getWidth() + s.size;
}
}
s.layer.graphics.clear();
s.layerUp.graphics.clear();
s.layerDown.graphics.clear();
s.layer.graphics.drawRect(2,"#000000",[0,0,s.selectWidth,s.size*2],true,"#D3D3D3");
s.layerUp.x = s.selectWidth;
s.layerUp.graphics.drawRect(2,"#000000",[0,0,s.size*2,s.size]);
s.layerUp.graphics.drawVertices(2,"#000000",[[s.size*0.5*2,s.size*0.2],[s.size*0.2*2,s.size*0.8],[s.size*0.8*2,s.size*0.8]],true,"#000000");
s.layerDown.x = s.selectWidth;
s.layerDown.y = s.size;
s.layerDown.graphics.drawRect(2,"#000000",[0,0,s.size*2,s.size]);
s.layerDown.graphics.drawVertices(2,"#000000",[[s.size*0.5*2,s.size*0.8],[s.size*0.2*2,s.size*0.2],[s.size*0.8*2,s.size*0.2]],true,"#000000");
};The usage of combo box is as follows:
	var com = new LComboBox(20);
	com.x = 50;
	com.y= 210;
	com.setChild({label:"测试一",value:"aaa"});
	com.setChild({label:"测试二",value:"bbb"});
	com.setChild({label:"测试三",value:"ccc"});
	com.setChild({label:"测试四",value:"ddd"});
layer.addChild(com);Effect
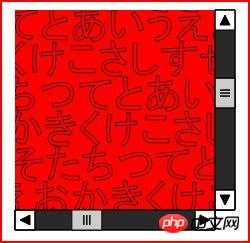
最后是滚动条,这个实现起来就有点难度了,还好以前我用AS3写过一个滚动条,直接copy移植过来了,移植过程中,我再次感叹,lufylegend.js的语法模仿AS3还是比较成功的。
这个比较麻烦,所以我在这里只说一下它的用法,感兴趣的朋友可以看一下代码,自己了解一下。
看一下官方API介绍
LScrollbar(showObject,maskW,maskH,scrollWidth,wVisible)

■作用:

带有滚动条的可视对象。

■参数:

showObject:需要加入滚动条的对象。

maskW:滚动条对象的可视大小的宽。

maskH:滚动条对象的可视大小的高。

scrollWidth:滚动条的宽。

wVisible:是否显示横向滚动条,未设定则为默认。
具体用法如下:
	var showObject = new LSprite();
	showObject.graphics.drawRect(2,"#ff0000",[0,0,500,500],true,"#ff0000");
	var t = new LTextField();
	t.color = "#000000";
	t.text = "あいうえおかきくけこさしすせそたちつてとあいうえおかきくけこさしすせそたちつてとあいうえおかきくけこさしすせそたちつてとあいうえおかきくけこさしすせそたちつてとあいうえおかきくけこさしすせそたちつてとあいうえおかきくけこさしすせそたちつてとあいうえおかきくけこさしすせそたちつてとあいうえおかきくけこさしすせそたちつてと";
	t.width = 300;
	t.stroke = true;
	t.size = 30;
	t.setWordWrap(true,35);
	showObject.addChild(t);
	var sc = new LScrollbar(showObject,200,200);
	sc.x = 450;
	sc.y = 20;
	layer.addChild(sc);
效果
在下美工设计极差,所以本篇纯属抛砖引玉,大家可以试着自己写几组漂亮的UI,或者有什么好的意见或想法的,可以联系我。
HTML5开源游戏引擎lufylegend1.7.1发布贴
http://blog.csdn.net/lufy_legend/article/details/8780821
lufylegend.js引擎官网
http://lufylegend.com/lufylegend
lufylegend.js引擎在线API文档链接
http://lufylegend.com/lufylegend/api
以上就是画出自己的UI组件的详情的内容,更多相关内容请关注PHP中文网(m.sbmmt.com)!
 What are the production methods of html5 animation production?
 The difference between HTML and HTML5
 Three triggering methods of sql trigger
 oracle imp
 How to solve the problem of access denied when booting up Windows 10
 How to read data from excel file in python
 How to change file type in win7
 Is Hongmeng system easy to use?


![[Web front-end] Node.js quick start](https://img.php.cn/upload/course/000/000/067/662b5d34ba7c0227.png)


