Maison > Java > javaDidacticiel > le corps du texte

Comment Spring Boot intègre Thymeleaf

王林
Libérer: 2023-05-16 09:22:11
avant
1318 Les gens l'ont consulté

Thymeleaf

Introduction de base

Spring Boot recommande officiellement d'utiliser Thymeleaf comme moteur de modèles. SpringBoot fournit une série de configurations par défaut pour Thymeleaf et fournit un résolveur de vue pour Thymeleaf. Une fois les dépendances de Thymeleaf importées dans le projet, la configuration automatique correspondante (ThymeleafAutoConfiguration) prendra automatiquement effet, afin que Thymeleaf puisse être parfaitement intégré à Spring Boot. Le moteur de modèles Thymeleaf peut être parfaitement combiné avec des balises HTML pour faciliter le rendu back-end des données. Thymeleaf prend en charge les effets statiques et effets dynamiques Lorsqu'il n'y a pas de données dynamiques, les effets statiques seront affichés Le moteur de modèle est produit pour séparer l'interface utilisateur des données métier (contenu des documents). dans un format spécifique peut être généré, et le moteur de modèle utilisé pour le site Web générera un document HTML standard consiste à utiliser le fichier modèle et les données pour générer un code HTML via le moteur de modèle ** Les moteurs de modèles courants incluent : jsp, freemarker, L'emplacement d'écriture par défaut de Velocity et Thymeleaf Thymeleaf se trouve dans le répertoire templatesThymeleaf site officiel : https://www.thymeleaf.org/

<dependency>
  <groupId>org.springframework.boot</groupId>
  <artifactId>spring-boot-starter-thymeleaf</artifactId>
</dependency>
Copier après la connexion
Thymeleaf's default le chemin d'affichage est : /resources/templates, créez du HTML sous ce répertoire et introduisez thymeleaf
<html lang="en" xmlns:th="http://www.thymleaf.org">
Copier après la connexion

xmlns:th="http://www.thymleaf.org">

#🎜🎜 #Syntaxe de base

${nom de l'attribut de domaine} : Obtenez la valeur de l'attribut de domaine dans le domaine de la requête et affichez-la

${nom de l'attribut session.domain} : Obtenez le domaine valeur d'attribut dans le domaine de la session Et afficher

< p th:text="${name}">aaa</p>
Copier après la connexion
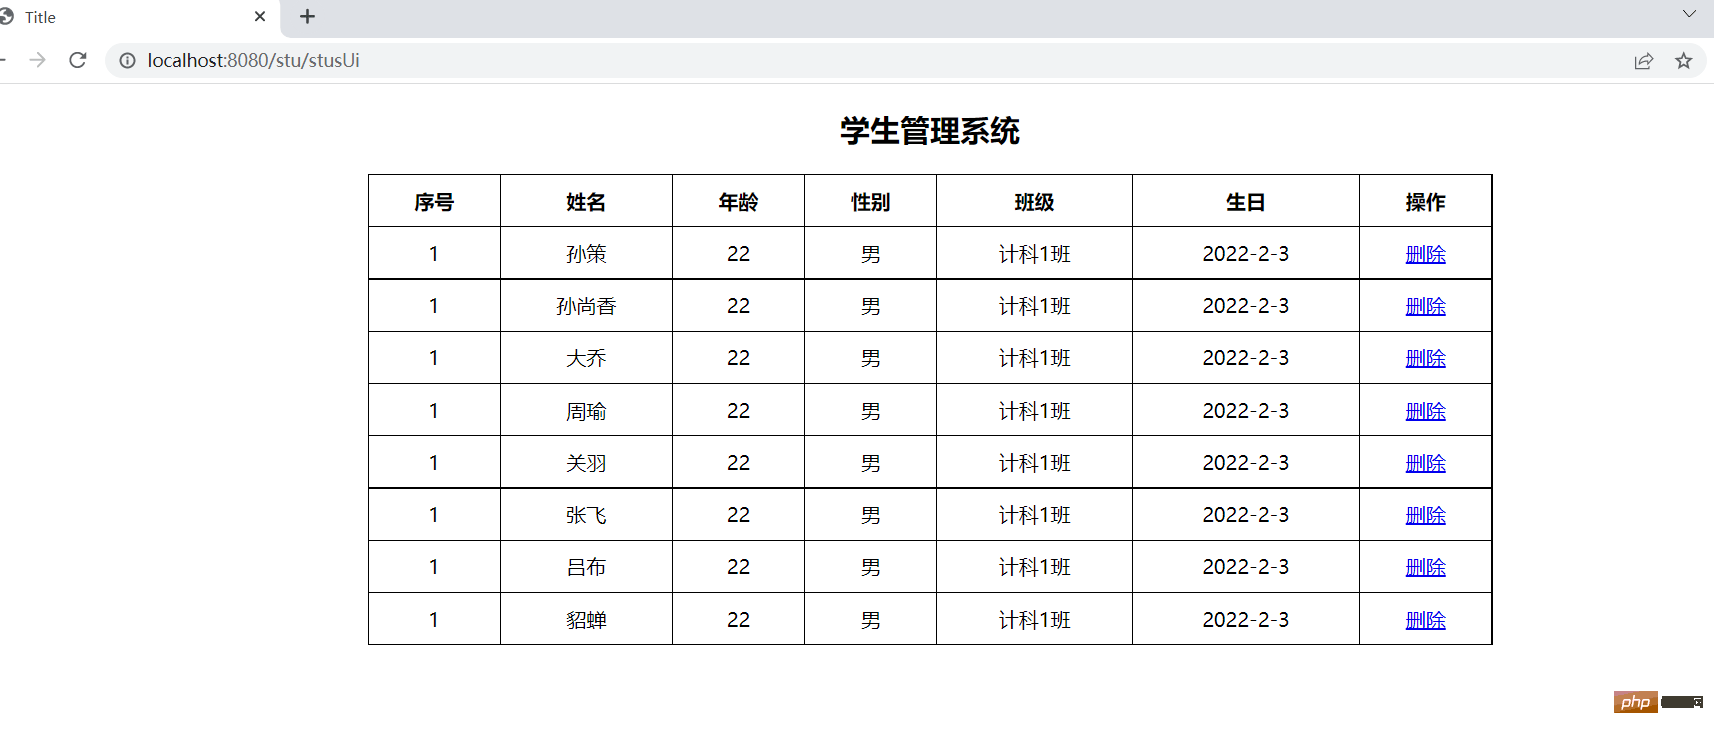
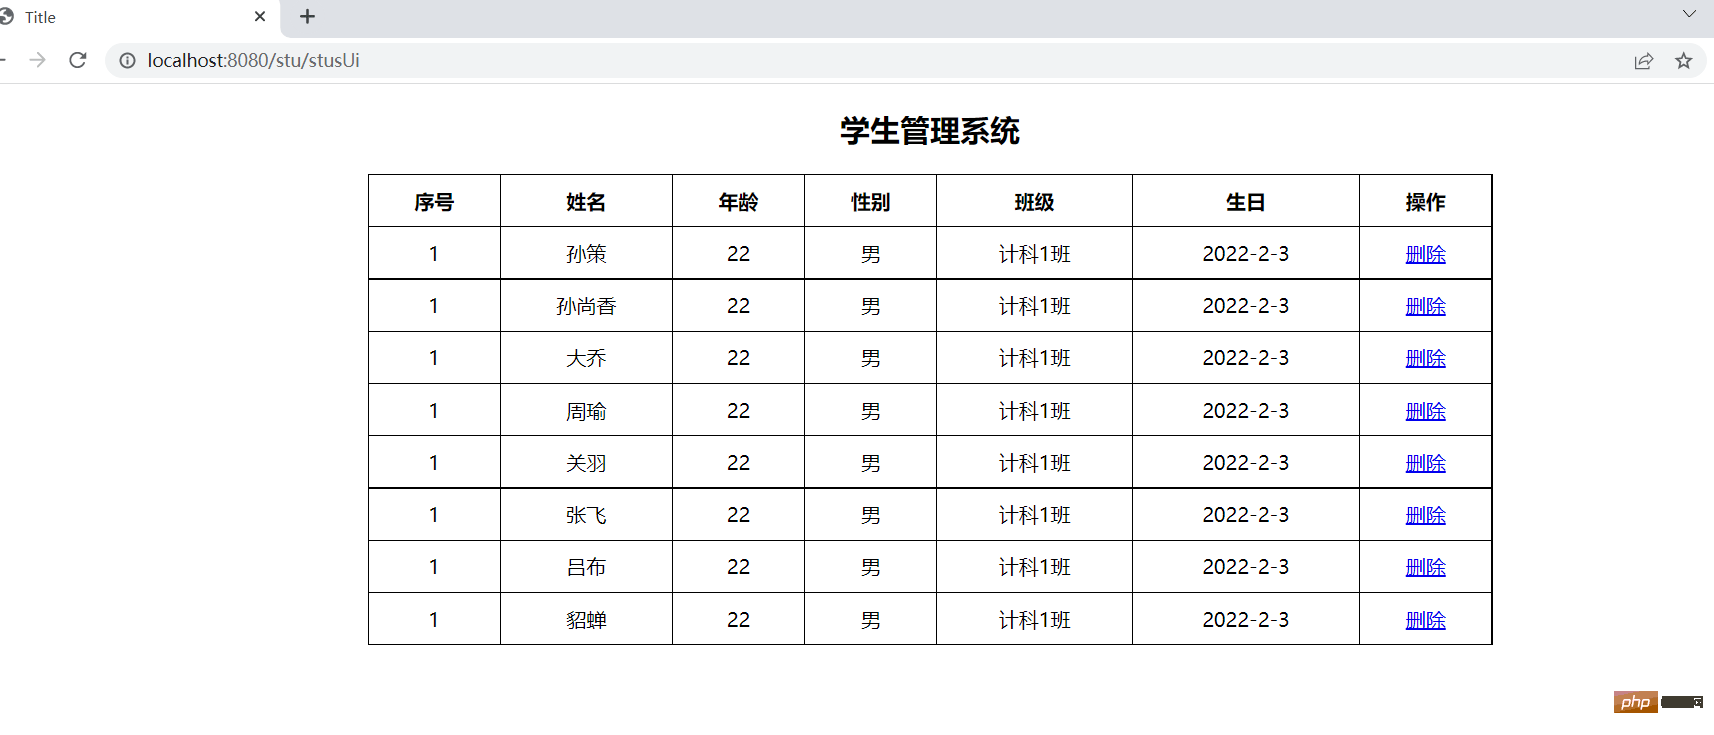
Si les données sont obtenues, elles seront rendues dans une image dynamique, sinon elles seront rendues dans une image statique (seuls les mots étudiant le système de gestion sera affiché)

Comment Spring Boot intègre Thymeleaf

th:text remplacement de texte

<span th:text="${user.name}">Tom</span>
Copier après la connexion

th:if et th:sauf remplacement de texte# 🎜🎜##🎜🎜 #

Utilisez les attributs th:if et th:sauf pour un jugement conditionnel. th:sauf si c'est exactement le contraire. Ce n'est que lorsque la condition d'expression n'est pas établie que le contenu sera affiché #🎜. 🎜#

<h3 th:if="${age>=18}">成年</h3>
<h3 th:unless="${age>=18}">未成年</h3>
Copier après la connexion
th : chaque boucle foreach


<html lang="en" xmlns:th="http://www.thymleaf.org">

    
    Title
    

学生管理系统

序号 姓名 年龄 性别 班级 生日 操作
1 aa 22 计科1班 2022-2-3 删除
Copier après la connexion

th:href et @{} expression de chaîne Comment Spring Boot intègre Thymeleaf
<!--http://localhost:8080/stu/10 -->
<a th:href="${&#39;/stus/&#39;+ stu.id}" rel="external nofollow" >编辑学生1</a>

<!--http://localhost:8080/stu?id=10 -->
<a th:href="@{/stus(id=${stu.id})}" rel="external nofollow" >编辑学生2</a>

<!--http://localhost:8080/stu?id=10&name=abc -->
<a th:href="@{/stus(id=${stu.id},name=${stu.name})}" rel="external nofollow" >编辑学生3</a>
Copier après la connexion
#🎜🎜 #

th:switch et th:case

<div th:switch="${stu.role}">
  <h3 th:case="banzhang">班长</h3>
  <h3 th:case="tuanzhishu">团支书</h3>
  <h3 th:case="${data}">学委</h3>
  <h3 th:case="*">其他</h3>
  
</div>
Copier après la connexion

thymeleaf par défaut est le nom de la variable + le statut Stat

Si la variable d'état n'est pas définie explicitement, thymeleaf prendra par défaut un nom de variable + un statut statistique

#🎜🎜 #
<tr th:each="stu: ${stus}">
  <td th:text="${stuStat.index}"></td>
  <td th:text="${ stu.name}"></td>
  <td th:text="${ stu.age}"></td>    
</tr>
Copier après la connexion
th:id, th:value , th:checked, etc. (lié au formulaire)

th:object peut définir des attributs d'objet # 🎜🎜#
*

{}peut être utilisé en conjonction avec th:object, vous pouvez supprimer les attributs de l'objet

#dates.format() peut être utilisé pour formater le format de la date

 <form th:object="${stu}">
        编号:<input type="text" name="id" th:value="*{id}"><br>
        姓名:<input type="text" name="name" th:value="*{name}"><br>
        年龄:<input type="text" name="age" th:value="*{age}"><br>
        性别:<input type="radio" name="gender" value="true" th:checked="*{gender}">男<br>
        性别:<input type="radio" name="gender" value="true" th:checked="*{not gender}">女<br>
        生日:<input type="text" name="birth" th:value="*{#dates.format(birth,&#39;yyyy-MM-dd&#39;)}"><br>
        <input type="submit" value="编辑">
    </form>
Copier après la connexion
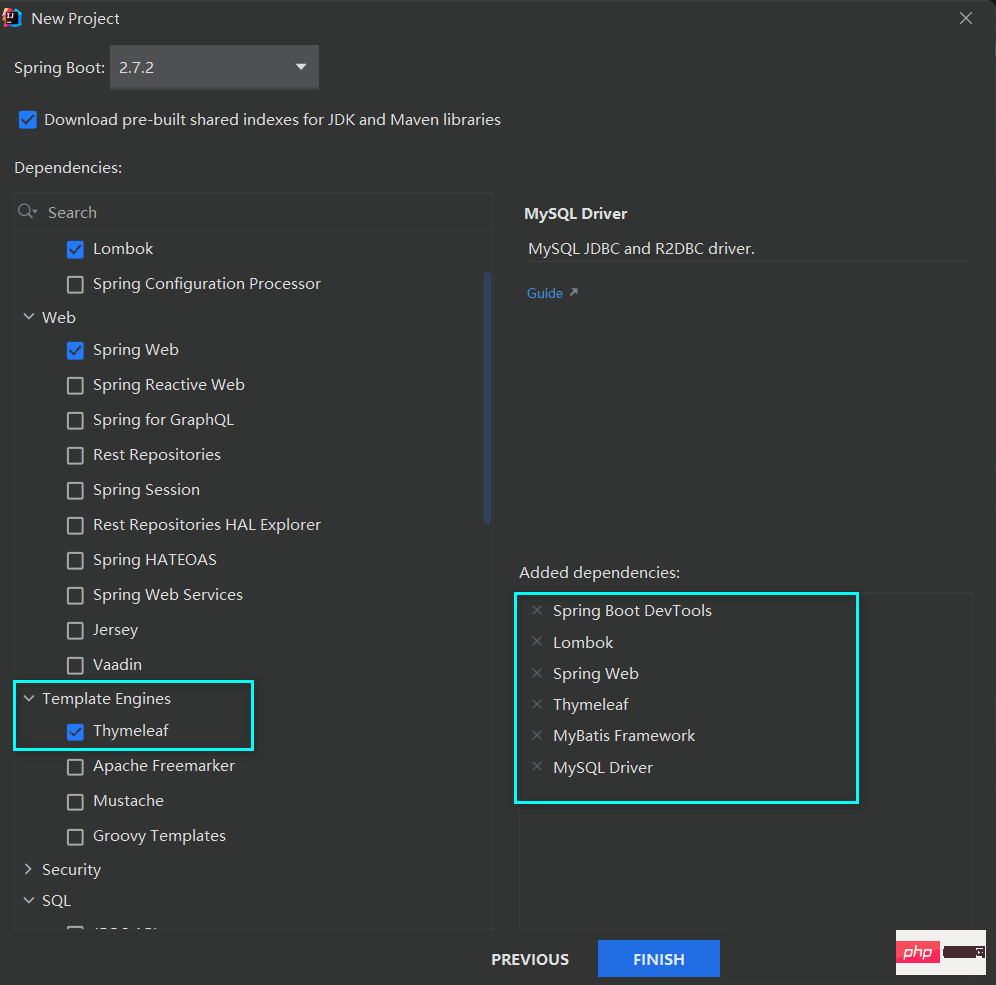
Intégrer Thymeleaf# 🎜🎜#Configuration de base
Lors de la création d'un projet, pensez à cocher Thymeleaf

dans le moteur de modèle

Supprimez la portée du pilote MySQL dans pom Nous devons effectuer les configurations pertinentes dans le fichier de configuration global application.properties

.

 <dependency>
            <groupId>com.alibaba</groupId>
            <artifactId>druid-spring-boot-starter</artifactId>
            <version>1.2.11</version>
        </dependency>
Copier après la connexion
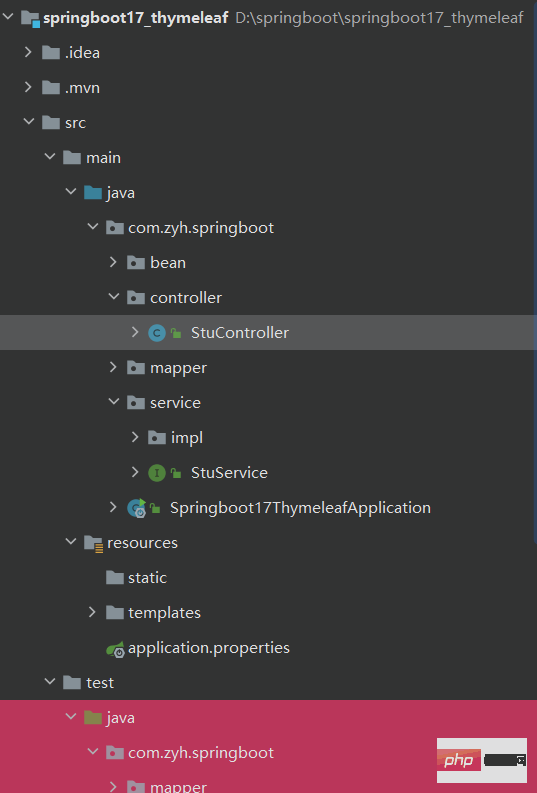
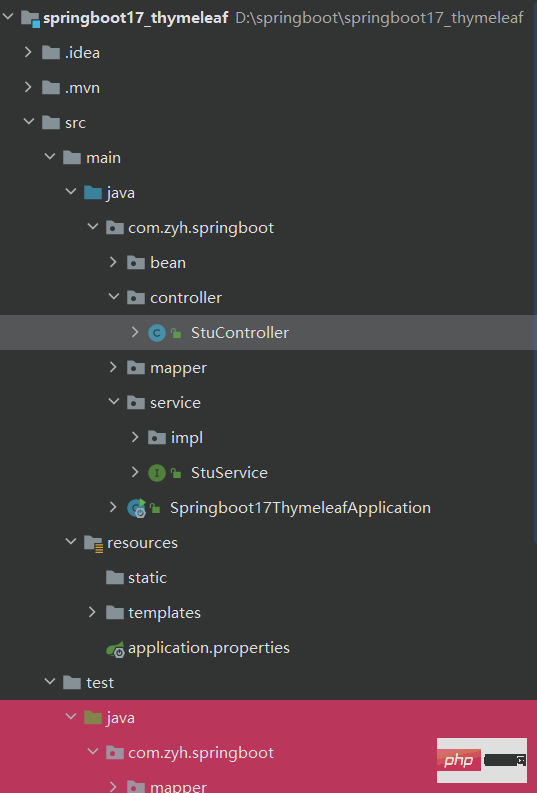
Préparation de la base de données Préparer les classes d'entités correspondant aux tables de la base de données, et la structure à trois niveaux

#🎜🎜 #

Comment Spring Boot intègre Thymeleaf

# 🎜🎜#

# 指定Mybatis的Mapper接口的xml映射文件的路径
mybatis.mapper-locations=classpath:mapper/*xml
# MySQL数据库驱动
#这个驱动也可以省略,可以根据使用的MySQL自动加载相应的驱动
spring.datasource.driver-class-name=com.mysql.cj.jdbc.Driver
# 数据源名称
spring.datasource.name=com.alibaba.druid.pool.DruidDataSource
# 数据库连接地址
spring.datasource.url=jdbc:mysql://localhost:3306/school?serverTimezone=UTC&zeroDateTimeBehavior=convertToNull
# 数据库用户名和密码
spring.datasource.username=root
spring.datasource.password=a87684009.
# 设置日志级别
logging.level.com.zyh.springboot=debug
# 开启mybatis驼峰命名规则自动转换功能
mybatis.configuration.map-underscore-to-camel-case=true
Copier après la connexion

Architecture à trois niveaux

Mapper

@Data
public class Stu {
    private Integer id;
    private String name;
    private Integer age;
    private Boolean gender;
    private Integer cid;
    @DateTimeFormat(pattern = "yyyy-MM-dd")
    private Date birth;
}
Copier après la connexion

Service#🎜 🎜 #

@Mapper
public interface StuMapper {
    /**
     * 查询所有学生信息
     * @return
     * @throws Exception
     */
    @Select("select * from stu")
     List<Stu> queryAllStu() throws Exception;
}
Copier après la connexion
Comment Spring Boot intègre Thymeleaf

Classe d'implémentation de services

Comment Spring Boot intègre Thymeleaf

public interface StuService  {
    /**
     * 查询所有学生信息
     * @return
     */
    List<Stu> queryAllStu() throws Exception;
}
Copier après la connexion

thymeleaf# 🎜🎜#

@Service
public class StuServiceImpl implements StuService {
    @Autowired
    private StuMapper stuMapper;
    @Override
    public List<Stu> queryAllStu() throws Exception {
         return stuMapper.queryAllStu();
    }
}
Copier après la connexion

# 🎜 🎜#Contrôleur


<html lang="en" xmlns:th="http://www.thymleaf.org">
  
    
    Title
  

学生管理系统

aaaa

Copier après la connexion

# 🎜🎜#

#🎜 🎜#Ensuite, nous préparons d'abord la page

@Controller
@RequestMapping("/stu")
public class StuController {
    @Autowired
    private StuService stuService;
    /**
    * 显示学生管理系统的画面
    * @return
    */
    @RequestMapping("/stusUi")
    public String stusUi(){
        return "stus";
    }
}
Copier après la connexion

Lorsque nous cliquons sur Supprimer, le backend doit supprimer les données correspondantes de la base de données en fonction de l'identifiant transmis par le front-end. Ici, nous allons d'abord le compléter selon la méthode familière lorsque nous l'avons appris auparavant. Plus tard, nous parlerons en détail du développement de la séparation front-end et back-end

Opération de suppression#. 🎜🎜#Controller (précédent La méthode n'est pas collée ici, sinon il y aura trop de code)

<!DOCTYPE html>
<html lang="en"  xmlns:th="http://www.thymeleaf.org">
<head>
    <meta charset="UTF-8">
    <title>Title</title>
    <style>
        .tb-stus{
            width: 900px;
            margin: 0 auto;
            border: black 1px solid;
            border-collapse: collapse;
        }
        .tb-stus th,td{
            padding: 10px;
            text-align: center;
            border:1px solid black;
        }
    </style>
</head>
<body>
<h3 align="center">学生管理系统</h3>
<table class="tb-stus">
    <thead>
    <tr>
        <th>序号</th>
        <th>姓名</th>
        <th>年龄</th>
        <th>性别</th>
        <th>班级</th>
        <th>生日</th>
        <th>操作</th>
    </tr>
    </thead>
    <tbody>
    <tr th:each="stu,status: ${stuList}">
        <td th:text="${status.index+1}">1</td>
        <td th:text="${stu.name}">aa</td>
        <td th:text="${stu.age}">22</td>
<!--        gender的属性值为1表示性别为男-->
        <td th:if="${stu.gender}">男</td>
        <td th:unless="${stu.gender}">女</td>
        <td th:text="${stu.cid}">计科1班</td>
       <td th:text="${#dates.format(stu.birth,&#39;yyyy-MM-dd&#39;)}">2022-2-3</td>
        <td>
            <!--http://localhost:8080/stu/delete?id=10-->
            <a th:href="@{/stu/delete(id=${stu.id})}" rel="external nofollow"  rel="external nofollow"  rel="external nofollow" >删除</a>
        </td>
    </tr>
    </tbody>
</table>
</body>
</html>
Copier après la connexion

Comment Spring Boot intègre ThymeleafService

@Controller
@RequestMapping("/stu")
public class StuController {
    @Autowired
    private StuService stuService;
   
    /**根据id删除数据
     * http://localhost:8080/stu/delete?id=10
     * @return
     */
    @RequestMapping("/delete")
    public String deleteById(@RequestParam("id") Integer id){
        try {
            stuService.deleteByid(id);
        } catch (Exception e) {
            e.printStackTrace();
        }
        System.out.println(id);
        return "redirect:/stu/stusUi";
    }


  }
Copier après la connexion
Comment Spring Boot intègre Thymeleaf#🎜 🎜#Classe d'implémentation de service

public interface StuService  {
    /**
     * 查询所有学生信息
     * @return
     */
    List<Stu> queryAllStu() throws Exception;

    void deleteByid(Integer id);
}
Copier après la connexion
Comment Spring Boot intègre Thymeleaf

Mapper

@Service
public class StuServiceImpl implements StuService {
    @Autowired
    private StuMapper stuMapper;
    @Override
    public List<Stu> queryAllStu() throws Exception {
         return stuMapper.queryAllStu();
    }

    /**
     * 根据id删除数据
     * @param id
     */
    @Override
    public void deleteByid(Integer id) throws Exception {
        stuMapper.deleteById(id);
    }
}
Copier après la connexion

Supprimer les données numérotées 8Comment Spring Boot intègre Thymeleaf

Comment Spring Boot intègre Thymeleaf

编辑操作

页面stus.html

<!DOCTYPE html>
<html lang="en"  xmlns:th="http://www.thymeleaf.org">
<head>
    <meta charset="UTF-8">
    <title>Title</title>
    <style>
        .tb-stus{
            width: 900px;
            margin: 0 auto;
            border: black 1px solid;
            border-collapse: collapse;
        }
        .tb-stus th,td{
            padding: 10px;
            text-align: center;
            border:1px solid black;
        }
    </style>
</head>
<body>
<h3 align="center">学生管理系统</h3>
<table class="tb-stus">
    <thead>
    <tr>
        <th>序号</th>
        <th>姓名</th>
        <th>年龄</th>
        <th>性别</th>
        <th>班级</th>
        <th>生日</th>
        <th>操作</th>
    </tr>
    </thead>
    <tbody>
    <tr th:each="stu,status: ${stuList}">
        <td th:text="${stu.id}">1</td>
        <td th:text="${stu.name}">aa</td>
        <td th:text="${stu.age}">22</td>
<!--        gender的属性值为1表示性别为男-->
        <td th:if="${stu.gender}">男</td>
        <td th:unless="${stu.gender}">女</td>
        <td th:text="${stu.cid}">计科1班</td>
         <td th:text="${#dates.format(stu.birth,&#39;yyyy-MM-dd&#39;)}">2022-2-3</td>
        <td>
<!--            localhost:8080/stu/delete/8-->
<!--            <a th:href="${&#39;/stu/delete/&#39;+stu.id}" rel="external nofollow"  rel="external nofollow" >删除</a>-->
            <!--http://localhost:8080/stu/delete?id=10-->
            <a th:href="@{/stu/delete(id=${stu.id})}" rel="external nofollow"  rel="external nofollow"  rel="external nofollow" >删除</a>
            <a th:href="@{/stu/edit(id=${stu.id})}" rel="external nofollow"  rel="external nofollow" >编辑</a>
        </td>
    </tr>
    </tbody>
</table>

</body>
</html>
Copier après la connexion

页面 stu-edit.html

<!DOCTYPE html>
<html lang="en" xmlns:th="http://www.thymeleaf.org">
  <head>
    <meta charset="UTF-8">
    <title>编辑画面</title>
  </head>
  <body>
    <h3 >编辑学生信息</h3>
    <form action="" method="post" th:object="${stu}">
      学号:<input type="text" name="id" th:value="*{id}"  ><br><br>
      姓名:<input type="text" name="name"  th:value="*{name}"><br><br>
      年龄:<input type="text" name="age"  th:value="*{age}"><br><br>
      性别:<input type="radio" name="gender"    th:checked="*{gender}"  >男
      <input type="radio" name="gender"   th:checked="*{!gender}" >女<br><br>
      班级:<input type="text" name="cid" th:value="*{cid}"><br><br>
      生日:<input type="text" name="birth" th:value="*{#dates.format(birth,&#39;yyyy-MM-dd&#39;)}"><br><br>
      <input type="submit" value="编辑">
    </form>
  </body>
</html>
Copier après la connexion

Controller

/**
     * 根据id来修改数据
     * 我们首先得先根据id把数据查询出来,然后把数据展示出来
     * 用户再进行编辑,用户编辑完并且提交以后,跳转到学生管理系统画面,展示所有数据
     * @return
     */
    @RequestMapping("/edit")
    public String edit(@RequestParam("id") Integer id,Model model){
        System.out.println("id"+id);
        try {
            Stu stu=stuService.queryById(id);
            model.addAttribute("stu",stu);
        } catch (Exception e) {
            e.printStackTrace();
        }

        return "stu-edit";
    }
Copier après la connexion

Service

public interface StuService  {
    /**
     * 查询所有学生信息
     * @return
     */
    List<Stu> queryAllStu() throws Exception;

    /**
     * 根据id来删除学生信息
     * @param id
     * @throws Exception
     */
    void deleteByid(Integer id) throws Exception;

    /**
     * 根据id来查询对应学生信息
     * @param id
     * @return
     * @throws Exception
     */
    Stu queryById(Integer id) throws Exception;
}
Copier après la connexion

Service实现类

@Service
public class StuServiceImpl implements StuService {
    @Autowired
    private StuMapper stuMapper;
    @Override
    public List<Stu> queryAllStu() throws Exception {
         return stuMapper.queryAllStu();
    }

    /**
     * 根据id删除数据
     * @param id
     */
    @Override
    public void deleteByid(Integer id) throws Exception {
        stuMapper.deleteById(id);
    }

    @Override
    public Stu queryById(Integer id) throws Exception {
        return stuMapper.queryById(id);
    }
}
Copier après la connexion

Mapper

@Mapper
public interface StuMapper {
    /**
    * 查询所有学生信息
    * @return
    * @throws Exception
    */
    @Select("select * from stu")
    List<Stu> queryAllStu() throws Exception;
    @Delete("delete from stu where id=#{id}")
    void deleteById( Integer id);
    @Select("select * from stu where id=#{id}")
    Stu queryById(Integer id) throws Exception;
}
Copier après la connexion

Comment Spring Boot intègre Thymeleaf

比如在序号为4中,点击编辑

Comment Spring Boot intègre Thymeleaf

用户登录

登录页面:

<!DOCTYPE html>
<html lang="en">
<head>
    <meta charset="UTF-8">
    <title>Title</title>
</head>
<body>
    <h3>用户登录</h3>
    <form action="/login" method="post">
        账号:<input type="text" name="username"><br><br>
        密码:<input type="password" name="password"><br><br>
        <input type="submit" value="登录">
    </form>


</body>
</html>
Copier après la connexion

因为需要判断用户是否存在,这是从数据库进行查询的,所以要准备对应的管理员表

# 创建管理员表
CREATE TABLE admin(
	id INT PRIMARY KEY AUTO_INCREMENT,
	username VARCHAR(20),
	`password` VARCHAR(20)
); 

INSERT INTO admin VALUES
	(DEFAULT,&#39;aaa&#39;,111),
	(DEFAULT,&#39;bbb&#39;,222),
	(DEFAULT,&#39;ccc&#39;,333);
# 查询测试
SELECT * FROM admin;	
Copier après la connexion

准备对应的实体类

@Data
public class Admin {
    private String username;
    private String password;
}
Copier après la connexion

Controller

@Controller
@SessionAttributes(names = {"admin"})
public class AdminController {
    @Autowired
    private AdminService adminService;

    /**
     * 显示登录页面
     * @return
     */
    @RequestMapping(value = "/loginUi")
    public String loginUi(){
        return "login";
    }
    @RequestMapping(value = "/login",method = RequestMethod.POST)
    public String login(String username, String password, Model model){
        try {
            Admin admin = adminService.login(username, password);
            //用户名存在说明登录成功
            if (admin!=null){
                //存放到session域中
                model.addAttribute("admin",admin);
                return "redirect:/stu/stusUi";
            }
        } catch (Exception e) {
            e.printStackTrace();
        }
        return "redirect:/loginUi";
    }

}
Copier après la connexion

Service

public interface AdminService {
    Admin login(String username,String password) throws Exception;
}
Copier après la connexion

Service对应的实现类

@Service
public class AdminServiceImpl implements AdminService {
    @Autowired
    private AdminMapper adminMapper;
    @Override
    public Admin login(String username, String password) throws Exception {
        return adminMapper.queryByUsernameAndPassword(username,password);
    }
}
Copier après la connexion

Mapper

@Mapper
public interface AdminMapper {
    @Select("select * from admin where username=#{username} and password=#{password}")
    Admin queryByUsernameAndPassword(@Param("username") String username, @Param("password") String password);
}
Copier après la connexion

Comment Spring Boot intègre Thymeleaf

Comment Spring Boot intègre Thymeleaf

<!DOCTYPE html>
<html lang="en"  xmlns:th="http://www.thymeleaf.org">
<head>
    <meta charset="UTF-8">
    <title>Title</title>
    <style>
        .tb-stus{
            width: 900px;
            margin: 0 auto;
            border: black 1px solid;
            border-collapse: collapse;
        }
        .tb-stus th,td{
            padding: 10px;
            text-align: center;
            border:1px solid black;
        }
    </style>
</head>
<body>
    <h3 align="center">学生管理系统</h3>
    <h3 th:if="${session.admin!=null}" th:text="${session.admin.username}">用户名</h3>
    <a th:unless="${session.admin!=null}" href="/loginUi" rel="external nofollow" >登录</a>
    <a th:if="${session.admin!=null}" href="/logout" rel="external nofollow" >注销用户</a>
<table class="tb-stus">
    <thead>
    <tr>
        <th>序号</th>
        <th>姓名</th>
        <th>年龄</th>
        <th>性别</th>
        <th>班级</th>
        <th>生日</th>
        <th>操作</th>
    </tr>
    </thead>
    <tbody>
    <tr th:each="stu,status: ${stuList}">
        <td th:text="${stu.id}">1</td>
        <td th:text="${stu.name}">aa</td>
        <td th:text="${stu.age}">22</td>
<!--        gender的属性值为1表示性别为男-->
        <td th:if="${stu.gender}">男</td>
        <td th:unless="${stu.gender}">女</td>
        <td th:text="${stu.cid}">计科1班</td>
        <td th:text="${#dates.format(stu.birth,&#39;yyyy-MM-dd&#39;)}">2022-2-3</td>
        <td>
<!--            localhost:8080/stu/delete/8-->
<!--            <a th:href="${&#39;/stu/delete/&#39;+stu.id}" rel="external nofollow"  rel="external nofollow" >删除</a>-->
            <!--http://localhost:8080/stu/delete?id=10-->
            <a th:href="@{/stu/delete(id=${stu.id})}" rel="external nofollow"  rel="external nofollow"  rel="external nofollow" >删除</a>
            <a th:href="@{/stu/edit(id=${stu.id})}" rel="external nofollow"  rel="external nofollow" >编辑</a>
        </td>
    </tr>
    </tbody>
</table>

</body>
</html>
Copier après la connexion

Comment Spring Boot intègre Thymeleaf

Comment Spring Boot intègre Thymeleaf

Comment Spring Boot intègre Thymeleaf

用户注销

注销的话,我们把session域中的用户对象取消,然后这个时候就得重新登录,应该要跳转到登录画面

@RequestMapping("/logout")
    public String logout(HttpSession session){
        session.removeAttribute("admin");
        return "redirect:/loginUi";
    }
Copier après la connexion

Comment Spring Boot intègre Thymeleaf

点击注销用户

Comment Spring Boot intègre Thymeleaf

Ce qui précède est le contenu détaillé de. pour plus d'informations, suivez d'autres articles connexes sur le site Web de PHP en chinois!

Étiquettes associées:
source:yisu.com
Déclaration de ce site Web
Le contenu de cet article est volontairement contribué par les internautes et les droits d'auteur appartiennent à l'auteur original. Ce site n'assume aucune responsabilité légale correspondante. Si vous trouvez un contenu suspecté de plagiat ou de contrefaçon, veuillez contacter admin@php.cn
Tutoriels populaires
Plus>
Derniers téléchargements
Plus>
effets Web
Code source du site Web
Matériel du site Web
Modèle frontal
À propos de nous Clause de non-responsabilité Sitemap
Site Web PHP chinois:Formation PHP en ligne sur le bien-être public,Aidez les apprenants PHP à grandir rapidement!