
Cet article vous apporte des connaissances pertinentes sur python. Il présente principalement des problèmes liés aux Pandas, notamment les opérations d'indexation de Pandas, les opérations d'alignement, les applications de fonctions, etc. . Tout le monde est utile.

Apprentissage recommandé : Tutoriel vidéo Python

Ensuite, la question se pose :
numpy peut déjà nous aider à traiter des données et peut être combiné avec matplotlib pour résoudre notre question d'analyse des données, alors quel est le but de l'apprentissage des pandas ?
numpy peut nous aider à traiter des données numériques, mais cela ne suffit pas. Dans de nombreux cas, en plus des valeurs numériques, nos données incluent également des chaînes, des séries temporelles, etc.
Par exemple : nous obtenons des données stockées dans Data in. la base de données
Alors, des pandas sont apparus.
Le nom Pandas vient des données de panel
Pandas est un ensemble d'outils puissants pour analyser les données structurées, construit sur NumPy, fournissant des structures de données avancées et des outils opérationnels de données , qui en sont un. des facteurs importants qui font de Python un environnement d'analyse de données puissant et efficace.
Un ensemble d'outils puissants requis pour analyser et manipuler de grands ensembles de données structurées
Basé sur NumPy, fournissant des opérations matricielles hautes performances
Fournit un grand nombre de fonctions capables de traiter les données rapidement et facilement Et des méthodes
sont appliqués à l'exploration et à l'analyse des données
Fournit une fonction de nettoyage des données
Site officiel
http://pandas.pydata.org/
Index. object Index
Exemple de code :
print(type(ser_obj.index))print(type(df_obj2.index))print(df_obj2.index)
Résultats d'exécution :
<class>
<class>
Int64Index([0, 1, 2, 3], dtype='int64')</class></class>
# 索引对象不可变df_obj2.index[0] = 2
3. Types d'index communs
Index, index Int64Index, index entier---------------------------------------------------------------------------TypeError Traceback (most recent call last)<ipython-input-23-7f40a356d7d1> in <module>()
1 # 索引对象不可变----> 2 df_obj2.index[0] = 2/Users/Power/anaconda/lib/python3.6/site-packages/pandas/indexes/base.py in __setitem__(self, key, value)
1402
1403 def __setitem__(self, key, value):-> 1404 raise TypeError("Index does not support mutable operations")
1405
1406 def __getitem__(self, key):TypeError: Index does not support mutable operations</module></ipython-input-23-7f40a356d7d1>ser_obj = pd.Series(range(5), index = ['a', 'b', 'c', 'd', 'e'])print(ser_obj.head())
2. Index de ligne
ser_obj['label'], ser_obj[pos]Exemple de code :Exécuter le résultat :a 0 b 1 c 2 d 3 e 4 dtype: int64Copier après la connexion
# 行索引print(ser_obj['b'])print(ser_obj[2])
3. Index de découpage
ser_obj[2:4], ser_obj['label1': 'label3']Notez que lors du découpage par nom d'index, l'index de fin est inclus.Exemple de code :Résultat d'exécution :1 2Copier après la connexion
# 切片索引print(ser_obj[1:3])print(ser_obj['b':'d'])
4. Index discontinu
ser_obj[['label1', 'label2', 'label3']]Exemple de code :Résultat de l'exécution:b 1 c 2 dtype: int64 b 1 c 2 d 3 dtype: int64Copier après la connexion
# 不连续索引print(ser_obj[[0, 2, 4]])print(ser_obj[['a', 'e']])
5. Index booléen
Exemple de code :
a    0
c    2
e    4
dtype: int64
a    0
e    4
dtype: int64
# 布尔索引ser_bool = ser_obj > 2print(ser_bool)print(ser_obj[ser_bool])print(ser_obj[ser_obj > 2])
3.2 Index DataFrame
1. ee
a    False
b    False
c    False
d     True
e     True
dtype: bool
d    3
e    4
dtype: int64
d    3
e    4
dtype: int64
import numpy as np

df_obj = pd.DataFrame(np.random.randn(5,4), columns = ['a', 'b', 'c', 'd'])print(df_obj.head())
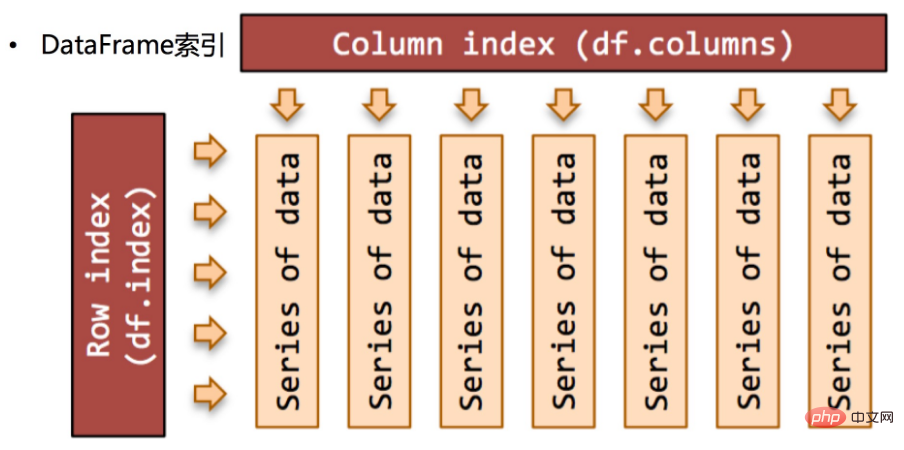 4. Indexation avancée : étiquette, position et mixte
1. directement, le découpage peut être effectué via loc loc est un index basé sur le nom de l'étiquette, qui est notre nom d'index personnaliséExemple de code :
          a         b         c         d
0 -0.241678  0.621589  0.843546 -0.383105
1 -0.526918 -0.485325  1.124420 -0.653144
2 -1.074163  0.939324 -0.309822 -0.209149
3 -0.716816  1.844654 -2.123637 -1.323484
4  0.368212 -0.910324  0.064703  0.486016
# 列索引print(df_obj['a']) # 返回Series类型
Exemple de code :
0   -0.241678
1   -0.526918
2   -1.074163
3   -0.716816
4    0.368212
Name: a, dtype: float64
Résultat d'exécution :
# 不连续索引print(df_obj[['a','c']])
3. Étiquette et position d'index mixte
ix est une combinaison du au-dessus de deux. Il peut utiliser des numéros d'index et Vous pouvez utiliser un index personnalisé, qui dépend de la situation Si l'index contient à la fois des chiffres et de l'anglais, cette méthode n'est pas recommandée et peut facilement prêter à confusion dans le positionnement.Exemple de code :Note Opération d'indexation DataFrame, qui peut être considérée comme l'opération d'indexation de ndarrayL'index de tranche de l'étiquette inclut la position finaleRésultat de l'exécution :a c 0 -0.241678 0.843546 1 -0.526918 1.124420 2 -1.074163 -0.309822 3 -0.716816 -2.123637 4 0.368212 0.064703Copier après la connexion# 标签索引 loc# Seriesprint(ser_obj['b':'d'])print(ser_obj.loc['b':'d'])# DataFrameprint(df_obj['a'])# 第一个参数索引行,第二个参数是列print(df_obj.loc[0:2, 'a'])Copier après la connexion
L'opération d'alignement des pandas2. Opération d'alignement des pandas
est un processus important de nettoyage des données. Elle peut être effectuée en fonction de l'alignement de l'index, NaN sera rempli.
示例代码:
s1 = pd.Series(range(10, 20), index = range(10))s2 = pd.Series(range(20, 25), index = range(5))print('s1: ' )print(s1)print('') print('s2: ')print(s2)运行结果:
s1:
0    10
1    11
2    12
3    13
4    14
5    15
6    16
7    17
8    18
9    19
dtype: int64

s2:
0    20
1    21
2    22
3    23
4    24
dtype: int64
示例代码:
# Series 对齐运算s1 + s2
运行结果:
0    30.0
1    32.0
2    34.0
3    36.0
4    38.0
5     NaN
6     NaN
7     NaN
8     NaN
9     NaN
dtype: float64
示例代码:
df1 = pd.DataFrame(np.ones((2,2)), columns = ['a', 'b'])df2 = pd.DataFrame(np.ones((3,3)), columns = ['a', 'b', 'c'])print('df1: ')print(df1)print('') print('df2: ')print(df2)运行结果:
df1:
     a    b
0  1.0  1.0
1  1.0  1.0

df2:
     a    b    c
0  1.0  1.0  1.0
1  1.0  1.0  1.0
2  1.0  1.0  1.0
示例代码:
# DataFrame对齐操作df1 + df2
运行结果:
a b c0 2.0 2.0 NaN1 2.0 2.0 NaN2 NaN NaN NaN
使用
add,sub,p,mul的同时,通过
fill_value指定填充值,未对齐的数据将和填充值做运算
示例代码:
print(s1)print(s2)s1.add(s2, fill_value = -1)print(df1)print(df2)df1.sub(df2, fill_value = 2.)
运行结果:
# print(s1)0    101    112    123    134    145    156    167    178    189    19dtype: int64# print(s2)0    201    212    223    234    24dtype: int64# s1.add(s2, fill_value = -1)0    30.01    32.02    34.03    36.04    38.05    14.06    15.07    16.08    17.09    18.0dtype: float64# print(df1)
     a    b0  1.0  1.01  1.0  1.0# print(df2)
     a    b    c0  1.0  1.0  1.01  1.0  1.0  1.02  1.0  1.0  1.0# df1.sub(df2, fill_value = 2.)
     a    b    c0  0.0  0.0  1.01  0.0  0.0  1.02  1.0  1.0  1.0
算术方法表:
| 方法 | 描述 |
|---|---|
| add,radd | 加法(+) |
| sub,rsub | 减法(-) |
| p,rp | 除法(/) |
| floorp,rfllorp | 整除(//) |
| mul,rmul | 乘法(*) |
| pow,rpow | 幂次方(**) |
示例代码:
# Numpy ufunc 函数df = pd.DataFrame(np.random.randn(5,4) - 1)print(df)print(np.abs(df))
运行结果:
          0         1         2         3
0 -0.062413  0.844813 -1.853721 -1.980717
1 -0.539628 -1.975173 -0.856597 -2.612406
2 -1.277081 -1.088457 -0.152189  0.530325
3 -1.356578 -1.996441  0.368822 -2.211478
4 -0.562777  0.518648 -2.007223  0.059411

          0         1         2         3
0  0.062413  0.844813  1.853721  1.980717
1  0.539628  1.975173  0.856597  2.612406
2  1.277081  1.088457  0.152189  0.530325
3  1.356578  1.996441  0.368822  2.211478
4  0.562777  0.518648  2.007223  0.059411
示例代码:
# 使用apply应用行或列数据#f = lambda x : x.max()print(df.apply(lambda x : x.max()))
运行结果:
0   -0.062413
1    0.844813
2    0.368822
3    0.530325
dtype: float64
注意指定轴的方向,默认axis=0,方向是列
示例代码:
# 指定轴方向,axis=1,方向是行print(df.apply(lambda x : x.max(), axis=1))
运行结果:
0    0.844813
1   -0.539628
2    0.530325
3    0.368822
4    0.518648
dtype: float64
示例代码:
# 使用applymap应用到每个数据f2 = lambda x : '%.2f' % xprint(df.applymap(f2))
运行结果:
       0      1      2      3
0  -0.06   0.84  -1.85  -1.98
1  -0.54  -1.98  -0.86  -2.61
2  -1.28  -1.09  -0.15   0.53
3  -1.36  -2.00   0.37  -2.21
4  -0.56   0.52  -2.01   0.06
sort_index()
排序默认使用升序排序,ascending=False 为降序排序
示例代码:
# Seriess4 = pd.Series(range(10, 15), index = np.random.randint(5, size=5))print(s4)# 索引排序s4.sort_index() # 0 0 1 3 3
运行结果:
0    10
3    11
1    12
3    13
0    14
dtype: int64

0    10
0    14
1    12
3    11
3    13
dtype: int64
对DataFrame操作时注意轴方向
示例代码:
# DataFramedf4 = pd.DataFrame(np.random.randn(3, 5),
                   index=np.random.randint(3, size=3),
                   columns=np.random.randint(5, size=5))print(df4)df4_isort = df4.sort_index(axis=1, ascending=False)print(df4_isort) # 4 2 1 1 0
运行结果:
          1         4         0         1         2
2 -0.416686 -0.161256  0.088802 -0.004294  1.164138
1 -0.671914  0.531256  0.303222 -0.509493 -0.342573
1  1.988321 -0.466987  2.787891 -1.105912  0.889082

          4         2         1         1         0
2 -0.161256  1.164138 -0.416686 -0.004294  0.088802
1  0.531256 -0.342573 -0.671914 -0.509493  0.303222
1 -0.466987  0.889082  1.988321 -1.105912  2.787891
sort_values(by=‘column name’)
根据某个唯一的列名进行排序,如果有其他相同列名则报错。
示例代码:
# 按值排序df4_vsort = df4.sort_values(by=0, ascending=False)print(df4_vsort)
运行结果:
          1         4         0         1         2
1  1.988321 -0.466987  2.787891 -1.105912  0.889082
1 -0.671914  0.531256  0.303222 -0.509493 -0.342573
2 -0.416686 -0.161256  0.088802 -0.004294  1.164138
示例代码:
df_data = pd.DataFrame([np.random.randn(3), [1., 2., np.nan],
                       [np.nan, 4., np.nan], [1., 2., 3.]])print(df_data.head())
运行结果:
          0         1         2
0 -0.281885 -0.786572  0.487126
1  1.000000  2.000000       NaN
2       NaN  4.000000       NaN
3  1.000000  2.000000  3.000000
示例代码:
# isnullprint(df_data.isnull())
运行结果:
       0      1      2
0  False  False  False
1  False  False   True
2   True  False   True
3  False  False  False
根据axis轴方向,丢弃包含NaN的行或列。 示例代码:
# dropnaprint(df_data.dropna()) # 默认是按行print(df_data.dropna(axis=1)) # axis=1是按列
运行结果:
          0         1         2
0 -0.281885 -0.786572  0.487126
3  1.000000  2.000000  3.000000

          1
0 -0.786572
1  2.000000
2  4.000000
3  2.000000
示例代码:
# fillnaprint(df_data.fillna(-100.))
运行结果:
            0         1           2
0   -0.281885 -0.786572    0.487126
1    1.000000  2.000000 -100.000000
2 -100.000000  4.000000 -100.000000
3    1.000000  2.000000    3.000000
下面创建一个Series, 在输入索引Index时,输入了由两个子list组成的list,第一个子list是外层索引,第二个list是内层索引。
示例代码:
import pandas as pdimport numpy as np

ser_obj = pd.Series(np.random.randn(12),index=[
                ['a', 'a', 'a', 'b', 'b', 'b', 'c', 'c', 'c', 'd', 'd', 'd'],
                [0, 1, 2, 0, 1, 2, 0, 1, 2, 0, 1, 2]
            ])print(ser_obj)
运行结果:
a  0    0.099174
   1   -0.310414
   2   -0.558047
b  0    1.742445
   1    1.152924
   2   -0.725332
c  0   -0.150638
   1    0.251660
   2    0.063387
d  0    1.080605
   1    0.567547
   2   -0.154148
dtype: float64
打印这个Series的索引类型,显示是MultiIndex
直接将索引打印出来,可以看到有lavels,和labels两个信息。levels表示两个层级中分别有那些标签,labels是每个位置分别是什么标签。
示例代码:
print(type(ser_obj.index))print(ser_obj.index)
运行结果:
<class>MultiIndex(levels=[['a', 'b', 'c', 'd'], [0, 1, 2]],
           labels=[[0, 0, 0, 1, 1, 1, 2, 2, 2, 3, 3, 3], [0, 1, 2, 0, 1, 2, 0, 1, 2, 0, 1, 2]])</class>
根据索引获取数据。因为现在有两层索引,当通过外层索引获取数据的时候,可以直接利用外层索引的标签来获取。
当要通过内层索引获取数据的时候,在list中传入两个元素,前者是表示要选取的外层索引,后者表示要选取的内层索引。
ser_obj[‘outer_label’]
示例代码:
# 外层选取print(ser_obj['c'])
运行结果:
0   -1.362096
1    1.558091
2   -0.452313
dtype: float64
ser_obj[:, ‘inner_label’]
示例代码:
# 内层选取print(ser_obj[:, 2])
运行结果:
a    0.826662
b    0.015426
c   -0.452313
d   -0.051063
dtype: float64
常用于分组操作、透视表的生成等
.swaplevel( )交换内层与外层索引。
示例代码:
print(ser_obj.swaplevel())
运行结果:
0  a    0.099174
1  a   -0.310414
2  a   -0.558047
0  b    1.742445
1  b    1.152924
2  b   -0.725332
0  c   -0.150638
1  c    0.251660
2  c    0.063387
0  d    1.080605
1  d    0.567547
2  d   -0.154148
dtype: float64
.sortlevel( )先对外层索引进行排序,再对内层索引进行排序,默认是升序。
示例代码:
# 交换并排序分层print(ser_obj.swaplevel().sortlevel())
运行结果:
0  a    0.099174
   b    1.742445
   c   -0.150638
   d    1.080605
1  a   -0.310414
   b    1.152924
   c    0.251660
   d    0.567547
2  a   -0.558047
   b   -0.725332
   c    0.063387
   d   -0.154148
dtype: float64
示例代码:
arr1 = np.random.rand(4,3)pd1 = pd.DataFrame(arr1,columns=list('ABC'),index=list('abcd'))f = lambda x: '%.2f'% x
pd2 = pd1.applymap(f).astype(float)pd2运行结果:
      A            B           C
a    0.87        0.26        0.67
b    0.69        0.89        0.17
c    0.94        0.33        0.04
d    0.35        0.46        0.29
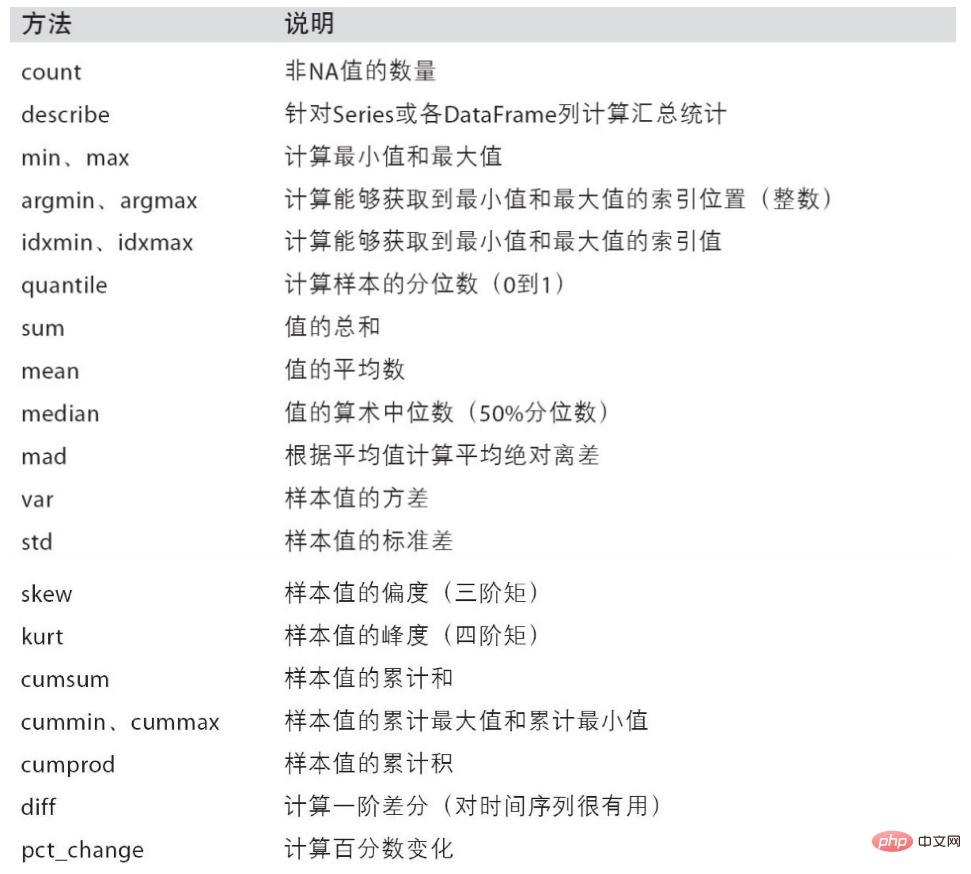
axis=0 按列统计,axis=1按行统计
skipna 排除缺失值, 默认为True
示例代码:
pd2.sum() #默认把这一列的Series计算,所有行求和pd2.sum(axis='columns') #指定求每一行的所有列的和pd2.idxmax()#查看每一列所有行的最大值所在的标签索引,同样我们也可以通过axis='columns'求每一行所有列的最大值的标签索引
运行结果:
A    2.85
B    1.94
C    1.17
dtype: float64


a    1.80
b    1.75
c    1.31
d    1.10
dtype: float64


A    c
B    b
C    a
dtype: object

示例代码:
pd2.describe()#查看汇总
运行结果:
                A        B        C
count      4.000000    4.00000        4.000000mean       0.712500    0.48500        0.292500std        0.263613    0.28243        0.271585min        0.350000    0.26000        0.04000025%        0.605000    0.31250        0.13750050%        0.780000    0.39500        0.23000075%        0.887500    0.56750        0.385000max        0.940000    0.89000        0.670000
#百分比:除以原来的量pd2.pct_change() #查看行的百分比变化,同样指定axis='columns'列与列的百分比变化
     A                 B                C
a    NaN              NaN             NaN
b    -0.206897        2.423077        -0.746269c    0.362319        -0.629213        -0.764706d    -0.627660        0.393939        6.250000
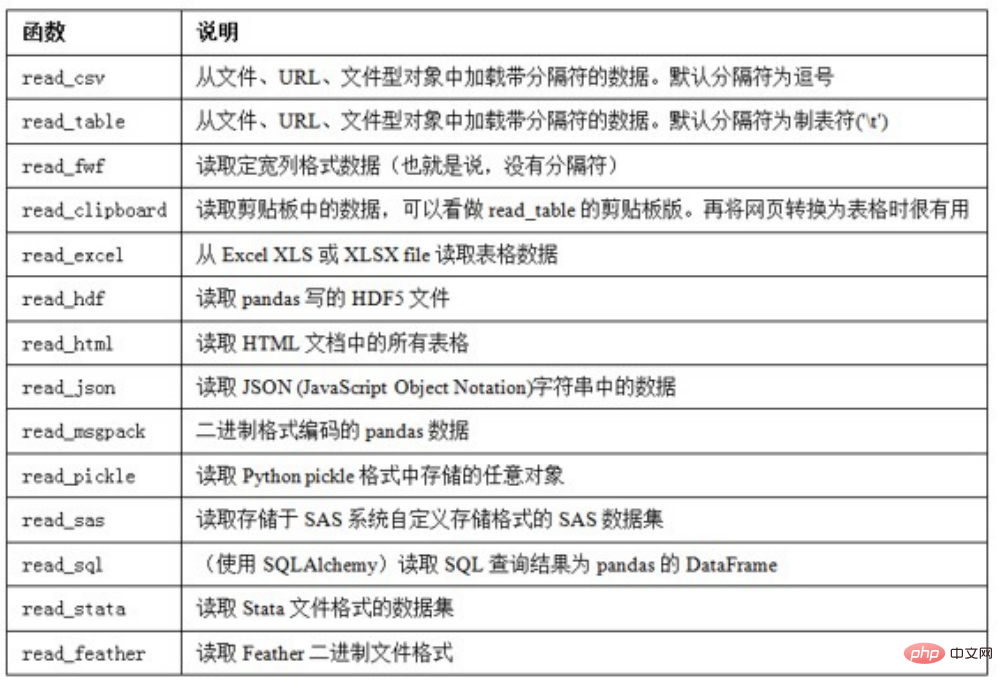
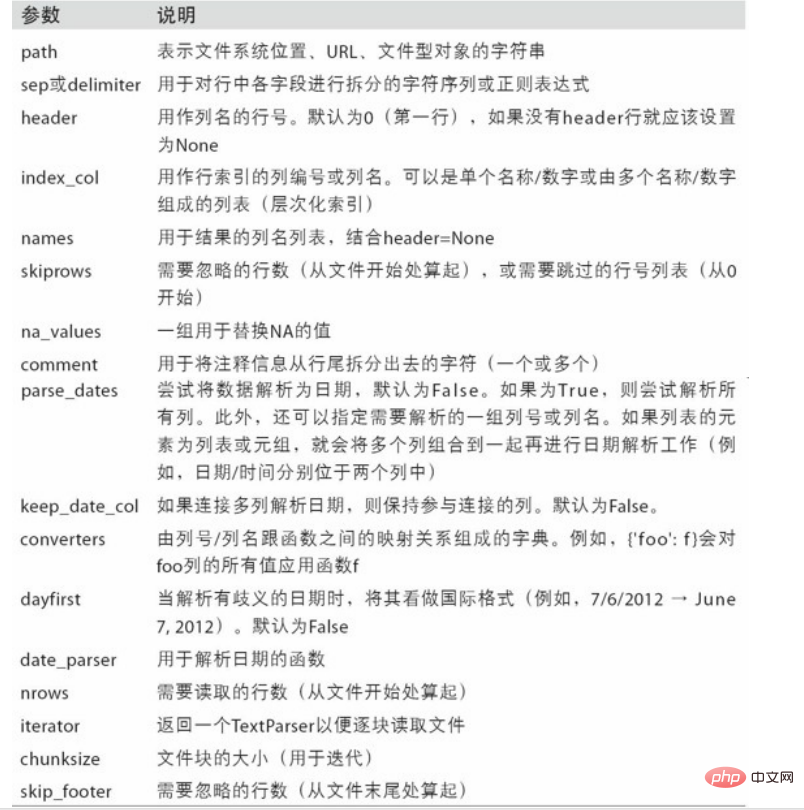
读取csv文件read_csv(file_path or buf,usecols,encoding):file_path:文件路径,usecols:指定读取的列名,encoding:编码
data = pd.read_csv('d:/test_data/food_rank.csv',encoding='utf8')data.head()
    name    num0    酥油茶    219.01    青稞酒    95.02    酸奶    62.03    糌粑    16.04    琵琶肉    2.0#指定读取的列名data = pd.read_csv('d:/test_data/food_rank.csv',usecols=['name'])data.head()
    name0    酥油茶1    青稞酒2    酸奶3    糌粑4    琵琶肉#如果文件路径有中文,则需要知道参数engine='python'data = pd.read_csv('d:/数据/food_rank.csv',engine='python',encoding='utf8')data.head()
name num0 酥油茶 219.01 青稞酒 95.02 酸奶 62.03 糌粑 16.04 琵琶肉 2.0#建议文件路径和文件名,不要出现中文写入csv文件
DataFrame:to_csv(file_path or buf,sep,columns,header,index,na_rep,mode):file_path:保存文件路径,默认None,sep:分隔符,默认’,’ ,columns:是否保留某列数据,默认None,header:是否保留列名,默认True,index:是否保留行索引,默认True,na_rep:指定字符串来代替空值,默认是空字符,mode:默认’w’,追加’a’
**Series**:`Series.to_csv`\ (_path=None_,_index=True_,_sep='_,_'_,_na\_rep=''_,_header=False_,_mode='w'_,_encoding=None_\)
# 导入必要模块import pandas as pdfrom sqlalchemy import create_engine#初始化数据库连接#用户名root 密码   端口 3306  数据库 db2engine = create_engine('mysql+pymysql://root:@localhost:3306/db2')#查询语句sql = '''
    select * from class;
'''#两个参数   sql语句  数据库连接df = pd.read_sql(sql,engine)df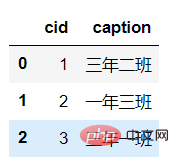
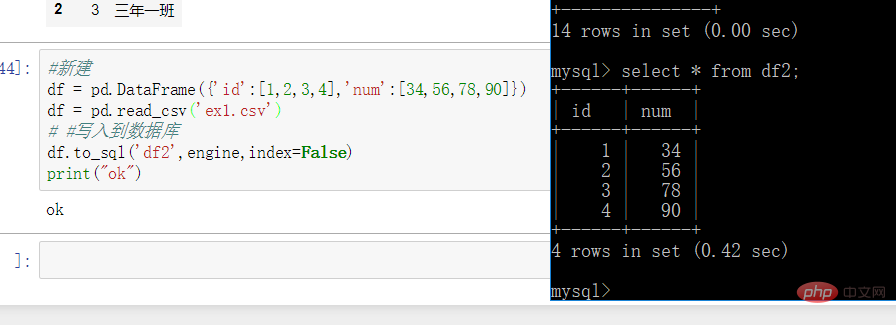
#新建df = pd.DataFrame({'id':[1,2,3,4],'num':[34,56,78,90]})df = pd.read_csv('ex1.csv')# #写入到数据库df.to_sql('df2',engine,index=False)print("ok")进入数据库查看
数据清洗是数据分析关键的一步,直接影响之后的处理工作
数据需要修改吗?有什么需要修改的吗?数据应该怎么调整才能适用于接下来的分析和挖掘?
是一个迭代的过程,实际项目中可能需要不止一次地执行这些清洗操作

duplicated\(\): 返回布尔型Series表示每行是否为重复行
示例代码:
import numpy as npimport pandas as pd

df_obj = pd.DataFrame({'data1' : ['a'] * 4 + ['b'] * 4,
'data2' : np.random.randint(0, 4, 8)})print(df_obj)print(df_obj.duplicated())运行结果:
# print(df_obj)
  data1  data20     a      31     a      22     a      33     a      34     b      15     b      06     b      37     b      0# print(df_obj.duplicated())0    False1    False2     True3     True4    False5    False6    False7     Truedtype: bool
示例代码:
print(df_obj.drop_duplicates())print(df_obj.drop_duplicates('data2'))运行结果:
# print(df_obj.drop_duplicates())
  data1  data20     a      31     a      24     b      15     b      06     b      3# print(df_obj.drop_duplicates('data2'))
data1 data20 a 31 a 24 b 15 b 0根据map传入的函数对每行或每列进行转换
示例代码:
ser_obj = pd.Series(np.random.randint(0,10,10))print(ser_obj)print(ser_obj.map(lambda x : x ** 2))
运行结果:
# print(ser_obj)0 11 42 83 64 85 66 67 48 79 3dtype: int64# print(ser_obj.map(lambda x : x ** 2))0 11 162 643 364 645 366 367 168 499 9dtype: int64
示例代码:
# 单个值替换单个值print(ser_obj.replace(1, -100))# 多个值替换一个值print(ser_obj.replace([6, 8], -100))# 多个值替换多个值print(ser_obj.replace([4, 7], [-100, -200]))
运行结果:
# print(ser_obj.replace(1, -100))0 -1001 42 83 64 85 66 67 48 79 3dtype: int64# print(ser_obj.replace([6, 8], -100))0 11 42 -1003 -1004 -1005 -1006 -1007 48 79 3dtype: int64# print(ser_obj.replace([4, 7], [-100, -200]))0 11 -1002 83 64 85 66 67 -1008 -2009 3dtype: int64
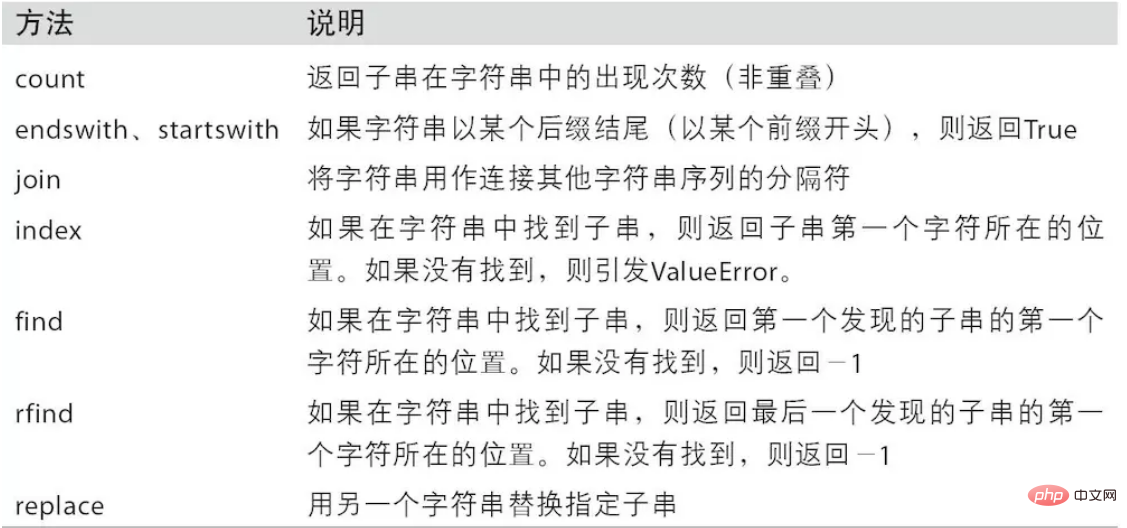

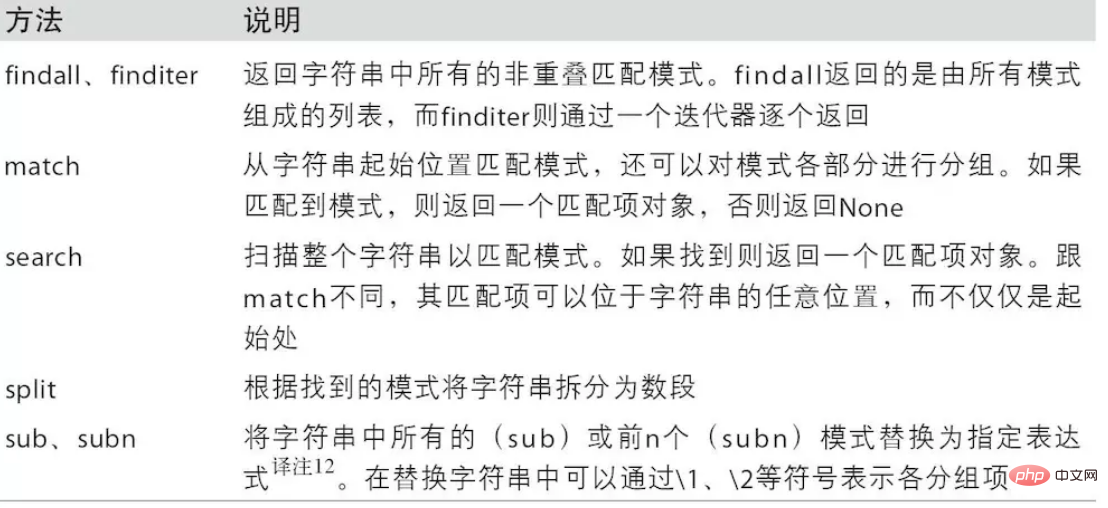
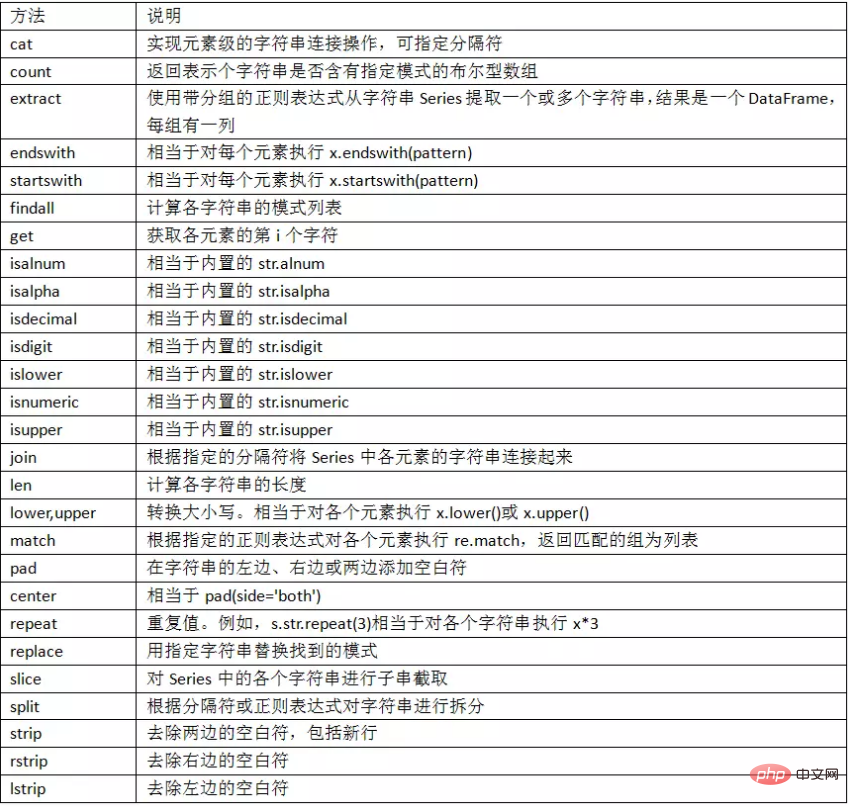
根据单个或多个键将不同DataFrame的行连接起来
类似数据库的连接操作
pd.merge:(left, right, how=‘inner’,on=None,left_on=None, right_on=None )
left:合并时左边的DataFrame
right:合并时右边的DataFrame
how:合并的方式,默认’inner’, ‘outer’, ‘left’, ‘right’
on:需要合并的列名,必须两边都有的列名,并以 left 和 right 中的列名的交集作为连接键
left_on: left Dataframe中用作连接键的列
right_on: right Dataframe中用作连接键的列
内连接 inner:对两张表都有的键的交集进行联合
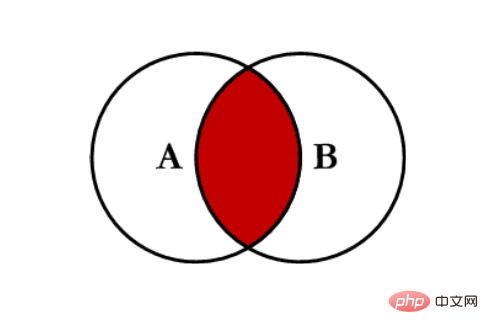

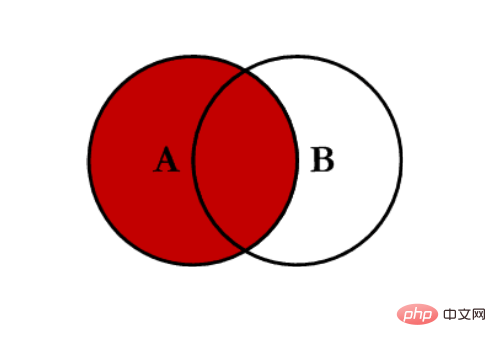
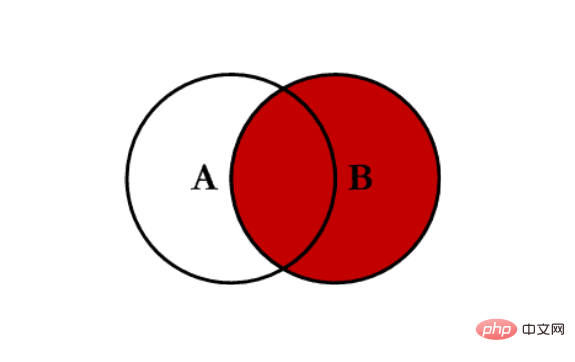
示例代码:
import pandas as pdimport numpy as np

left = pd.DataFrame({'key': ['K0', 'K1', 'K2', 'K3'],
                      'A': ['A0', 'A1', 'A2', 'A3'],
                       'B': ['B0', 'B1', 'B2', 'B3']})right = pd.DataFrame({'key': ['K0', 'K1', 'K2', 'K3'],
                      'C': ['C0', 'C1', 'C2', 'C3'],
'D': ['D0', 'D1', 'D2', 'D3']})pd.merge(left,right,on='key') #指定连接键key运行结果:
key A B C D0 K0 A0 B0 C0 D01 K1 A1 B1 C1 D12 K2 A2 B2 C2 D23 K3 A3 B3 C3 D3

示例代码:
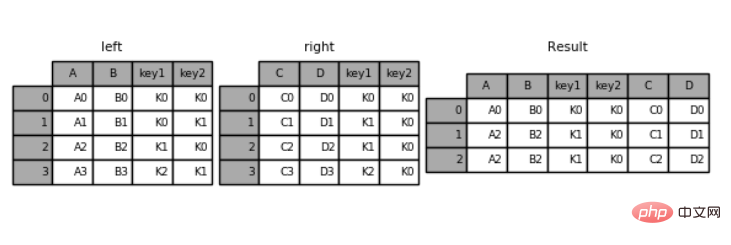
left = pd.DataFrame({'key1': ['K0', 'K0', 'K1', 'K2'],
                    'key2': ['K0', 'K1', 'K0', 'K1'],
                    'A': ['A0', 'A1', 'A2', 'A3'],
                    'B': ['B0', 'B1', 'B2', 'B3']})right = pd.DataFrame({'key1': ['K0', 'K1', 'K1', 'K2'],
                      'key2': ['K0', 'K0', 'K0', 'K0'],
                      'C': ['C0', 'C1', 'C2', 'C3'],
'D': ['D0', 'D1', 'D2', 'D3']})pd.merge(left,right,on=['key1','key2']) #指定多个键,进行合并运行结果:
key1 key2 A B C D0 K0 K0 A0 B0 C0 D01 K1 K0 A2 B2 C1 D12 K1 K0 A2 B2 C2 D2
#指定左连接left = pd.DataFrame({'key1': ['K0', 'K0', 'K1', 'K2'],
                    'key2': ['K0', 'K1', 'K0', 'K1'],
                    'A': ['A0', 'A1', 'A2', 'A3'],
                    'B': ['B0', 'B1', 'B2', 'B3']})right = pd.DataFrame({'key1': ['K0', 'K1', 'K1', 'K2'],
                      'key2': ['K0', 'K0', 'K0', 'K0'],
                      'C': ['C0', 'C1', 'C2', 'C3'],
                      'D': ['D0', 'D1', 'D2', 'D3']})pd.merge(left, right, how='left', on=['key1', 'key2'])
    key1    key2          A    B    C    D0    K0        K0        A0    B0    C0    D01    K0        K1        A1    B1    NaN    NaN2    K1        K0        A2    B2    C1    D13    K1        K0        A2    B2    C2    D24    K2        K1        A3    B3    NaN    NaN
#指定右连接left = pd.DataFrame({'key1': ['K0', 'K0', 'K1', 'K2'],
                    'key2': ['K0', 'K1', 'K0', 'K1'],
                    'A': ['A0', 'A1', 'A2', 'A3'],
                    'B': ['B0', 'B1', 'B2', 'B3']})right = pd.DataFrame({'key1': ['K0', 'K1', 'K1', 'K2'],
                      'key2': ['K0', 'K0', 'K0', 'K0'],
                      'C': ['C0', 'C1', 'C2', 'C3'],
                      'D': ['D0', 'D1', 'D2', 'D3']})pd.merge(left, right, how='right', on=['key1', 'key2'])
    key1    key2          A    B    C    D0    K0        K0        A0    B0    C0    D01    K1        K0        A2    B2    C1    D12    K1        K0        A2    B2    C2    D23    K2        K0        NaN    NaN    C3    D3
默认是“内连接”(inner),即结果中的键是交集
how: 指定连接方式
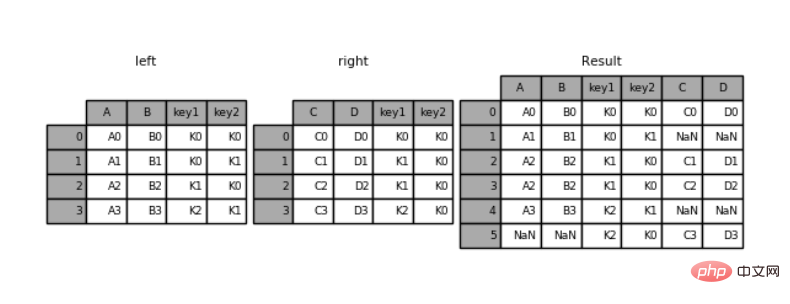
“外连接”(outer),结果中的键是并集
示例代码:
left = pd.DataFrame({'key1': ['K0', 'K0', 'K1', 'K2'],
                    'key2': ['K0', 'K1', 'K0', 'K1'],
                    'A': ['A0', 'A1', 'A2', 'A3'],
                    'B': ['B0', 'B1', 'B2', 'B3']})right = pd.DataFrame({'key1': ['K0', 'K1', 'K1', 'K2'],
                      'key2': ['K0', 'K0', 'K0', 'K0'],
                      'C': ['C0', 'C1', 'C2', 'C3'],
                      'D': ['D0', 'D1', 'D2', 'D3']})
pd.merge(left,right,how='outer',on=['key1','key2'])运行结果:
key1 key2 A B C D0 K0 K0 A0 B0 C0 D01 K0 K1 A1 B1 NaN NaN2 K1 K0 A2 B2 C1 D13 K1 K0 A2 B2 C2 D24 K2 K1 A3 B3 NaN NaN5 K2 K0 NaN NaN C3 D3
参数suffixes:默认为_x, _y
示例代码:
# 处理重复列名df_obj1 = pd.DataFrame({'key': ['b', 'b', 'a', 'c', 'a', 'a', 'b'],
                        'data' : np.random.randint(0,10,7)})df_obj2 = pd.DataFrame({'key': ['a', 'b', 'd'],
'data' : np.random.randint(0,10,3)})print(pd.merge(df_obj1, df_obj2, on='key', suffixes=('_left', '_right')))运行结果:
data_left key data_right0 9 b 11 5 b 12 1 b 13 2 a 84 2 a 85 5 a 8
参数left_index=True或right_index=True
示例代码:
# 按索引连接df_obj1 = pd.DataFrame({'key': ['b', 'b', 'a', 'c', 'a', 'a', 'b'],
'data1' : np.random.randint(0,10,7)})df_obj2 = pd.DataFrame({'data2' : np.random.randint(0,10,3)}, index=['a', 'b', 'd'])print(pd.merge(df_obj1, df_obj2, left_on='key', right_index=True))运行结果:
data1 key data20 3 b 61 4 b 66 8 b 62 6 a 04 3 a 05 0 a 0
沿轴方向将多个对象合并到一起
np.concatenate
示例代码:
import numpy as npimport pandas as pd

arr1 = np.random.randint(0, 10, (3, 4))arr2 = np.random.randint(0, 10, (3, 4))print(arr1)print(arr2)print(np.concatenate([arr1, arr2]))  # 默认axis=0,按行拼接print(np.concatenate([arr1, arr2], axis=1))  # 按列拼接
运行结果:
# print(arr1)[[3 3 0 8]
 [2 0 3 1]
 [4 8 8 2]]# print(arr2)[[6 8 7 3]
 [1 6 8 7]
 [1 4 7 1]]# print(np.concatenate([arr1, arr2]))
 [[3 3 0 8]
 [2 0 3 1]
 [4 8 8 2]
 [6 8 7 3]
 [1 6 8 7]
 [1 4 7 1]]# print(np.concatenate([arr1, arr2], axis=1)) [[3 3 0 8 6 8 7 3]
 [2 0 3 1 1 6 8 7]
 [4 8 8 2 1 4 7 1]]
注意指定轴方向,默认axis=0
join指定合并方式,默认为outer
Series合并时查看行索引有无重复
df1 = pd.DataFrame(np.arange(6).reshape(3,2),index=list('abc'),columns=['one','two'])df2 = pd.DataFrame(np.arange(4).reshape(2,2)+5,index=list('ac'),columns=['three','four'])pd.concat([df1,df2]) #默认外连接,axis=0
    four    one    three    two
a    NaN        0.0    NaN        1.0b    NaN        2.0    NaN        3.0c    NaN        4.0    NaN        5.0a    6.0        NaN    5.0        NaN
c    8.0        NaN    7.0        NaN

pd.concat([df1,df2],axis='columns') #指定axis=1连接
    one    two    three    four
a    0    1    5.0        6.0b    2    3    NaN        NaN
c    4    5    7.0        8.0#同样我们也可以指定连接的方式为innerpd.concat([df1,df2],axis=1,join='inner')

    one    two    three    four
a 0 1 5 6c 4 5 7 8将列索引旋转为行索引,完成层级索引
DataFrame->Series
示例代码:
import numpy as npimport pandas as pd

df_obj = pd.DataFrame(np.random.randint(0,10, (5,2)), columns=['data1', 'data2'])print(df_obj)stacked = df_obj.stack()print(stacked)
运行结果:
# print(df_obj)
   data1  data20      7      91      7      82      8      93      4      14      1      2# print(stacked)0  data1    7
   data2    91  data1    7
   data2    82  data1    8
   data2    93  data1    4
   data2    14  data1    1
   data2    2dtype: int64
将层级索引展开
Series->DataFrame
默认操作内层索引,即level=-1
示例代码:
# 默认操作内层索引print(stacked.unstack())# 通过level指定操作索引的级别print(stacked.unstack(level=0))
运行结果:
# print(stacked.unstack())
   data1  data20      7      91      7      82      8      93      4      14      1      2# print(stacked.unstack(level=0))
       0  1  2  3  4data1  7  7  8  4  1data2  9  8  9  1  2
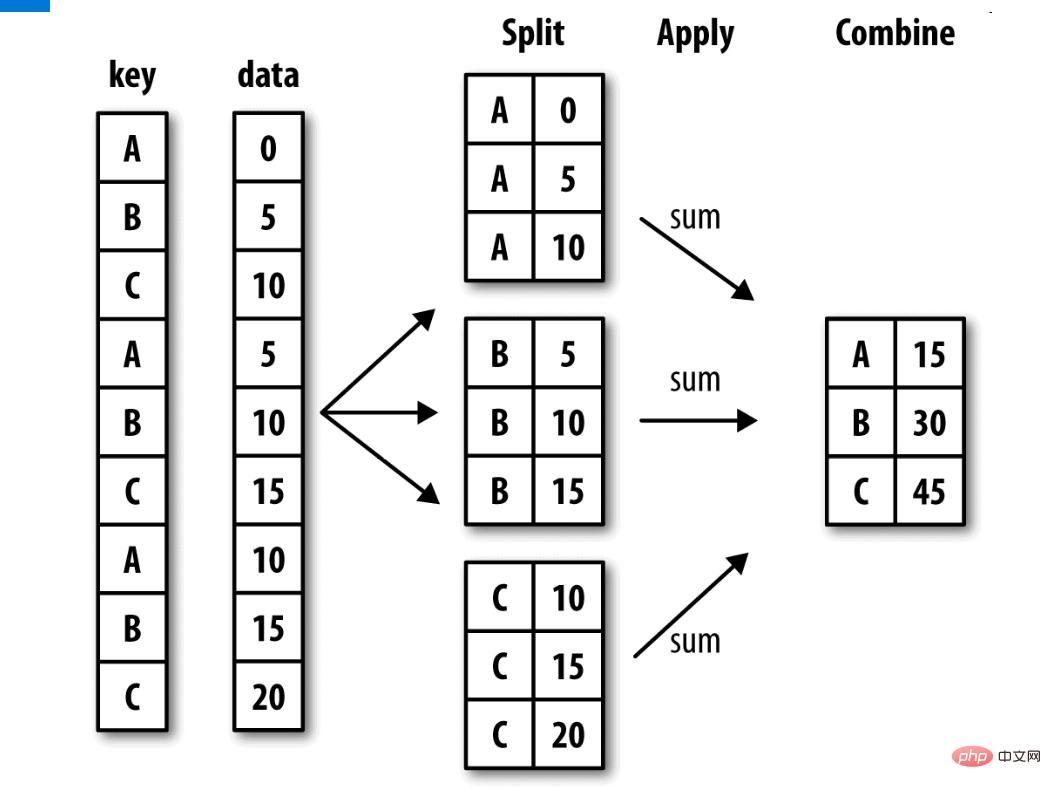
by:根据什么进行分组,用于确定groupby的组
as_index:对于聚合输出,返回以组便签为索引的对象,仅对DataFrame
df1 = pd.DataFrame({'fruit':['apple','banana','orange','apple','banana'],
                    'color':['red','yellow','yellow','cyan','cyan'],
                   'price':[8.5,6.8,5.6,7.8,6.4]})#查看类型type(df1.groupby('fruit'))pandas.core.groupby.groupby.DataFrameGroupBy  #GruopBy对象,它是一个包含组名,和数据块的2维元组序列,支持迭代for name, group in df1.groupby('fruit'):
    print(name) #输出组名
    apple
    banana
    orange    print(group) # 输出数据块
       fruit color  price    0  apple   red    8.5
    3  apple  cyan    7.8
       fruit   color  price    1  banana  yellow    6.8
    4  banana    cyan    6.4
       fruit   color  price    2  orange  yellow    5.6

    #输出group类型
    print(type(group))  #数据块是dataframe类型
    <class>
    <class>
    <class>#选择任意的数据块dict(list(df1.groupby('fruit')))['apple']  #取出apple组的数据块
fruit color price0 apple red 8.53 apple cyan 7.8</class></class></class>聚合
| 函数名 | 描述 |
|---|---|
| count | 分组中非NA值的数量 |
| sum | 非NA值的和 |
| mean | 非NA值的平均值 |
| median | 非NA值的中位数 |
| std, var | 标准差和方差 |
| min, max | 非NA的最小值,最大值 |
| prod | 非NA值的乘积 |
| first, last | 非NA值的第一个,最后一个 |
#Groupby对象具有上表中的聚合方法#根据fruit来求price的平均值df1['price'].groupby(df1['fruit']).mean()fruit
apple     8.15banana    6.60orange    5.60Name: price, dtype: float64
#或者df1.groupby('fruit')['price'].mean()# as_index=False(不把分组后的值作为索引,重新生成默认索引)df1.groupby('fruit',as_index=False)['price'].mean()
    fruit    price0    apple    8.151    banana    6.602    orange    5.60"""
如果我现在有个需求,计算每种水果的差值,
1.上表中的聚合函数不能满足于我们的需求,我们需要使用自定义的聚合函数
2.在分组对象中,使用我们自定义的聚合函数
"""#定义一个计算差值的函数def diff_value(arr):
    return arr.max() - arr.min()#使用自定义聚合函数,我们需要将函数传递给agg或aggregate方法,我们使用自定义聚合函数时,会比我们表中的聚合函数慢的多,因为要进行函数调用,数据重新排列df1.groupby('fruit')['price'].agg(diff_value)fruit
apple 0.7banana 0.4orange 0.0Name: price, dtype: float64通过字典或Series对象进行分组:
m = {'a':'red', 'b':'blue'}people.groupby(m, axis=1).sum()s1 = pd.Series(m)people.groupby(s1, axis=1).sum()通过函数进行分组:
people.groupyby(len).sum()
时间序列(time series)数据是一种重要的结构化数据形式。
在多个时间点观察或测量到的任何时间都可以形成一段时间序列。很多时间, 时间序列是固定频率的, 也就是说, 数据点是根据某种规律定期出现的(比如每15秒…)。
时间序列也可以是不定期的。时间序列数据的意义取决于具体的应用场景。
主要由以下几种:
Python标准库包含用于日期(date)和时间(time)数据的数据类型,而且还有日历方面的功能。我们主要会用到datetime、time以及calendar模块。
datetime.datetime(也可以简写为datetime)是用得最多的数据类型:
In [10]: from datetime import datetime

In [11]: now = datetime.now()In [12]: now
Out[12]: datetime.datetime(2017, 9, 25, 14, 5, 52, 72973)In [13]: now.year, now.month, now.day
Out[13]: (2017, 9, 25)
datetime以毫秒形式存储日期和时间。timedelta表示两个datetime对象之间的时间差:
In [14]: delta = datetime(2011, 1, 7) - datetime(2008, 6, 24, 8, 15)In [15]: delta
Out[15]: datetime.timedelta(926, 56700)In [16]: delta.days
Out[16]: 926In [17]: delta.seconds
Out[17]: 56700
可以给datetime对象加上(或减去)一个或多个timedelta,这样会产生一个新对象:
In [18]: from datetime import timedelta

In [19]: start = datetime(2011, 1, 7)In [20]: start + timedelta(12)Out[20]: datetime.datetime(2011, 1, 19, 0, 0)In [21]: start - 2 * timedelta(12)Out[21]: datetime.datetime(2010, 12, 14, 0, 0)

利用str或strftime方法(传入一个格式化字符串),datetime对象和pandas的Timestamp对象(稍后就会介绍)可以被格式化为字符串:
In [22]: stamp = datetime(2011, 1, 3)In [23]: str(stamp)Out[23]: '2011-01-03 00:00:00'In [24]: stamp.strftime('%Y-%m-%d')Out[24]: '2011-01-03'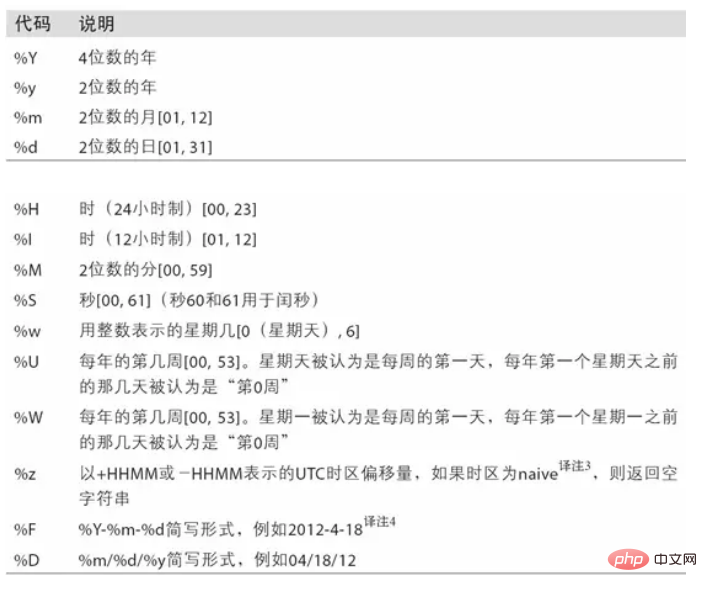
datetime.strptime可以用这些格式化编码将字符串转换为日期:
In [26]: datetime.strptime(value, '%Y-%m-%d')Out[26]: datetime.datetime(2011, 1, 3, 0, 0)In [27]: datestrs = ['7/6/2011', '8/6/2011']In [28]: [datetime.strptime(x, '%m/%d/%Y') for x in datestrs]Out[28]: [datetime.datetime(2011, 7, 6, 0, 0),
 datetime.datetime(2011, 8, 6, 0, 0)]
datetime.strptime是通过已知格式进行日期解析的最佳方式。但是每次都要编写格式定义是很麻烦的事情,尤其是对于一些常见的日期格式。
这种情况下,你可以用dateutil这个第三方包中的parser.parse方法(pandas中已经自动安装好了):
In [29]: from dateutil.parser import parse

In [30]: parse('2011-01-03')Out[30]: datetime.datetime(2011, 1, 3, 0, 0)dateutil可以解析几乎所有人类能够理解的日期表示形式:
In [31]: parse('Jan 31, 1997 10:45 PM')Out[31]: datetime.datetime(1997, 1, 31, 22, 45)在国际通用的格式中,日出现在月的前面很普遍,传入dayfirst=True即可解决这个问题:
In [32]: parse('6/12/2011', dayfirst=True)Out[32]: datetime.datetime(2011, 12, 6, 0, 0)Pandas通常是用于处理成组日期的,不管这些日期是DataFrame的轴索引还是列。to_datetime方法可以解析多种不同的日期表示形式。对标准日期格式(如ISO8601)的解析非常快:
In [33]: datestrs = ['2011-07-06 12:00:00', '2011-08-06 00:00:00']In [34]: pd.to_datetime(datestrs)Out[34]: DatetimeIndex(['2011-07-06 12:00:00', '2011-08-06 00:00:00'], dtype='datetime64[ns]', freq=None)
它还可以处理缺失值(None、空字符串等):
In [35]: idx = pd.to_datetime(datestrs + [None])In [36]: idx
Out[36]: DatetimeIndex(['2011-07-06 12:00:00', '2011-08-06 00:00:00', 'NaT'], dty
pe='datetime64[ns]', freq=None)In [37]: idx[2]Out[37]: NaT

In [38]: pd.isnull(idx)Out[38]: array([False, False, True], dtype=bool)
NaT(Not a Time)是Pandas中时间戳数据的null值。
pandas最基本的时间序列类型就是以时间戳(通常以Python字符串或datatime对象表示)为索引的Series:
In [39]: from datetime import datetime

In [40]: dates = [datetime(2011, 1, 2), datetime(2011, 1, 5),
   ....:          datetime(2011, 1, 7), datetime(2011, 1, 8),
   ....:          datetime(2011, 1, 10), datetime(2011, 1, 12)]In [41]: ts = pd.Series(np.random.randn(6), index=dates)In [42]: ts
Out[42]: 2011-01-02   -0.2047082011-01-05    0.4789432011-01-07   -0.5194392011-01-08   -0.5557302011-01-10    1.9657812011-01-12    1.393406dtype: float64
这些datetime对象实际上是被放在一个DatetimeIndex中的:
In [43]: ts.index
Out[43]: DatetimeIndex(['2011-01-02', '2011-01-05', '2011-01-07', '2011-01-08',
               '2011-01-10', '2011-01-12'],
              dtype='datetime64[ns]', freq=None)
跟其他Series一样,不同索引的时间序列之间的算术运算会自动按日期对齐:
In [44]: ts + ts[::2]Out[44]: 2011-01-02   -0.4094152011-01-05         NaN2011-01-07   -1.0388772011-01-08         NaN2011-01-10    3.9315612011-01-12         NaN
dtype: float64
ts[::2] 是每隔两个取一个。
当你根据标签索引选取数据时,时间序列和其它的pandas.Series很像:
In [48]: stamp = ts.index[2]In [49]: ts[stamp]Out[49]: -0.51943871505673811
还有一种更为方便的用法:传入一个可以被解释为日期的字符串:
In [50]: ts['1/10/2011']Out[50]: 1.9657805725027142In [51]: ts['20110110']Out[51]: 1.9657805725027142
Pandas中的原生时间序列一般被认为是不规则的,也就是说,它们没有固定的频率。对于大部分应用程序而言,这是无所谓的。但是,它常常需要以某种相对固定的频率进行分析,比如每日、每月、每15分钟等(这样自然会在时间序列中引入缺失值)。
幸运的是,pandas有一整套标准时间序列频率以及用于重采样、频率推断、生成固定频率日期范围的工具。
例如,我们可以将之前那个时间序列转换为一个具有固定频率(每日)的时间序列,只需调用resample即可:
In [72]: ts
Out[72]: 2011-01-02   -0.2047082011-01-05    0.4789432011-01-07   -0.5194392011-01-08   -0.5557302011-01-10    1.9657812011-01-12    1.393406dtype: float64

In [73]: resampler = ts.resample('D')字符串“D”是每天的意思。
频率的转换(或重采样)是一个比较大的主题。这里,我将告诉你如何使用基本的频率和它的倍数。
虽然我之前用的时候没有明说,但你可能已经猜到pandas.date_range可用于根据指定的频率生成指定长度的 DatetimeIndex:
In [74]: index = pd.date_range('2012-04-01', '2012-06-01')In [75]: index
Out[75]: DatetimeIndex(['2012-04-01', '2012-04-02', '2012-04-03', '2012-04-04',
               '2012-04-05', '2012-04-06', '2012-04-07', '2012-04-08',
               '2012-04-09', '2012-04-10', '2012-04-11', '2012-04-12',
               '2012-04-13', '2012-04-14', '2012-04-15', '2012-04-16',
               '2012-04-17', '2012-04-18', '2012-04-19', '2012-04-20',
               '2012-04-21', '2012-04-22', '2012-04-23', '2012-04-24',
               '2012-04-25', '2012-04-26', '2012-04-27', '2012-04-28',
               '2012-04-29', '2012-04-30', '2012-05-01', '2012-05-02',
               '2012-05-03', '2012-05-04', '2012-05-05', '2012-05-06',
               '2012-05-07', '2012-05-08', '2012-05-09', '2012-05-10',
               '2012-05-11', '2012-05-12', '2012-05-13', '2012-05-14',
               '2012-05-15', '2012-05-16', '2012-05-17', '2012-05-18',
               '2012-05-19', '2012-05-20', '2012-05-21', '2012-05-22',
               '2012-05-23', '2012-05-24', '2012-05-25', '2012-05-26',
               '2012-05-27', '2012-05-28', '2012-05-29', '2012-05-30',
               '2012-05-31', '2012-06-01'],
dtype='datetime64[ns]', freq='D')默认情况下,date_range会产生按天计算的时间点。如果只传入起始或结束日期,那就还得传入一个表示一段时间的数字:
In [76]: pd.date_range(start='2012-04-01', periods=20)Out[76]: DatetimeIndex(['2012-04-01', '2012-04-02', '2012-04-03', '2012-04-04',
               '2012-04-05', '2012-04-06', '2012-04-07', '2012-04-08',
               '2012-04-09', '2012-04-10', '2012-04-11', '2012-04-12',
               '2012-04-13', '2012-04-14', '2012-04-15', '2012-04-16',
               '2012-04-17', '2012-04-18', '2012-04-19', '2012-04-20'],
              dtype='datetime64[ns]', freq='D')In [77]: pd.date_range(end='2012-06-01', periods=20)Out[77]: DatetimeIndex(['2012-05-13', '2012-05-14', '2012-05-15', '2012-05-16',
               '2012-05-17', '2012-05-18', '2012-05-19', '2012-05-20',
               '2012-05-21', '2012-05-22', '2012-05-23', '2012-05-24',
               '2012-05-25', '2012-05-26', '2012-05-27','2012-05-28',
               '2012-05-29', '2012-05-30', '2012-05-31', '2012-06-01'],
              dtype='datetime64[ns]', freq='D')
起始和结束日期定义了日期索引的严格边界。
例如,如果你想要生成一个由每月最后一个工作日组成的日期索引,可以传入"BM"频率(表示business end of month),这样就只会包含时间间隔内(或刚好在边界上的)符合频率要求的日期:
In [78]: pd.date_range('2000-01-01', '2000-12-01', freq='BM')Out[78]: DatetimeIndex(['2000-01-31', '2000-02-29', '2000-03-31', '2000-04-28',
               '2000-05-31', '2000-06-30', '2000-07-31', '2000-08-31',
               '2000-09-29', '2000-10-31', '2000-11-30'],
              dtype='datetime64[ns]', freq='BM')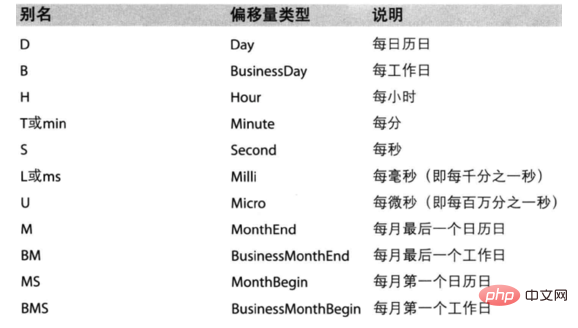
重采样(resampling)指的是将时间序列从一个频率转换到另一个频率的处理过程。
将高频率数据聚合到低频率称为降采样(downsampling),而将低频率数据转换到高频率则称为升采样(upsampling)。并不是所有的重采样都能被划分到这两个大类中。
例如,将W-WED(每周三)转换为W-FRI既不是降采样也不是升采样。
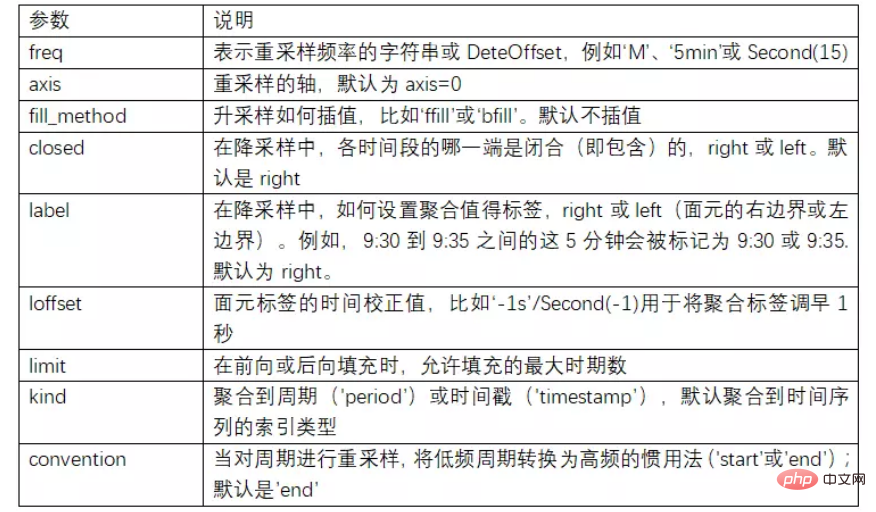
Pandas对象都带有一个resample方法,它是各种频率转换工作的主力函数。resample有一个类似于groupby的API,调用resample可以分组数据,然后会调用一个聚合函数:
In [208]: rng = pd.date_range('2000-01-01', periods=100, freq='D')In [209]: ts = pd.Series(np.random.randn(len(rng)), index=rng)In [210]: ts
Out[210]: 2000-01-01    0.6316342000-01-02   -1.5943132000-01-03   -1.5199372000-01-04    1.1087522000-01-05    1.2558532000-01-06   -0.0243302000-01-07   -2.0479392000-01-08   -0.2726572000-01-09   -1.6926152000-01-10    1.423830
                ...   2000-03-31   -0.0078522000-04-01   -1.6388062000-04-02    1.4012272000-04-03    1.7585392000-04-04    0.6289322000-04-05   -0.4237762000-04-06    0.7897402000-04-07    0.9375682000-04-08   -2.2532942000-04-09   -1.772919Freq: D, Length: 100, dtype: float64

In [211]: ts.resample('M').mean()Out[211]: 2000-01-31   -0.1658932000-02-29    0.0786062000-03-31    0.2238112000-04-30   -0.063643Freq: M, dtype: float64

In [212]: ts.resample('M', kind='period').mean()Out[212]: 2000-01 -0.1658932000-02 0.0786062000-03 0.2238112000-04 -0.063643Freq: M, dtype: float64resample是一个灵活高效的方法,可用于处理非常大的时间序列。
推荐学习:python视频教程
Ce qui précède est le contenu détaillé de. pour plus d'informations, suivez d'autres articles connexes sur le site Web de PHP en chinois!