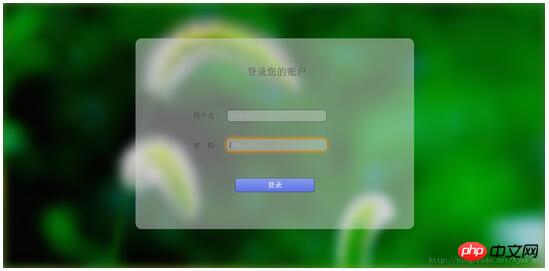
Cet article présente principalement les informations pertinentes sur HTML+CSS pour réaliser une page de connexion dynamique en arrière-plan.Les amis qui en ont besoin peuvent s'y référer
1. 🎜>
Tout d'abord, ajoutez l'image p dans la section corps de la page HTML. Le code est le suivant :<body>
<p class="bgk">
<p class="bgk-image" style="background-image: url('${pageContext.request.contextPath}/img/1.jpg')"></p>
<p class="bgk-image" style="background-image: url('${pageContext.request.contextPath}/img/2.jpg')"></p>
<p class="bgk-image" style="background-image: url('${pageContext.request.contextPath}/img/3.jpg')"></p>
<p class="bgk-image" style="background-image: url('${pageContext.request.contextPath}/img/4.jpg')"></p>
</body>.
Appliquez ensuite le CSS à la conception de l'image. Si vous souhaitez redimensionner et positionner l'image, le code suivant doit d'abord être écrit :`.bgk {
margin: auto;
position: absolute;
width: 1366px;
height: 672px;
overflow: hidden; /*溢出部分隐藏*/
}`-webkit-animation-name: kenburns; /*-animation-name:为@keyframes 动画规定名称,必须与-animation-duration同时使用,否则无动画效果*/ animation-name: kenburns; /*或者:后面值为需要绑定到选择器上的keyframe名称*/ -webkit-animation-duration: 16s; /*定义动画完成一个周期所需时间*/ animation-duration: 16s; -webkit-animation-timing-function: linear; /*规定动画从头到尾以相同速度播放,还有其他几个速度值*/ animation-timing-function: linear; -webkit-animation-iteration-count: infinite; /*规定动画播放次数,infinite为无限次*/ animation-iteration-count: infinite; -webkit-transform: scale(1.2); /*规定动画的缩放特效,scale:规定2D缩放*/ transform: scale(1.2); -webkit-filter: blur(10px); /*定义图片的模糊程度,显示为毛玻璃效果*/ filter: blur(10px);
.bgk-image:nth-child(1) {
-webkit-animation-name: kenburns-1;       /*选择器上的名称*/
animation-name: kenburns-1;
z-index: 3;         /*动画堆叠顺序,值越大表示越先播放,离用户越近*/
}
.bgk-image:nth-child(2) {
-webkit-animation-name: kenburns-2;
animation-name: kenburns-2;
z-index: 2;
}
.bgk-image:nth-child(3) {
-webkit-animation-name: kenburns-3;
animation-name: kenburns-3;
z-index: 1;
}
.bgk-image:nth-child(4) {
-webkit-animation-name: kenburns-4;
animation-name: kenburns-4;
z-index: 0;
}2 Concevoir le formulaire de connexion
Continuer pour ajouter un formulaire. à la page HTML précédente<p class="form_login_p">
<form class="form_login" action="" method="post">
<label class="login_title">登录您的账户</label>
<label class="username">用户名</label><input class="input_username" id="input_username" type="text" name="username" placeholder="邮箱/手机号"/>
<label class="password">密 码</label><input class="input_password" id="input_password" type="password" name="password" placeholder="请输入密码"/>
<input type="submit" value="登录"/><br/>
</form>
</p>.form_login{
margin: auto;
width:700px;
height: 480px;
top: 90px;
left: 333px;
position: absolute;
border-radius: 15px;
background: rgba(216,216,216,0.5); /*设置form表单透明度*/
text-align: center;
overflow: hidden;
}outline:none; /*outline (轮廓)是绘制于元素周围的一条线,位于边框边缘的外围,可起到突出元素的作用。*/ border:1px solid rgba(0,0,0,.49); /*输入框边框的大小,实线,rgba(red,green,blue,a为透明度),透明度处于0-1之间*/ -webkit-background-clip: padding-box; /*background-clip 规定背景的绘制区域,padding-box为内容被裁减到内边距框*/ background-clip: padding-box; background:rgba(216,216,216,0.4) ; border-radius:6px; /*对输入框进行圆角*/ padding:7px; /*输入框中光标位置*/
.form_login input[type="text"]:focus,input[type="password"]:focus{
    -webkit-transition:border linear .2s,-webkit-box-shadow linear .5s;     /*对边框颜色的逐步过渡高亮显示,后面是对阴影的逐步过渡*/
    border-color:rgba(255,128,0,.75);
}text-shadow:0px -1px 0px #5b6ddc; /*文字阴影设置*/ outline:none; border:1px solid rgba(0,0,0,0.49); /*按钮边框颜色与透明度设置*/ -webkit-background-clip: padding-box; /*规定内容的绘制区域,padding-box为内边框距*/ background-clip: padding-box; border-radius:6px; cursor:pointer; /*光标形状,pointer为一只手的形状*/ background-color:#768ee4; /*按钮背景颜色*/
.form_login input[type="submit"]:hover{
    background-color:#5f73e9;
    background-image:-webkit-linear-gradient(bottom,#5f73e9 0%,#859bef 100%);
    background-image:-moz-linear-gradient(bottom,#5f73e9 0%,#859bef 100%);
    background-image:-ms-linear-gradient(bottom,#5f73e9 0%,#859bef 100%);
    background-image:-o-linear-gradient(bottom,#5f73e9 0%,#859bef 100%);
    -webkit-box-shadow: inset 0px 1px 0px #aab9f4;      /*当鼠标放在按钮上个时边框的阴影*/
    box-shadow: inset 0px 1px 0px #aab9f4;
    margin-top:22px;
}
Utilisez CSS3 pour créer des effets spéciaux de mur de photos
HTML5 et CSS3
Réalisez l'effet de commutation de l'animation intelligente
Code HTML et CSS pour réaliser du texte pur et des boutons avec des icônes
Ce qui précède est le contenu détaillé de. pour plus d'informations, suivez d'autres articles connexes sur le site Web de PHP en chinois!