Cet article présente principalement les informations pertinentes sur le code de mise en œuvre du paiement par compte public WeChat du SDK PHP de paiement WeChat. Les amis dans le besoin peuvent s'y référer
Il est supposé que vous avez déjà demandé le paiement WeChat
1. Configuration de l'arrière-plan WeChat Comme le montre la figure

jsapi Lors d'une demande, le répertoire où se trouve jsapi.php est généralement le répertoire de test, et la liste blanche de test est le WeChat du développeur compte.
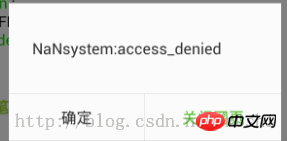
Le répertoire officiel des autorisations de paiement ne peut pas être le même que celui de test, sinon une erreur sera signalée. Le fait de ne pas remplir ou de remplir un mauvais répertoire d'autorisation et une liste blanche de test entraînera une erreur. Exemple de rapport d'erreur : NaNsystem:access_denied

2. Configurez le fichier lib/WxPay.Config.php
La configuration la plus importante est constituée des quatre éléments suivants :
const MCHID = '';
const
KEY = '';const APPSECRET = '';
APPID et APPSECRET peuvent tous deux être trouvé dans le backend WeChat.
MCHID peut être trouvé dans l'e-mail envoyé après la demande de paiement WeChat. KEY peut être configuré sur la plateforme marchande en fonction des invites de l'e-mail

3. Accédez au fichier index.php de départ
Accédez d'abord à index.php et vous pourrez voir l'interface
<ul> <li style="background-color:#FF7F24"><a href="<?php echo 'http://'.$_SERVER['HTTP_HOST'].$_SERVER['REQUEST_URI'].'example/jsapi.php';?>">JSAPI支付</a></li> <li style="background-color:#698B22"><a href="<?php echo 'http://'.$_SERVER['HTTP_HOST'].$_SERVER['REQUEST_URI'].'example/micropay.php';?>">刷卡支付</a></li> <li style="background-color:#8B6914"><a href="<?php echo 'http://'.$_SERVER['HTTP_HOST'].$_SERVER['REQUEST_URI'].'example/native.php';?>">扫码支付</a></li> <li style="background-color:#CDCD00"><a href="<?php echo 'http://'.$_SERVER['HTTP_HOST'].$_SERVER['REQUEST_URI'].'example/orderquery.php';?>">订单查询</a></li> <li style="background-color:#CD3278"><a href="<?php echo 'http://'.$_SERVER['HTTP_HOST'].$_SERVER['REQUEST_URI'].'example/refund.php';?>">订单退款</a></li> <li style="background-color:#848484"><a href="<?php echo 'http://'.$_SERVER['HTTP_HOST'].$_SERVER['REQUEST_URI'].'example/refundquery.php';?>">退款查询</a></li> <li style="background-color:#8EE5EE"><a href="<?php echo 'http://'.$_SERVER['HTTP_HOST'].$_SERVER['REQUEST_URI'].'example/download.php';?>">下载订单</a></li> </ul>
4. Paiement JSAPI
Analyse du code nécessaire :$logHandler= new CLogFileHandler("../logs/".date('Y-m-d').'.log');
$log = Log::Init($logHandler, 15);classe de journal peut imprimer les informations de débogage via $log->DEBUG('test');. En fait, vous pouvez également utiliser $Log::DEBUG('test'); directement pour déboguer
$tools = new JsApiPay();
$openId = $tools->GetOpenid();
fonctionDéfini dans le fichier WxPay.JsApiPay.php
public function GetOpenid()
 {
 //通过code获得openid
 if (!isset($_GET['code'])){
  //触发微信返回code码
  $baseUrl = urlencode('http://'.$_SERVER['HTTP_HOST'].$_SERVER['PHP_SELF'].$_SERVER['QUERY_STRING']);
  $url = $this->CreateOauthUrlForCode($baseUrl);
  Header("Location: $url");
  exit();
 } else {
  //获取code码,以获取openid
   $code = $_GET['code'];
  $openid = $this->getOpenidFromMp($code);
  return $openid;
 }
}interface d'autorisation Web de WeChat.
Après avoir obtenu l'Openid, vous pouvez appeler l'interface de commande unifiée de WeChat Pay. Revenez au fichier jsapi.php et le code suivant est$input = new WxPayUnifiedOrder();
$input->SetBody("test");
$input->SetAttach("test");
$input->SetOut_trade_no(WxPayConfig::MCHID.date("YmdHis"));
$input->SetTotal_fee("1");
$input->SetTime_start(date("YmdHis"));
$input->SetTime_expire(date("YmdHis", time() + 600));
$input->SetGoods_tag("test");
$input->SetNotify_url("http://paysdk.weixin.qq.com/example/notify.php");
$input->SetTrade_type("JSAPI");
$input->SetOpenid($openId);
$order = WxPayApi::unifiedOrder($input);
echo '<font color="#f00"><b>统一下单支付单信息</b></font><br/>';
printf_info($order);
$jsApiParameters = $tools->GetJsApiParameters($order);$input->SetAttach("test");$input->SetNotify_url(http://paysdk.weixin.qq.com/example/notify.php);
$input->SetNotify_url(dirname('http://'.$_SERVER['HTTP_HOST'].$_SERVER['REQUEST_URI']).'/notify.php');
当然你也可以选择直接写死。
其中的函数 unifiedOrder($input) 可以到WxPay.Api.php 中文件跟踪,其实就是调用统一下单接口。
在 WxPay.Api.php 中需要更改的一处代码是:
//异步通知url未设置,则使用配置文件中的url
    if(!$inputObj->IsNotify_urlSet()){
      $inputObj->SetNotify_url(WxPayConfig::NOTIFY_URL);//异步通知url
}就是当没设置 notifyUrl 的时候回去配置文件中找,但是配置文件中根本没有设置。
所以你可以选择在 配置文件WxPay.Config.php 中加上这个配置,也可以直接写一个默认的notify链接。
函数 GetJsApiParameters() 是获取jsApi支付的参数给变量 $jsApiParameters 方便在下面的Js中调用
jsapi.php 中js的代码:
function jsApiCall()
{
WeixinJSBridge.invoke(
'getBrandWCPayRequest',
<?php echo $jsApiParameters; ?>,
function(res){
WeixinJSBridge.log(res.err_msg);
alert(res.err_code+res.err_desc+res.err_msg);
}
);
}
function callpay()
{
if (typeof WeixinJSBridge == "undefined"){
if( document.addEventListener ){
document.addEventListener('WeixinJSBridgeReady', jsApiCall, false);
}else if (document.attachEvent){
document.attachEvent('WeixinJSBridgeReady', jsApiCall);
document.attachEvent('onWeixinJSBridgeReady', jsApiCall);
}
}else{
jsApiCall();
}
}其中点击立即支付按钮调用的就是 callpay() 函数,他有会调用jsApiCall() 函数打开支付程序。
此后输入密码完成支付。
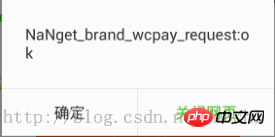
在完成支付页面点击完成会回到这个支付页面,并弹出 支付成功的提示框

这个其实就是 js函数 jsApiCall 里面的alter 弹出的对话框
其中 res.err_msg 为get_brand_wcpay_request:ok 表明前端判断的支付成功,我们可以根据这个将支付跳转到成功页面。
但是这个并不可信。确认是否支付成功还是应当 通过notify.php 处理业务逻辑。
5. 支付结果通知 notify.php
其实这个页面最主要的代码就两行
$notify = new PayNotifyCallBack();
$notify->Handle(false);
其中大部分逻辑在 Handle 函数中处理 文件 WxPay.Notify.php
final public function Handle($needSign = true)
 {
 $msg = "OK";
 //当返回false的时候,表示notify中调用NotifyCallBack回调失败获取签名校验失败,此时直接回复失败
 $result = WxpayApi::notify(array($this, 'NotifyCallBack'), $msg);
 if($result == false){
  $this->SetReturn_code("FAIL");
  $this->SetReturn_msg($msg);
  $this->ReplyNotify(false);
  return;
 } else {
  //该分支在成功回调到NotifyCallBack方法,处理完成之后流程
  $this->SetReturn_code("SUCCESS");
  $this->SetReturn_msg("OK");
 }
 $this->ReplyNotify($needSign);
}主要代码:
$result = WxpayApi::notify(array($this, 'NotifyCallBack'), $msg);
跟踪函数 notify 文件WxPay.Api.php
public static function notify($callback, &$msg)
 {
 //获取通知的数据
 $xml = $GLOBALS['HTTP_RAW_POST_DATA'];
 //如果返回成功则验证签名
 try {
  $result = WxPayResults::Init($xml);
 } catch (WxPayException $e){
  $msg = $e->errorMessage();
  return false;
 }

 return call_user_func($callback, $result);
}通过 $GLOBALS[‘HTTP_RAW_POST_DATA‘]; 获取同志数据 然后 Init 函数验证签名等。验签成功运行代码
return call_user_func($callback, $result);
即调用了一个回调函数,NotifyCallBack() 函数并传递参数 $result 在NotifyCallBack函数中会调用我们重写的NotifyProcess()函数(此函数在notify.php 中被重写)
NotifyProcess() 判断也没有问题就会 设置返回 success的xml信息
$this->SetReturn_code("SUCCESS");
$this->SetReturn_msg("OK");并最终调用函数 $this->ReplyNotify($needSign); echo success的结果
函数ReplyNotify 需要修改一处代码:
final private function ReplyNotify($needSign = true)
 {
 //如果需要签名
 if($needSign == true &&
  $this->GetReturn_code($return_code) == "SUCCESS")
 {
  $this->SetSign();
 }
 WxpayApi::replyNotify($this->ToXml());
 }

$this->GetReturn_code($return_code) == "SUCCESS")改为
$this->GetReturn_code() == "SUCCESS")
即可。
这样整个流程就结束了。上面提到了 传递订单参数
$input->SetAttach("test");如果我设置 值为 test this is attach (其实只要有空格就会存在bug)
如图 传递的订单信息

可以看到 attach 信息正常,当然支付也是正常的没有任何问题。
但是发现总是会收到notify 通知,即意味着没有返回给微信服务器正确的结果通知。
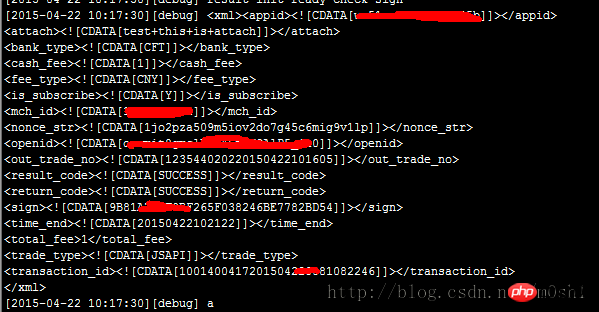
打印服务器发来的通知数据

可以看到 attach 是 test+this+is+attach 即空格被转化为加号
打印接收到的签名和程序算出来的签名发现 签名不同,即认为接收结果异常。
所以我们要是想使用attach 这个值就不能有空格,要么干脆不使用这个参数
(等待微信修复这个bug, 也可能是我这边有哪个地方不会? - -#)
这样 微信支付的 JsApi支付就大致分析完成了。
Ce qui précède est le contenu détaillé de. pour plus d'informations, suivez d'autres articles connexes sur le site Web de PHP en chinois!
 tutoriel CSS3
 instruction de sortie Java
 Supprimer l'historique de recherche
 Comment résoudre les problèmes lors de l'analyse des packages
 gestionnaire de démarrage de Windows
 Comment ouvrir le fichier gff
 qu'est-ce qu'Internet.exe
 Comment récupérer des fichiers complètement supprimés sur un ordinateur