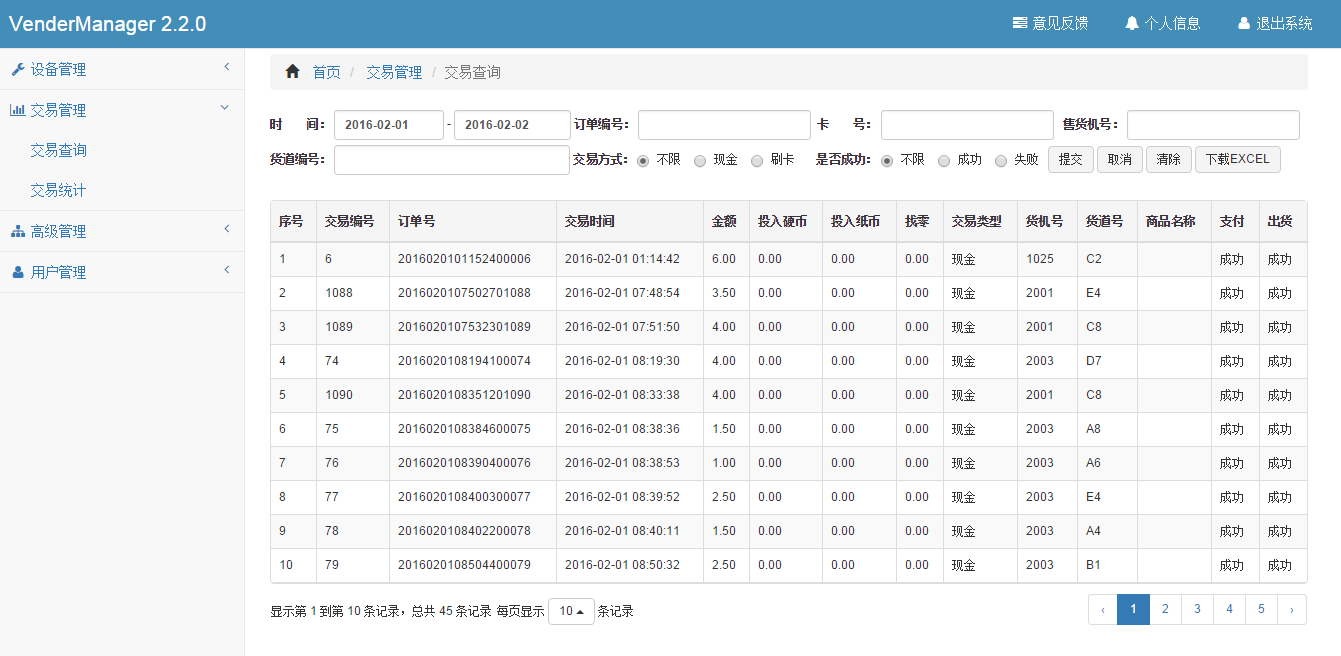
Récemment, des clients ont émis des demandes et souhaitent optimiser le système de gestion d'origine afin qu'il puisse être bien affiché sur les téléphones mobiles. Deux solutions me viennent à l'esprit :
Planifiez a : conservez la page d'origine et concevez un nouvel ensemble de pages adaptées aux téléphones mobiles. Lorsque vous y accédez par téléphone mobile, entrez m.zhy.com (page mobile). Lorsque vous y accédez par un appareil PC, entrez www.zhy. com (page PC)
Plan b : utiliser le framework bootstrap pour remplacer la page d'origine et s'adapter automatiquement aux téléphones mobiles, tablettes et appareils PC
Si vous adoptez l'option a, vous devez concevoir une interface et réécrire l'interface adaptée à la page. Compte tenu des problèmes de temps et de coût, le projet adopte l'option b
.1. Affichage des effets

2. Brève introduction à la table BootStrap
bootStrap table est un plug-in de table léger qui utilise AJAX pour obtenir des données au format JSON. Sa pagination et son remplissage de données sont très pratiques et prennent en charge l'internationalisation
.
3. Comment utiliser
1. Présentez js et css
<!--css样式-->
<link href="css/bootstrap/bootstrap.min.css" rel="stylesheet">
<link href="css/bootstrap/bootstrap-table.css" rel="stylesheet">
<!--js-->
<script src="js/bootstrap/jquery-1.12.0.min.js" type="text/javascript"></script>
<script src="js/bootstrap/bootstrap.min.js"></script>
<script src="js/bootstrap/bootstrap-table.js"></script>
<script src="js/bootstrap/bootstrap-table-zh-CN.js"></script>
2. Remplissage des données du tableau
Il existe deux façons pour la table bootStrap d'obtenir des données. L'une consiste à spécifier la source de données via l'attribut data-url de la table, et l'autre consiste à obtenir les données en spécifiant l'URL lors de l'initialisation de la table via JavaScript
<table data-toggle="table">
  <thead>
    ...
  </thead>
</table>
 ...
$('#table').bootstrapTable({
     url: 'data.json'
 });
La deuxième méthode est plus flexible que la première méthode lors du traitement de données complexes. Généralement, la deuxième méthode est utilisée pour remplir les données d'un tableau.
$(function () {

    //1.初始化Table
    var oTable = new TableInit();
    oTable.Init();

    //2.初始化Button的点击事件
    /* var oButtonInit = new ButtonInit();
    oButtonInit.Init(); */

  });


  var TableInit = function () {
    var oTableInit = new Object();
    //初始化Table
    oTableInit.Init = function () {
      $('#tradeList').bootstrapTable({
        url: '/VenderManager/TradeList',     //请求后台的URL(*)
        method: 'post',           //请求方式(*)
        toolbar: '#toolbar',        //工具按钮用哪个容器
        striped: true,           //是否显示行间隔色
        cache: false,            //是否使用缓存,默认为true,所以一般情况下需要设置一下这个属性(*)
        pagination: true,          //是否显示分页(*)
        sortable: false,           //是否启用排序
        sortOrder: "asc",          //排序方式
        queryParams: oTableInit.queryParams,//传递参数(*)
        sidePagination: "server",      //分页方式:client客户端分页,server服务端分页(*)
        pageNumber:1,            //初始化加载第一页,默认第一页
        pageSize: 50,            //每页的记录行数(*)
        pageList: [10, 25, 50, 100],    //可供选择的每页的行数(*)
        strictSearch: true,
        clickToSelect: true,        //是否启用点击选中行
        height: 460,            //行高,如果没有设置height属性,表格自动根据记录条数觉得表格高度
        uniqueId: "id",           //每一行的唯一标识,一般为主键列
        cardView: false,          //是否显示详细视图
        detailView: false,          //是否显示父子表
        columns: [{
          field: 'id',
          title: '序号'
        }, {
          field: 'liushuiid',
          title: '交易编号'
        }, {
          field: 'orderid',
          title: '订单号'
        }, {
          field: 'receivetime',
          title: '交易时间'
        }, {
          field: 'price',
          title: '金额'
        }, {
          field: 'coin_credit',
          title: '投入硬币'
        }, {
          field: 'bill_credit',
          title: '投入纸币'
        }, {
          field: 'changes',
          title: '找零'
        }, {
          field: 'tradetype',
          title: '交易类型'
        },{
          field: 'goodmachineid',
          title: '货机号'
        },{
          field: 'inneridname',
          title: '货道号'
        },{
          field: 'goodsName',
          title: '商品名称'
        }, {
          field: 'changestatus',
          title: '支付'
        },{
          field: 'sendstatus',
          title: '出货'
        },]
      });
    };

    //得到查询的参数
   oTableInit.queryParams = function (params) {
      var temp = {  //这里的键的名字和控制器的变量名必须一直,这边改动,控制器也需要改成一样的
        limit: params.limit,  //页面大小
        offset: params.offset, //页码
        sdate: $("#stratTime").val(),
        edate: $("#endTime").val(),
        sellerid: $("#sellerid").val(),
        orderid: $("#orderid").val(),
        CardNumber: $("#CardNumber").val(),
        maxrows: params.limit,
        pageindex:params.pageNumber,
        portid: $("#portid").val(),
        CardNumber: $("#CardNumber").val(),
        tradetype:$('input:radio[name="tradetype"]:checked').val(),
        success:$('input:radio[name="success"]:checked').val(),
      };
      return temp;
    };
    return oTableInit;
  };
Le champ field doit correspondre au champ renvoyé par le serveur pour afficher les données.
3. Obtenir des données en arrière-plan
a. la servlet obtient des données
BufferedReader bufr = new BufferedReader(
  new InputStreamReader(request.getInputStream(),"UTF-8"));
  StringBuilder sBuilder = new StringBuilder("");
  String temp = "";
  while((temp = bufr.readLine()) != null){
      sBuilder.append(temp);
   }
  bufr.close();
  String json = sBuilder.toString();
  JSONObject json1 = JSONObject.fromObject(json);
  String sdate= json1.getString("sdate");//通过此方法获取前端数据
    ...
b. La méthode correspondante dans springMvc Controller obtient des données
public JsonResult GetDepartment(int limit, int offset, string orderId, string SellerId,PortId,CardNumber,Success,maxrows,tradetype)
{
 ...
}
4. Pagination (la plus problématique)
Lors de l'utilisation de la pagination, les données renvoyées par le serveur doivent inclure les lignes et le total. Le code est le suivant :
.
...<br>gblst = SqlADO.getTradeList(sql,pageindex,maxrows);
JSONArray jsonData=new JSONArray();
JSONObject jo=null;
for (int i=0,len=gblst.size();i<len;i++)
{
TradeBean tb = gblst.get(i);
if(tb==null)
{
continue;
}
jo=new JSONObject();
jo.put("id", i+1);
jo.put("liushuiid", tb.getLiushuiid());
jo.put("price", String.format("%1.2f",tb.getPrice()/100.0));
jo.put("mobilephone", tb.getMobilephone());
jo.put("receivetime", ToolBox.getYMDHMS(tb.getReceivetime()));
jo.put("tradetype", clsConst.TRADE_TYPE_DES[tb.getTradetype()]);
jo.put("changestatus", (tb.getChangestatus()!=0)?"成功":"失败");
jo.put("sendstatus", (tb.getSendstatus()!=0)?"成功":"失败");
jo.put("bill_credit", String.format("%1.2f",tb.getBill_credit()/100.0));
jo.put("changes",String.format("%1.2f",tb.getChanges()/100.0));
jo.put("goodroadid", tb.getGoodroadid());
jo.put("SmsContent", tb.getSmsContent());
jo.put("orderid", tb.getOrderid());
jo.put("goodsName", tb.getGoodsName());
jo.put("inneridname", tb.getInneridname());
jo.put("xmlstr", tb.getXmlstr());
jsonData.add(jo);
}
int TotalCount=SqlADO.getTradeRowsCount(sql);
JSONObject jsonObject=new JSONObject();
jsonObject.put("rows", jsonData);//JSONArray
jsonObject.put("total",TotalCount);//总记录数
out.print(jsonObject.toString()); <br>...
5. Introduction au contenu de l'interface de pagination

Le front-end récupère les données de pagination, le code est le suivant :
...<br>oTableInit.queryParams = function (params) {
      var temp = {  //这里的键的名字和控制器的变量名必须一直,这边改动,控制器也需要改成一样的
        limit: params.limit,  //第几条记录
        offset: params.offset, //显示一页多少记录
        sdate: $("#stratTime").val(),

      };
      return temp;
    };<br>...
Le backend récupère les données de pagination, le code est le suivant :
...<br>int pageindex=0;
int offset = ToolBox.filterInt(json1.getString("offset"));
int limit = ToolBox.filterInt(json1.getString("limit"));
if(offset !=0){
  pageindex = offset/limit;
}
pageindex+= 1;//第几页<br>...Ce qui précède explique comment utiliser Bootstrap Table partagé avec vous. J'espère qu'il sera utile à tout le monde de maîtriser l'utilisation de Bootstrap Table.
 Comment télécharger Binance
 La différence entre Win7 32 bits et 64 bits
 Comment utiliser la porte dérobée Shift
 Quels sont les espaces sans inscription en Chine ?
 vlookup correspond à deux colonnes de données
 Solution à l'échec de la connexion entre wsus et le serveur Microsoft
 Quels sont les formats vidéo
 caisse d'armurerie