Home > Web Front-end > PS Tutorial > body text

Photoshop渲染滤镜制作半流体特效

PHP中文网
Release: 2017-03-21 09:23:07
Original
1617 people have browsed it

我们在《Photoshop滤镜制作简单的云彩特效》中详细剖析了渲染类滤镜做特效的方法,今天我们来介绍具体的实例——半流体特效。   1、Photoshop中新建图像,用默认颜色执行【滤镜_渲染_分层云彩】,并按〖CTRL_F〗重复若干次,效果如下图。
  
  2、执行【滤镜_艺术效果_干画笔】,设定如下左图。然后执行【滤镜_扭曲_极坐标】。
  
  设定如下图。
  Photoshop渲染滤镜制作半流体特效jb51.net
  按〖CTRL_F〗重复执行极坐标滤镜三四次,效果如下图。
  
  3、使用【滤镜_扭曲_波浪】,设定如下图。
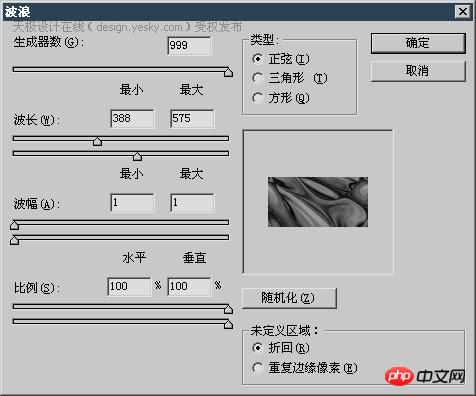
  
  效果如下图。
  
  4、建立色彩调整蹭或直接〖CTRL_U〗执行色相饱和度调整,设定如下图。
  Photoshop渲染滤镜制作半流体特效jb51.net
  完成效果如下图。
  

source:php.cn
Statement of this Website
The content of this article is voluntarily contributed by netizens, and the copyright belongs to the original author. This site does not assume corresponding legal responsibility. If you find any content suspected of plagiarism or infringement, please contact admin@php.cn
Popular Tutorials
More>
Latest Downloads
More>
Web Effects
Website Source Code
Website Materials
Front End Template
About us Disclaimer Sitemap
php.cn:Public welfare online PHP training,Help PHP learners grow quickly!