

 Software Tutorial
Computer Software
How to draw cool lion illustrations with AI - Tutorial on drawing cool lion illustrations with AI in street style
Software Tutorial
Computer Software
How to draw cool lion illustrations with AI - Tutorial on drawing cool lion illustrations with AI in street style
How to draw cool lion illustrations with AI - Tutorial on drawing cool lion illustrations with AI in street style

Do you want to know how to use AI to create stunning street style cool lion illustrations? Our php editor Zimo has prepared a detailed tutorial for you that will show you step by step how to create this eye-catching illustration using Adobe Illustrator. Come and follow our guide and embark on this artistic journey to make your paintings shine in the street art world!
First of all, let’s find a photo of a lion on the Internet that is more appealing, and then we use the brush tool in AI to draw the appearance.
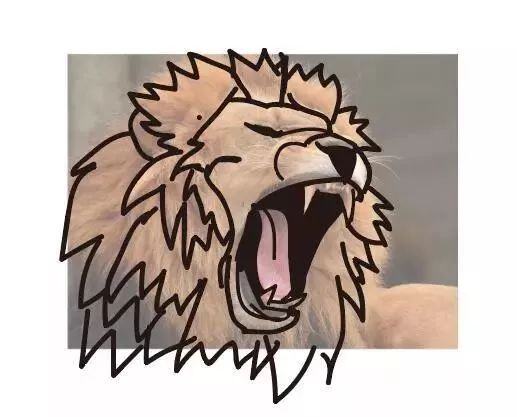
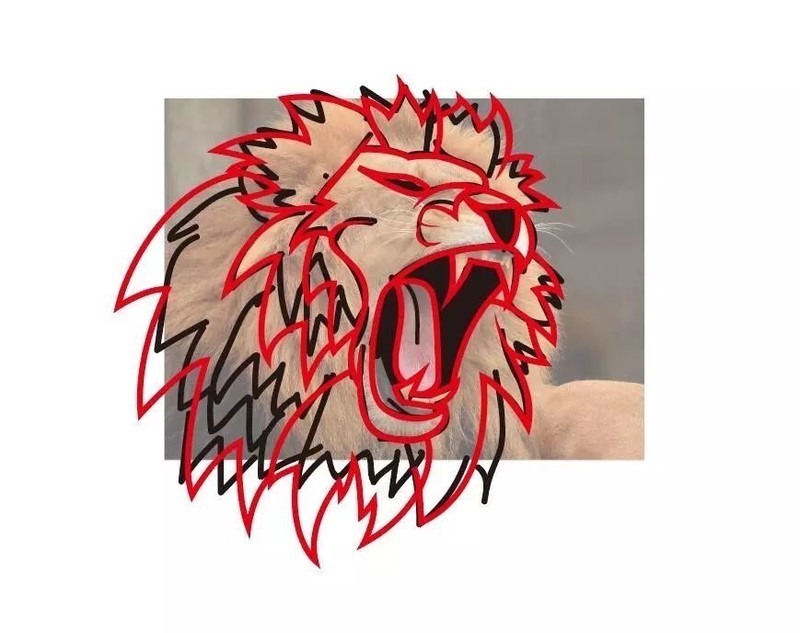
Use the pen tool to carefully outline the shape of the lion, paying attention to closing the path when expanding.

After the pen outlines the shape, we can see that the hair part is too dense and complicated, so we need to simplify the complicated part.
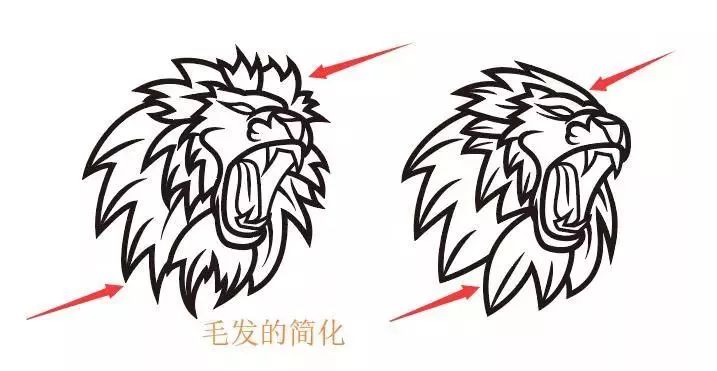
Comparing the before and after, it can be seen that it is simpler than before, which enhances the tension of the lion and makes people more impressive.

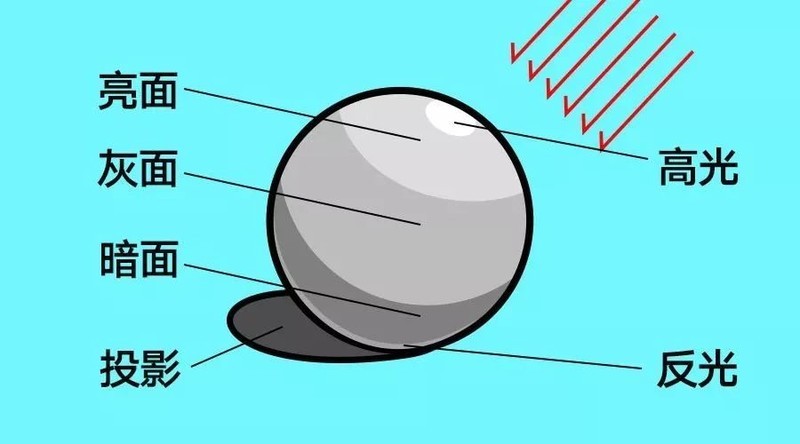
After the line draft is determined, we must consider the relationship between surfaces. In the previous tutorial, we learned some basics about light and shadow, let us get familiar with the relationship between light and shadow. (Take a ball as an example) Let's assume that the light comes from the upper right, so where should we add shadows and where should we add highlights?
Here we use a ball to represent it, and use a few simple color blocks to represent the light and shadow relationship of the ball.

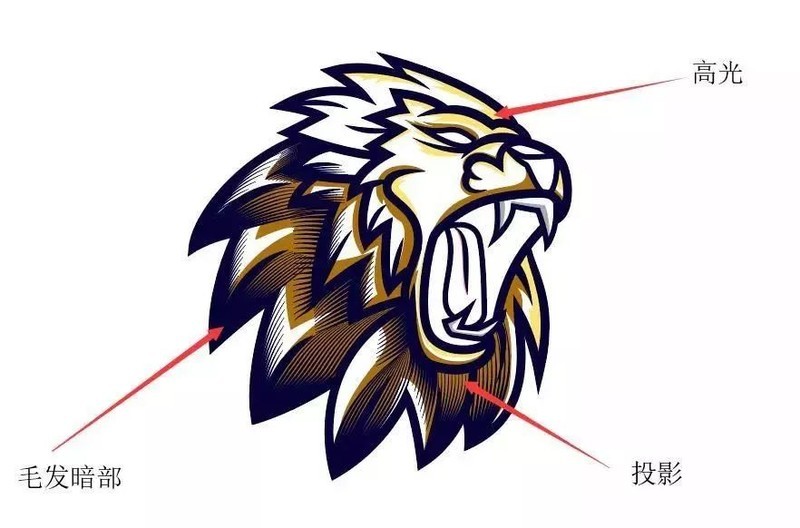
The relationship between light and shadow in the picture is as follows. There are three sides of light, gray and dark respectively, as well as highlight, reflection and projection. These six are the six major relationships of this type of illustration. It can also be called the castrated version of the three major noodles and five major tunes.
The complete three major faces and five major tones also include the intersection of light and dark and the middle tone, but these are rarely used in this type of illustrations. Those who are interested can find out for themselves.

In this type of illustration, the dark side and shadow can be directly replaced with the black of line drawing to form another style.

After understanding these art basics, we can draw the light and shadow relationship based on the coloring draft.
Many students may want to know how to make the hair in this part. In fact, it is to use the blending tool
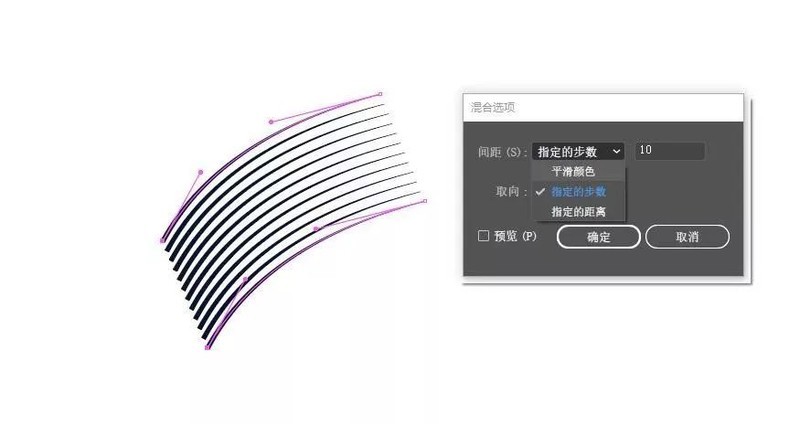
Use the pen tool to draw two Lines, and then select the shortcut key Ctrl Alt b to draw many lines
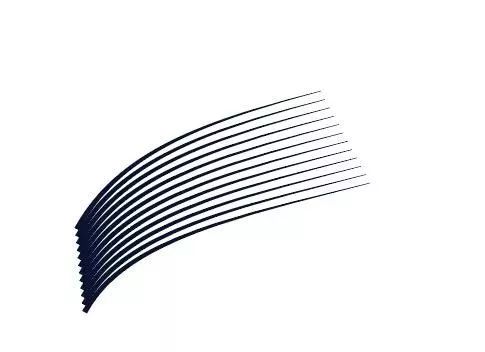
Finally, we use the direct selection tool to adjust the density of the hair and improve the texture of the hair.

Okay, we can see that after analyzing the front and rear occlusion relationship of the lion's hair and then drawing projection and highlights, our illustration style logo is more three-dimensional and no longer thin.

Finally, choose the matching font and make final adjustments. Then an illustration-style logo is completed.

The above is the detailed content of How to draw cool lion illustrations with AI - Tutorial on drawing cool lion illustrations with AI in street style. For more information, please follow other related articles on the PHP Chinese website!

Hot AI Tools

Undress AI Tool
Undress images for free

Undresser.AI Undress
AI-powered app for creating realistic nude photos

AI Clothes Remover
Online AI tool for removing clothes from photos.

Clothoff.io
AI clothes remover

Video Face Swap
Swap faces in any video effortlessly with our completely free AI face swap tool!

Hot Article
Hot Tools

Notepad++7.3.1
Easy-to-use and free code editor

SublimeText3 Chinese version
Chinese version, very easy to use

Zend Studio 13.0.1
Powerful PHP integrated development environment

Dreamweaver CS6
Visual web development tools

SublimeText3 Mac version
God-level code editing software (SublimeText3)


 Remote Desktop your credentials did not work
Jul 15, 2025 am 12:57 AM
Remote Desktop your credentials did not work
Jul 15, 2025 am 12:57 AM
When encountering the "RemoteDesktopyourcredentialsdidnotwork" problem, first confirm whether the correct username and password have been entered, including checking whether the case, keyboard layout and special characters are entered correctly, and it is recommended to try to log in locally to verify the credentials; secondly, confirm whether the account has remote login permissions, you can view and add allowed users through the remote option in the system properties; thirdly, if network-level authentication (NLA) is enabled, some clients may not be able to authenticate normally, you can try to uncheck "Always require network-level authentication" on the client or turn off the NLA option on the target computer; finally, check whether there are group policy or other security settings restrictions, such as company domain
 Why does Adobe Acrobat keep asking me to sign in?
Jul 20, 2025 am 12:05 AM
Why does Adobe Acrobat keep asking me to sign in?
Jul 20, 2025 am 12:05 AM
The reasons why Adobe Acrobat frequently require login include synchronous settings, cloud storage or verification of licenses. Solutions include: 1. Use the "Remember Me" option; 2. Avoid using cloud features; 3. Stay online regularly; 4. Try old versions or third-party readers. To manage cloud services and authorization, Adobe will continuously verify the account when using related functions. After understanding the trigger mechanism, it can adjust the workflow to reduce interference.
 AutoCAD for Mac vs Windows
Jul 14, 2025 am 01:32 AM
AutoCAD for Mac vs Windows
Jul 14, 2025 am 01:32 AM
AutoCAD is not as experienced as Windows on Mac. First of all, Windows is more comprehensive in function support, and dynamic blocks, advanced rendering and other functions are more complete, while the Mac version is only suitable for basic drawing; secondly, the interface and operation habits are different, and the shortcut keys, mouse logic and menu layout are all different, which affects the smoothness of use; thirdly, although file compatibility is good, there may be details such as fonts and plug-ins loss during collaboration. Therefore, Windows is recommended for complex designs, while Macs are suitable for auxiliary or lightweight use.
 How to enable Remote Desktop on Windows 11?
Jul 16, 2025 am 12:53 AM
How to enable Remote Desktop on Windows 11?
Jul 16, 2025 am 12:53 AM
To enable the remote desktop function of Windows 11, the system version, network environment and firewall settings must be met; the steps are: 1. Right-click "This computer" → "Properties" → "Remote Settings"; 2. Check "Allow remote connection to this computer" in the "Remote" tab; 3. If you want to allow old clients to connect, uncheck "Only allow computers that use network-level authentication"; 4. Add users who allow remote login; at the same time, you must ensure that the TCP3389 port is open and the firewall rules are enabled, and configure router port mapping and fixed LAN IP addresses when connecting to the public network.
 How to cancel an Adobe Acrobat subscription?
Jul 15, 2025 am 12:46 AM
How to cancel an Adobe Acrobat subscription?
Jul 15, 2025 am 12:46 AM
To cancel Adobe Acrobat subscription, you must use the official account page and pay attention to subsequent impacts. 1. Log in to your Adobe account, confirm your email or third-party account; 2. Enter "Plan and Bill" and click Cancel and select the reason; 3. Subscription will be terminated after the end of the current billing cycle; 4. Files and cloud storage will be retained for about 90 days, and will be automatically deactivated after the trial period is cancelled; 5. If you purchase through a third-party platform, you must cancel it on the corresponding platform.
 How to use actions in Photoshop
Jul 14, 2025 am 12:59 AM
How to use actions in Photoshop
Jul 14, 2025 am 12:59 AM
Photoshop's Actions is a tool for automating repetitive operations, and can be executed in one click through recording and editing steps. It can record processes such as color tuning, cropping, and watermarking, and supports batch processing and cross-device sharing. When using it, you need to create actions and record steps first, and then you can click Play to complete the operation automatically. Common problems include some operations that cannot be recorded, and differences in file structure affect the effect. The export action can be shared or backed up through .atn files. 1. Open the action panel and create a new action; 2. Click the record and execute the editing steps; 3. Stop recording and play it for use; 4. Use the "Batch" function to batch process files; 5. You can modify, delete or adjust the action steps; 6. The action can be exported as .atn files for easy sharing.
 What is Generative Fill in Photoshop
Jul 15, 2025 am 12:53 AM
What is Generative Fill in Photoshop
Jul 15, 2025 am 12:53 AM
GenerativeFillinPhotoshop is an AI function based on AdobeFirefly. 1. It helps users add, expand or delete image content through text prompts; 2. When using it, you need to select an area first, then enter descriptive text and click to generate; 3. It is often used to remove objects, expand backgrounds, add elements or create surreal art; 4. The more specific the prompts, the more ideal the result; 5. It is necessary to combine high-quality pictures with other tools to optimize the effect; 6. However, there are restrictions such as inability to perfectly match complex details, inconsistent light and shadow, and the need to use it online.
 How to use the pen tool to make a selection in Photoshop
Jul 15, 2025 am 12:57 AM
How to use the pen tool to make a selection in Photoshop
Jul 15, 2025 am 12:57 AM
The key to using the pen tool to select areas is to master anchor point control and path closure. 1. The anchor points should be precise, and complex edges need to be laid out multiple anchor points to fit the outline; 2. After the path must be closed, right-click to select "Create Selection", and set the feather value of 0.5~1 pixel to improve the naturalness of the edge; 3. You can save and modify the path multiple times through the "Path" mode, or use the "Shape" mode to directly generate the selection; 4. Zoom in the picture to depict the edges carefully to avoid distortion caused by too few or too many anchor points; 5. The pen selection is more refined and controllable than magic wands and quick selection, and is more efficient after proficiency.
