


How to create a shared homegroup in Win11

Some friends want to create a shared homegroup in Win11 system, but they don’t know how to create a shared homegroup in Win11. Next, the editor will give you a detailed introduction to the tutorial on creating a shared homegroup in Win11. Happy friends in need. Come and take a look with the editor to find out more.
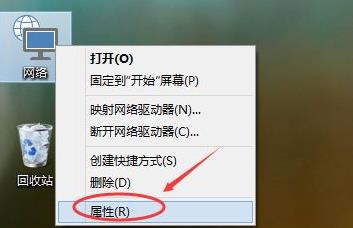
1. Right-click the "Network" icon on the desktop and select "Properties" in the menu option to open it.
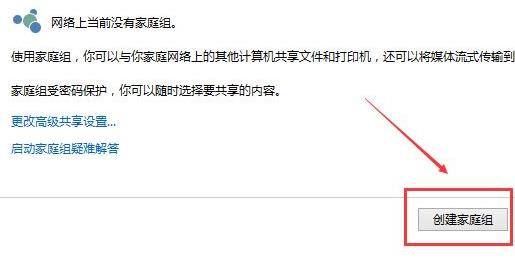
2. Click the "Homegroup" option in the lower left corner of the new interface that opens.

3. Then click the "Create Homegroup" button in the lower right corner.
4. Click Next to create.

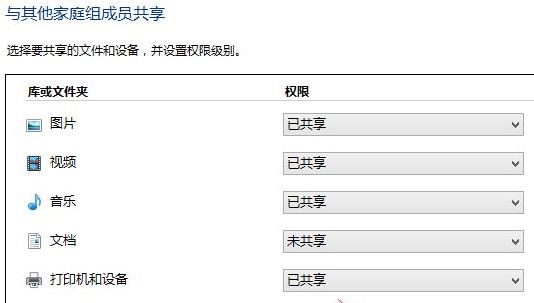
5. Then select the appropriate permissions for other family group members and click Next.
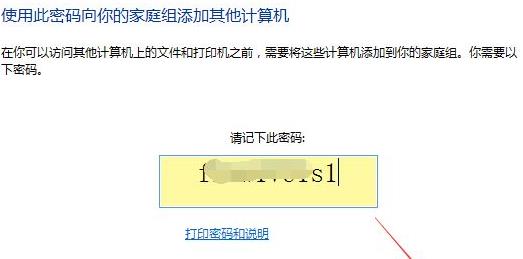
6. Just choose to exit after creating.
The above is the detailed content of How to create a shared homegroup in Win11. For more information, please follow other related articles on the PHP Chinese website!

Hot AI Tools

Undress AI Tool
Undress images for free

Undresser.AI Undress
AI-powered app for creating realistic nude photos

AI Clothes Remover
Online AI tool for removing clothes from photos.

Clothoff.io
AI clothes remover

Video Face Swap
Swap faces in any video effortlessly with our completely free AI face swap tool!

Hot Article
Hot Tools

Notepad++7.3.1
Easy-to-use and free code editor

SublimeText3 Chinese version
Chinese version, very easy to use

Zend Studio 13.0.1
Powerful PHP integrated development environment

Dreamweaver CS6
Visual web development tools

SublimeText3 Mac version
God-level code editing software (SublimeText3)


 How to fix the black screen issue in Google Chrome?
Aug 06, 2025 pm 12:22 PM
How to fix the black screen issue in Google Chrome?
Aug 06, 2025 pm 12:22 PM
DisablehardwareaccelerationbygoingtoChromeSettings→Systemandtogglingoff"Usehardwareaccelerationwhenavailable",thenrelaunchChrome.2.UpdategraphicsdriversviaDeviceManageronWindowsorSystemSettingsonmacOS,ordownloadthelatestversionfromthemanufa
 edge pdf viewer not working
Aug 07, 2025 pm 04:36 PM
edge pdf viewer not working
Aug 07, 2025 pm 04:36 PM
TestthePDFinanotherapptodetermineiftheissueiswiththefileorEdge.2.Enablethebuilt-inPDFviewerbyturningoff"AlwaysopenPDFfilesexternally"and"DownloadPDFfiles"inEdgesettings.3.Clearbrowsingdataincludingcookiesandcachedfilestoresolveren
 how to fix win 10 blue screen 'irql_gt_zero_at_system_service'
Aug 13, 2025 pm 05:03 PM
how to fix win 10 blue screen 'irql_gt_zero_at_system_service'
Aug 13, 2025 pm 05:03 PM
First update or rollback the driver, 1. Enter safe mode; 2. Update or roll back the graphics card, storage and other drivers; 3. Run Windows memory diagnostic tools to detect RAM; 4. Use sfc/scannow and DISM to repair system files; 5. Uninstall recent software or system updates; 6. Run chkdsk to check disk errors; 7. Use BlueScreenView to analyze dump file and locate faulty drivers; 8. Finally, you can try to reset Windows retained files, and the problem can usually be solved.
 Volume keys on keyboard not working
Aug 05, 2025 pm 01:54 PM
Volume keys on keyboard not working
Aug 05, 2025 pm 01:54 PM
First,checkiftheFnkeysettingisinterferingbytryingboththevolumekeyaloneandFn volumekey,thentoggleFnLockwithFn Escifavailable.2.EnterBIOS/UEFIduringbootandenablefunctionkeysordisableHotkeyModetoensurevolumekeysarerecognized.3.Updateorreinstallaudiodriv
 How to solve touchpad not working issues on Windows?
Aug 05, 2025 am 09:21 AM
How to solve touchpad not working issues on Windows?
Aug 05, 2025 am 09:21 AM
Checkifthetouchpadisdisabledbyusingthefunctionkey(Fn F6/F9/F12),adedicatedtogglebutton,orensuringit’sturnedoninSettings>Devices>Touchpad,andunplugexternalmice.2.UpdateorreinstallthetouchpaddriverviaDeviceManagerbyselectingUpdatedriverorUninstal
 How to solve the problem of 404 online
Aug 12, 2025 pm 09:21 PM
How to solve the problem of 404 online
Aug 12, 2025 pm 09:21 PM
How to solve the Internet 404 error: Check whether the URL is correct. Refresh the page. Clear browser cache: Chrome: three dots in the upper right corner > More tools > Clear browsing data > Check "Cached pictures and files" > Clear data Firefox: Three horizontal lines in the upper right corner > Options > Privacy and Security > Clear history > Check "Cache" > Confirm Safari: dish
 Why can't you access the Internet when connecting to a wireless network? Check these 4 common reasons
Aug 12, 2025 pm 08:57 PM
Why can't you access the Internet when connecting to a wireless network? Check these 4 common reasons
Aug 12, 2025 pm 08:57 PM
Wireless network displays that it is connected but cannot access the Internet is a problem that many people often encounter when using electronic devices. Although the Wi-Fi signal is full, but the web page cannot be opened or video cannot be viewed. What is the problem? Don't worry, Driver will organize a complete set of troubleshooting and solutions for you today to help you quickly restore network connections. Let's learn about it together~1. A router or router that has abnormally running for a long time may have a performance degradation due to heat, cache accumulation or system failure; if Lightmaster loses communication with the operator's server, even if the device shows that it is connected to Wi-Fi, it will not be able to access the Internet. 1. Restart the network device: Unplug the router and the optical cat, wait for about 30 seconds before powering on and starting again, so that the device can re-establish the connection. 2. Check the settings
 What should I do if the application cannot start normally (0xc0000906)? See the solution here
Aug 13, 2025 pm 06:42 PM
What should I do if the application cannot start normally (0xc0000906)? See the solution here
Aug 13, 2025 pm 06:42 PM
When opening the software or game, a prompt suddenly appears that "the application cannot start normally (0xc0000906)" appears, and many users will be confused and don't know where to start. In fact, most of these errors are caused by corruption of system files or missing runtime libraries. Don't rush to reinstall the system. This article provides you with several simple and effective solutions to help you quickly restore the program to run. 1. What is the error of 0xc0000906? Error code 0xc0000906 is a common startup exception in Windows systems, which usually means that the program cannot load the necessary system components or running environment when running. This problem often occurs when running large software or games. The main reasons may include: the necessary runtime library is not installed or damaged. The software installation package is endless
