This article mainly introduces the relevant knowledge points of JavaScript reading and writing cookies through examples. Friends who are in need of this can refer to it.
First of all, let us briefly understand cookies.
In the process of making web pages, we often need to transfer information from one page to another. At this time, we need to use JavaScript The cookie mechanism in . Simply put, cookies provide a convenient way to save small amounts of data on the user's computer and obtain it remotely, allowing websites to save details such as the user's habit settings or the time of the last visit to the website. The cookie itself is a short piece of information that can be saved on the user's computer by the page and then read by other pages. Cookies are generally set to expire after a certain period of time.
Of course, cookies also have limitations: browsers have limits on the number of cookies that can be saved, usually a few hundred or more. Under normal circumstances, 20 cookies are allowed per domain name, and each domain can save up to 4KB of cookies. In addition to the problems that may be caused by size restrictions, there are also many reasons that may cause cookies on the hard disk to disappear, such as reaching the expiration date. Or the user cleared the cookie information, or switched to another browser. Therefore, cookies are not suitable for storing important data. When writing code, you must also consider how to handle cookie acquisition exceptions.
In JavaScript, use the cookie attribute of the document object to store and retrieve cookies. Usually, the information in document.cookie is a string consisting of pairs of names and values, and each pair of data is in the form :
name=value;
Below we will use a simple example to show how to read and write cookies in JavaScript.
The first is createCookie.html, in which a page will be created cookie, the complete code is as follows:
<html>
<head>
<title>createCookie</title>
<script>
function createCookie(){
//get name and password
var name = document.getElementById("name").value;
var pwd = document.getElementById("pwd").value;
//create cookie
document.cookie = name+'|'+pwd;
//go to showCookie.html page
window.location.href = "showCookie.html";
}
</script>
</head>
<body>
Userame: <input id="name" type="text" /><br><br>
Password: <input id="pwd" type="password" /><br><br>
<button onclick="createCookie()">Submit</submit>
</body>
</html>A screenshot of the page is as follows:

Click the submit button and a cookie will be created. The Username and Password information is saved in it, and it will jump to the showCookie.html page. Among them, the complete code of the showCookie.html page is as follows:
<html>
<head>
<title>showCookie</title>
<script>
function showCookie(){
//document.cookie is a string, using split() function to get cookie date in array form
var arr = document.cookie.split('|');
//processing data in cookie
var cookie_info = 'Data in cookie:<br>username is: '+arr[0]+"<br>password is: "+arr[1]+'<br>';
//set content of element of id "res"
document.getElementById("res").innerHTML = cookie_info;
}
</script>
</head>
<body>
<button onclick="showCookie()">Show Cookie</button>
<p id="res"></p>
</body>
</html>The screenshot of the page is as follows:
Clicking the show Cookie button will display the information in the cookie. .
Next, we will run this program locally and on the server, and run this program on IE browser and Chrome browser respectively to see the operation of cookies.
First we run this program locally, and we put the above two files in the E drive. First run it on the IE browser, enter the information on the createCookie.html page, and click the submit button. The screenshot is as follows:

After jumping to the showCookie.html page, click show Cookie button, the page screenshot is as follows:
Cookies run normally in the IE browser in the local environment.
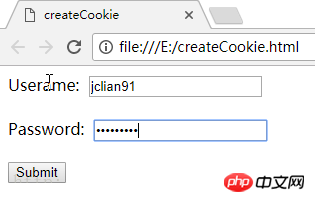
Next, let’s see how it works in the Chrome browser. First, open the createCookie.html page in the Chrome browser, enter the information, and click the submit button. The screenshot is as follows:

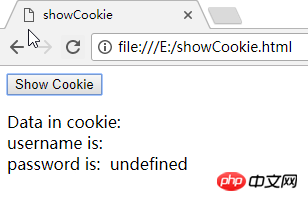
After jumping to the showCookie.html page, click the show Cookie button. The page screenshot is as follows:

Same procedure, this time the cookie is in Chrome It failed to run in the browser.
Then let us run this program in the server. We need to use xampp, open the Apache server, and place the above two html files in the htdocs folder under the xampp installation folder (the specific operation method can be Refer to this blog: Using AJAX with JavaScript (for beginners)). We now run the program in the IE browser, enter the URL in the IE browser: http://localhost/createCookie...:
Click the Submit button to jump Go to the showCookie.html page and click the show Cookie button. The screenshot is as follows:
Then we enter the URL in the Chrome browser: http://localhost/createCookie... :
Click the Submit button, jump to the showCookie.html page, and click the show Cookie button. The screenshot is as follows:
This time in the server environment, IE browser and Chrome browser cookies are working fine!
The above is the entire content of this chapter. For more related tutorials, please visit JavaScript Video Tutorial!


