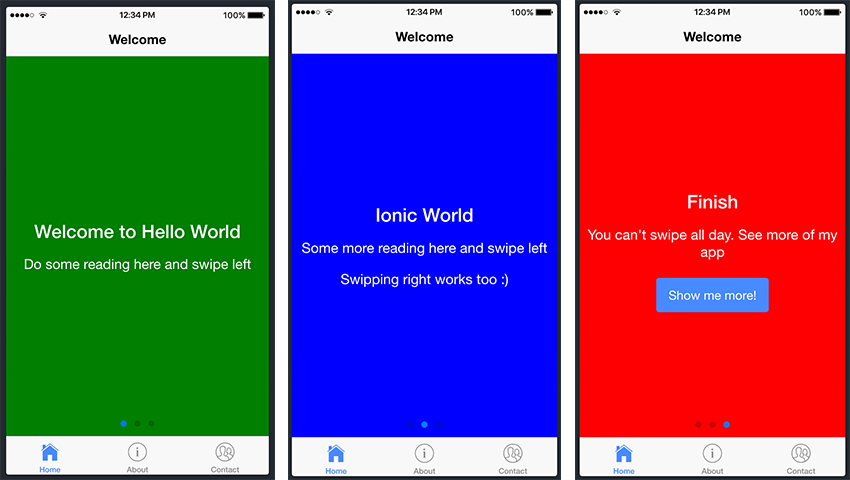
<button ion-button>Navigate to Info</button>

 <h2>Add components to your project<p>
<p> Now that we've gathered some information about Ionic components, let's try to put some of these "building blocks" together. Let's go ahead and add some components to our Ionic project.
<p>We will use the project we created in the previous tutorial, and since Homepage is the entry point to our app, we will add slides to Homepage. html file to add our slideshow. To do this, we will navigate to the home.html file in src/pages/home and make the following changes to the file:
<ion-header>
  <ion-navbar>
    <ion-title>Welcome</ion-title>
  </ion-navbar>
</ion-header>

<ion-content>
  <!-- Start Ionic Slides Component -->
  <ion-slides pager>

    <ion-slide style="background-color: green">
      <h2>Welcome to Hello World</h2>
      <p>Do some reading here and swipe left</p>
    </ion-slide>

    <ion-slide style="background-color: blue">
      <h2>Ionic World</h2>
      <p>Some more reading here and swipe left</p>
      <p>Swiping right works too :)</p>
    </ion-slide>

    <ion-slide style="background-color: red">
      <h2>Finish</h2>
      <p>You can't swipe all day. See more of my app</p>
      <button ion-button (click)="navigateToMyList()">Show me more!</button>
    </ion-slide>

  </ion-slides>
  <!-- End Ionic Slides Component -->
</ion-content>
<ion-slide>content here...</ion-slide>. You can generate as many slides as you like, but for the purposes of this example, we only created three.
<p>We will use another Ionic component: the list component. To do this, we go ahead and generate a new page titled My List. You should remember how to generate a new page from the previous tutorial using the following command: ionic generate page my-list.
<p>After adding the newly created page to the application, let's continue navigating to my-list.html and edit the file as follows:
<ion-header>

  <ion-navbar>
    <ion-title>My List</ion-title>
  </ion-navbar>

</ion-header>

<ion-content>
    <!-- Start Ionic List Component -->
    <ion-list>
      <ion-item>1</ion-item>
      <ion-item>2</ion-item>
      <ion-item>3</ion-item>
    </ion-list>
    <!-- End Ionic List Component -->
</ion-content>
<ion-header>

  <ion-navbar>
    <ion-title>My List</ion-title>
  </ion-navbar>

</ion-header>

<ion-content>
    <!-- Start Ionic List Component -->
    <ion-list>
      <ion-item>1</ion-item>
      <ion-item>2</ion-item>
      <ion-item>3</ion-item>
      <ion-item>4</ion-item>
      <ion-item>5</ion-item>
      <ion-item>6</ion-item>
      <ion-item>7</ion-item>
      <ion-item>8</ion-item>
      <ion-item>9</ion-item>
      <ion-item>10</ion-item>
      <ion-item>11</ion-item>
      <ion-item>12</ion-item>
      <ion-item>13</ion-item>
      <ion-item>14</ion-item>
      <ion-item>15</ion-item>
      <ion-item>16</ion-item>
      <ion-item>17</ion-item>
      <ion-item>18</ion-item>
      <ion-item>19</ion-item>
      <ion-item>20</ion-item>
    </ion-list>
    <!-- End Ionic List Component -->
</ion-content>
<ion-item>...content...</ion-item> for each one. Fortunately, there is a better way, and even as a beginner, you should try to follow the same approach when dealing with large amounts of data and information.
<p>The official Ionic documentation shows how to populate a list with items using different methods:
<ion-header>

  <ion-navbar>
    <ion-title>My List</ion-title>
  </ion-navbar>

</ion-header>

<ion-content>
    <!-- Start Ionic List Component -->
    <ion-list>
        <button ion-item *ngFor="let item of items" (click)="itemSelected(item)">
        {{ item }}
        </button>
    </ion-list>
    <!-- End Ionic List Component -->
</ion-content>
*ngFor. We won’t go into more depth about what this directive means and what it does, but in a nutshell, it iterates over a collection of data, allowing us to build data presentation lists and tables in our app. items is a variable containing our data, and item is populated with each item in the list. If you want to know more about this directive, check out the official Angular documentation.
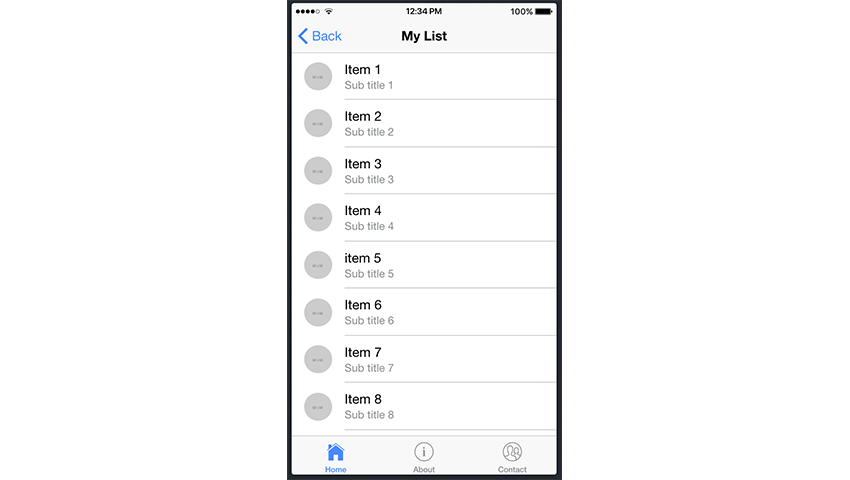
<p>With this knowledge, we can use the *ngFor directive to improve our project. Edit the my-list.html file to reflect the following:
<ion-header>

  <ion-navbar>
    <ion-title>My List</ion-title>
  </ion-navbar>

</ion-header>

<ion-content>
    <!-- Start Ionic List Component -->
    <ion-list>
      <ion-item *ngFor="let item of items">
        <ion-avatar item-start>
          <img  src="{{item.image}}" alt="Building with Ionic Components: A Beginner's Guide" >
        </ion-avatar>
        <h2>{{item.title}}</h2>
        <p>{{item.subTitle}}</p>
      </ion-item>
    </ion-list>
    <!-- End Ionic List Component -->
</ion-content>
<ion-list> 包含一系列 <ion-avatar> 组件。 item-start 属性意味着头像将与右侧对齐。每个列表项还包含一个标题标签 (<h2>) 和一个段落标签 (<p>)。
<p>因此,基本上,您还可以在列表组件内添加其他组件。看看 Ionic 文档中的卡片列表示例中如何实现此目的的另一个很好的示例。同样,在该示例中实现 *ngFor 将会带来好处。
<p>现在,回到我们的代码,items 中的 item 包含 title、subTitle 和 >图像。让我们继续在 my-list.ts 文件中进行以下更改:
export class MyListPage {
  items: any;

  constructor(public navCtrl: NavController, public navParams: NavParams) {
    this.items = [
      {
        title: 'Item 1',
        subTitle: 'Sub title 1',
        image: 'https://placehold.it/50'
      },
      {
        title: 'Item 2',
        subTitle: 'Sub title 2',
        image: 'http://placehold.it/50'
      },
      {
        title: 'Item 3',
        subTitle: 'Sub title 3',
        image: 'http://placehold.it/50'
      },
      {
        title: 'Item 4',
        subTitle: 'Sub title 4',
        image: 'http://placehold.it/50'
      },
      {
        title: 'item 5',
        subTitle: 'Sub title 5',
        image: 'http://placehold.it/50'
      },
      title: 'item 6',
        subTitle: 'Sub title 6',
        image: 'http://placehold.it/50'
      },
      title: 'item 7',
        subTitle: 'Sub title 7',
        image: 'http://placehold.it/50'
      },
      title: 'item 8',
        subTitle: 'Sub title 8',
        image: 'http://placehold.it/50'
      },
      title: 'item 9',
        subTitle: 'Sub title 9',
        image: 'http://placehold.it/50'
      },
      title: 'item 10',
        subTitle: 'Sub title 10',
        image: 'http://placehold.it/50'
      }]
    }
The above is the detailed content of Building with Ionic Components: A Beginner's Guide. For more information, please follow other related articles on the PHP Chinese website!


