In Part 1 , Part 2 , and Part 3 of our custom meta box template tutorial series, we learned how to make a reusable meta box from an easy-to-read, easy-to-copy array Get all field information. Much of the data is easy to use, just echo metafields in templates or through functions, but some fields are more complex and require more skill to use correctly. This tutorial will give you a basic idea of how to use this data, and it can be elaborated in countless ways.
WordPress provides several ways to obtain post metadata.
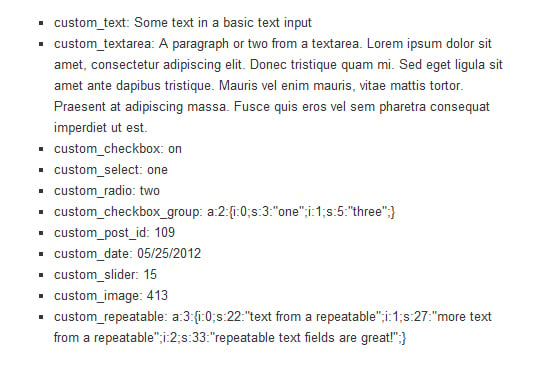
The easiest way to display data is to use Reusable custom metabox using data Part 4() function. You could put this directly into your single.php template, but it won't give you the results you probably want. It is a very literal output of the data in an unordered list, prefixed by the key of each field, as shown.


The most common way to get the data saved in the post meta fields is to use the get_post_meta() function. This is a simple way to locate a specific field and store it in a variable that can be used later.
$custom_text = get_post_meta($post->ID, 'custom_text', true);
Using this code in a single post loop will put the text "some text from the base text input" into a variable $custom_text which can then be echoed or filtered however you want Any operation performed on a string. This might be the right approach when you're only dealing with a few fields, but in our example we're dealing with 11 different fields. Calling them individually using this function will bloat your code unnecessarily since there is a way to get all the data at once.
My favorite method when I'm dealing with so many fields is to use the get_post_custom() function. With this function we can store all custom post meta fields in an array and then retrieve the data we want using the array keys.
$post_meta_data = get_post_custom($post->ID); will give us an array as shown below:
Array
(
    [custom_text] => Array (
            [0] => Some text in a basic text input
        )
    [custom_textarea] => Array (
            [0] => A paragraph or two from a textarea. Lorem ipsum dolor sit amet, consectetur adipiscing elit. Donec tristique quam mi. Sed eget ligula sit amet ante dapibus tristique.

Mauris vel enim mauris, vitae mattis tortor. Praesent at adipiscing massa. Fusce quis eros vel sem pharetra consequat imperdiet ut est.
        )
    [custom_checkbox] => Array (
            [0] => on
        )
    [custom_select] => Array (
            [0] => one
        )
    [custom_radio] => Array (
            [0] => two
        )
    [custom_checkbox_group] => Array (
            [0] => a:2:{i:0;s:3:"one";i:1;s:5:"three";}
        )
    [custom_post_id] => Array (
            [0] => 109
        )
    [custom_date] => Array (
            [0] => 05/25/2012
        )
    [custom_slider] => Array (
            [0] => 15
        )
    [custom_image] => Array (
            [0] => 413
        )
    [custom_repeatable] => Array (
            [0] => a:3:{i:0;s:22:"text from a repeatable";i:1;s:27:"more text from a repeatable";i:2;s:33:"repeatable text fields are great!";}
        )
)
As you can see from this array, WordPress stores each field as an array because there may be multiple values for the same field. You may also notice that some fields are serialized. Let's take a deeper look at how each field's data is processed and discuss how to solve this problem.
Handling of text and textarea fields is very simple. You can respond to them using one of the following examples:
echo $post_meta_data['custom_text'][0];

echo apply_filters('the_content', $post_meta_data['custom_textarea'][0]);

$custom_checkox = $post_meta_data['custom_checkbox'][0];

if ($custom_checkbox == 'on') {
	do_stuff();
}
The first line will simply output the string as is, the second line will use WordPress's the_content filter to convert line breaks into paragraphs. You can also use these same methods with select, radio, date, and slider fields.
The last line shows how to test whether the checkbox is checked. If so, you can perform various functions or any number of things.
Our checkbox group fields and repeatable fields are stored in serialized arrays in the database. Before outputting this data, we must deserialize it.
$custom_checkbox_group = unserialize($post_meta_data['custom_checkbox_group'][0]);

$custom_repeatable = unserialize($post_meta_data['custom_repeatable'][0]);
unserialize() The function is a basic PHP function that converts our data into an array that is easier to use. The above code will give me two arrays that look like this:
Array
(
    [0] => one
    [1] => three
)
Array
(
    [0] => text from a repeatable
    [1] => more text from a repeatable
    [2] => repeatable text fields are great!
)
Now I can loop through the arrays, but I want to use them in the output. One thing to note is that in a repeatable field, if you also make it sortable like the example in Part 3 of the Custom Meta Box Template Tutorial, the keys in the array will automatically be in the order 0, 1, 2, 3 etc., rather than in the order in which they were originally entered before sorting.
echo '<ul class="custom_repeatable">';
foreach ($custom_repeatable as $string) {
echo '<li>'.$string.'</li>';
}
echo '</ul>';
This example will output an unordered list of each string saved in the $custom_repeatable array.
For our post list and image fields, we save an ID. In rare cases you might just want to output the ID, but most likely you'll want to use the ID to get more information.
$custom_post_id = $post_meta_data['custom_post_id'][0];
echo '<a href="'.get_permalink($custom_post_id).'">'.get_the_title($custom_post_id).'</a>';

$custom_image = $post_meta_data['custom_image'][0];
echo wp_get_attachment_image($custom_image, 'thumbnail');
This tutorial shows the most basic way to use the data we store via a reusable custom meta box. Being able to save additional data and use it in themes and plugins opens up a whole new world of possibilities for WordPress. What will you use it for?
The above is the detailed content of Reusable custom metabox using data Part 4. For more information, please follow other related articles on the PHP Chinese website!
 How to light up Douyin close friends moment
 What should I do if my computer starts up and the screen shows a black screen with no signal?
 Kaspersky Firewall
 plugin.exe application error
 nvidia geforce 940mx
 Do you know if you cancel the other person immediately after following them on Douyin?
 How to calculate the refund handling fee for Railway 12306
 Top ten digital currency exchanges


