


Often, you need to make a choice and decide how to implement a specific feature. WordpPress has a fairly flexible approach to almost any problem, and in this tutorial we’ll look at the flexibility of the Custom Post Type API.
You can do many things with custom post types, including generating and managing certain posts on certain custom pages, slideshows, galleries, and even portfolio projects. Some people don't know they exist yet, others don't fully understand their options and how to use them. We will try in the following steps to build a specific plugin that works best with custom post types. More precisely, we will build a plugin that creates one custom post type that dynamically creates and manages other custom post types (like Inception here!).
Before we begin, we'll take a closer look at the what, how, and why we'll be building in this tutorial. The purpose of this tutorial is to help you get familiar with custom post types in WordPress.
To do this we will build a plugin that creates a main custom post type and then uses the posts within that custom post type as well as setting up a meta box to create other dynamic custom post types based on the meta box interface options . This will help you learn more about all the custom post options and some of the possibilities it can offer. For the purposes of this tutorial, it is assumed that you have a working Apache server running PHP and MySQL, and have WordPress installed so that you can test the plugin code on version 3.0 of WordPress.
Each post will be interpreted as a new custom post type and we will use meta boxes to save the configuration options for each post in custom fields with a bunch of forms, checkboxes, dropdowns and text Boxes, checkboxes, drop-down boxes, and text boxes will store and display data, allowing users to easily modify anything.
Since the plugin has 450 lines of code, not every line of code will be present in the tutorial, as most of the code is repeated with different variables. But all the features of the plugin will be explained, with examples from the source code.
If we want to get custom post type functionality, meta box functionality, and want to save data on update or publish operations, we need hooks and need to implement them specifically to get the desired effect.
add_action('save_post', 'cpt_save_postdata'); add_action('add_meta_boxes', 'cpt_add_meta_boxes'); add_action('init', 'init_custom_post_types');
We only need three hooks for this tutorial, no filters, and nothing else in the core functionality. First, we need a hook to generate a custom post type in its callback function. To do this, we will use theinittag hook and a callback function named'init_custom_post_types'. This is where all the magic happens, i.e. where we declare the custom post types and make them dynamic by pulling the values from the database and generating the dynamic custom post types in a loop. This part of the code is discussed later.
Another hook we need is the'add_meta_boxes'tag hook, which points to the callback function'cpt_add_meta_boxes'that is used when generating all other custom master custom post types Intrinsically generated meta box post type. This is where we create the form that will store and update the data we need to manipulate to create the functionality.
The last hook we use is'save_post'whose callback function is'cpt_save_postdata', which is to save the data posted by the meta box. When a user submits a page with the main custom post type in the admin panel, all the form fields are submitted and this is the hook we use to get that content and save/update it into the database for later use. < /p>
First, we need to create a common custom post type to handle all dynamic content. To do this, first we create a generic custom post type with hardcoded data, as shown in the example below. First we create the label. The labels parameter is one of the main parameter values interpreted as an array. The array value is given by its identifier, specificallynamerepresents the primary common name of the custom post type, usually the plural string of the custom post type name,singular_namerepresents the singular Custom post type object name in the form,add_newto add new string text,add_new_itemto add new post/page text by default,edit_itemas the edit post or page Default text,all_itemsis used to display all custom post type name text as per requirement (eg: all cars),view_itemsandsearch_itemsare used in the same way as the previous ones Examples are similar, just for significantly different purposes,not_found,not_fount_in_trash,parent_item_colonare also replacements for text used on certain pages you may want to create for you Posts for any custom post type changes (Custom Post Type) feature.
在下一个示例中,$labels数组使用 CPT 替换默认的 post/posts/page/pages 文本。我想这对于某些读者来说是不必要的,但为了确保我不会错过这个想法,CPT 代表自定义帖子类型,并且在本教程中将以多种方式使用。
需要注意的是,此代码被插入到init_custom_post_types回调函数中才能正常工作。
$labels = array( 'name' => _x('CPT', 'post type general name'), 'singular_name' => _x('CPT', 'post type singular name'), 'add_new' => _x('Add New CPT', 'CPT'), 'add_new_item' => __('Add New Post type'), 'edit_item' => __('Edit CPT'), 'new_item' => __('New CPT'), 'all_items' => __('All CPT'), 'view_item' => __('View CPT'), 'search_items' => __('Search CPT'), 'not_found' => __('No CPT found'), 'not_found_in_trash' => __('No CPT found in Trash'), 'parent_item_colon' => '', 'menu_name' => __('CPT') ); $args = array( 'labels' => $labels, 'public' => true, 'publicly_queryable' => true, 'show_ui' => true, 'show_in_menu' => true, 'query_var' => true, 'rewrite' => true, 'capability_type' => 'post', 'has_archive' => true, 'hierarchical' => false, 'menu_position' => null, 'supports' => array('title') ); register_post_type('CPT', $args);
生成自定义帖子类型所需的主数组是$args数组,其唯一目的是设置自定义帖子类型的主要选项并管理其功能。
public– 一个布尔变量,true 或 false,表示自定义帖子类型的可用性(如果它对于管理界面或主题中的前端用户是公开的)。publicly_queryable– 又是一个布尔值,用于设置前端是否能够查询自定义帖子类型的结果。show_ui– 一个布尔值,指示是否为自定义帖子类型生成默认管理内容。show_in_menu– 另一个布尔变量,需要show_ui才能正常工作,因为其目的是在 WordPress 管理面板的菜单中显示或不显示帖子类型。query_var– 为此自定义帖子类型创建查询 var 键。您可以将其用作布尔值或字符串,如果为 true 则为默认值,如果为 false 则禁用查询 var 键的使用,而 string 设置自定义键。在我们的示例中,我们使用默认值并将其设置为 true。rewrite– 这可以防止重写此帖子类型。capability_type– 最后,一个字符串,用于设置自定义帖子类型是帖子还是页面,采用纯文本字符串。我们正在使用邮寄。has_archive– 此参数启用帖子存档并默认使用post_type作为存档 slug。hierarchical– 一个布尔值,用于设置帖子类型是否为分层结构,即是否允许指定父级。menu_position– 表示帖子类型在菜单中显示的位置的字符串。这些值大约从 5 到 100。supports– 该值再次具有数组值,这次包含标题、编辑器、缩略图、自定义字段、引用、修订、页面属性和帖子格式等值。主 args 数组用于下一个register_post_type函数,该函数的第一个参数是自定义帖子类型名称(在我们的例子中是 CPT),第二个参数是$args变量。
这几乎涵盖了创建我们的主要自定义帖子类型,上面给出并解释了示例。
首先,我们介绍了钩子,其中一个钩子实现了一个标签,该标签具有专门为元框实现而设计的回调函数。该函数如下所示:
function cpt_add_meta_boxes() { add_meta_box('cpt_meta_id', 'Custom Post Type Settings', 'cpt_inner_custom_box', 'CPT', 'normal'); }
在函数内部,我们有add_meta_box函数,它具有用于实现元框的默认参数,即唯一的元框 id、它的标题、回调函数和应应用它的自定义帖子类型,也是最后但并非最不重要的一点,位置(我们将其设置为正常,因为我们希望它位于编辑器下方)。
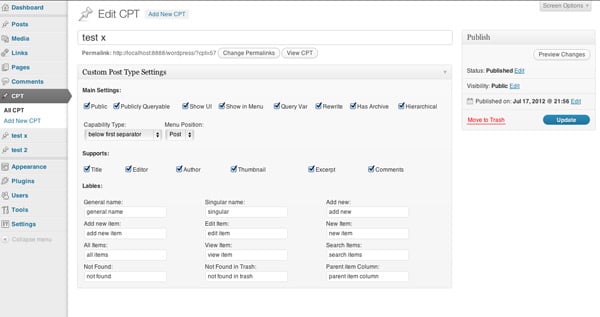
这就是使用 API 生成的内容,但是我们要填充什么呢?好吧,我们需要用之前讨论的第 3 步中的所有选项来填充它,为此,我们将创建表单字段并根据其类型填充数据。
我们对需要布尔值的数组参数使用复选框。选中为 true,未选中为 false。
name="cp_publicly_queryable" /> Publicly Queryable
某些数组参数需要从多个元素中进行选择。为此,我们使用带有硬编码值的下拉框来满足我们的需求。
Menu Position:
我们将在这些表单字段中存储字符串值。
General name:
您可能已经注意到它们充满了 PHP 变量并使用数据运行。但您可能会问自己,这些变量从何而来,数据又如何呢?要回答这个问题,我们必须进入下一步并保存刚才创建的表单字段。但是因为我不想让您来回执行这些步骤,所以我会要求您假设所有数据都以某种方式保存在数据库中,我将向您展示如何操作,我们需要做的就是提取它到变量中,如下例所示:
global $post; $cp_public = get_post_meta($post->ID, 'cp_public', true);
在我们的元框回调函数中,我们声明全局变量$post以稍后获取当前帖子 id,并且由于数据存储为自定义帖子,因此我们将使用get_post_meta函数来获取元为每个变量存储的键值,如上例所示,其中第一个参数是帖子 ID,第二个参数是元键,第三个参数是一个布尔值,告诉函数返回字符串而不是数组。
本教程中使用了 27 个变量,它们存储为自定义帖子,如下所示:
$cp_public = get_post_meta($post->ID, 'cp_public', true); $cp_publicly_queryable = get_post_meta($post->ID, 'cp_publicly_queryable', true); $cp_show_ui = get_post_meta($post->ID, 'cp_show_ui', true); $cp_show_in_menu = get_post_meta($post->ID, 'cp_show_in_menu', true); $cp_query_var = get_post_meta($post->ID, 'cp_query_var', true); $cp_rewrite = get_post_meta($post->ID, 'cp_rewrite', true); $cp_has_archive = get_post_meta($post->ID, 'cp_has_archive', true); $cp_hierarchical = get_post_meta($post->ID, 'cp_hierarchical', true); $cp_capability_type = get_post_meta($post->ID, 'cp_capability_type', true); $cp_menu_position = get_post_meta($post->ID, 'cp_menu_position', true); $cp_s_title = get_post_meta($post->ID, 'cp_s_title', true); $cp_s_editor = get_post_meta($post->ID, 'cp_s_editor', true); $cp_s_author = get_post_meta($post->ID, 'cp_s_author', true); $cp_s_thumbnail = get_post_meta($post->ID, 'cp_s_thumbnail', true); $cp_s_excerpt = get_post_meta($post->ID, 'cp_s_excerpt', true); $cp_s_comments = get_post_meta($post->ID, 'cp_s_comments', true); $cp_general_name = get_post_meta($post->ID, 'cp_general_name', true); $cp_singular_name = get_post_meta($post->ID, 'cp_singular_name', true); $cp_add_new = get_post_meta($post->ID, 'cp_add_new', true); $cp_add_new_item = get_post_meta($post->ID, 'cp_add_new_item', true); $cp_edit_item = get_post_meta($post->ID, 'cp_edit_item', true); $cp_new_item = get_post_meta($post->ID, 'cp_new_item', true); $cp_all_items = get_post_meta($post->ID, 'cp_all_items', true); $cp_view_item = get_post_meta($post->ID, 'cp_view_item', true); $cp_search_items = get_post_meta($post->ID, 'cp_search_items', true); $cp_not_found = get_post_meta($post->ID, 'cp_not_found', true); $cp_not_found_in_trash = get_post_meta($post->ID, 'cp_not_found_in_trash', true); $cp_parent_item_colon = get_post_meta($post->ID, 'cp_parent_item_colon', true);
您需要了解的是,它们都是以相同的方式提取的,除了它们的值之外,在这个长长的变量列表中没有任何特殊或不同的地方。当然,这个想法是,此代码从数据库获取数据,并稍后在每个表单字段中使用,以将管理面板元框中的数据显示为选定值、字符串或布尔值的选中复选框价值观。在附加的可下载文件中可以更好地看到所有功能。
到目前为止,这就是基于我们的实现的自定义帖子类型元框内容的自定义帖子的样子。

从元框提交的所有表单数据都需要保存到数据库中,以便稍后可以使用它来使自定义帖子类型动态化以及元框的功能中。为了保存数据,我们使用cpt_save_postdata函数作为我们为此创建的回调函数。但这个函数需要填充实际保存数据的功能。那么,我们如何保存所有这些元素的数据。最简单、最明显的答案是自定义字段。我们将把所有这些值存储在主要自定义帖子类型单个帖子的自定义字段中,因为当我们根据某个查询的帖子提取它们时,以后管理起来会容易得多。
这里是在之前指定的函数中运行所需的所有代码,以便保存我们需要的所有数据。
global $post; if ($_POST['cpt-hidd'] == 'true') { $cp_public = get_post_meta($post->ID, 'cp_public', true); $cp_publicly_queryable = get_post_meta($post->ID, 'cp_publicly_queryable', true); $cp_show_ui = get_post_meta($post->ID, 'cp_show_ui', true); $cp_show_in_menu = get_post_meta($post->ID, 'cp_show_in_menu', true); $cp_query_var = get_post_meta($post->ID, 'cp_query_var', true); $cp_rewrite = get_post_meta($post->ID, 'cp_rewrite', true); $cp_has_archive = get_post_meta($post->ID, 'cp_has_archive', true); $cp_hierarchical = get_post_meta($post->ID, 'cp_hierarchical', true); $cp_capability_type = get_post_meta($post->ID, 'cp_capability_type', true); $cp_menu_position = get_post_meta($post->ID, 'cp_menu_position', true); $cp_s_title = get_post_meta($post->ID, 'cp_s_title', true); $cp_s_editor = get_post_meta($post->ID, 'cp_s_editor', true); $cp_s_author = get_post_meta($post->ID, 'cp_s_author', true); $cp_s_thumbnail = get_post_meta($post->ID, 'cp_s_thumbnail', true); $cp_s_excerpt = get_post_meta($post->ID, 'cp_s_excerpt', true); $cp_s_comments = get_post_meta($post->ID, 'cp_s_comments', true); $cp_general_name = get_post_meta($post->ID, 'cp_general_name', true); $cp_singular_name = get_post_meta($post->ID, 'cp_singular_name', true); $cp_add_new = get_post_meta($post->ID, 'cp_add_new', true); $cp_add_new_item = get_post_meta($post->ID, 'cp_add_new_item', true); $cp_edit_item = get_post_meta($post->ID, 'cp_edit_item', true); $cp_new_item = get_post_meta($post->ID, 'cp_new_item', true); $cp_all_items = get_post_meta($post->ID, 'cp_all_items', true); $cp_view_item = get_post_meta($post->ID, 'cp_view_item', true); $cp_search_items = get_post_meta($post->ID, 'cp_search_items', true); $cp_not_found = get_post_meta($post->ID, 'cp_not_found', true); $cp_not_found_in_trash = get_post_meta($post->ID, 'cp_not_found_in_trash', true); $cp_parent_item_colon = get_post_meta($post->ID, 'cp_parent_item_colon', true); update_post_meta($post->ID, 'cp_public', $_POST['cp_public'], $cp_public); update_post_meta($post->ID, 'cp_publicly_queryable', $_POST['cp_publicly_queryable'], $cp_publicly_queryable); update_post_meta($post->ID, 'cp_show_ui', $_POST['cp_show_ui'], $cp_show_ui); update_post_meta($post->ID, 'cp_show_in_menu', $_POST['cp_show_in_menu'], $cp_show_in_menu); update_post_meta($post->ID, 'cp_query_var', $_POST['cp_query_var'], $cp_query_var); update_post_meta($post->ID, 'cp_rewrite', $_POST['cp_rewrite'], $cp_rewrite); update_post_meta($post->ID, 'cp_has_archive', $_POST['cp_has_archive'], $cp_has_archive); update_post_meta($post->ID, 'cp_hierarchical', $_POST['cp_hierarchical'], $cp_hierarchical); update_post_meta($post->ID, 'cp_capability_type', $_POST['cp_capability_type'], $cp_capability_type); update_post_meta($post->ID, 'cp_menu_position', $_POST['cp_menu_position'], $cp_menu_position); update_post_meta($post->ID, 'cp_s_title', $_POST['cp_s_title'], $cp_s_title); update_post_meta($post->ID, 'cp_s_editor', $_POST['cp_s_editor'], $cp_s_editor); update_post_meta($post->ID, 'cp_s_author', $_POST['cp_s_author'], $cp_s_author); update_post_meta($post->ID, 'cp_s_thumbnail', $_POST['cp_s_thumbnail'], $cp_s_thumbnail); update_post_meta($post->ID, 'cp_s_excerpt', $_POST['cp_s_excerpt'], $cp_s_excerpt); update_post_meta($post->ID, 'cp_s_comments', $_POST['cp_s_comments'], $cp_s_comments); update_post_meta($post->ID, 'cp_general_name', $_POST['cp_general_name'], $cp_general_name); update_post_meta($post->ID, 'cp_singular_name', $_POST['cp_singular_name'], $cp_singular_name); update_post_meta($post->ID, 'cp_add_new', $_POST['cp_add_new'], $cp_add_new); update_post_meta($post->ID, 'cp_add_new_item', $_POST['cp_add_new_item'], $cp_add_new_item); update_post_meta($post->ID, 'cp_edit_item', $_POST['cp_edit_item'], $cp_edit_item); update_post_meta($post->ID, 'cp_new_item', $_POST['cp_new_item'], $cp_new_item); update_post_meta($post->ID, 'cp_all_items', $_POST['cp_all_items'], $cp_all_items); update_post_meta($post->ID, 'cp_view_item', $_POST['cp_view_item'], $cp_view_item); update_post_meta($post->ID, 'cp_search_items', $_POST['cp_search_items'], $cp_search_items); update_post_meta($post->ID, 'cp_not_found', $_POST['cp_not_found'], $cp_not_found); update_post_meta($post->ID, 'cp_not_found_in_trash', $_POST['cp_not_found_in_trash'], $cp_not_found_in_trash); update_post_meta($post->ID, 'cp_parent_item_colon', $_POST['cp_parent_item_colon'], $cp_parent_item_colon); }
首先,我们像之前在元框功能顶部所做的那样提取变量,然后使用update_post_meta函数更新它们,我们给出参数:帖子 id、元键名称、新值,旧值。瞧,我们更新了一个值的自定义字段。我们需要重复您在上面的示例中看到的过程,以涵盖我们需要的所有值和所有选项。
这就是保存数据的方法。
那么我们如何获取刚刚保存的所有数据并使其动态化?我们如何使用它来生成自定义帖子类型?很简单,我们查询主要的自定义帖子类型,对于每个循环帖子,我们提取自定义字段并将数据相应地放置在数组中。
让我们看看如何做到这一点。首先,我们将此代码放在init_custom_post_types函数内的主自定义帖子类型代码的正下方。因此,我们首先创建查询:
$the_query = new WP_Query(array('post_type' => array('CPT'))); while ($the_query->have_posts()) : $the_query->the_post();
我们创建一个名为$the_query的变量,在其中存储调用的主类函数wp_query的内容,以及一个数组的参数,该数组的值是post_type主要自定义帖子类型的名称,即CPT。然后我们开始循环。在循环内,我们使用与从数据库中提取变量作为自定义字段相同的方法来生成我们想要保存所需值的变量:
global $post; //*************************get the values $cp_public = get_post_meta($post->ID, 'cp_public', true); if ($cp_public == "on") { $cp_public = true; } else { $cp_public = false; } $cp_publicly_queryable = get_post_meta($post->ID, 'cp_publicly_queryable', true); if ($cp_publicly_queryable == "on") { $cp_publicly_queryable = true; } else { $cp_publicly_queryable = false; } $cp_show_ui = get_post_meta($post->ID, 'cp_show_ui', true); if ($cp_show_ui == "on") { $cp_show_ui = true; } else { $cp_show_ui = false; } $cp_show_in_menu = get_post_meta($post->ID, 'cp_show_in_menu', true); // if ($cp_show_in_menu == "on") { $cp_show_in_menu = true; } else { $cp_show_in_menu = false; } $cp_query_var = get_post_meta($post->ID, 'cp_query_var', true); // if ($cp_query_var == "on") { $cp_query_var = true; } else { $cp_query_var = false; } $cp_rewrite = get_post_meta($post->ID, 'cp_rewrite', true); // if ($cp_rewrite == "on") { $cp_rewrite = true; } else { $cp_rewrite = false; } $cp_has_archive = get_post_meta($post->ID, 'cp_has_archive', true); // if ($cp_has_archive == "on") { $cp_has_archive = true; } else { $cp_has_archive = false; } $cp_hierarchical = get_post_meta($post->ID, 'cp_hierarchical', true); if ($cp_hierarchical == "on") { $cp_hierarchical = true; } else { $cp_hierarchical = false; } $cp_capability_type = get_post_meta($post->ID, 'cp_capability_type', true); $cp_menu_position = get_post_meta($post->ID, 'cp_menu_position', true); $cp_s_title = get_post_meta($post->ID, 'cp_s_title', true); if ($cp_s_title == "on") { $cp_s[] = 'title'; } $cp_s_editor = get_post_meta($post->ID, 'cp_s_editor', true); if ($cp_s_editor == "on") { $cp_s[] = 'editor'; } $cp_s_author = get_post_meta($post->ID, 'cp_s_author', true); if ($cp_s_author == "on") { $cp_s[] = 'author'; } $cp_s_thumbnail = get_post_meta($post->ID, 'cp_s_thumbnail', true); if ($cp_s_thumbnail == "on") { $cp_s[] = 'thumbnail'; } $cp_s_excerpt = get_post_meta($post->ID, 'cp_s_excerpt', true); if ($cp_s_excerpt == "on") { array_push($cp_s, 'excerpt'); } $cp_s_comments = get_post_meta($post->ID, 'cp_s_comments', true); if ($cp_s_comments == "on") { array_push($cp_s, 'comments'); } $cp_general_name = get_post_meta($post->ID, 'cp_general_name', true); $cp_singular_name = get_post_meta($post->ID, 'cp_singular_name', true); $cp_add_new = get_post_meta($post->ID, 'cp_add_new', true); $cp_add_new_item = get_post_meta($post->ID, 'cp_add_new_item', true); $cp_edit_item = get_post_meta($post->ID, 'cp_edit_item', true); $cp_new_item = get_post_meta($post->ID, 'cp_new_item', true); $cp_all_items = get_post_meta($post->ID, 'cp_all_items', true); $cp_view_item = get_post_meta($post->ID, 'cp_view_item', true); $cp_search_items = get_post_meta($post->ID, 'cp_search_items', true); $cp_not_found = get_post_meta($post->ID, 'cp_not_found', true); $cp_not_found_in_trash = get_post_meta($post->ID, 'cp_not_found_in_trash', true); $cp_parent_item_colon = get_post_meta($post->ID, 'cp_parent_item_colon', true);
因为我们现在处于查询循环内,所以我们可以使用全局$post变量来获取我们需要的 ID。此外,您可能已经注意到 if 在这里和那里为大多数变量设置了一些条件。这些存在是因为 true 布尔值或某些其他字符串值需要从它们表示的"on"字符串正确转换为它们需要的true布尔值。
完成所有这些操作后,我们将把变量插入到动态自定义帖子类型实现的数组中:
$labels = array( 'name' => _x(get_the_title($post->ID), 'post type general name'), 'singular_name' => _x($cp_singular_name, 'post type singular name'), 'add_new' => _x($cp_add_new, get_the_title($post->ID)), 'add_new_item' => __($cp_add_new_item), 'edit_item' => __($cp_edit_item), 'new_item' => __($cp_new_item), 'all_items' => __($cp_all_items), 'view_item' => __($cp_view_item), 'search_items' => __($cp_search_items), 'not_found' => __($cp_not_found), 'not_found_in_trash' => __($cp_not_found_in_trash), 'parent_item_colon' => __($cp_parent_item_colon), 'menu_name' => __(get_the_title($post->ID)) ); $args = array( 'labels' => $labels, 'public' => $cp_public, 'publicly_queryable' => $cp_publicly_queryable, 'show_ui' => $cp_show_ui, 'show_in_menu' => $cp_show_in_menu, 'query_var' => $cp_query_var, 'rewrite' => $cp_rewrite, 'capability_type' => 'post', 'has_archive' => $cp_has_archive, 'hierarchical' => $cp_hierarchical, 'menu_position' => $cp_menu_position, 'supports' => $cp_s ); register_post_type(get_the_title($post->ID), $args); endwhile;
帖子标题用作自定义帖子类型的主名称,元框设置用作其余属性。这就是在 WordPress 中实现动态自定义帖子类型所需的全部内容。您可能已经注意到,我们还在上一个代码的末尾关闭了循环。
自定义帖子类型并不难处理,并且它们在您可能需要的任何功能中都非常灵活,甚至可以使用其他挂钩、过滤器或自定义函数。在本教程中,我们设法在单个插件中介绍自定义帖子类型管理的特定动态实现,并根据您的需求使用代码和文件进行了解释。当然,自定义帖子类型的使用并不限于这些示例,因为它可以用于多种类型的实现、插件和主题,以多种方式纠缠在一起,以不同的方式查询,以多种方式过滤或操作。 p>
The above is the detailed content of Create a versatile plugin for custom post types. For more information, please follow other related articles on the PHP Chinese website!


![[Web front-end] Node.js quick start](https://img.php.cn/upload/course/000/000/067/662b5d34ba7c0227.png)


