

 Backend Development
Python Tutorial
Teach you step by step how to use Python to easily send emails
Backend Development
Python Tutorial
Teach you step by step how to use Python to easily send emails
Teach you step by step how to use Python to easily send emails

#Preface
Nowadays, the pace of life is accelerating, and the communication methods between people are also very different. In order to make communication more convenient, email was born. As we all know, email is actually the client and server. The same as sending and receiving data, it has a function of sending and receiving messages. The communication protocols of email are SMTP, POP3, and IMAP, and they all belong to the tcp/ip protocol, such as the QQ mailbox and NetEase mailbox that we often use. These are the same patterns.
Preparation
Editor: sublime text 3
Module: smtplib and email
Project Implementation
1. Installation
pip install smtplib
pip install email
Note: There is a small pit here. You cannot install smtplib directly as above, otherwise it will not be installed. You have to install PyEmail first, because your smtplib is integrated into this module, just like the pillow module is integrated into PIL. Another normal installation is Can.
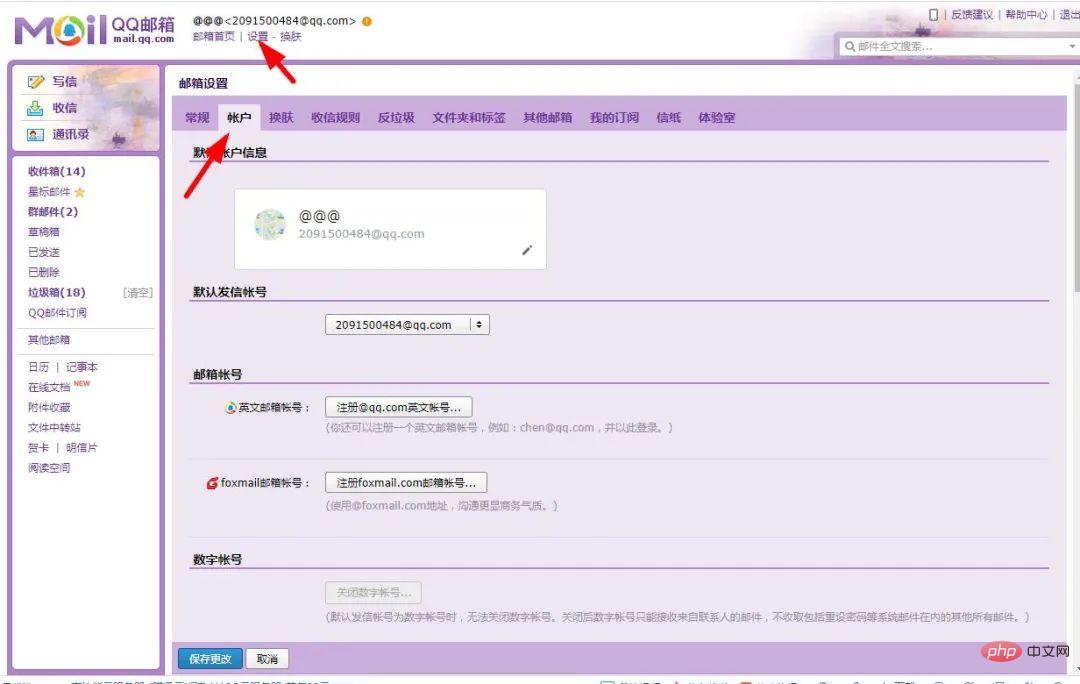
2. Open the pop3 SMTP imap service and learn the email authorization code
Any email If you want to send emails, you must first activate the above services so that emails can be communicated, and you must also have an email authorization code, such as QQ email:
Open QQ email and select Settings --------Account, and then start the service.
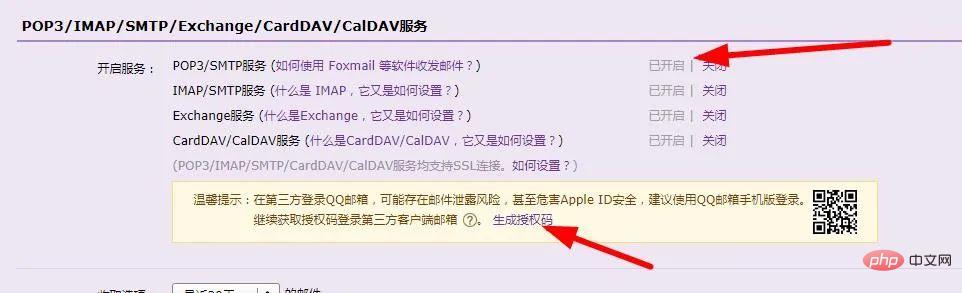
After starting the service, click to generate the authorization code and save the authorization code. To obtain the authorization code, you only need to send a text message or dynamic token with your registered mobile phone number.
3. Build a mail port and establish a connection
import smtplib
sm=smtp.SMTP()  # 初始化连接
sm.connect('邮件服务器地址','端口')  #建立连接
sm.login('邮箱账号','邮箱密码/授权码')  #登陆账户
sm.sendmail('邮件发送方','邮件接受方','邮件内容') #发送邮件
sm.quit() #关闭连接,结束邮件服务
Got it After the above knowledge, let’s try to log in. I’ll take QQ mailbox as an example:
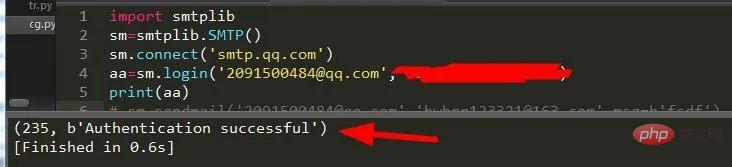
有这样的标识表示登陆成功,顺便强调一句,在这里我为什么没有配置邮件服务器端口,因为服务器已经帮我们配置好了,默认的都是25号端口,如果你担心邮件的安全问题,比如会被黑客截胡,你也可以使用ssl链接传输:
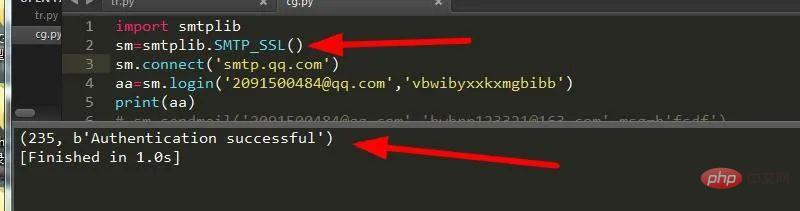
同样它的端口也是默认配置好了,他的端口号为465,为了安全,咱们选择这项。
4.构建邮件内容部分
这里我们需要用到email模块,我们都知道,邮件一般可以发很多东西,比如说文本,图片,文件等等,那么我们来看看吧。
一、文本
导入模块
from email.mime.text import MIMEText
填充文本
在此之前我们得知道它的具体用法:
MIMEText(‘邮件内容’,‘类型’, '编码')
邮件内容为字符串
类型: text/plain text/html
编码 : utf-8 gbk
构造文本
MIMEText('hello','text/plain','utf-8')
构造超文本
MIMEText('<a href='www.baidu.com'>点击此处有惊喜</a>','text/html','utf-8')
下面我们来实际操作下吧。
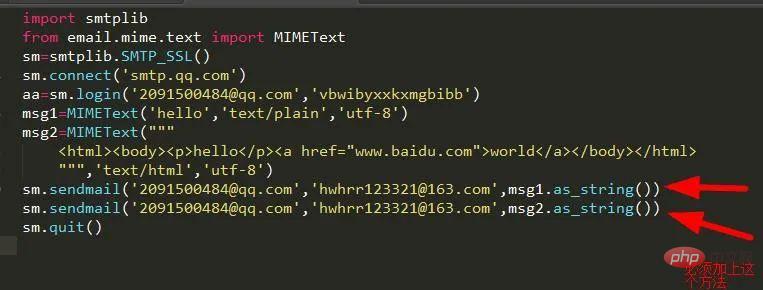
非常成功收到了邮件了。正是2091500484这个邮箱给我发的。当然我们这样只是实现了最简单的功能,
我们需要将它格式规范下,比如给它添加个开头结尾什么的。我们需要导入构建邮件完整内容的模块:
from email.header import Header
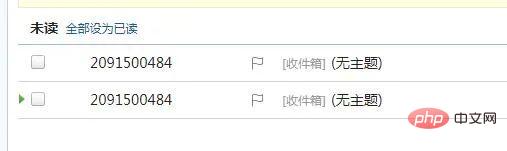
然后设置头部,内容,尾部
msg1['From']=Header('你是猪吗') #设置发件人昵称msg1['To']=Header('hwhrr123321@163.com') #设置收件人昵称msg1['Subject'] = Header('我是猪') #设置标题
可以看到,是不是觉得很有趣了,快来试试吧,哈哈哈。。。
二、图片
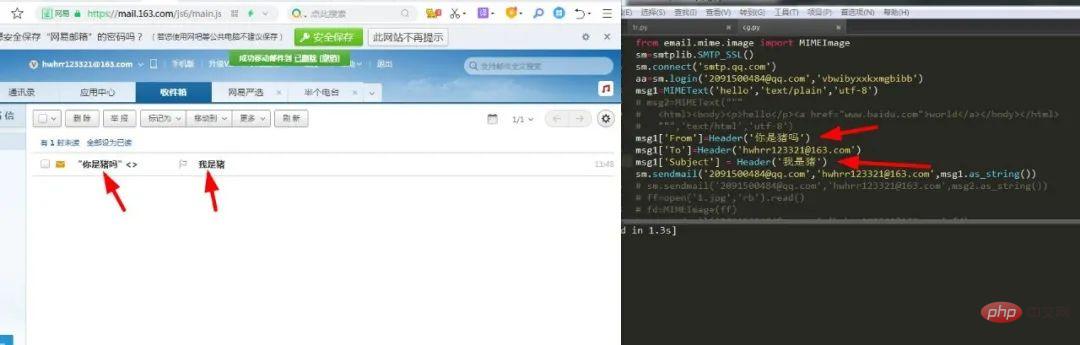
发了文本后我们还想发一张图片,那该怎么办呢?莫慌,此时需要先导入发图片的模块:
from email.mime.image import MIMEImage
然后我们在读取图片文件将它添加到邮件中去。
ff=open('1.jpg','rb').read() #打开文件fd=MIMEImage(ff,'subtype') #初始化fd.add_header('Content-ID','1.jpg') #添加到头部
可以看到图片并没有显示出来,那么这是怎么回事,哦,原来图片是依托附件而存在的,要么是html要么是附件,但是两者都需要附件模块的支持,下面我们导入附件模块:
from email.mime.multipart import MIMEMultipart
1.将图片插入到html中
也就是将图片插入到正文部分,而非附件的形式。
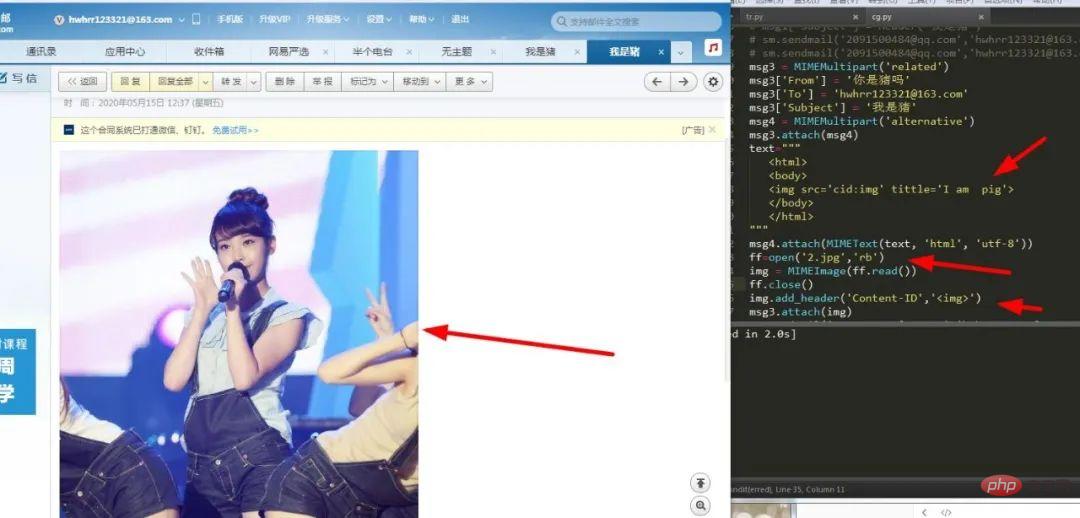
msg3 = MIMEMultipart('related')msg3['From'] = '你是猪吗'msg3['To'] = 'hwhrr123321@163.com'msg3['Subject'] = '我是猪'msg4 = MIMEMultipart('alternative') #构建一个附件msg3.attach(msg4) #将附件引入到另一个附件text=""" <html> <body> <img src='cid:img' tittle='I am pig'> </body> </html>"""msg4.attach(MIMEText(text, 'html', 'utf-8')) #将html插入到附件中ff=open('2.jpg','rb')img = MIMEImage(ff.read()) #将图片读取到附件中ff.close()img.add_header('Content-ID','<img>') #添加图片头部msg3.attach(img) #将图片添加到附件sm.sendmail('2091500484@qq.com','hwhrr123321@163.com',msg3.as_string()) #发送sm.quit()
可以看出,过程还是比较复杂的,比单纯附件添加图片麻烦点,主要是嵌套了一层附件结构。
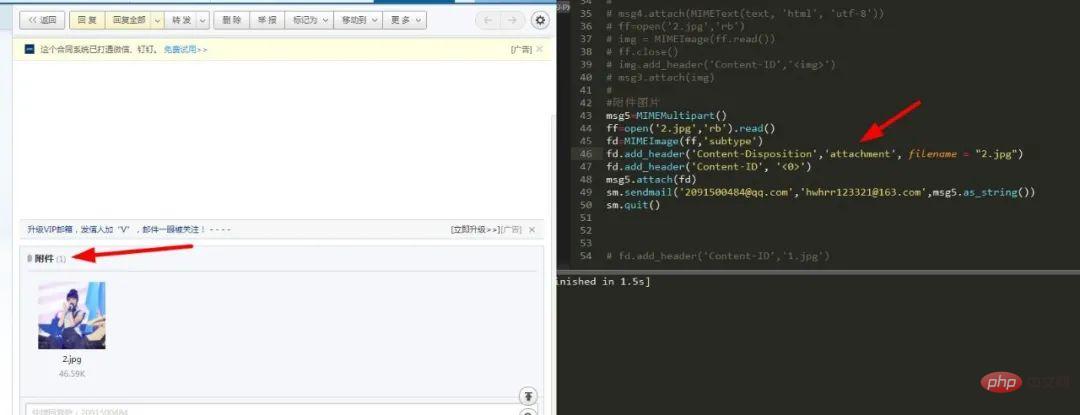
2.将图片引入到附件中
这个比较好实现。如图:
三、文件
在发送文件前,我们要考虑的一个问题是,我们读取它要以二进制的形式,然后再将它添加到附件中,搞懂了这个就好办了。
1.读取文件
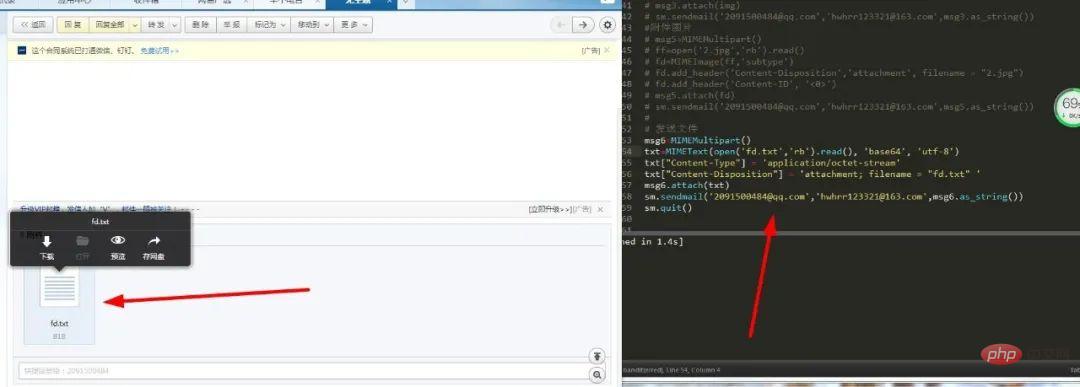
这里我们需要构造一个base64的一个数据流读取文件:
msg6=MIMEMultipart()txt=MIMEText(open('fd.txt','rb').read(), 'base64', 'utf-8')
2.设置传输类型
txt["Content-Type"] = 'application/octet-stream'
3.设置附件名称
txt["Content-Disposition"] = 'attachment; filename = "fd.txt" '
4.将文件添加到附件中
msg6.attach(txt)
最后就成功将文件添加到了附件中了。
项目总结
以上便是我对邮件发送的所有感悟了,另外如果你想将邮件传输时的过程直观展示出来的话只需在邮件服务器登陆的前一句加上:
sm.set_debuglevel(1)
这样便可以将所有传输过程打印在终端了。通过对邮件的学习,可以极大地便利我们的生活,你可以使用邮件来给你设置一个计划表,通过程序实现,每天按时发送邮件,是不是很高逼格了,希望今天这篇文章能让大家对邮件有个全新的认识。
The above is the detailed content of Teach you step by step how to use Python to easily send emails. For more information, please follow other related articles on the PHP Chinese website!

Hot AI Tools

Undress AI Tool
Undress images for free

Undresser.AI Undress
AI-powered app for creating realistic nude photos

AI Clothes Remover
Online AI tool for removing clothes from photos.

Clothoff.io
AI clothes remover

Video Face Swap
Swap faces in any video effortlessly with our completely free AI face swap tool!

Hot Article
Hot Tools

Notepad++7.3.1
Easy-to-use and free code editor

SublimeText3 Chinese version
Chinese version, very easy to use

Zend Studio 13.0.1
Powerful PHP integrated development environment

Dreamweaver CS6
Visual web development tools

SublimeText3 Mac version
God-level code editing software (SublimeText3)


 What are class methods in Python
Aug 21, 2025 am 04:12 AM
What are class methods in Python
Aug 21, 2025 am 04:12 AM
ClassmethodsinPythonareboundtotheclassandnottoinstances,allowingthemtobecalledwithoutcreatinganobject.1.Theyaredefinedusingthe@classmethoddecoratorandtakeclsasthefirstparameter,referringtotheclassitself.2.Theycanaccessclassvariablesandarecommonlyused
 python asyncio queue example
Aug 21, 2025 am 02:13 AM
python asyncio queue example
Aug 21, 2025 am 02:13 AM
asyncio.Queue is a queue tool for secure communication between asynchronous tasks. 1. The producer adds data through awaitqueue.put(item), and the consumer uses awaitqueue.get() to obtain data; 2. For each item you process, you need to call queue.task_done() to wait for queue.join() to complete all tasks; 3. Use None as the end signal to notify the consumer to stop; 4. When multiple consumers, multiple end signals need to be sent or all tasks have been processed before canceling the task; 5. The queue supports setting maxsize limit capacity, put and get operations automatically suspend and do not block the event loop, and the program finally passes Canc
 How to run a Python script and see the output in a separate panel in Sublime Text?
Aug 17, 2025 am 06:06 AM
How to run a Python script and see the output in a separate panel in Sublime Text?
Aug 17, 2025 am 06:06 AM
ToseePythonoutputinaseparatepanelinSublimeText,usethebuilt-inbuildsystembysavingyourfilewitha.pyextensionandpressingCtrl B(orCmd B).2.EnsurethecorrectbuildsystemisselectedbygoingtoTools→BuildSystem→Pythonandconfirming"Python"ischecked.3.Ifn
 How to use regular expressions with the re module in Python?
Aug 22, 2025 am 07:07 AM
How to use regular expressions with the re module in Python?
Aug 22, 2025 am 07:07 AM
Regular expressions are implemented in Python through the re module for searching, matching and manipulating strings. 1. Use re.search() to find the first match in the entire string, re.match() only matches at the beginning of the string; 2. Use brackets() to capture the matching subgroups, which can be named to improve readability; 3. re.findall() returns all non-overlapping matches, and re.finditer() returns the iterator of the matching object; 4. re.sub() replaces the matching text and supports dynamic function replacement; 5. Common patterns include \d, \w, \s, etc., you can use re.IGNORECASE, re.MULTILINE, re.DOTALL, re
 How to build and run Python in Sublime Text?
Aug 22, 2025 pm 03:37 PM
How to build and run Python in Sublime Text?
Aug 22, 2025 pm 03:37 PM
EnsurePythonisinstalledbyrunningpython--versionorpython3--versionintheterminal;ifnotinstalled,downloadfrompython.organdaddtoPATH.2.InSublimeText,gotoTools>BuildSystem>NewBuildSystem,replacecontentwith{"cmd":["python","-
 How to use variables and data types in Python
Aug 20, 2025 am 02:07 AM
How to use variables and data types in Python
Aug 20, 2025 am 02:07 AM
VariablesinPythonarecreatedbyassigningavalueusingthe=operator,anddatatypessuchasint,float,str,bool,andNoneTypedefinethekindofdatabeingstored,withPythonbeingdynamicallytypedsotypecheckingoccursatruntimeusingtype(),andwhilevariablescanbereassignedtodif
 How to pass command-line arguments to a script in Python
Aug 20, 2025 pm 01:50 PM
How to pass command-line arguments to a script in Python
Aug 20, 2025 pm 01:50 PM
Usesys.argvforsimpleargumentaccess,whereargumentsaremanuallyhandledandnoautomaticvalidationorhelpisprovided.2.Useargparseforrobustinterfaces,asitsupportsautomatichelp,typechecking,optionalarguments,anddefaultvalues.3.argparseisrecommendedforcomplexsc
 How to debug a remote Python application in VSCode
Aug 30, 2025 am 06:17 AM
How to debug a remote Python application in VSCode
Aug 30, 2025 am 06:17 AM
To debug a remote Python application, you need to use debugpy and configure port forwarding and path mapping: First, install debugpy on the remote machine and modify the code to listen to port 5678, forward the remote port to the local area through the SSH tunnel, then configure "AttachtoRemotePython" in VSCode's launch.json and correctly set the localRoot and remoteRoot path mappings. Finally, start the application and connect to the debugger to realize remote breakpoint debugging, variable checking and code stepping. The entire process depends on debugpy, secure port forwarding and precise path matching.
