


Introduction to how to enter bios in windows 7

What is the method to enter the bios in Windows 7? Since most users generally do not take the initiative to enter the bios interface, users do not know how to enter the bios. The bios interface is equivalent to the background of the system when starting the computer, and can control some Hardware startup and other functions, so if users want to enter the BIOS, they need a method to enter. Here is an introduction to the method of entering the BIOS in Windows 7. If you want to enter, you can refer to it.
What is the method to enter bios in Windows 7
1. Press the ESC key
Press the power switch of the laptop, enter the startup desktop, and immediately press the ESC key quickly.
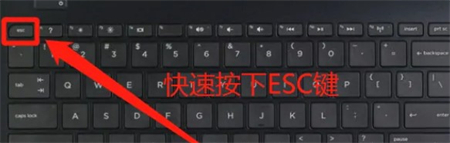
2. Enter the BIOS interface
Press the ESC key quickly until you enter the BIOS interface.

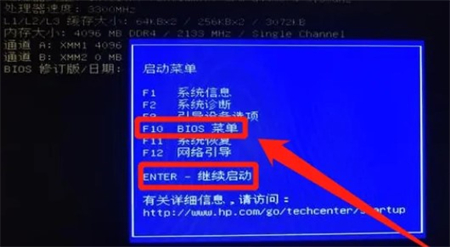
3. Press the F10 key
You can also press the F10 key to select the BIOS menu item after entering the startup desktop, and then press Enter to enter BIOS interface.
The above is the content of how to enter the bios in Windows 7. I hope it can help everyone.
The above is the detailed content of Introduction to how to enter bios in windows 7. For more information, please follow other related articles on the PHP Chinese website!

Hot AI Tools

Undress AI Tool
Undress images for free

Undresser.AI Undress
AI-powered app for creating realistic nude photos

AI Clothes Remover
Online AI tool for removing clothes from photos.

Clothoff.io
AI clothes remover

Video Face Swap
Swap faces in any video effortlessly with our completely free AI face swap tool!

Hot Article
Hot Tools

Notepad++7.3.1
Easy-to-use and free code editor

SublimeText3 Chinese version
Chinese version, very easy to use

Zend Studio 13.0.1
Powerful PHP integrated development environment

Dreamweaver CS6
Visual web development tools

SublimeText3 Mac version
God-level code editing software (SublimeText3)


 How to Fix the BAD_POOL_CALLER Blue Screen Error in Windows
Aug 16, 2025 am 02:47 AM
How to Fix the BAD_POOL_CALLER Blue Screen Error in Windows
Aug 16, 2025 am 02:47 AM
Restartyourcomputertoresolvepotentialtemporaryglitches.2.BootintoSafeModebytriggeringAutomaticRepairandselectingStartupSettingstoisolatetheissue.3.Uninstallorrollbackrecentlyinstalleddriversorsoftware,especiallygraphics,network,orstoragedrivers,andup
 How to enable BitLocker in Windows
Aug 17, 2025 pm 02:25 PM
How to enable BitLocker in Windows
Aug 17, 2025 pm 02:25 PM
BitLockerisavailableonWindows10/11Pro,Enterprise,andEducation,butnotonHomeedition—usedeviceencryptioninsteadifsupported.2.EnsureyoursystemhasaTPM1.2orhigher,administratorrights,andatleasttwopartitions.3.EnableBitLockerviaControlPanelbyselectingthedri
 Fixed: Windows Is Getting 'IRQL_NOT_LESS_OR_EQUAL' Error
Aug 15, 2025 pm 04:12 PM
Fixed: Windows Is Getting 'IRQL_NOT_LESS_OR_EQUAL' Error
Aug 15, 2025 pm 04:12 PM
First try to enter safe mode to eliminate third-party drivers or software problems. 1. Restart and interrupt startup three times in a row to enter automatic repair. Select the boot settings in the advanced options and press F4 or F5 to enable safe mode after restarting; 2. Update or roll back suspicious drivers, especially network, display, disk and USB controller drivers, which can be operated through the device manager or manually downloaded from the manufacturer's official website; 3. Run Windows Memory Diagnostic Tool (mdsched.exe) or use MemTest86 to detect RAM errors, and replace the memory stick if necessary; 4. Use the sfc/scannow and DISM/Online/Cleanup-Image/RestoreHealth commands to repair the system text
 How to find your Windows version number
Aug 15, 2025 pm 04:16 PM
How to find your Windows version number
Aug 15, 2025 pm 04:16 PM
PressWindowskey I,gotoSystem>AbouttoseeWindowsedition,version,andOSbuild.2.PressWindowskey R,typewinver,andpressEntertoopenawindowshowingtheversionandbuildnumber.3.OpenCommandPromptorPowerShellandtypeverorrunGet-ComputerInfotodisplayversiondetails
 How to fix 'The activation server determined the specified product key has been blocked' in Windows
Aug 16, 2025 pm 12:32 PM
How to fix 'The activation server determined the specified product key has been blocked' in Windows
Aug 16, 2025 pm 12:32 PM
VerifytheproductkeywaspurchasedfromMicrosoftoranauthorizedretailerandavoidgray-marketsellers.2.Ensurethekeyhasn’tbeenoverused;deactivateonolddevicesandlinkthekeytoyourMicrosoftaccount.3.ContactMicrosoftSupportwithproofofpurchasetorequestunblockingora
 The computer's system tray icon is messy, how to organize it?
Aug 21, 2025 pm 08:12 PM
The computer's system tray icon is messy, how to organize it?
Aug 21, 2025 pm 08:12 PM
Hide the system tray icon without affecting the program operation, only removes the visual display; 2. Completely clean up and disable non-essential startup items through the task manager; 3. Resolve the mess and uninstall the software and develop the habit of canceling the bundling and checking during installation, so as to achieve the dual goals of visual refreshing and resource optimization.
 How to choose the right edition of Windows to install?
Aug 17, 2025 pm 01:04 PM
How to choose the right edition of Windows to install?
Aug 17, 2025 pm 01:04 PM
Formostusers,Windows10/11Homeissufficient;chooseWindowsProifyouneedbusinessfeatureslikeBitLocker,RemoteDesktop,orHyper-V,1.Homeisidealforeverydayuse,2.Prosuitsremoteworkersandsmallbusinesses,3.ProforWorkstationsbenefitshigh-performanceusers,4.Educati
 Fixed: Windows Is Getting 'api-ms-win-crt-runtime-l1-1-0.dll is missing' Error
Aug 17, 2025 pm 02:13 PM
Fixed: Windows Is Getting 'api-ms-win-crt-runtime-l1-1-0.dll is missing' Error
Aug 17, 2025 pm 02:13 PM
First, install the latest Windows updates, then install the Microsoft VisualC Redistributable package, then run the System File Checker (SFC) to repair the system files, and finally avoid manually downloading the DLL file. The specific steps are: 1. Go to Control Panel > Windows Update, install all important updates, especially "UniversalCRuntime" related updates, to ensure that the system has SP1 and IE11 installed; 2. Download and install VisualC Redistributable2015-2022 (x86 and x64 versions); 3. Run "sfc/scann as an administrator