


Windows 7 recycle bin deleted repair example tutorial

Win7's Recycle Bin is very important, it can help us delete unused data and software, but some friends will accidentally delete the Recycle Bin, so how to restore the deleted Win7 Recycle Bin, in fact Just find it again.
How to restore the deleted recycle bin in win7:
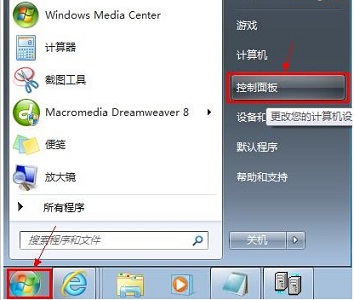
1. The recycle bin icon is gone
1. If you only delete the recycle bin icon, then just open the "Control" Panel"
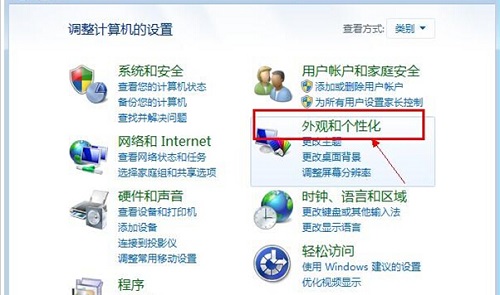
#2. Then open the "Appearance and Humanization" settings.
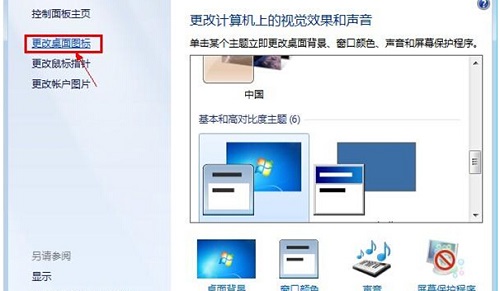
3. Then click "Change desktop icons" in the upper left corner
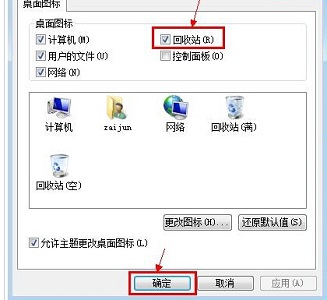
4. Finally, enable "Recycle" Station" and save to fix it.
2. Documents in the Recycle Bin
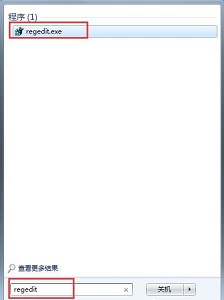
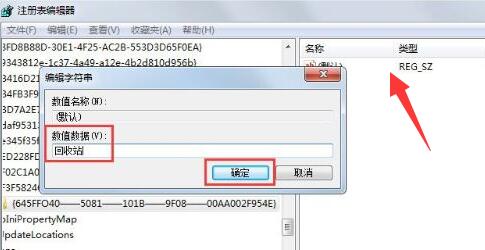
1. If you have cleared the Recycle Bin, retrieve and open the "regedit" registry file.
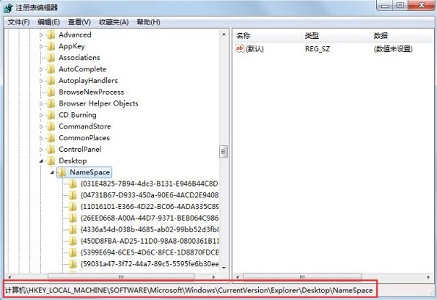
2. Then go to the "HEKEY_LOCAL_MACHIME/SOFTWARE/microsoft/WINDOWS/CURRENTVERSION/EXPLORER/DESKTOP/NAMESPACE" section.
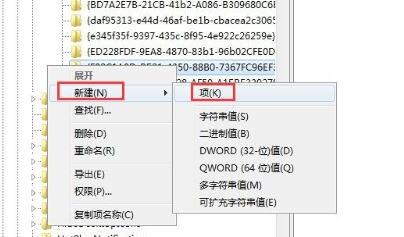
3. Then right-click the blank space on the left side of the mouse and select "New Create" a "item"
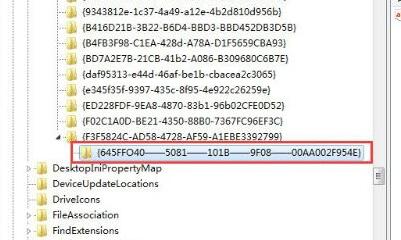
4. Name the newly created item "{645FFO40——5081——101B——9F08——00AA002F954E}"
5. Finally, double-click the mouse to open the registration on the right Table file, change the data to the "Recycle Bin" and save it explicitly to restore the data.
The above is the detailed content of Windows 7 recycle bin deleted repair example tutorial. For more information, please follow other related articles on the PHP Chinese website!

Hot AI Tools

Undress AI Tool
Undress images for free

Undresser.AI Undress
AI-powered app for creating realistic nude photos

AI Clothes Remover
Online AI tool for removing clothes from photos.

Clothoff.io
AI clothes remover

Video Face Swap
Swap faces in any video effortlessly with our completely free AI face swap tool!

Hot Article
Hot Tools

Notepad++7.3.1
Easy-to-use and free code editor

SublimeText3 Chinese version
Chinese version, very easy to use

Zend Studio 13.0.1
Powerful PHP integrated development environment

Dreamweaver CS6
Visual web development tools

SublimeText3 Mac version
God-level code editing software (SublimeText3)


 This Apple ID is not yet in use in the iTunes Store: Fix
Jun 10, 2024 pm 05:42 PM
This Apple ID is not yet in use in the iTunes Store: Fix
Jun 10, 2024 pm 05:42 PM
When logging into iTunesStore using AppleID, this error saying "This AppleID has not been used in iTunesStore" may be thrown on the screen. There are no error messages to worry about, you can fix them by following these solution sets. Fix 1 – Change Shipping Address The main reason why this prompt appears in iTunes Store is that you don’t have the correct address in your AppleID profile. Step 1 – First, open iPhone Settings on your iPhone. Step 2 – AppleID should be on top of all other settings. So, open it. Step 3 – Once there, open the “Payment & Shipping” option. Step 4 – Verify your access using Face ID. step
 Is it true that you can be blocked and deleted on WeChat and permanently unable to be added?
Apr 08, 2024 am 11:41 AM
Is it true that you can be blocked and deleted on WeChat and permanently unable to be added?
Apr 08, 2024 am 11:41 AM
1. First of all, it is false to block and delete someone permanently and not add them permanently. If you want to add the other party after you have blocked them and deleted them, you only need the other party's consent. 2. If a user blocks someone, the other party will not be able to send messages to the user, view the user's circle of friends, or make calls with the user. 3. Blocking does not mean deleting the other party from the user's WeChat contact list. 4. If the user deletes the other party from the user's WeChat contact list after blocking them, there is no way to recover after deletion. 5. If the user wants to add the other party as a friend again, the other party needs to agree and add the user again.
 How to delete WeChat Moments
Apr 08, 2024 pm 03:25 PM
How to delete WeChat Moments
Apr 08, 2024 pm 03:25 PM
1. Open the WeChat app, click [Me] in the lower right corner, find and click the [Moments] option. 2. Click [My Moments] in the upper right corner and find the content in the Moments you want to delete on the My Moments interface. 3. Click to enter the details page of this circle of friends, and click the [small trash can] icon to the right of the content release time. 4. Select [OK] in the pop-up window, thus completing the operation of deleting the content in the circle of friends.
 How to completely delete TikTok chat history
May 07, 2024 am 11:14 AM
How to completely delete TikTok chat history
May 07, 2024 am 11:14 AM
1. Open the Douyin app, click [Message] at the bottom of the interface, and click the chat conversation entry that needs to be deleted. 2. Long press any chat record, click [Multiple Select], and check the chat records you want to delete. 3. Click the [Delete] button in the lower right corner and select [Confirm deletion] in the pop-up window to permanently delete these records.
 iPhone stuck in airplane mode: How to fix it
Jun 15, 2024 pm 02:16 PM
iPhone stuck in airplane mode: How to fix it
Jun 15, 2024 pm 02:16 PM
Airplane mode is very convenient in some situations. However, the same airplane mode may give you a headache if your iPhone suddenly gets stuck on it. In this article, we have designed this set of solutions to get your iPhone out of airplane mode. Quick fix – 1. Try disabling Airplane Mode directly from Control Center. 2. If you are unable to disable Airplane Mode from Control Center, you can disable Airplane Mode directly from the Settings tab – If these tips don’t work, follow the fixes below to resolve the issue. Fix 1 – Force Restart Your Device The process of force restarting your device is very simple. All you have to do is follow these step-by-step instructions. Step 1 – You can start the process by pressing and releasing the Volume Up button. step
 Introduction to the method of deleting elements in a slice using Go language
Apr 02, 2024 pm 05:33 PM
Introduction to the method of deleting elements in a slice using Go language
Apr 02, 2024 pm 05:33 PM
There are three methods to remove slice elements in Go language: append function (not recommended), copy function and manually modifying the underlying array. The append function can delete tail elements, the copy function can delete middle elements, and manually modify the underlying array to directly assign and delete elements.
 How to delete electricity bill account number in Alipay
Apr 01, 2024 pm 05:11 PM
How to delete electricity bill account number in Alipay
Apr 01, 2024 pm 05:11 PM
Alipay is a payment software commonly used by many friends. It allows everyone to enjoy a convenient life. It can be easily processed through the software. It also supports deleting electricity bill account numbers. Please remember to learn the specific operation methods on the PHP Chinese website. . Introduction to the method of deleting electricity bill accounts with Alipay. First, open the Alipay APP on your mobile phone and enter it. Find [Life Payment] in the function options on the homepage, and then click to enter. 2. After coming to the living payment interface, there is an [Account Number Management]. After finding it, click on it to open it. 3. Next, you can view the bound electricity account number on the account management page. Click the [Delete] icon in the shape of a trash can behind the option you want to delete. 4. A window will pop up on the final page.
 iPhone stuck in Do Not Disturb mode: How to fix it
May 03, 2024 pm 09:07 PM
iPhone stuck in Do Not Disturb mode: How to fix it
May 03, 2024 pm 09:07 PM
Is your iPhone stuck in Do Not Disturb mode? It can be troublesome if you can't toggle Do Not Disturb mode. You won't receive any alerts at all. It won't take much effort to fix this DND issue on iPhone. So, no need to waste any more time and just follow these simple solutions to solve your problem. Fix 1 – Remove the Do Not Disturb schedule If you have any Do Not Disturb schedule on your phone, it may force the device to automatically go into Do Not Disturb mode. Step 1 – Go to your iPhone’s Settings. Step 2 – Next, turn on Focus mode. Step 3 – You will find “Do Not Disturb” at the top of the chart. Step 4 – Open it. Step 5 – On the next page, if you go to the Schedule tab, you