

Redis是一种高级key-value数据库。它跟memcached类似,不过数据可以持久化,而且支持的数据类型很丰富。有字符串,链表,集 合和有序集合。支持在服务器端计算集合的并,交和补集(difference)等,还支持多种排序功能。所以Redis也可以被看成是一个数据结构服务器。 PS:此次安装为redis储存字符串的形式,储存用户会话session。

软件包保存位置:/usr/local/src 软件包编译位置:/usr/local/src/redis-x-x/ 软件安装位置:/usr/local/redis/ 软件命令位置:/usr/local/redis/bin 软件日志保存位置:/usr/local/reids/redis.log 软件配置文件位置:/usr/local/redis/etc/redis.conf 软件pid文件位置:/var/run/redis.pid 软件启动服务位置:/etc/init.d/redis 软件认证需要密码
redis的准备工作,安装依赖包
Centos系列:
yum repolist yum -y install gcc gcc-c++ make gmake cmake zlib tcl
Ubuntu系列:
agt-get update Agt-get install gcc gcc-c++ make zlib tcl
下载包,安装redis
cd /usr/local/src \\进入软件包目录(规范化) wget http://download.redis.io/releases/redis-3.2.9.tar.gz \\下载软件包 tar -xzf redis-3.2.9.tar.gz \\#解压并进入redis目录cd redis-3.2.9 \\解压并进入redis目录#运行测试./runtest#预编译 编译安装make make test#进入src目录安装cd src make PREFIX=/usr/local/redis install PS:redis的编译安装过程漫长,在此处我们把redis编译安装到了"/usr/local/redis"目录了,默认情况下bin命令都是在"/usr/bin"下面直接可以调用redis的命令。指的安装路径后我们需要在后期添加系统环境变量。
Redis配置文件
创建redis的配置文件目录,拷贝配置文件redis.conf
mkdir -p /usr/local/redis/etc cp /usr/local/src/redis-3.2.9/redis.conf /usr/local/redis/etc/redis.conf
修改配置文件
vim /usr/local/redis/etc/redis.conf cat /usr/local/redis/etc/redis.conf |grep -v “^$” |grep -v “#
bind 0.0.0.0 \\修改内容=======对外监听 protected-mode yes port 6379 \\修改端口号=====按照需求 tcp-backlog 511 timeout 0 tcp-keepalive 300 daemonize yes \\守护进程模式打开,添加系统服务用的 supervised no pidfile /var/run/redis.pid \\pid的位置 loglevel verbose \\日志启动级别 logfile /usr/local/redis/redis.log \\日志保存位置 databases 16 \\reids 数据库个数 save 900 1 save 300 10 save 60 10000 stop-writes-on-bgsave-error yes rdbcompression yes rdbchecksum yes dbfilename dump.rdb dir ./ slave-serve-stale-data yes slave-read-only yes repl-diskless-sync no repl-diskless-sync-delay 5 repl-disable-tcp-nodelay no slave-priority 100 requirepass mima \\访问身份验证=================密码 maxmemory 256m \\最大内存设置 maxmemory-policy volatile-ttl \\redis最大内存丢弃规则 appendonly no appendfilename "appendonly.aof"appendfsync everysec no-appendfsync-on-rewrite no auto-aof-rewrite-percentage 100 auto-aof-rewrite-min-size 64mb aof-load-truncated yes lua-time-limit 5000 slowlog-log-slower-than 10000 slowlog-max-len 128 latency-monitor-threshold 0 notify-keyspace-events ""hash-max-ziplist-entries 512hash-max-ziplist-value 64 list-max-ziplist-size -2 list-compress-depth 0set-max-intset-entries 512 zset-max-ziplist-entries 128 zset-max-ziplist-value 64 hll-sparse-max-bytes 3000 activerehashing yes client-output-buffer-limit normal 0 0 0
配置文件修改内容:
port 6379 修改端口号bind 0.0.0.0 修改绑定IP(按需求) timeout 0 修改连接超时时间 loglevel verbose 日志三种类型debug、verbose、notice、warn logfile /var/log/redis.log 日志目录***** maxmemory 256m redis的内存大小*** maxmemory-policy volatile-ttl 内存丢弃策略 requirepass 密码 redis认证规则**(按需求)
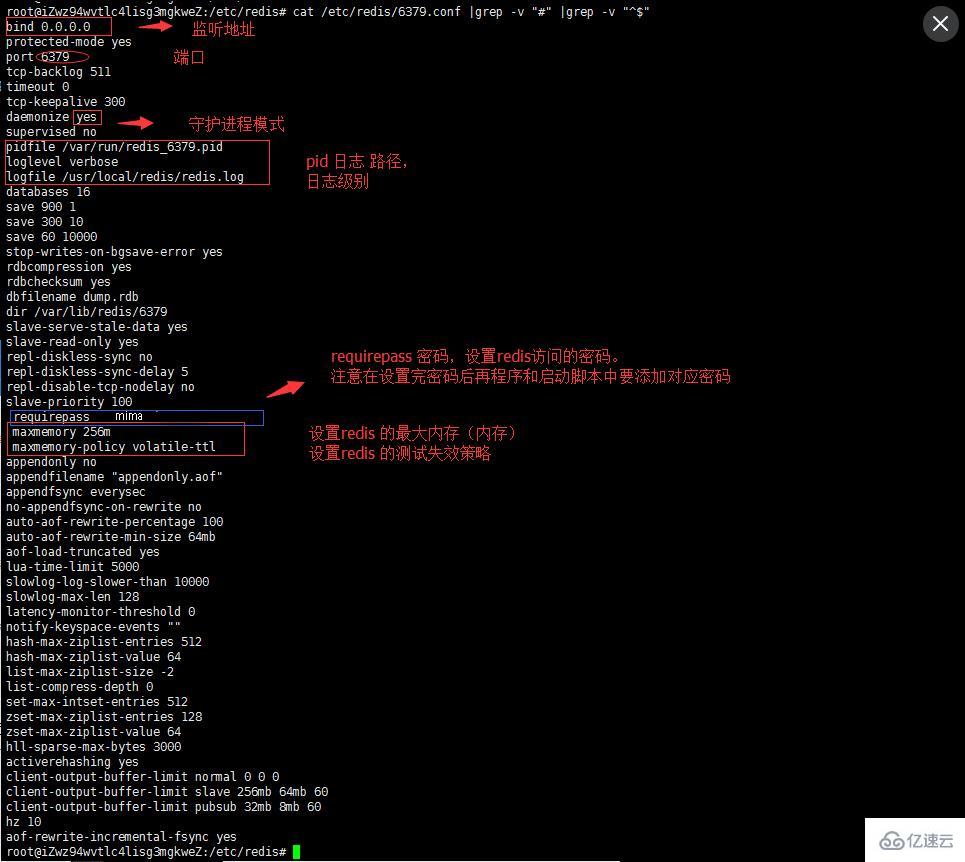 PS:注意配置日志和pid等的位置,要和启动脚本关联。密码也要和启动脚本关联。
创建修改系统启动配置文件
创建系统服务启动文件
启动文件的模板:/usr/local/src/redis-3.2.9/utils/redis_init_script
cp /usr/local/src/redis-3.2.9/utils/redis_init_script /etc/init.d/redis chmod 755 /etc/init.d/redis
修改系统启动脚本
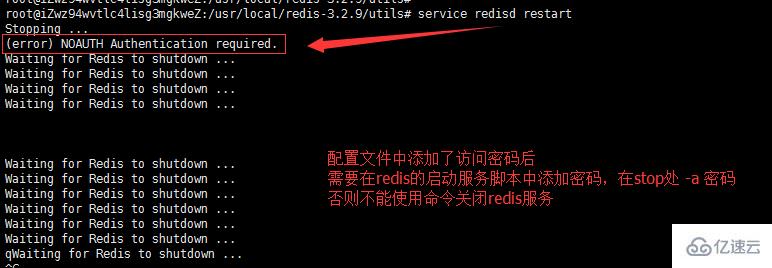
#!/bin/sh#Configurations injected by install_server below....EXEC=/usr/local/redis/bin/redis-server ######服务命令启动#####CLIEXEC=/usr/local/redis/bin/redis-cli ####客户端命令路径###PIDFILE=/var/run/redis.pid ###pid文件所在位置#####要和配置文件一致CONF="/usr/local/redis/etc/redis.conf" ####redis配置文件的路径##REDISPORT="6379" #####启动端口##################### SysV Init Information# chkconfig: - 58 74 #####添加内容,注释但有意义####### description: redis_6379 is the redis daemon.### BEGIN INIT INFO# Provides: redis_6379 #####启动端口##################### Required-Start: $network $local_fs $remote_fs# Required-Stop: $network $local_fs $remote_fs# Default-Start: 2 3 4 5# Default-Stop: 0 1 6# Should-Start: $syslog $named# Should-Stop: $syslog $named# Short-Description: start and stop redis_6379# Description: Redis daemon### END INIT INFO case "$1" in start) if [ -f $PIDFILE ] then echo "$PIDFILE exists, process is already running or crashed" else echo "Starting Redis server..." $EXEC $CONF fi ;; stop) if [ ! -f $PIDFILE ] then echo "$PIDFILE does not exist, process is not running" else PID=$(cat $PIDFILE) echo "Stopping ..." $CLIEXEC -p $REDISPORT -a mima shutdown \\###修改内容,添加-a密码验证的项目###while [ -x /proc/${PID} ] do echo "Waiting for Redis to shutdown ..." sleep 1 done echo "Redis stopped" fi ;; status) PID=$(cat $PIDFILE) if [ ! -x /proc/${PID} ] then echo 'Redis is not running' else echo "Redis is running ($PID)" fi ;; restart) $0 stop $0 start ;; *) echo "Please use start, stop, restart or status as first argument" ;;esac
PS:看过《Linux就该这样学》的人都知道系统启动文件怎么写,什么格式,在这里我们就不在解释了。
redis 启动脚本添加认证两个方法
方法一: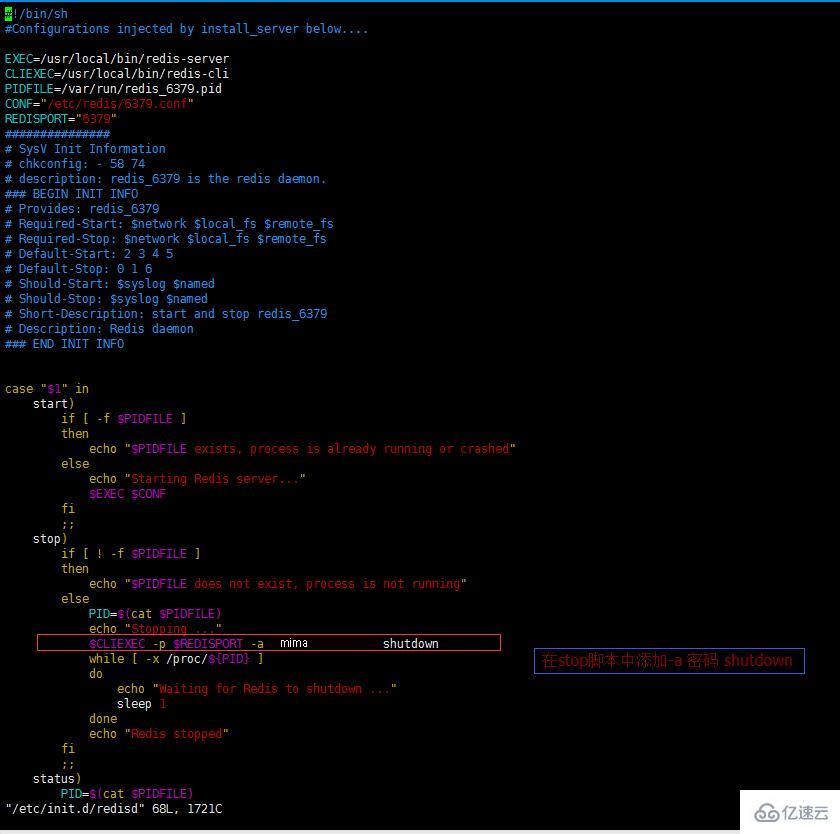 方法二:
方法二: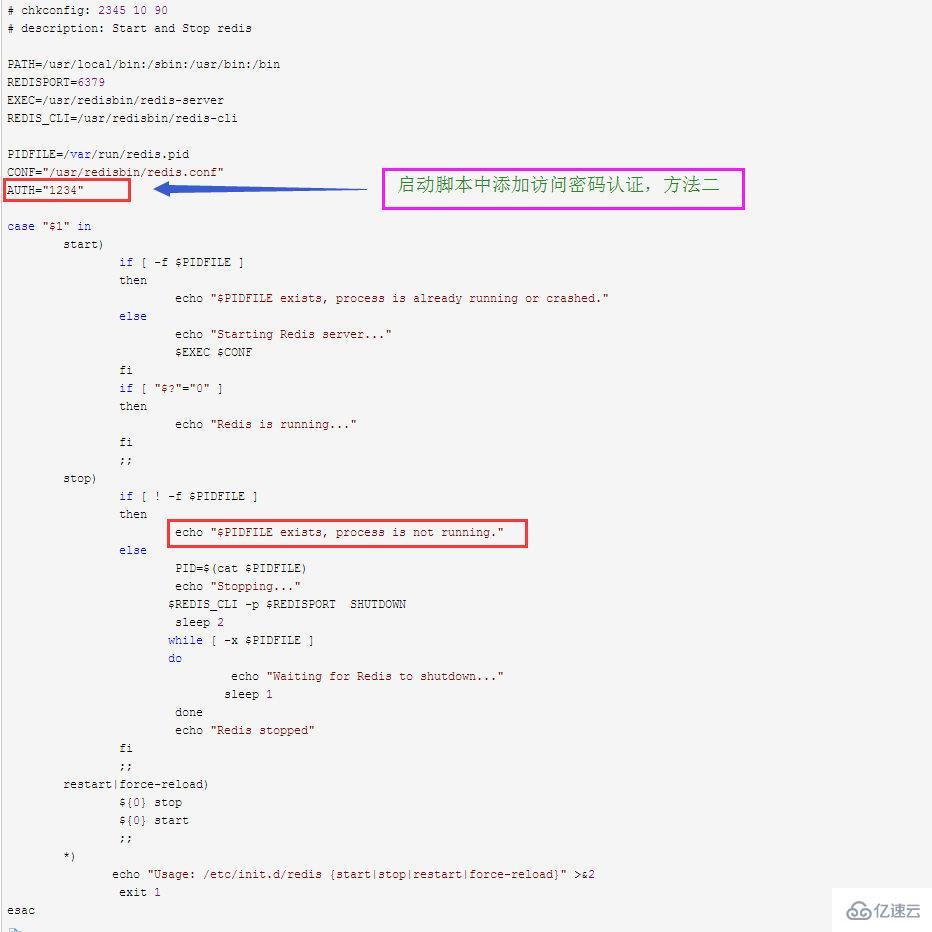
将启动脚本添加到系统服务
chkconfig --add redis #添加系统服务chkconfig redis on #设置开机自启service redis start service redis status service redis stop service redis restart
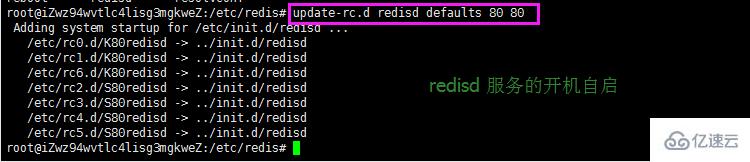
Ubuntu系统没有chkconfig
PS:chkconfig 在ubuntu系统中有可能不太容易安装,可以使用update-rc.d 命令来进行使用。
update-rc.d redisd defaults 80 80 root@linuxprobe:/etc/redis# update-rc.d redisd defaults 80 80Adding system startup for /etc/init.d/redisd ... /etc/rc0.d/K80redisd -> ../init.d/redisd /etc/rc1.d/K80redisd -> ../init.d/redisd /etc/rc6.d/K80redisd -> ../init.d/redisd /etc/rc2.d/S80redisd -> ../init.d/redisd /etc/rc3.d/S80redisd -> ../init.d/redisd /etc/rc4.d/S80redisd -> ../init.d/redisd /etc/rc5.d/S80redisd -> ../init.d/redisd 2345 启动 0 1 6 关闭
如果在启动脚本里没有添加认证字段:
启动文件的一致性
The above is the detailed content of How to configure single instance redis in Linux. For more information, please follow other related articles on the PHP Chinese website!


![[Web front-end] Node.js quick start](https://img.php.cn/upload/course/000/000/067/662b5d34ba7c0227.png)


