


How Docker uses nginx to build a tomcat cluster

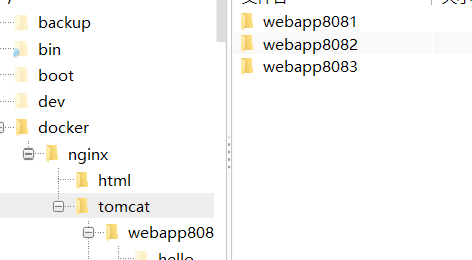
First create the tomcat folder. In order to facilitate the configuration of docker, I will create it directly in the root directory. Step 1: Create the folder: publish the folder
mkdir -p /docker/tomcat/webapp8081

mkdir -p /docker/tomcat/webapp8082

mkdir -p /docker/tomcat/webapp8083
Step 2: Create a tomcat container (the port can be changed according to your actual situation)
docker run -d --name tomcat8081 -p 8081:8080 -v /docker/tomcat/webapp8081:/usr/local/tomcat/webapps/ tomcat
docker run -d --name tomcat8082 -p 8082:8080 -v /docker/tomcat/webapp8082:/usr/local/tomcat/webapps/ tomcat
docker run -d --name tomcat8083 -p 8083:8080 -v /docker/tomcat/webapp8083:/usr/local/tomcat/webapps/ tomcat
After the creation is completed, use the docker ps command to check whether the creation is successful and use

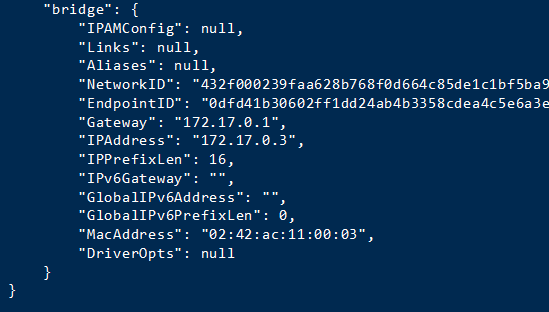
Step 3: Check tomcat’s ip. Use the command to query. Only the first example is used.
docker inspect tomcat8081
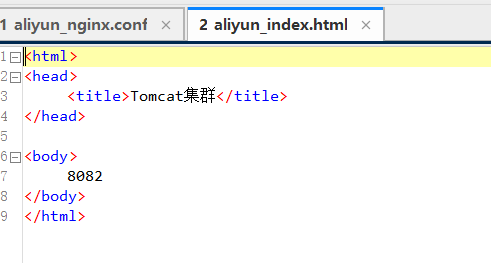
Step 4: In order to facilitate testing, I will not upload the war package here, and directly create a hello/index.html file in it
Note: If nginx is docker The container must use the tomact container ip, otherwise it will not be connected.
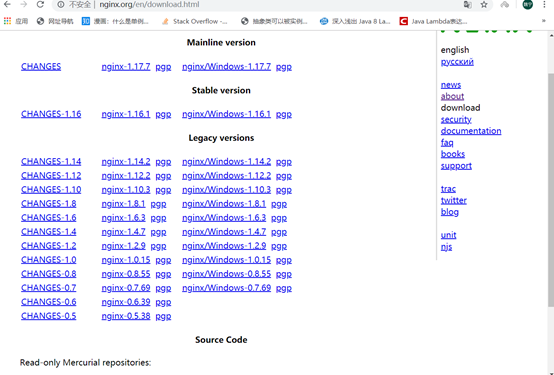
First download the official version of nginx from the official website
Official website:
Click download on the right navigation bar to enter the download Select the corresponding version in the interface to download. I will use nginx-1.6.2.tar
After the download is completed, put the file in a custom folder. Here I will Place it in /usr/local/tools/nginx-1.6.2

Use this command to decompress nginx:
tar vxf nginx-1.6 .2.tar.gz
After decompression is completed, I return to the root directory and create a host folder in the root directory. The purpose is to create files so that nginx can be mounted (you can also Customized)
Create the host folder here
mkdir -p /docker/nginx/
vim /docker/nginx/nginx.conf
mkdir -p /docker/nginx/html
Copy the index.html 50x.html in the html folder in negix you decompressed to the /docker/nginx/html folder
Here is a negix conf file. If you add annotations, the format may change. Remember to delete the annotations.
nginx.conf:
user root;
worker_processes 2; #Set your number of threads here
#error_log logs/error.log;
#error_log logs/error.log notice;
#error_log logs/error.log info;
#pid logs/nginx.pid;
events {
worker_connections 1024; #最大连接数量
}
http {
include mime.types;
default_type application/octet-stream;
upstream mytomcat{
server 172.17.0.3:8080 weight=10;
# 另外mytomcat 这里名字和下方的名字保持一致 这里需要和你的tomcat ip保持一致
server 172.17.0.4:8080 weight=50;
server 172.17.0.5:8080 weight=10;
}
#log_format main '$remote_addr - $remote_user [$time_local] "$request" '
# '$status $body_bytes_sent "$http_referer" '
# '"$http_user_agent" "$http_x_forwarded_for"';
#access_log logs/access.log main;
sendfile on;
#tcp_nopush on;
#keepalive_timeout 0;
keepalive_timeout 65;
#gzip on;
server {
listen 80;
server_name mytomcat;
#charset koi8-r;
#access_log logs/host.access.log main;
location / {
# root html;
# index index.html index.htm;
proxy_connect_timeout 50;
proxy_read_timeout 10;
proxy_send_timeout 20;
proxy_pass http://mytomcat;
}
#error_page 404 /404.html;
# redirect server error pages to the static page /50x.html
#
error_page 500 502 503 504 /50x.html;
location = /50x.html {
root html;
}
# proxy the php scripts to apache listening on 127.0.0.1:80
#
#location ~ \.php$ {
# proxy_pass http://127.0.0.1;
#}
# pass the php scripts to fastcgi server listening on 127.0.0.1:9000
#
#location ~ \.php$ {
# root html;
# fastcgi_pass 127.0.0.1:9000;
# fastcgi_index index.php;
# fastcgi_param script_filename /scripts$fastcgi_script_name;
# include fastcgi_params;
#}
# deny access to .htaccess files, if apache's document root
# concurs with nginx's one
#
#location ~ /\.ht {
# deny all;
#}
}
# another virtual host using mix of ip-, name-, and port-based configuration
#
#server {
# listen 8000;
# listen somename:8080;
# server_name somename alias another.alias;
# location / {
# root html;
# index index.html index.htm;
# }
#}
# https server
#
#server {
# listen 443 ssl;
# server_name localhost;
# ssl_certificate cert.pem;
# ssl_certificate_key cert.key;
# ssl_session_cache shared:ssl:1m;
# ssl_session_timeout 5m;
# ssl_ciphers high:!anull:!md5;
# ssl_prefer_server_ciphers on;
# location / {
# root html;
# index index.html index.htm;
# }
#}
}
Use docker to start
Create and run the container
81:Yes The port for external network access can be modified according to the actual situation
/docker/nginx/nginx.conf The local host file
/etc/nginx/nginx.conf The decompressed directory (it can also be used without Change)
/docker/nginx/html Local host file
/usr/share/nginx/html Unzipped directory
docker run -d --name nginx81 -p 81:80 -v /docker/nginx/nginx.conf:/etc/nginx/nginx.conf -v /docker/nginx/html:/usr/share/nginx/html nginx
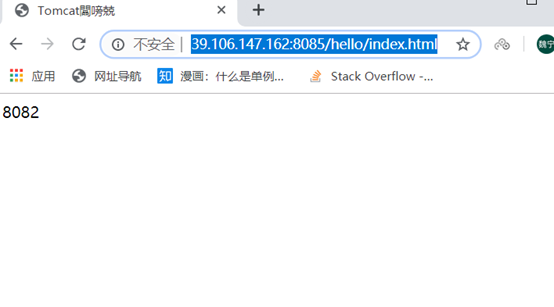
Test
http ://39.106.147.162:8085/hello/index.html What I configure here is port 8085
Direct access
The above is the detailed content of How Docker uses nginx to build a tomcat cluster. For more information, please follow other related articles on the PHP Chinese website!

Hot AI Tools

Undress AI Tool
Undress images for free

Undresser.AI Undress
AI-powered app for creating realistic nude photos

AI Clothes Remover
Online AI tool for removing clothes from photos.

Clothoff.io
AI clothes remover

Video Face Swap
Swap faces in any video effortlessly with our completely free AI face swap tool!

Hot Article
Hot Tools

Notepad++7.3.1
Easy-to-use and free code editor

SublimeText3 Chinese version
Chinese version, very easy to use

Zend Studio 13.0.1
Powerful PHP integrated development environment

Dreamweaver CS6
Visual web development tools

SublimeText3 Mac version
God-level code editing software (SublimeText3)


 How to use PHP to develop a Q&A community platform Detailed explanation of PHP interactive community monetization model
Jul 23, 2025 pm 07:21 PM
How to use PHP to develop a Q&A community platform Detailed explanation of PHP interactive community monetization model
Jul 23, 2025 pm 07:21 PM
1. The first choice for the Laravel MySQL Vue/React combination in the PHP development question and answer community is the first choice for Laravel MySQL Vue/React combination, due to its maturity in the ecosystem and high development efficiency; 2. High performance requires dependence on cache (Redis), database optimization, CDN and asynchronous queues; 3. Security must be done with input filtering, CSRF protection, HTTPS, password encryption and permission control; 4. Money optional advertising, member subscription, rewards, commissions, knowledge payment and other models, the core is to match community tone and user needs.
 How to set environment variables in PHP environment Description of adding PHP running environment variables
Jul 25, 2025 pm 08:33 PM
How to set environment variables in PHP environment Description of adding PHP running environment variables
Jul 25, 2025 pm 08:33 PM
There are three main ways to set environment variables in PHP: 1. Global configuration through php.ini; 2. Passed through a web server (such as SetEnv of Apache or fastcgi_param of Nginx); 3. Use putenv() function in PHP scripts. Among them, php.ini is suitable for global and infrequently changing configurations, web server configuration is suitable for scenarios that need to be isolated, and putenv() is suitable for temporary variables. Persistence policies include configuration files (such as php.ini or web server configuration), .env files are loaded with dotenv library, and dynamic injection of variables in CI/CD processes. Security management sensitive information should be avoided hard-coded, and it is recommended to use.en
 How to build a PHP Nginx environment with MacOS to configure the combination of Nginx and PHP services
Jul 25, 2025 pm 08:24 PM
How to build a PHP Nginx environment with MacOS to configure the combination of Nginx and PHP services
Jul 25, 2025 pm 08:24 PM
The core role of Homebrew in the construction of Mac environment is to simplify software installation and management. 1. Homebrew automatically handles dependencies and encapsulates complex compilation and installation processes into simple commands; 2. Provides a unified software package ecosystem to ensure the standardization of software installation location and configuration; 3. Integrates service management functions, and can easily start and stop services through brewservices; 4. Convenient software upgrade and maintenance, and improves system security and functionality.
 How to make PHP container support automatic construction? Continuously integrated CI configuration method of PHP environment
Jul 25, 2025 pm 08:54 PM
How to make PHP container support automatic construction? Continuously integrated CI configuration method of PHP environment
Jul 25, 2025 pm 08:54 PM
To enable PHP containers to support automatic construction, the core lies in configuring the continuous integration (CI) process. 1. Use Dockerfile to define the PHP environment, including basic image, extension installation, dependency management and permission settings; 2. Configure CI/CD tools such as GitLabCI, and define the build, test and deployment stages through the .gitlab-ci.yml file to achieve automatic construction, testing and deployment; 3. Integrate test frameworks such as PHPUnit to ensure that tests are automatically run after code changes; 4. Use automated deployment strategies such as Kubernetes to define deployment configuration through the deployment.yaml file; 5. Optimize Dockerfile and adopt multi-stage construction
 Creating Production-Ready Docker Environments for PHP
Jul 27, 2025 am 04:32 AM
Creating Production-Ready Docker Environments for PHP
Jul 27, 2025 am 04:32 AM
Using the correct PHP basic image and configuring a secure, performance-optimized Docker environment is the key to achieving production ready. 1. Select php:8.3-fpm-alpine as the basic image to reduce the attack surface and improve performance; 2. Disable dangerous functions through custom php.ini, turn off error display, and enable Opcache and JIT to enhance security and performance; 3. Use Nginx as the reverse proxy to restrict access to sensitive files and correctly forward PHP requests to PHP-FPM; 4. Use multi-stage optimization images to remove development dependencies, and set up non-root users to run containers; 5. Optional Supervisord to manage multiple processes such as cron; 6. Verify that no sensitive information leakage before deployment
 How to build an independent PHP task container environment. How to configure the container for running PHP timed scripts
Jul 25, 2025 pm 07:27 PM
How to build an independent PHP task container environment. How to configure the container for running PHP timed scripts
Jul 25, 2025 pm 07:27 PM
Building an independent PHP task container environment can be implemented through Docker. The specific steps are as follows: 1. Install Docker and DockerCompose as the basis; 2. Create an independent directory to store Dockerfile and crontab files; 3. Write Dockerfile to define the PHPCLI environment and install cron and necessary extensions; 4. Write a crontab file to define timing tasks; 5. Write a docker-compose.yml mount script directory and configure environment variables; 6. Start the container and verify the log. Compared with performing timing tasks in web containers, independent containers have the advantages of resource isolation, pure environment, strong stability, and easy expansion. To ensure logging and error capture
 How to use Kubernetes to keep PHP environment consistent Production and local container configuration standards
Jul 25, 2025 pm 06:21 PM
How to use Kubernetes to keep PHP environment consistent Production and local container configuration standards
Jul 25, 2025 pm 06:21 PM
To solve the problem of inconsistency between PHP environment and production, the core is to use Kubernetes' containerization and orchestration capabilities to achieve environmental consistency. The specific steps are as follows: 1. Build a unified Docker image, including all PHP versions, extensions, dependencies and web server configurations to ensure that the same image is used in development and production; 2. Use Kubernetes' ConfigMap and Secret to manage non-sensitive and sensitive configurations, and achieve flexible switching of different environment configurations through volume mounts or environment variable injection; 3. Ensure application behavior consistency through unified Kubernetes deployment definition files (such as Deployment and Service) and include in version control; 4.
 How to use PHP to develop e-commerce backend monetization PHP e-commerce system architecture and profit strategy
Jul 25, 2025 pm 06:33 PM
How to use PHP to develop e-commerce backend monetization PHP e-commerce system architecture and profit strategy
Jul 25, 2025 pm 06:33 PM
1. The mainstream frameworks of PHP e-commerce backend include Laravel (fast development, strong ecology), Symfony (enterprise-level, stable structure), Yii (excellent performance, suitable for standardized modules); 2. The technology stack needs to be equipped with MySQL Redis cache, RabbitMQ/Kafka message queue, Nginx PHP-FPM, and front-end separation is considered; 3. High concurrency architecture should be layered and modular, database read and write separation/distributed database, accelerated with cache and CDN, asynchronous processing of tasks, sharing of load balancing and Session, gradually microservice, and establish a monitoring and alarm system; 4. Multiple monetization paths include product price difference or platform commission, site advertising, SaaS subscription, customized development and plug-in market, API connection
