liunx PHP installation redis extension method: 1. Check the redis version; 2. Download the installation package through the wget command and decompress the installation package through "tar zxf"; 3. Execute "cd redis -4.0.8/src make" to install redis.
linux installation redis
linux installation redis is very simple, the official website has an introduction.
Install redis:
1. Check the redis version first
2. Install redis
#2.1 下载安装包 wget http://download.redis.io/releases/redis-4.0.8.tar.gz #2.2 解压 tar zxf redis-4.0.8.tar.gz

1 is the downloaded installation package, 2 is the decompressed folder. Remember this file directory. I decompressed it under /root. The files in this redis directory will be used for subsequent startup
#2.3编译 cd redis-4.0.8/src make
undefined
#2.4 新建redis文件夹 mkdir /usr/local/redis
#2.5移动文件 cd redis-4.0.8/src mv redis-server /usr/local/redis mv redis-benchmark /usr/local/redis mv redis-cli /usr/local/redis cd ../ mv redis.conf /usr/local/redis

#2.6 启动redis cd /usr/local/redis ./redis-server #这个是以默认配置开启,配置文件redis.conf 开机自启要用到。

As shown in the picture above, start according to the configuration file, and it will prompt that the startup is successful.
Possible warnings:
WARNING: The TCP backlog setting of 511 cannot be enforced because /proc/sys/net/core/somaxconn is set to the lower value of 128.
Solution:
vim /etc/sysctl.conf
Start another line and add:
net.core.somaxconn = 511
Save and exit
Then: sysctl -p
WARNING overcommit_memory is set to 0! Background save may fail under low memory condition. To fix this issue add 'vm.overcommit_memory = 1' to /etc/sysctl.conf and then reboot or run the command 'sysctl vm.overcommit_memory=1' for this to take effect.
Solution:
vim /etc/sysctl.conf
Newline add:
vm.overcommit_memory=1
Save and exit
sysctl -p
WARNING you have Transparent Huge Pages (THP) support enabled in your kernel. This will create latency and memory usage issues with Redis. To fix this issue run the command 'echo never > /sys/kernel/mm/transparent_hugepage/enabled' as root, and add it to your /etc/rc.local in order to retain the setting after a reboot. Redis must be restarted after THP is disabled.
Solution:
vim /etc/rc.local
Newline addition:
if test -f /sys/kernel/mm/transparent_hugepage/enabled; then echo never > /sys/kernel/mm/transparent_hugepage/enabled fi
Save and exit
Restart the system, restart the server:
reboot
Generally, a new server will have these three warnings when it first installs redis and then starts it.
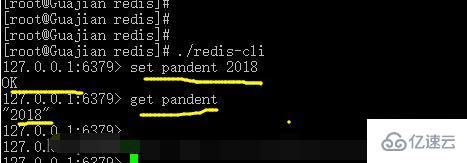
#2.7 连接redis,进行测试 ./redis-cli set pandent 2018 get pandent

The setting and retrieval are normal, indicating that redis has been installed successfully.
The above is the detailed content of How to install redis extension in liunx php. For more information, please follow other related articles on the PHP Chinese website!


