Virtual host: Normally, in order to make each server available to more users, a server can be divided into many virtual sub-servers. Each sub-server They are all independent of each other. These servers are separated based on virtualization technology, so that one server can be virtualized into many sub-servers. We call the sub-server a virtual host. After we set up the Nginx server, there is only one Nginx server at this time. If we configure the virtual host on this server, we can divide one Nginx server into multiple independent sub-servers.
There are two main steps to configure a virtual host in Nginx:
1. Create a virtual host IP
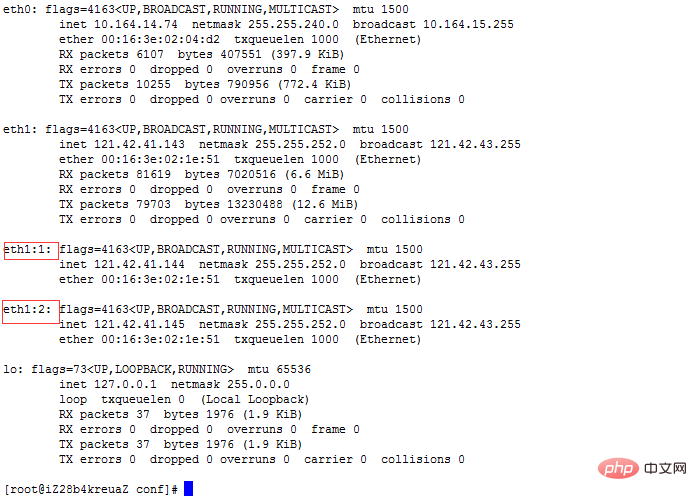
Check your own host IP through ifconfig, and then create a virtual host based on the host IP Host IP.
Command: ifconfig eth2:2 121.42.41.145 broadcast 121.42.43.255 netmask 255.255.252.0
As shown in the figure after execution:

2. Bind the IP address and virtual host.
nginx.conf: This file is the system configuration file of nginx. It is recommended not to change it. We generally use a custom file and then load the file to achieve the same effect.
Create the configuration file xnzj.conf in the /usr/local/nginx/conf directory.
#========工作衍生进程数(建议设置成与cpu核数相同或者2倍)==========
worker_processes  1;
#===========设置最大连接数==============
events {
    worker_connections  1024;
}
#============http协议的相关信息==============
http {
    server {
        #===========要监听虚拟主机的IP地址与端口==========
        listen 121.42.41.144:80;
        #===========该虚拟主机的名称===========
        server_name  121.42.41.144;
        #===============该虚拟主机服务器的日志文件=========
        access_log  logs/server144.access.log  combined;
        #============== 默认请求资源=============
        location / {
            root   html/server144;
            #===== nginx会先找index.html 如果没找到就找index.htm
            index  index.html index.htm;
        }
    }
    server {
        #===========要监听虚拟主机的IP地址与端口==========
        listen 121.42.41.145:80;
        #===========该虚拟主机的名称===========
        server_name  121.42.41.145;
        #===============该虚拟主机服务器的日志文件=========
        access_log  logs/server145.access.log  combined;
        #============== 默认请求资源=============
        location / {
            root   html/server145;
            index  index.html index.htm;
        }
    }
}Create the corresponding virtual host default resource under /usr/local/nginx/html
/usr/local/nginx/html/server144/index.html ;/usr /local/nginx/html/server145/index.html
Let Nginx load our customized configuration file (my configuration file: xnzj.conf)
Execute the command: /usr/local/nginx/sbin/nginx -c /usr/local/nginx/conf/xnzj.conf
The Nginx server is in When running, there will be various operations, and these key operation information will be recorded in files. These files are called log files. The records of log files are formatted. We can record according to the system's default format, or we can record according to our customized format. We can use the log_format directive to set the recording format of the Nginx server's log file.
Configuration method: Open the nginx.conf file and enable the commented lower code.
#combined:日志输出格式
     #remote_addr 客户端请求地址
     #remote_user:客户端用户名
     #request:请求的地址(服务器资源位置)
     #status:用户的请求状态
     #body_bytes_sent:服务器响应的资源大小(字节数),
     #http_referer:源网页
     #http_user_agent:客户端浏览器信息
     #http_x_forwarded_for:客户端Ip地址
    log_format  combined  '$remote_addr - $remote_user [$time_local] "$request" '
                      '$status $body_bytes_sent "$http_referer" '
                     '"$http_user_agent" "$http_x_forwarded_for"';
    #==================日志文件  access_log:off;表示关闭日志===========
access_log logs/access.log combined;Log cutting:
In order to make Nginx log file storage more reasonable and orderly, we need to store the log files separately. For example, we can separate them by time. Today’s log files Stored in a file, tomorrow's log file is stored in another new file, and so on. At this time, we will use the log file cutting operation.
Log cutting steps:
1. Create a batch file
Execute in the /usr/local/nginx/logs directory [root@iZ28b4kreuaZ logs]# touch cutlog.sh
2. Add content to the file:
D=$(date +%Y%m%d)
mv /usr/local/nginx/logs/access.log ${D}.log
kill -USR1 $(cat /usr/local/nginx/nginx.pid)3. Execute the batch file regularly. Execute the crontab -e command to add the following content
23 59 *** /bin/bash /usr/local/nginx/logs/cutlog.sh
When When we browse a web page in the browser, we will store some information on the web page (such as the pictures on the web page) locally. When we browse the web page for the second time, some of the information on the web page will be stored locally. Can be loaded from local, which will be much faster. This information stored locally is called cache. But when there are too many caches, the cache files will be very large, affecting our normal Internet activities. Therefore, the cache needs to be cleaned regularly.
Configuration method: /usr/local/nginx/conf/nginx.conf Add the following code under the location in http{ server{}} of the configuration file:
#====================缓存配置=============
       location ~.*\.(jpg|png|swf|gif)${
            expires 2d;#两天后清除
       }
       location ~.*\.(css|js)?${
        expires:1h;#
}The compression function we mentioned here refers to gzip compression technology. Through gzip compression technology, the content size of the original web page can be compressed to 30% of the original size. In this way, when users access the web page, the access speed will be much faster because the transmitted content is much smaller than the original content. Nginx server supports gzip compression technology, however, it needs to be configured.
Configuration method: /usr/local/nginx/conf/nginx.conf Add the following code in http{ } of the configuration file:
gzip  on;#开启压缩
    gzip_min_lenth 1k;#设置使用压缩的最小单位
    gzip_buffers 4 16k;#创建压缩文件缓存大小
    gzip_http_version 1.1;#使用压缩技术的协议 及其版本
gzip_vary:on;#开启判断客户端浏览器是否支持压缩技术When the client accesses a folder on the server through the browser, if there is a default homepage file on the folder, such as index.html, then the user will automatically access the index.html page. However, when there is no default homepage file such as index.html, assuming that there are other files in the folder at this time, the user cannot access the contents of our folder without configuring the automatic directory listing function. . But after we configure the automatic directory listing function, we can see a list of all files in the folder, and the list of directories is automatically listed.
Two conditions are required to realize automatic listing of directories:
1. There is no default homepage file such as index in the accessed folder.
2.服务器配置了自动列目录功能。
配置方式:/usr/local/nginx/conf/nginx.conf 配置文件的http{ server{}}中添加 如下代码:
location / {
            root   html;
            index  index.html index.htm;
            autoindex on;#开启自动列目录
}The above is the detailed content of How to configure Nginx virtual host. For more information, please follow other related articles on the PHP Chinese website!


