

 Operation and Maintenance
Nginx
How to set up Nginx and Tomcat servers to achieve load balancing under Debian
Operation and Maintenance
Nginx
How to set up Nginx and Tomcat servers to achieve load balancing under Debian
How to set up Nginx and Tomcat servers to achieve load balancing under Debian

Basic concept of load balancing
Load balancing (load balancing) is a computer network technology used to balance multiple computers (computer clusters), network connections, cpu, disks Distribute load among drives or other resources to optimize resource usage, maximize throughput, minimize response time, and avoid overload.
Using multiple server components with load balancing instead of a single component can improve reliability through redundancy. Load balancing services are usually performed by specialized software and hardware.
One of the most important applications of load balancing is to use multiple servers to provide a single service. This solution is sometimes called a server farm. Usually, load balancing is mainly used in web websites, large internet relay chat networks, high-traffic file download websites, nntp (network news transfer protocol) services and dns services. Now load balancers also start to support database services, called database load balancers.
For Internet services, a load balancer is usually a software program that listens on an external port. Internet users can access the service through this port, and the software as a load balancer will forward the user's request. To the backend intranet server, the intranet server returns the requested response to the load balancer, and the load balancer then sends the response to the user. This hides the intranet structure from Internet users and prevents users from directly accessing the backend (intranet). Server, making the server more secure and preventing attacks on the core network stack and services running on other ports.
When all backend servers fail, some load balancers will provide some special functions to handle this situation. For example, forwarding requests to a backup load balancer, displaying a message about a service outage, etc. Load balancers allow IT teams to significantly increase fault tolerance. It automatically provides large amounts of capacity to handle any increase or decrease in application traffic.
0. Preliminary preparation
Use debian environment. Install nginx (default installation), a web project, install tomcat (default installation), etc.
1. An nginx.conf configuration file
# 定义nginx运行的用户 和 用户组 如果对应服务器暴露在外面的话建议使用权限较小的用户 防止被入侵
# user www www;
#nginx进程数, 建议设置为等于cpu总核心数
worker_processes 8;
#开启全局错误日志类型
error_log /var/log/nginx/error.log info;
#进程文件
pid /var/run/nginx.pid;
#一个nginx进程打开的最多文件描述数目 建议与ulimit -n一致
#如果面对高并发时 注意修改该值 ulimit -n 还有部分系统参数 而并非这个单独确定
worker_rlimit_nofile 65535;
events{
 #使用epoll模型提高性能
 use epoll;
 #单个进程最大连接数
 worker_connections 65535;
}
http{
 #扩展名与文件类型映射表
 include mime.types;
 #默认类型
 default_type application/octet-stream;
 sendfile on;
 tcp_nopush on;
 tcp_nodelay on;
 keepalive_timeout 65;
 types_hash_max_size 2048;
 #日志
 access_log /var/log/nginx/access.log;
 error_log /var/log/nginx/error.log;
 #gzip 压缩传输
 gzip on;
 gzip_min_length 1k; #最小1k
 gzip_buffers 16 64k;
 gzip_http_version 1.1;
 gzip_comp_level 6;
 gzip_types text/plain application/x-javascript text/css application/xml application/javascript;
 gzip_vary on;
 #负载均衡组
 #静态服务器组
 upstream static.zh-jieli.com {
 server 127.0.0.1:808 weight=1;
 }
 #动态服务器组
 upstream zh-jieli.com {
 server 127.0.0.1:8080;
 #server 192.168.8.203:8080;
 }
 #配置代理参数
 proxy_redirect off;
 proxy_set_header host $host;
 proxy_set_header x-real-ip $remote_addr;
 proxy_set_header x-forwarded-for $proxy_add_x_forwarded_for;
 client_max_body_size 10m;
 client_body_buffer_size 128k;
 proxy_connect_timeout 65;
 proxy_send_timeout 65;
 proxy_read_timeout 65;
 proxy_buffer_size 4k;
 proxy_buffers 4 32k;
 proxy_busy_buffers_size 64k;
 #缓存配置
 proxy_cache_key '$host:$server_port$request_uri';
 proxy_temp_file_write_size 64k;
 proxy_temp_path /dev/shm/jielierp/proxy_temp_path;
 proxy_cache_path /dev/shm/jielierp/proxy_cache_path levels=1:2 keys_zone=cache_one:200m inactive=5d max_size=1g;
 proxy_ignore_headers x-accel-expires expires cache-control set-cookie;
server{
 listen 80;
 server_name erp.zh-jieli.com;
 location / {
 index index; #默认主页为 /index
 #proxy_pass http://jieli;
 }
 location ~ .*\.(js|css|ico|png|jpg|eot|svg|ttf|woff) {
 proxy_cache cache_one;
 proxy_cache_valid 200 304 302 5d;
 proxy_cache_valid any 5d;
 proxy_cache_key '$host:$server_port$request_uri';
 add_header x-cache '$upstream_cache_status from $host';
 proxy_pass http:
//static.zh-jieli.com;
 #所有静态文件直接读取硬盘
 # root /var/lib/tomcat7/webapps/jielierp/web-inf ;
 expires 30d; #缓存30天
 }
 #其他页面反向代理到tomcat容器
 location ~ .*$ {
 index index;
 proxy_pass http:
//zh-jieli.com;
 }
 }
 server{
 listen 808;
 server_name static;
 location / {
}
 location ~ .*\.(js|css|ico|png|jpg|eot|svg|ttf|woff) {
 #所有静态文件直接读取硬盘
 root /var/lib/tomcat7/webapps/jielierp/web-inf ;
 expires 30d; #缓存30天
 }
 }
}
Basically configure this file to achieve load. But it is more troublesome to understand the various relationships inside.
2. Basic explanation
Now suppose there is a computer 192.168.8.203, with tomcat deployed on it, and there is j2ee service on port 8080, through the browser You can browse the web normally. Now there is a problem. Tomcat is a relatively comprehensive web container. The processing of static web pages should be relatively resource intensive, especially the static pages must be read from the disk every time and then returned. This will consume tomcat resources and may affect the parsing performance of those dynamic pages. Adhering to the Linux philosophy, the principle that a software only does one thing. Tomcat should only handle jsp dynamic pages. Here we use nginx that we have learned before for reverse proxy. The first step is to act as a proxy to separate dynamic and static web pages. This is very simple.
worker_processes 8;

 pid /var/run/nginx.pid;

 worker_rlimit_nofile 65535;

 events{
 use epoll;
 worker_connections 65535;
 }

 http{
 include mime.types;
 default_type application/octet-stream;
 sendfile on;
 tcp_nopush on;
 tcp_nodelay on;
 keepalive_timeout 65;
 types_hash_max_size 2048;
proxy_redirect off;
 proxy_set_header host $host;
 proxy_set_header x-real-ip $remote_addr;
 proxy_set_header x-forwarded-for $proxy_add_x_forwarded_for;
 client_max_body_size 10m;
 client_body_buffer_size 128k;
 proxy_connect_timeout 65;
 proxy_send_timeout 65;
 proxy_read_timeout 65;
 proxy_buffer_size 4k;
 proxy_buffers 4 32k;
 proxy_busy_buffers_size 64k;

 server{
 listen 80;
 server_name xxx.com;
 location / {
 index index;
 }
 location ~ .*\.(js|css|ico|png|jpg|eot|svg|ttf|woff) {
 proxy_pass http:
//192.168.8.203:8080;
 expires 30d;
 }
 location ~ .*$ {
 index index;
 proxy_pass http:
//192.168.8.203:8080;
 }
 }
 }

worker_processes 8;
pid /var/run/nginx.pid;
worker_rlimit_nofile 65535;
events{
 use epoll;
 worker_connections 65535;
 }
http{
 include mime.types;
 default_type application/octet-stream;
 sendfile on;
 tcp_nopush on;
 tcp_nodelay on;
 keepalive_timeout 65;
 types_hash_max_size 2048;
proxy_redirect off;
 proxy_set_header host $host;
 proxy_set_header x-real-ip $remote_addr;
 proxy_set_header x-forwarded-for $proxy_add_x_forwarded_for;
 client_max_body_size 10m;
 client_body_buffer_size 128k;
 proxy_connect_timeout 65;
 proxy_send_timeout 65;
 proxy_read_timeout 65;
 proxy_buffer_size 4k;
 proxy_buffers 4 32k;
 proxy_busy_buffers_size 64k;
server{
 listen 80;
 server_name xxx.com;
 location / {
 index index;
 }
 location ~ .*\.(js|css|ico|png|jpg|eot|svg|ttf|woff) {
 proxy_pass http:
//192.168.8.203:8080;
 expires 30d;
 }
 location ~ .*$ {
 index index;
 proxy_pass http:
//192.168.8.203:8080;
 }
 }
 }
Modify the nginx configuration file /etc/nginx/nginx.conf. There is a configuration file by default. In fact, most of them are similar, the key is the setting of the server segment. Here I set the server segment as shown above, and just copy the other segments. The explanation in the server section is as follows: Line 35 listens to port 80 of the local machine. Lines 37-39 represent the default homepage. The default homepage here is index.jsp, which corresponds to an index in my project. Here you can change it to
index index.jsp index.html index.htm index.php
Please refer to other articles for details. The key line 40, this is regular matching, there are many introductions on the Internet. This matches all static web page suffixes used in my project. Line 41 is the proxy address. Here I proxy into my web application. expires 30d cache is 30 days. The cache here corresponds to the front-end page and the user's cache-control field.
The regular expression in line 44 is matching None suffix page. The jsp pages in my project have no suffix. This can be modified as needed. Also proxy to 192.168.8.203:8080. At this point you may be asking, holy shit, what’s the point of this? Of course this is not the case anymore. To simply implement static and dynamic separation, we can modify line 41 to
root /var/lib/tomcat7/webapps/jielierp/web-inf
, which means no proxy and is taken directly from the local disk. By checking the tomcat log, you can see that the static page is not accessed. But there is another problem. This kind of flexibility is not good, and it is not friendly to the memory cache and cluster deployment discussed below, so the following writing method is used. Write another server segment.
server{
 listen 808;
 server_name static;
 location / {
}
location ~ .*\.(js|css|ico|png|jpg|eot|svg|ttf|woff) {
 #所有静态文件直接读取硬盘
 root /var/lib/tomcat7/webapps/jielierp/web-inf ;
 expires 30d; #缓存30天
 }
 }
This time, listen to port 808, and then modify the above code line 41 to proxy_pass http://192.168.8.203:808. At this point, the separation of dynamic and static is achieved. If there are multiple servers, just modify the corresponding IP. If you find that you cannot connect, you need to check the firewall, permissions and other external issues. This configuration is like this.
如果单纯这样的话,我们会发现页面直接传输过于占用带宽。对应web的优化,这里想到的是通过对页面进行gzip压缩,然后传到用户那里,再解压,这样可以有效的减少带宽。这里就会用到nginx 的gzip模块了。默认的nginx是集成有gzip模块的。只需在http段增加下面配置即可。
gzip on;
 gzip_min_length 1k; #最小1k
 gzip_buffers 16 64k;
 gzip_http_version 1.1;
 gzip_comp_level 6;
 gzip_types text/plain application/x-javascript text/css application/xml application/javascript;
 gzip_vary on;
给个首页看看效果

不要在意请求数不一样,那两个请求是谷歌插件来的。不用觉得我在骗你。
作为假使有很多人访问的网站来说,缓存肯定是很重要的东西了。一开始是想通过插件,让nginx和redis进行合成,然后nginx使用redis来缓存的,但是发现配置起来很麻烦,还要自己下载插件,重新编译nginx,比较麻烦,所以这里觉得用nginx自带的缓存也是不错的选择。虽然效率比不上redis,但是有还是比没有好。nginx默认的缓存是磁盘文件系统的缓存,而不是像redis那样的内存级别的缓存。一开始我以为nginx就只有这样。后来查了写资料,才知道是我太天真了,对linux不是很了解导致的。linux的一切皆文件。原来我们可以把文件缓存到内存对应的linux文件系统中。我说的可能比较难以理解,请自行搜索/dev/shm 这个文件目录。我们把文件缓存到这个文件目录里,其实就相当与内存的缓存了。只不过还是靠文件系统管理。所以比不上自定义格式的redis那样的内存缓存。
在http段进行基本配置
#缓存配置
proxy_cache_key '$host:$server_port$request_uri';
proxy_temp_file_write_size 64k;
proxy_temp_path /dev/shm/jielierp/proxy_temp_path;
proxy_cache_path /dev/shm/jielierp/proxy_cache_path levels=1:2 keys_zone=cache_one:200m inactive=5d max_size=1g;
proxy_ignore_headers x-accel-expires expires cache-control set-cookie;
location ~ .*\.(js|css|ico|png|jpg|eot|svg|ttf|woff) {
proxy_cache cache_one;
proxy_cache_valid 200 304 302 5d;
proxy_cache_valid any 5d;
proxy_cache_key '$host:$server_port$request_uri';
add_header x-cache '$upstream_cache_status from $host';
proxy_pass http:
//192.168.8.203:808;
expires 30d; #缓存30天
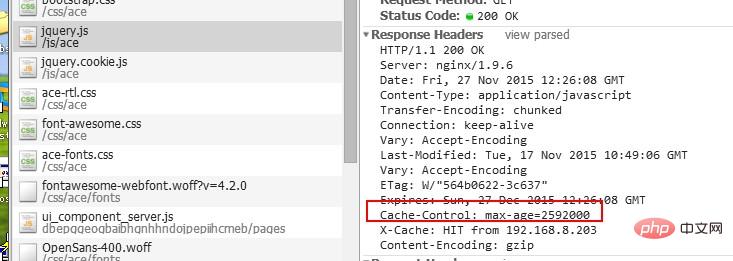
}经过这两个的配置就基本能实现了,这里说几个注意项,也是困扰我很久的问题。上面第一段代码第6行,proxy_ignore_headers 如果web项目中的html的head头里面指定
<meta http-equiv="pragma" content="no-cache">
<meta http-equiv="cache-control" content="no-cache">
<meta http-equiv="expires" content="0">
这些不缓存的话,就要加上proxy_ignore_headers的配置项了。还有一点就是/dev/shm下面的文件系统权限默认只给root用户,所以要chmod 777 -r /dev/shm 这样不是很安全的做法,如果实际上线可以给定某个用户组,关于用户组的设置是配置的第一行
user www www;
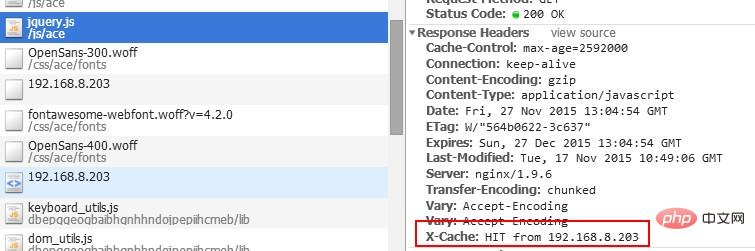
上面第二段代码的第6行是增加一个header字段方便查看是否击中缓存。
我们rm -rf /dev/shm/jielierp/proxy_* 下面的所有文件(注意这里如果是进行多次测试的话要nginx -s reload 重新读取配置或重启服务,因为你rm -rf只是删除了缓存文件,但是缓存的结构信息还在nginx进程里面,结构还在,如果不重启的话,是会出现访问不到的)

所以要记得重启哦。下面是运行效果
第一次访问

第二次访问,在浏览器中ctrl+shift+r 强制刷新
到这里就可以看到效果了。我们查看一下/dev/shm这个里面
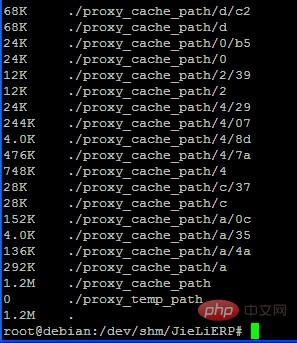
到这里已经快结束了。最后也是比较关键的一个技术点,就是集群,集群,集群。这个就要用到upstream了,看到最开头的配置文件了吗,就是那个
#负载均衡组
#静态服务器组
upstream static {
 server 127.0.0.1:808 weight=1;
 server 192.168.8.203:808 weight=1;
}

#动态服务器组
upstream dynamic {
 server 127.0.0.1:8080;
 #server 192.168.8.203:8080;
}
上面那个就是集群组了。upstream是关键字,static 和 dynamic是两个服务器集群组的名称。以第一个为例,server 127.0.0.1:808 是服务器地址,后面的weight=1 是权重。有多个就写多个。亲测试过,集群中的一个坏了,不影响系统运行。至于更多的轮询规则,可以参考网上更多的资料。这里不多说。至于怎么使用呢? proxy_pass http://192.168.8.203:808 改为 proxy_pass http://static; 这样即可实现均衡。
到这里就结束了。把上面各个部分根据自己需求配置起来就可以实现单机房负载均衡了。 上面这种做法有一个缺点就是在前面的那一台nginx如果当机,后面所以机器就失去了被访问的能力了,所以需要在前面实现多个nginx多机房的负载。关于这个就是另外一个话题了。目前还没有研究。以后有机会再说了。
上面动态服务器组如果是那种需要保存用户状态的话,会有问题,就是session问题,比如我在server1进行登录后,下一次动态服务器组进行轮询后可能分配到server2,就会造成要重新登录。治标的办法是,配置轮询规则,根据用户请求的ip进行hash,然后分配对应的服务器。具体配置如下:
upstream dynamic{
ip_hash;
server 127.0.0.1:8080;
server 192.168.0.203:8080;
}
这样就可以实现一个用户对应一个服务器节点。这样就不会有重复登录的问题。另一种治本的办法是,利用缓存系统进行session的统一存储管理。
The above is the detailed content of How to set up Nginx and Tomcat servers to achieve load balancing under Debian. For more information, please follow other related articles on the PHP Chinese website!

Hot AI Tools

Undress AI Tool
Undress images for free

Undresser.AI Undress
AI-powered app for creating realistic nude photos

AI Clothes Remover
Online AI tool for removing clothes from photos.

Clothoff.io
AI clothes remover

Video Face Swap
Swap faces in any video effortlessly with our completely free AI face swap tool!

Hot Article
Hot Tools

Notepad++7.3.1
Easy-to-use and free code editor

SublimeText3 Chinese version
Chinese version, very easy to use

Zend Studio 13.0.1
Powerful PHP integrated development environment

Dreamweaver CS6
Visual web development tools

SublimeText3 Mac version
God-level code editing software (SublimeText3)


 How to execute php code after writing php code? Several common ways to execute php code
May 23, 2025 pm 08:33 PM
How to execute php code after writing php code? Several common ways to execute php code
May 23, 2025 pm 08:33 PM
PHP code can be executed in many ways: 1. Use the command line to directly enter the "php file name" to execute the script; 2. Put the file into the document root directory and access it through the browser through the web server; 3. Run it in the IDE and use the built-in debugging tool; 4. Use the online PHP sandbox or code execution platform for testing.
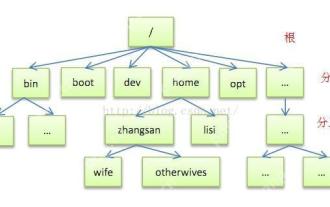 Detailed introduction to each directory of Linux and each directory (reprinted)
May 22, 2025 pm 07:54 PM
Detailed introduction to each directory of Linux and each directory (reprinted)
May 22, 2025 pm 07:54 PM
[Common Directory Description] Directory/bin stores binary executable files (ls, cat, mkdir, etc.), and common commands are generally here. /etc stores system management and configuration files/home stores all user files. The root directory of the user's home directory is the basis of the user's home directory. For example, the home directory of the user user is /home/user. You can use ~user to represent /usr to store system applications. The more important directory /usr/local Local system administrator software installation directory (install system-level applications). This is the largest directory, and almost all the applications and files to be used are in this directory. /usr/x11r6 Directory for storing x window/usr/bin Many
 How to update Debian Tomcat
May 28, 2025 pm 04:54 PM
How to update Debian Tomcat
May 28, 2025 pm 04:54 PM
Updating the Tomcat version in the Debian system generally includes the following process: Before performing the update operation, be sure to do a complete backup of the existing Tomcat environment. This covers the /opt/tomcat folder and its related configuration documents, such as server.xml, context.xml, and web.xml. The backup task can be completed through the following command: sudocp-r/opt/tomcat/opt/tomcat_backup Get the new version Tomcat Go to ApacheTomcat's official website to download the latest version. According to your Debian system
 How to limit user resources in Linux? How to configure ulimit?
May 29, 2025 pm 11:09 PM
How to limit user resources in Linux? How to configure ulimit?
May 29, 2025 pm 11:09 PM
Linux system restricts user resources through the ulimit command to prevent excessive use of resources. 1.ulimit is a built-in shell command that can limit the number of file descriptors (-n), memory size (-v), thread count (-u), etc., which are divided into soft limit (current effective value) and hard limit (maximum upper limit). 2. Use the ulimit command directly for temporary modification, such as ulimit-n2048, but it is only valid for the current session. 3. For permanent effect, you need to modify /etc/security/limits.conf and PAM configuration files, and add sessionrequiredpam_limits.so. 4. The systemd service needs to set Lim in the unit file
 What does java middleware mean? Definition and typical applications of middleware
May 28, 2025 pm 05:51 PM
What does java middleware mean? Definition and typical applications of middleware
May 28, 2025 pm 05:51 PM
Java middleware is a software that connects operating systems and application software, providing general services to help developers focus on business logic. Typical applications include: 1. Web server (such as Tomcat and Jetty), which handles HTTP requests; 2. Message queue (such as Kafka and RabbitMQ), which handles asynchronous communication; 3. Transaction management (such as SpringTransaction), which ensures data consistency; 4. ORM framework (such as Hibernate and MyBatis), which simplifies database operations.
 What are the Debian Nginx configuration skills?
May 29, 2025 pm 11:06 PM
What are the Debian Nginx configuration skills?
May 29, 2025 pm 11:06 PM
When configuring Nginx on Debian system, the following are some practical tips: The basic structure of the configuration file global settings: Define behavioral parameters that affect the entire Nginx service, such as the number of worker threads and the permissions of running users. Event handling part: Deciding how Nginx deals with network connections is a key configuration for improving performance. HTTP service part: contains a large number of settings related to HTTP service, and can embed multiple servers and location blocks. Core configuration options worker_connections: Define the maximum number of connections that each worker thread can handle, usually set to 1024. multi_accept: Activate the multi-connection reception mode and enhance the ability of concurrent processing. s
 Configure PhpStorm and Docker containerized development environment
May 20, 2025 pm 07:54 PM
Configure PhpStorm and Docker containerized development environment
May 20, 2025 pm 07:54 PM
Through Docker containerization technology, PHP developers can use PhpStorm to improve development efficiency and environmental consistency. The specific steps include: 1. Create a Dockerfile to define the PHP environment; 2. Configure the Docker connection in PhpStorm; 3. Create a DockerCompose file to define the service; 4. Configure the remote PHP interpreter. The advantages are strong environmental consistency, and the disadvantages include long startup time and complex debugging.
 What are the SEO optimization techniques for Debian Apache2?
May 28, 2025 pm 05:03 PM
What are the SEO optimization techniques for Debian Apache2?
May 28, 2025 pm 05:03 PM
DebianApache2's SEO optimization skills cover multiple levels. Here are some key methods: Keyword research: Use tools (such as keyword magic tools) to mine the core and auxiliary keywords of the page. High-quality content creation: produce valuable and original content, and the content needs to be conducted in-depth research to ensure smooth language and clear format. Content layout and structure optimization: Use titles and subtitles to guide reading. Write concise and clear paragraphs and sentences. Use the list to display key information. Combining multimedia such as pictures and videos to enhance expression. The blank design improves the readability of text. Technical level SEO improvement: robots.txt file: Specifies the access rights of search engine crawlers. Accelerate web page loading: optimized with the help of caching mechanism and Apache configuration
