


1. Preparation
First you must have a linux server that can be played and know the username and password. Then you need to install two linux servers on your windows computer that can connect to it. The tools, xshell 5 and xftp 5, I won’t go into the installation tutorial. The supplementary picture shows how to connect to the server:
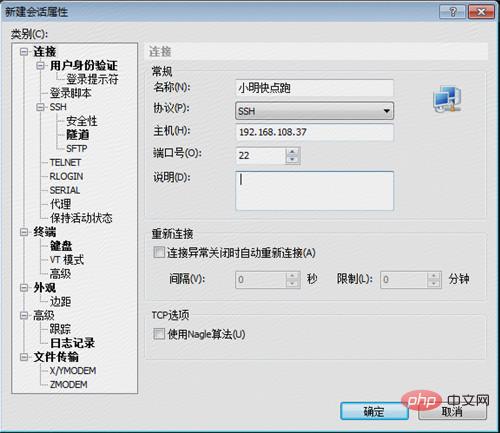
The xshell connection interface is as follows. After entering the host IP and click OK, xshell will pop up a window to enter the user name and password. The connection is successful!
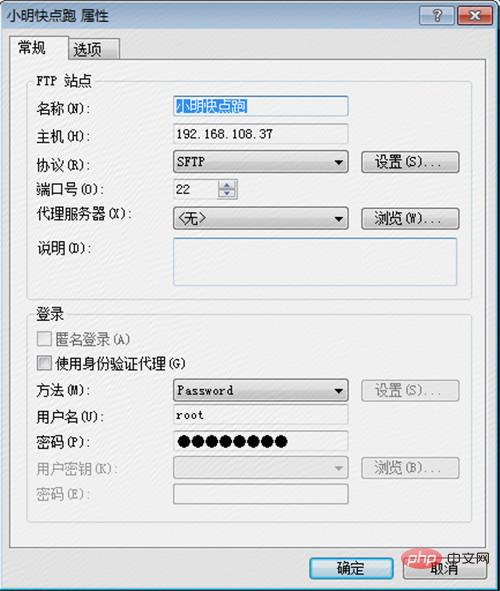
The xftp connection interface is as follows. Just fill in the blanks. It’s very simple. I won’t go into details. Let me mention why sftp is chosen instead of ftp here. See the difference between ftp and sftp. How much is enough to understand!
2. Installation and deployment work
If you want to deploy the project to a Linux server, it is essential to install jdk and tomcat Yes, what I want to emphasize here is that if you want to deploy multiple applications on one server, you need to have its own tomcat for each application, because the configuration of tomcat is definitely different for different applications. In this case, you can install a tomcat installation directory and tomcat working directories under multiple applications. For the same parts, you can share the tomcat installation directory. The following will introduce in detail how to operate and how to install tomcat and jdk to your On the server
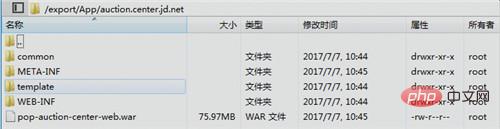
1. Directory division
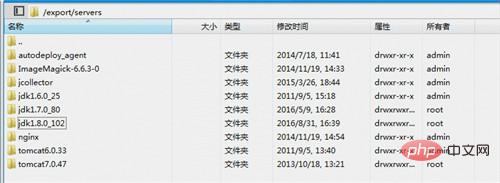
This is a very important step. You can create a new directory as shown in the figure below. Place the directory related to project startup and deployment under this directory. Accessing some related files, you can see that I have placed multiple versions of jdk and multiple versions of tomcat in this directory. Which tomcat and jdk to use during the project deployment process can be realized through configuration.
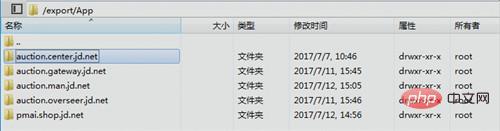
For actual applications, we put them in an instance directory, establish the name of each application, and then place the corresponding war package under the directory and unzip it. file, wait for tomcat to read the directory and deploy the application, as follows:
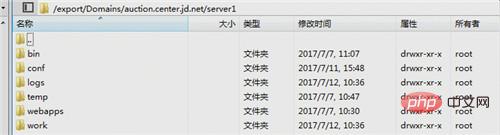
2. Modify the configuration
We also place the tomcat under each application under a directory for easy management, as shown below, but we must pay attention to the configuration of each tomcat

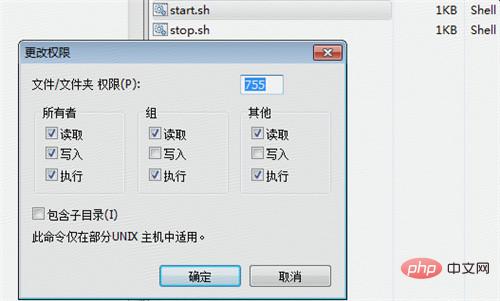
/bin directory, Both the start.sh file and the stop.sh file must be modified. First, you must specify the jdk path, which is similar to configuring environment variables. The second step is to specify the tomcat path of the tomcat working directory. You can notice that catalina_home and catalina_base correspond to the installation of tomcat respectively. Directory and working directory, and you can see from the last line that the project startup uses start.sh under the installation directory, but the tomcat configuration file used for project startup is the configuration file configured by each application tomcat. The same is true for stop.sh.

To use xshell to execute ./start.sh and ./stop.sh, permissions are required. If there is no permission, we can use xftp to email the start.sh To modify permissions, check the box as shown in the picture.
Under the /conf directory, you need to pay attention to the configuration modifications. The first is the server.xml file. Modify the corresponding port number. Each application of tomcat needs to modify different configurations. Port number, otherwise the port will be occupied when starting multiple tomcats and cannot be started. It is best to remember the port number of tomcat configured for this application, which will be used later when using nginx for port mapping;

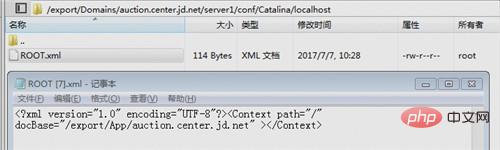
Another place that needs to be modified is the root.xml file in the localhost directory under the catalina directory. This file is used to specify which directory to load the project instance when tomcat starts.
The other /logs directory, /temp directory, /webapps directory, and /work directory do not need to be modified; as can be seen from the above, the directory division is very clear, and they are divided into service installation directories (jdk, tomcat, nginx, etc.) ), application instance directory, and application deployment directory. You can also divide them in this way when using a Linux server to deploy multiple projects.
3.nginx implements port 80 reverse proxy
Logically speaking, at this time we can transfer the war package of our own application to the corresponding directory and decompress it , and then go to the corresponding application tomcat working directory and execute ./start.sh to start the project! You might as well give it a try first.
After the project is deployed, we configure the hosts and start accessing. At this time, we will find that we must add the tomcat port number configured above before we can access it. Can we not add the port number (using What about the default port 80)? As mentioned above, we have configured different port numbers for different tomcats. The reason is that one port number can only be used by one tomcat. This means that project access must add port numbers for access. However, it must be done for each It is also possible for an application to use port 80 for access. This is when nginx is used. After installing nginx, we can add some configurations to achieve reverse proxy, and forward access to port 80 used by different applications to The corresponding port number. From the perspective of tomcat, external requests still use the port number configured by tomcat, which achieves the effect we want. The specific configuration is as follows (of course we also have to do the corresponding directory division work):
The nginx directory is as follows:
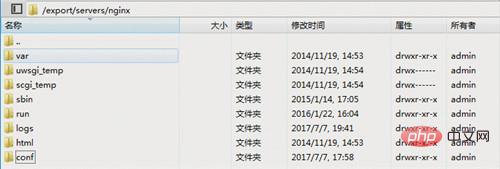
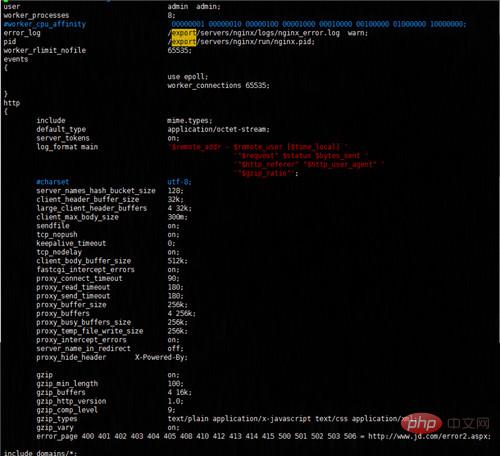
We only need to care about the nginx.conf configuration file under the /conf directory. I also opened the specific configuration information for everyone to see. Did you notice the last line, "include domains/*", which means that the configuration is not complete yet and includes all configuration files in the /domains directory,
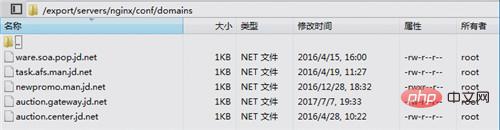
At this time we The corresponding nginx configuration for each application can be configured with differently named files
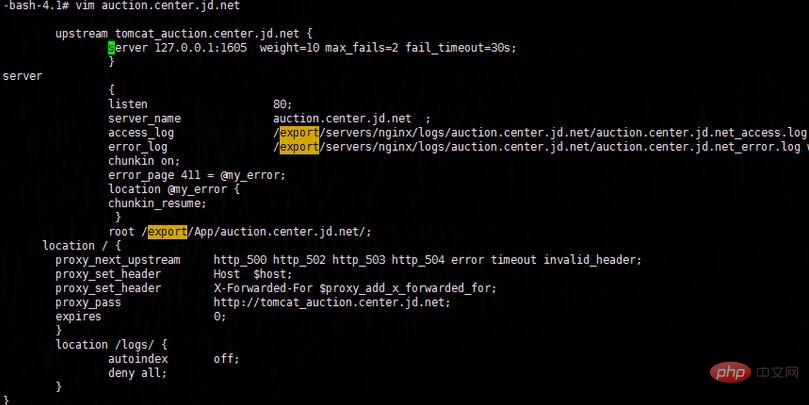
Then let’s take a look at how to configure it and listen to auction.center.jd.net :80 domain name access, and then forwarded to the 1605 port access of 127.0.0.1 of the local machine. From the configuration, we can also see that some abnormal states, such as http_500 http_502 http_504, etc., will be recorded and processed differently. Under normal circumstances You can jump to the homepage of the website, etc., and then record the log. After configuring this configuration file, we must not forget to create a new log directory, otherwise nginx cannot find the directory and will report an error when starting.
After completing these tasks, we are not finished yet. We need to restart nginx. I won’t go into details about how to restart. There is a lot of relevant information on Baidu. If the restart fails, we Just take a tough move, kill the nginx process, and then use the nginx service start command to start the nginx service.
After we have completed these tasks, can we use the familiar method (without adding a port number) to access it? Yes, that’s right. Many people are worried about whether it is still possible. To restart tomcat and redeploy the application, it only means that you do not understand the nginx routing conversion layer of the network layer. The domain name we visit first performs dns resolution through the hosts we configured, converts it to the corresponding ip, and finds the server corresponding to the ip. , through the server's firewall, and then when we configure nginx on the server, nginx will first intercept the request, process and distribute the request, and finally hit the corresponding tomcat (personal understanding, maybe the understanding is not in place, don't spray ), at this time we can access the domain name and send requests with confidence! !
4. Step into the trap
Um. . not good! ! I was overjoyed and jumped to the homepage, but still could not access the specified application. When I tried to add the port number, I was able to access it "miraculously". This means that the nginx we configured did not take effect. What is the problem? ?
Now let me talk about my problem-solving ideas. First, we have to confirm that all requests have gone to nginx. At this time, the benefits of logs are reflected. When we use port 80 to access our application, stare at the logs. Look, once, twice, three times. . There is no log. At this time, we can roughly conclude that the nginx service has not been used at all. We cannot be sure that the nginx service has not taken effect on the server. Maybe there is a problem with our log configuration. At this time, I made a bold operation. That is to turn off the nginx service access, or jump to the homepage of the website. What's going on? Isn't jumping to the homepage configured through nginx? Indeed, the company has already dealt with it at the network layer. At this time, I was very confused. It was just a matter of various attempts. I might as well modify the tomcat configuration and configure one of the applications to port 80, so that it can always be accessed. Soon, the modification was completed. After deploying it, I just waited for the domain name to be entered in the address bar to access it. Because the nginx service has been closed, the request at this time must be directly sent to tomcat. I accessed it once, twice and three times. Miraculously, I could not access it. Ni? ? ? At this time, I had a flash of inspiration. The server firewall must have disabled port 80. I quickly tried to telnet 192.168.108.37 80 locally and it turned out that I couldn't access it. This proved that my guess was correct. It was easy to handle now. I just needed to enable it in the firewall. Access to port 80 is sufficient. Below is a supplement on how to configure the iptables firewall to open port 80 under centos.
1. Open the iptables configuration file, the code is as follows: vi /etc/sysconfig/iptables
2. Use the /etc/init.d/iptables status command to check whether port 80 is open , if not, there are two ways to handle it
3. The first way: modify the vi /etc/sysconfig/iptables command to add the firewall to open port 80, the code is as follows:
Copy code Code As follows:
-a rh-firewall-1-input -m state --state new -m tcp -p tcp --dport 80 -j accept
4. Close/Open/Restart The firewall code is as follows: /etc/init.d/iptables stop (#start to open, #restart to restart)
5. The second method: add the port through the command, the code is as follows:
[root@centos httpd]# /sbin/iptables -i input -p tcp --dport 80 -j accept [root@centos httpd]# /etc/rc.d/init.d/iptables save [root@centos httpd]# /etc/init.d/iptables restart
6. Check the effect: [root@centos httpd]# /etc/init.d/iptables status
7. In addition, it is recommended to use the second method, which is simple to operate and has a high success rate. Take me For example, when I use the first method to modify the firewall configuration, the restart fails, but when I use the second method, it succeeds perfectly
The above is the detailed content of How to deploy tomcat and Nginx on linux server. For more information, please follow other related articles on the PHP Chinese website!


![[Web front-end] Node.js quick start](https://img.php.cn/upload/course/000/000/067/662b5d34ba7c0227.png)


