JTA is Java-Transaction-API. JTA allows applications to perform distributed transaction processing, that is, between two or more Access and update data on network computer resources. The JDBC driver's support for JTA greatly enhances data access capabilities.
The XA protocol is a set of distributed transaction management specifications at the database level. JTA is the implementation of the XA protocol in Java. Multiple databases or message vendors implement the JTA interface. Developers only need to call the SpringJTA interface. Can realize JTA transaction management function.
JTA transactions are more powerful than JDBC transactions. A JTA transaction can have multiple participants, while a JDBC transaction is limited to a single database connection. Any of the following Java platform components can participate in a JTA transaction
Distributed transaction (DistributedTransaction) includes a transaction manager (TransactionManager) and one or more Resource Manager that supports XA protocol.
The resource manager is any type of persistent data storage container, such as relational databases commonly used in development: MySQL, Oracle, etc., and message middleware RocketMQ, RabbitMQ, etc.
The transaction manager provides transaction declaration, transaction resource management, synchronization, transaction context propagation and other functions, and is responsible for the mutual communication of all transaction participants in the unit. The JTA specification defines the interface for the transaction manager to interact with other transaction participants, and other transaction participants to interact with the transaction manager.
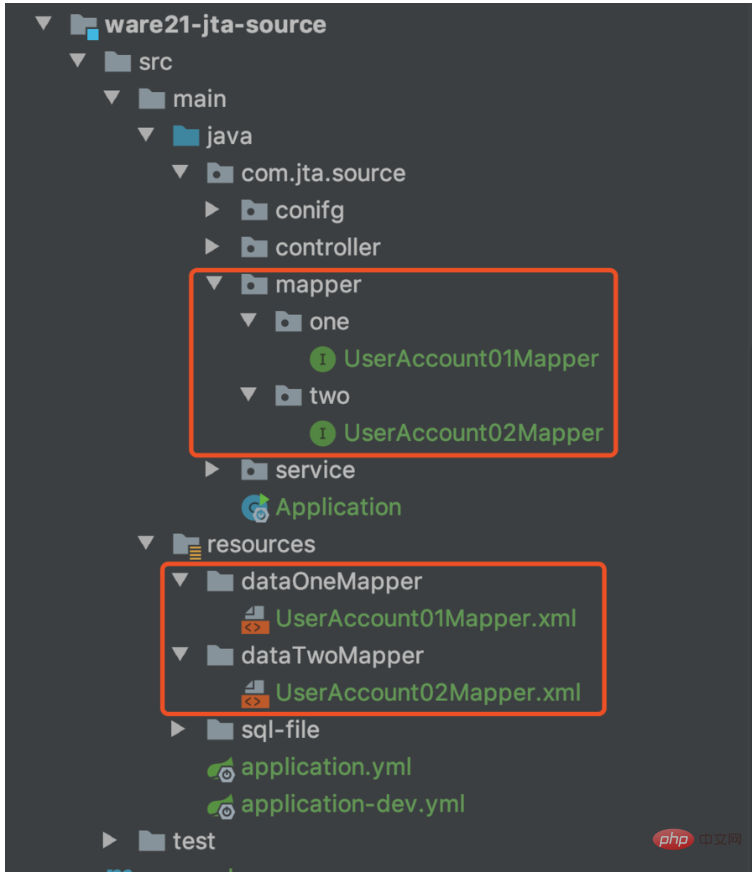
Overall structure diagram of the project

<!--SpringBoot核心依赖-->
<dependency>
    <groupid>org.springframework.boot</groupid>
    <artifactid>spring-boot-starter-web</artifactid>
</dependency>
<!--JTA组件核心依赖-->
<dependency>
    <groupid>org.springframework.boot</groupid>
    <artifactid>spring-boot-starter-jta-atomikos</artifactid>
</dependency>
spring:
  jta:
    transaction-manager-id: jtaManager
  # 数据源配置
  datasource:
    type: com.alibaba.druid.pool.DruidDataSource
    data01:
      driverClassName: com.mysql.jdbc.Driver
      dbUrl: jdbc:mysql://localhost:3306/data-one
      username: root
      password: 000000
    data02:
      driverClassName: com.mysql.jdbc.Driver
      dbUrl: jdbc:mysql://localhost:3306/data-two
      username: root
      password: 000000
Data source parameters
@Component
@ConfigurationProperties(prefix = "spring.datasource.data01")
public class DruidOneParam {
    private String dbUrl;
    private String username;
    private String password;
    private String driverClassName;
}JTA component configuration
package com.jta.source.conifg;
@Configuration
@MapperScan(basePackages = {"com.jta.source.mapper.one"},sqlSessionTemplateRef = "data01SqlSessionTemplate")
public class DruidOneConfig {
    private static final Logger LOGGER = LoggerFactory.getLogger(DruidOneConfig.class) ;
    @Resource
    private DruidOneParam druidOneParam ;
    @Primary
    @Bean("dataSourceOne")
    public DataSource dataSourceOne () {
        // 设置数据库连接
        MysqlXADataSource mysqlXADataSource = new MysqlXADataSource();
        mysqlXADataSource.setUrl(druidOneParam.getDbUrl());
        mysqlXADataSource.setUser(druidOneParam.getUsername());
        mysqlXADataSource.setPassword(druidOneParam.getPassword());
        mysqlXADataSource.setPinGlobalTxToPhysicalConnection(true);
        // 事务管理器
        AtomikosDataSourceBean atomikosDataSourceBean = new AtomikosDataSourceBean();
        atomikosDataSourceBean.setXaDataSource(mysqlXADataSource);
        atomikosDataSourceBean.setUniqueResourceName("dataSourceOne");
        return atomikosDataSourceBean;
    }
    @Primary
    @Bean(name = "sqlSessionFactoryOne")
    public SqlSessionFactory sqlSessionFactoryOne(
            @Qualifier("dataSourceOne") DataSource dataSourceOne) throws Exception{
        // 配置Session工厂
        SqlSessionFactoryBean sessionFactory = new SqlSessionFactoryBean();
        sessionFactory.setDataSource(dataSourceOne);
        ResourcePatternResolver resolver = new PathMatchingResourcePatternResolver();
        sessionFactory.setMapperLocations(resolver.getResources("classpath*:/dataOneMapper/*.xml"));
        return sessionFactory.getObject();
    }
    @Primary
    @Bean(name = "data01SqlSessionTemplate")
    public SqlSessionTemplate sqlSessionTemplate(
            @Qualifier("sqlSessionFactoryOne") SqlSessionFactory sqlSessionFactory) {
        // 配置Session模板
        return new SqlSessionTemplate(sqlSessionFactory);
    }
}@Service
public class TransferServiceImpl implements TransferService {
@Resource
private UserAccount01Mapper userAccount01Mapper ;
@Resource
private UserAccount02Mapper userAccount02Mapper ;
@Override
public void transfer01() {
userAccount01Mapper.transfer("jack",100);
System.out.println("i="+1/0);
userAccount02Mapper.transfer("tom",100);
}
@Transactional
@Override
public void transfer02() {
userAccount01Mapper.transfer("jack",200);
System.out.println("i="+1/0);
userAccount02Mapper.transfer("tom",200);
}
}The above is the detailed content of How to use JTA components to implement multi-data source transaction management in SpringBoot2. For more information, please follow other related articles on the PHP Chinese website!


