


Tutorial on writing a simple chat program in Python

Implementation ideas
x01 Establishment of the server
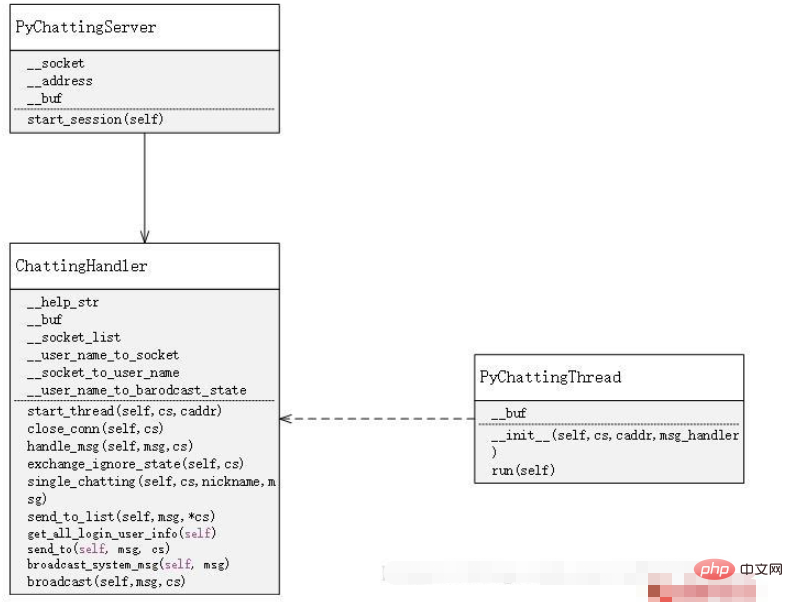
First, on the server side, use socket to accept messages. Every time a socket request is accepted, a socket is opened. A new thread is used to manage the distribution and acceptance of messages. At the same time, there is a handler to manage all threads, thereby realizing the processing of various functions of the chat room
x02 Establishment of the client
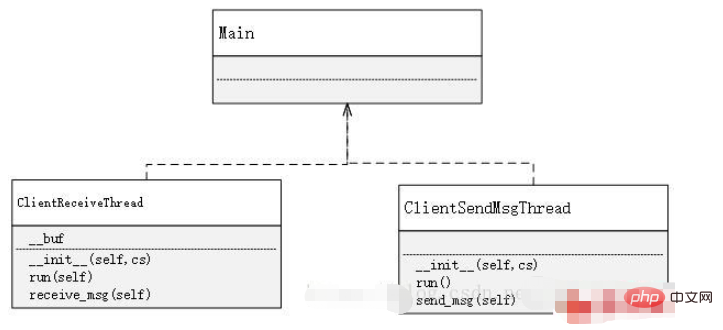
The establishment of the client is much simpler than the server. The function of the client is only to send and receive messages, and to enter specific characters according to specific rules to achieve the use of different functions. Therefore, in On the client side, you only need to use two threads, one is dedicated to receiving messages, and the other is dedicated to sending messages. As for why not use one, that is because, if you only use one, then After receiving a message, the one that receives the message is in a blocked state before sending it. Similarly, the same is true for sending a message. If these two functions are implemented in one place, it will make it impossible to continuously send or receive messages.
Implementation method
Server-side implementation
import json
import threading
from socket import *
from time import ctime


class PyChattingServer:
    __socket = socket(AF_INET, SOCK_STREAM, 0)
    __address = ('', 12231)

    __buf = 1024

    def __init__(self):
        self.__socket.bind(self.__address)
        self.__socket.listen(20)
        self.__msg_handler = ChattingHandler()

    def start_session(self):
        print('等待客户连接...\r\n')
        try:
            while True:
                cs, caddr = self.__socket.accept()
                # 利用handler来管理线程,实现线程之间的socket的相互通信
                self.__msg_handler.start_thread(cs, caddr)
        except socket.error:
            pass


class ChattingThread(threading.Thread):
    __buf = 1024

    def __init__(self, cs, caddr, msg_handler):
        super(ChattingThread, self).__init__()
        self.__cs = cs
        self.__caddr = caddr
        self.__msg_handler = msg_handler

    # 使用多线程管理会话
    def run(self):
        try:
            print('...连接来自于:', self.__caddr)
            data = '欢迎你到来PY_CHATTING!请输入你的很cooooool的昵称(不能带有空格哟`)\r\n'
            self.__cs.sendall(bytes(data, 'utf-8'))
            while True:
                data = self.__cs.recv(self.__buf).decode('utf-8')
                if not data:
                    break
                self.__msg_handler.handle_msg(data, self.__cs)
                print(data)
        except socket.error as e:
            print(e.args)
            pass
        finally:
            self.__msg_handler.close_conn(self.__cs)
            self.__cs.close()


class ChattingHandler:
    __help_str = "[ SYSTEM ]\r\n" \
                 "输入/ls,即可获得所有登陆用户信息\r\n" \
                 "输入/h,即可获得帮助\r\n" \
                 "输入@用户名 (注意用户名后面的空格)+消息,即可发动单聊\r\n" \
                 "输入/i,即可屏蔽群聊信息\r\n" \
                 "再次输入/i,即可取消屏蔽\r\n" \
                 "所有首字符为/的信息都不会发送出去"

    __buf = 1024
    __socket_list = []

    __user_name_to_socket = {}
    __socket_to_user_name = {}

    __user_name_to_broadcast_state = {}

    def start_thread(self, cs, caddr):
        self.__socket_list.append(cs)
        chat_thread = ChattingThread(cs, caddr, self)
        chat_thread.start()

    def close_conn(self, cs):
        if cs not in self.__socket_list:
            return
        # 去除socket的记录
        nickname = "SOMEONE"
        if cs in self.__socket_list:
            self.__socket_list.remove(cs)
        # 去除socket与username之间的映射关系
        if cs in self.__socket_to_user_name:
            nickname = self.__socket_to_user_name[cs]
            self.__user_name_to_socket.pop(self.__socket_to_user_name[cs])
            self.__socket_to_user_name.pop(cs)
            self.__user_name_to_broadcast_state.pop(nickname)
        nickname += " "
        # 广播某玩家退出聊天室
        self.broadcast_system_msg(nickname + "离开了PY_CHATTING")

    # 管理用户输入的信息
    def handle_msg(self, msg, cs):
        js = json.loads(msg)
        if js['type'] == "login":
            if js['msg'] not in self.__user_name_to_socket:
                if ' ' in js['msg']:
                    self.send_to(json.dumps({
                        'type': 'login',
                        'success': False,
                        'msg': '账号不能够带有空格'
                    }), cs)
                else:
                    self.__user_name_to_socket[js['msg']] = cs
                    self.__socket_to_user_name[cs] = js['msg']
                    self.__user_name_to_broadcast_state[js['msg']] = True
                    self.send_to(json.dumps({
                        'type': 'login',
                        'success': True,
                        'msg': '昵称建立成功,输入/ls可查看所有在线的人,输入/help可以查看帮助(所有首字符为/的消息都不会发送)'
                    }), cs)
                    # 广播其他人,他已经进入聊天室
                    self.broadcast_system_msg(js['msg'] + "已经进入了聊天室")
            else:
                self.send_to(json.dumps({
                    'type': 'login',
                    'success': False,
                    'msg': '账号已存在'
                }), cs)
        # 若玩家处于屏蔽模式,则无法发送群聊消息
        elif js['type'] == "broadcast":
            if self.__user_name_to_broadcast_state[self.__socket_to_user_name[cs]]:
                self.broadcast(js['msg'], cs)
            else:
                self.send_to(json.dumps({
                    'type': 'broadcast',
                    'msg': '屏蔽模式下无法发送群聊信息'
                }), cs)
        elif js['type'] == "ls":
            self.send_to(json.dumps({
                'type': 'ls',
                'msg': self.get_all_login_user_info()
            }), cs)
        elif js['type'] == "help":
            self.send_to(json.dumps({
                'type': 'help',
                'msg': self.__help_str
            }), cs)
        elif js['type'] == "sendto":
            self.single_chatting(cs, js['nickname'], js['msg'])
        elif js['type'] == "ignore":
            self.exchange_ignore_state(cs)

    def exchange_ignore_state(self, cs):
        if cs in self.__socket_to_user_name:
            state = self.__user_name_to_broadcast_state[self.__socket_to_user_name[cs]]
            if state:
                state = False
            else:
                state = True
            self.__user_name_to_broadcast_state.pop(self.__socket_to_user_name[cs])
            self.__user_name_to_broadcast_state[self.__socket_to_user_name[cs]] = state
            if self.__user_name_to_broadcast_state[self.__socket_to_user_name[cs]]:
                msg = "通常模式"
            else:
                msg = "屏蔽模式"
            self.send_to(json.dumps({
                'type': 'ignore',
                'success': True,
                'msg': '[TIME : %s]\r\n[ SYSTEM ] : %s\r\n' % (ctime(), "模式切换成功,现在是" + msg)
            }), cs)
        else:
            self.send_to({
                'type': 'ignore',
                'success': False,
                'msg': '切换失败'
            }, cs)

    def single_chatting(self, cs, nickname, msg):
        if nickname in self.__user_name_to_socket:
            msg = '[TIME : %s]\r\n[ %s CHATTING TO %s ] : %s\r\n' % (
                ctime(), self.__socket_to_user_name[cs], nickname, msg)
            self.send_to_list(json.dumps({
                'type': 'single',
                'msg': msg
            }), self.__user_name_to_socket[nickname], cs)
        else:
            self.send_to(json.dumps({
                'type': 'single',
                'msg': '该用户不存在'
            }), cs)
        print(nickname)

    def send_to_list(self, msg, *cs):
        for i in range(len(cs)):
            self.send_to(msg, cs[i])

    def get_all_login_user_info(self):
        login_list = "[ SYSTEM ] ALIVE USER : \r\n"
        for key in self.__socket_to_user_name:
            login_list += self.__socket_to_user_name[key] + ",\r\n"
        return login_list

    def send_to(self, msg, cs):
        if cs not in self.__socket_list:
            self.__socket_list.append(cs)
        cs.sendall(bytes(msg, 'utf-8'))

    def broadcast_system_msg(self, msg):
        data = '[TIME : %s]\r\n[ SYSTEM ] : %s\r\n' % (ctime(), msg)
        js = json.dumps({
            'type': 'system_msg',
            'msg': data
        })
        # 屏蔽了群聊的玩家也可以获得系统的群发信息
        for i in range(len(self.__socket_list)):
            if self.__socket_list[i] in self.__socket_to_user_name:
                self.__socket_list[i].sendall(bytes(js, 'utf-8'))

    def broadcast(self, msg, cs):
        data = '[TIME : %s]\r\n[%s] : %s\r\n' % (ctime(), self.__socket_to_user_name[cs], msg)
        js = json.dumps({
            'type': 'broadcast',
            'msg': data
        })
        # 没有的登陆的玩家无法得知消息,屏蔽了群聊的玩家也没办法获取信息
        for i in range(len(self.__socket_list)):
            if self.__socket_list[i] in self.__socket_to_user_name \
                    and self.__user_name_to_broadcast_state[self.__socket_to_user_name[self.__socket_list[i]]]:
                self.__socket_list[i].sendall(bytes(js, 'utf-8'))


def main():
    server = PyChattingServer()
    server.start_session()


main()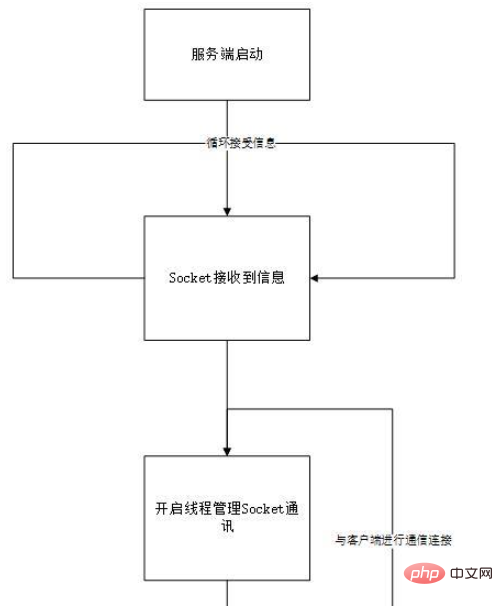 Client-side implementation
import json
import threading
from socket import *

is_login = False
is_broadcast = True


class ClientReceiveThread(threading.Thread):
    __buf = 1024

    def __init__(self, cs):
        super(ClientReceiveThread, self).__init__()
        self.__cs = cs

    def run(self):
        self.receive_msg()

    def receive_msg(self):
        while True:
            msg = self.__cs.recv(self.__buf).decode('utf-8')
            if not msg:
                break
            js = json.loads(msg)
            if js['type'] == "login":
                if js['success']:
                    global is_login
                    is_login = True
                print(js['msg'])
            elif js['type'] == "ignore":
                if js['success']:
                    global is_broadcast
                    if is_broadcast:
                        is_broadcast = False
                    else:
                        is_broadcast = True
                print(js['msg'])
            else:
                if not is_broadcast:
                    print("[现在处于屏蔽模式]")
                print(js['msg'])


class ClientSendMsgThread(threading.Thread):

    def __init__(self, cs):
        super(ClientSendMsgThread, self).__init__()
        self.__cs = cs

    def run(self):
        self.send_msg()

    # 根据不同的输入格式来进行不同的聊天方式
    def send_msg(self):
        while True:
            js = None
            msg = input()
            if not is_login:
                js = json.dumps({
                    'type': 'login',
                    'msg': msg
                })
            elif msg[0] == "@":
                data = msg.split(' ')
                if not data:
                    print("请重新输入")
                    break
                nickname = data[0]
                nickname = nickname.strip("@")
                if len(data) == 1:
                    data.append(" ")
                js = json.dumps({
                    'type': 'sendto',
                    'nickname': nickname,
                    'msg': data[1]
                })
            elif msg == "/help":
                js = json.dumps({
                    'type': 'help',
                    'msg': None
                })
            elif msg == "/ls":
                js = json.dumps({
                    'type': 'ls',
                    'msg': None
                })
            elif msg == "/i":
                js = json.dumps({
                    'type': 'ignore',
                    'msg': None
                })
            else:
                if msg[0] != '/':
                    js = json.dumps({
                        'type': 'broadcast',
                        'msg': msg
                    })
            if js is not None:
                self.__cs.sendall(bytes(js, 'utf-8'))


def main():
    buf = 1024
    # 改变这个的地址,变成服务器的地址,那么只要部署到服务器上就可以全网使用了
    address = ("127.0.0.1", 12231)
    cs = socket(AF_INET, SOCK_STREAM, 0)
    cs.connect(address)
    data = cs.recv(buf).decode("utf-8")
    if data:
        print(data)
    receive_thread = ClientReceiveThread(cs)
    receive_thread.start()
    send_thread = ClientSendMsgThread(cs)
    send_thread.start()
    while True:
        pass


main()The above is the detailed content of Tutorial on writing a simple chat program in Python. For more information, please follow other related articles on the PHP Chinese website!

Hot AI Tools

Undresser.AI Undress
AI-powered app for creating realistic nude photos

AI Clothes Remover
Online AI tool for removing clothes from photos.

Undress AI Tool
Undress images for free

Clothoff.io
AI clothes remover

AI Hentai Generator
Generate AI Hentai for free.

Hot Article
Hot Tools

Notepad++7.3.1
Easy-to-use and free code editor

SublimeText3 Chinese version
Chinese version, very easy to use

Zend Studio 13.0.1
Powerful PHP integrated development environment

Dreamweaver CS6
Visual web development tools

SublimeText3 Mac version
God-level code editing software (SublimeText3)
Hot Topics
 1378
1378
 52
52

 Python: Games, GUIs, and More
Apr 13, 2025 am 12:14 AM
Python: Games, GUIs, and More
Apr 13, 2025 am 12:14 AM
Python excels in gaming and GUI development. 1) Game development uses Pygame, providing drawing, audio and other functions, which are suitable for creating 2D games. 2) GUI development can choose Tkinter or PyQt. Tkinter is simple and easy to use, PyQt has rich functions and is suitable for professional development.
 PHP and Python: Comparing Two Popular Programming Languages
Apr 14, 2025 am 12:13 AM
PHP and Python: Comparing Two Popular Programming Languages
Apr 14, 2025 am 12:13 AM
PHP and Python each have their own advantages, and choose according to project requirements. 1.PHP is suitable for web development, especially for rapid development and maintenance of websites. 2. Python is suitable for data science, machine learning and artificial intelligence, with concise syntax and suitable for beginners.
 How debian readdir integrates with other tools
Apr 13, 2025 am 09:42 AM
How debian readdir integrates with other tools
Apr 13, 2025 am 09:42 AM
The readdir function in the Debian system is a system call used to read directory contents and is often used in C programming. This article will explain how to integrate readdir with other tools to enhance its functionality. Method 1: Combining C language program and pipeline First, write a C program to call the readdir function and output the result: #include#include#include#includeintmain(intargc,char*argv[]){DIR*dir;structdirent*entry;if(argc!=2){
 Python and Time: Making the Most of Your Study Time
Apr 14, 2025 am 12:02 AM
Python and Time: Making the Most of Your Study Time
Apr 14, 2025 am 12:02 AM
To maximize the efficiency of learning Python in a limited time, you can use Python's datetime, time, and schedule modules. 1. The datetime module is used to record and plan learning time. 2. The time module helps to set study and rest time. 3. The schedule module automatically arranges weekly learning tasks.
 Nginx SSL Certificate Update Debian Tutorial
Apr 13, 2025 am 07:21 AM
Nginx SSL Certificate Update Debian Tutorial
Apr 13, 2025 am 07:21 AM
This article will guide you on how to update your NginxSSL certificate on your Debian system. Step 1: Install Certbot First, make sure your system has certbot and python3-certbot-nginx packages installed. If not installed, please execute the following command: sudoapt-getupdatesudoapt-getinstallcertbotpython3-certbot-nginx Step 2: Obtain and configure the certificate Use the certbot command to obtain the Let'sEncrypt certificate and configure Nginx: sudocertbot--nginx Follow the prompts to select
 GitLab's plug-in development guide on Debian
Apr 13, 2025 am 08:24 AM
GitLab's plug-in development guide on Debian
Apr 13, 2025 am 08:24 AM
Developing a GitLab plugin on Debian requires some specific steps and knowledge. Here is a basic guide to help you get started with this process. Installing GitLab First, you need to install GitLab on your Debian system. You can refer to the official installation manual of GitLab. Get API access token Before performing API integration, you need to get GitLab's API access token first. Open the GitLab dashboard, find the "AccessTokens" option in the user settings, and generate a new access token. Will be generated
 How to configure HTTPS server in Debian OpenSSL
Apr 13, 2025 am 11:03 AM
How to configure HTTPS server in Debian OpenSSL
Apr 13, 2025 am 11:03 AM
Configuring an HTTPS server on a Debian system involves several steps, including installing the necessary software, generating an SSL certificate, and configuring a web server (such as Apache or Nginx) to use an SSL certificate. Here is a basic guide, assuming you are using an ApacheWeb server. 1. Install the necessary software First, make sure your system is up to date and install Apache and OpenSSL: sudoaptupdatesudoaptupgradesudoaptinsta
 What service is apache
Apr 13, 2025 pm 12:06 PM
What service is apache
Apr 13, 2025 pm 12:06 PM
Apache is the hero behind the Internet. It is not only a web server, but also a powerful platform that supports huge traffic and provides dynamic content. It provides extremely high flexibility through a modular design, allowing for the expansion of various functions as needed. However, modularity also presents configuration and performance challenges that require careful management. Apache is suitable for server scenarios that require highly customizable and meet complex needs.
