


It's very beneficial to have notes handy when working on a project or something else. So Microsoft launched Sticky Notes, a very useful software that can remember universal passwords, usernames, any URL, and more.
Many Windows users have recently reported that the Sticky Notes app on their Windows 11 systems has stopped working and they are unable to move forward no matter how many times they restart the system.
This may be due to some changes being made to its application settings, Windows system not being updated, Insights feature enabled, etc. So given below are some solutions, explained with short steps in this article, that can help users solve this problem.
Solution– Try to update the Windows system. Once completed, restart the system and check if it works.
If not, try other better solutions given below.
Sometimes, the installation process may be interrupted midway due to reasons such as unstable network or forced shutdown. This can cause such issues with any application, so it is recommended to uninstall and then reinstall the sticky notes app once and see if this solves the issue. First, let’s uninstall the Sticky Notes application using PowerShell.
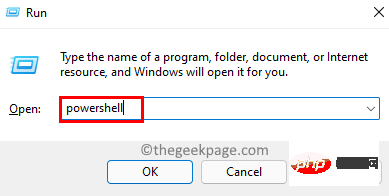
Step 1: Press the WindowsandRkeys simultaneously on your keyboardOpen withRunCommand box.
Step 2: When the run box appears, typepowershelland pressCTRLon the keyboard at the same timeSHIFTENTERkey.
Step 3: This will prompt UAC on the screen, which should be accepted by clicking"Yes".
Step 4: Now thePowerShellapplication window will be launched asadministrator.
Step 5: In the PowerShell application, copy and paste the command given below andpress Enterkey to execute it to remove/uninstall Sticky Notes app from the system program.
获取-AppxPackage Microsoft.MicrosoftStickyNotes | 删除-AppxPackage

Step 6: After the command is executed, close the PowerShell window and restart the system once.
After the system starts, use the Microsoft Store app to install the Sticky Notes app.
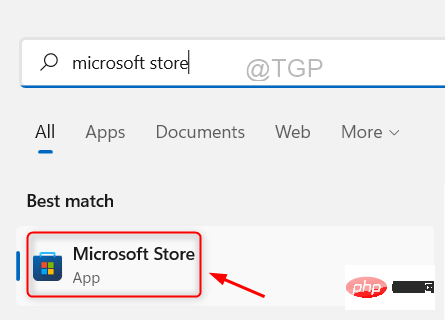
Step 1: Press theWindowskey and type MicrosoftStore to openon your system Microsoft Store App.
Step 2: Then select theMicrosoft Storeapp from the search results as shown below.
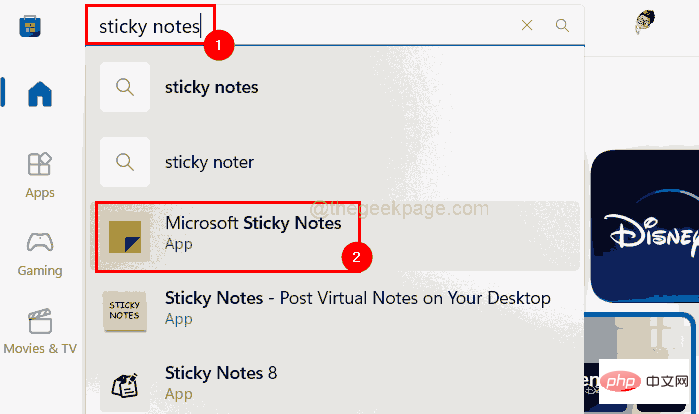
Step 3: Once the Microsoft Store window launches, typeNotes in the search bar at the top bar of the window.
Step 4: From the search results, click onMicrosoft Sticky Notesto go to its application as shown in the image below.
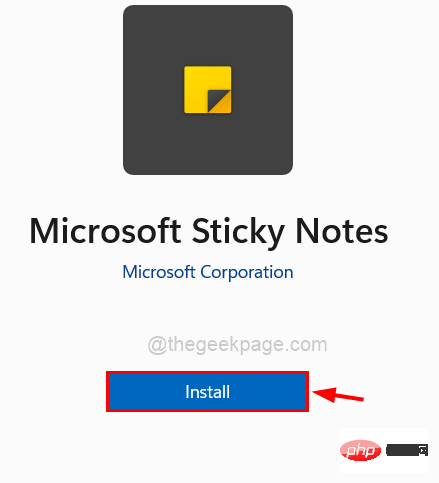
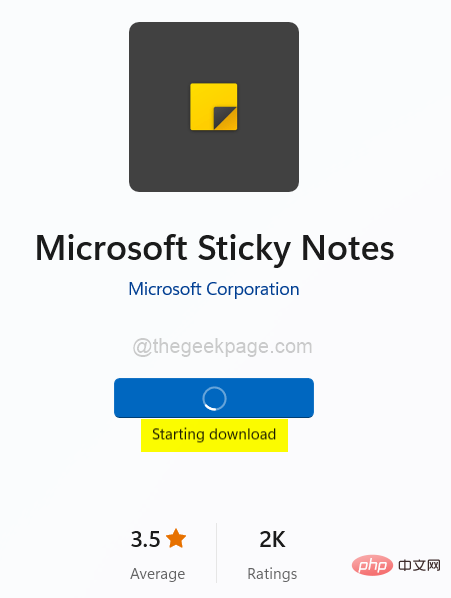
Step 5: Click on theInstallbutton of the Microsoft Sticky Notes app to start installing it on your system.
Step 6: It will start downloading the app and then install it. So wait for it to finish. It won't take a lot of time.
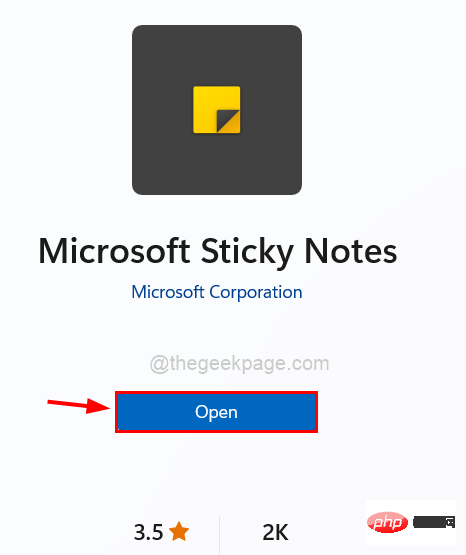
Step 7: After installation, click on "Open" to see if the Sticky Notes app is opened and working properly.
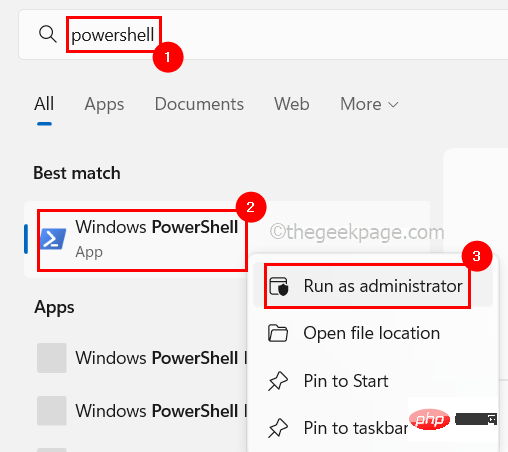
Step 1: Press theWindowskey and typepowershell .
Step 2: Then,right-click theWindowsPowershellapplication in the search results as shown below.
Step 3: SelectRun as administrator from the context menu,as shown below.
Step 4: Click YesAccept the UAC prompt to continue.
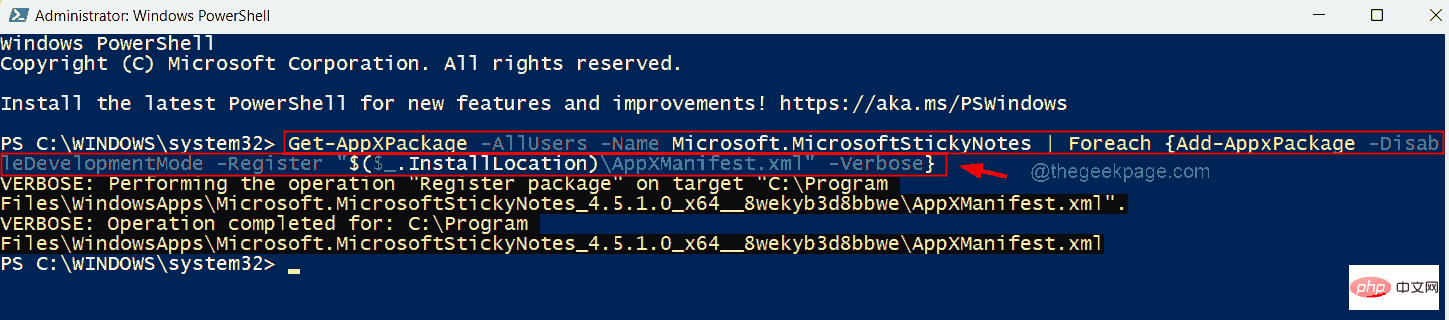
Step 5: Once the PowerShell window opens, type the following lines and pressEntertore-register# on the system ##Sticky NotesApp.
Get-AppXPackage -AllUsers -Name Microsoft.MicrosoftStickyNotes | Foreach {Add-AppxPackage -DisableDevelopmentMode -Register "$($_.InstallLocation)\AppXManifest.xml" -Verbose}
第 6 步:完成后,关闭 Powershell 窗口,然后尝试打开系统上的 Sticky Notes 应用程序,看看它现在是否正常工作。
如果在便笺应用程序上启用洞察功能,洞察功能实际上非常出色且高效,可让 Cortana 和 bing 使用笔记,以便用户在拨打电话或设置提醒时方便使用。
这有时会导致应用程序出现问题,因为它正在与所有 Windows 设备同步。因此,让我们看看如何通过以下步骤禁用此功能。
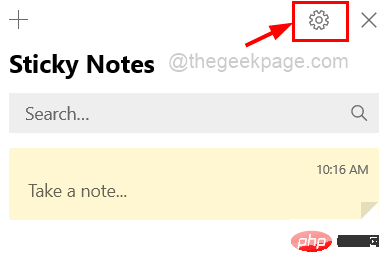
第 1 步:在您的系统上打开 Microsoft 便笺应用程序。
第2步:打开后,转到窗口右上角的“设置”图标(齿轮形) 。
第 3 步:单击启用洞察力的切换按钮将其关闭,如下面的屏幕截图所示。
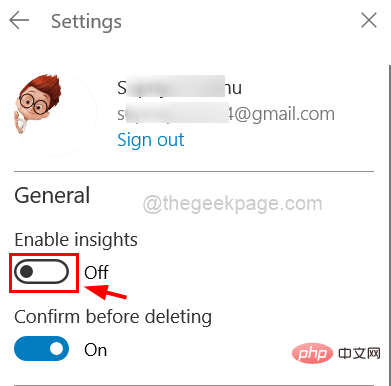
第 4 步:完成后,重新启动便笺应用程序并检查它是否工作正常或仍然相同。
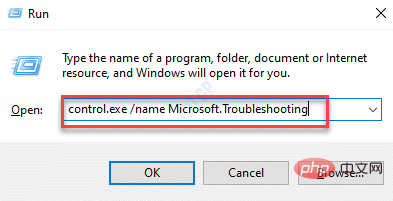
步骤 1:同时按下键盘上的Windows和R键打开运行框。
第 2 步:在其中键入control.exe /name Microsoft.Troubleshooting,然后按Enter键。
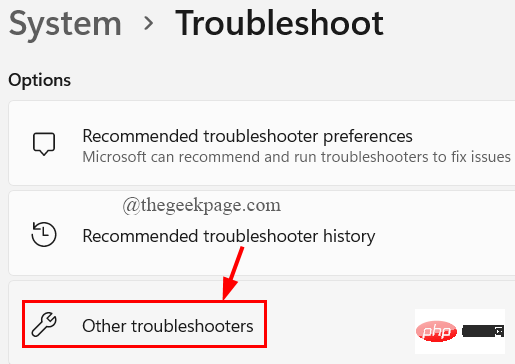
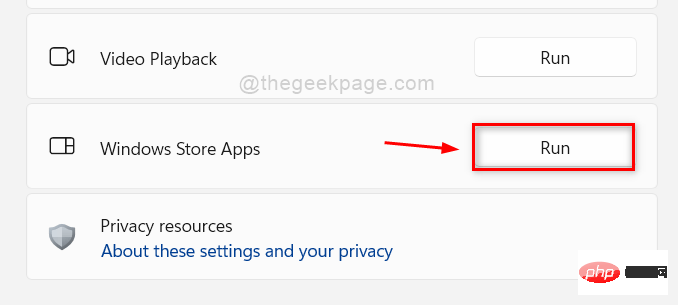
第 3 步:现在“疑难解答”页面打开,然后单击“其他疑难解答”选项,如下所示。
第 4 步:向下滚动到底部并选择Windows Store Apps选项,然后单击其运行按钮。
第 5 步:按照屏幕上的说明完成故障排除过程。
第 6 步:完成后,关闭“疑难解答”页面。
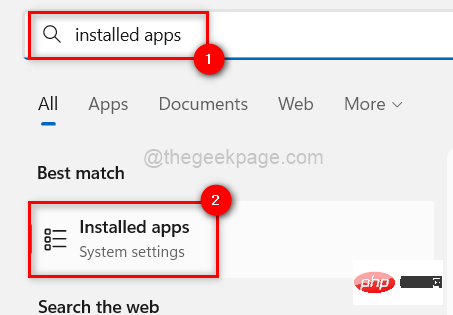
第 1 步:按键盘上的Windows键并键入已安装的应用程序。
第 2 步:从搜索结果中选择已安装的应用程序系统设置,如下所示。
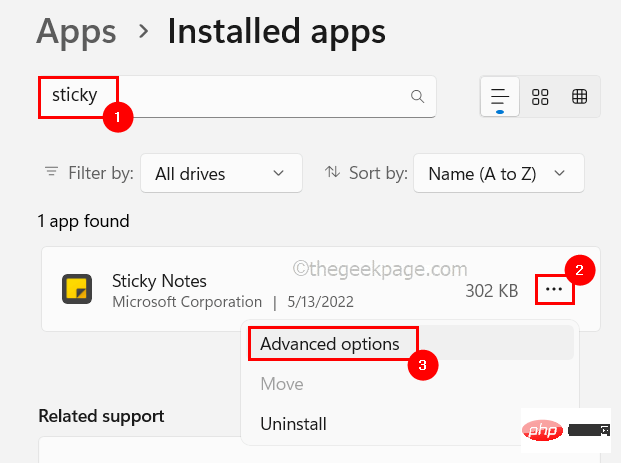
第 3 步:接下来,通过在顶部的搜索栏中键入sticky来搜索便笺应用程序,如图所示。
第 4 步:然后,单击三个水平点(显示更多选项图标)以查看选项列表,如下所示。
第 5 步:接下来,单击列表中的高级选项。
第 6 步:稍后,将高级选项页面向下滚动到“重置”部分,然后单击“重置”按钮,如下面的屏幕截图所示。
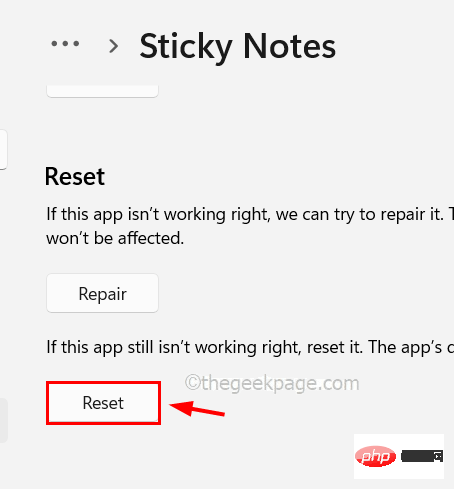
完成后,关闭高级选项页面并检查便笺应用程序是否正常工作!
如果没有任何效果,则将您的系统恢复到上次保存的点,其中所有设置和系统上安装的所有应用程序都可以正常工作。为此,您应该使用系统上的系统还原功能,本文介绍了如何执行此操作的步骤。
The above is the detailed content of Fix: Notes stopped working in Windows 11. For more information, please follow other related articles on the PHP Chinese website!


![[Web front-end] Node.js quick start](https://img.php.cn/upload/course/000/000/067/662b5d34ba7c0227.png)


