Practical Word Tips Sharing: Several Common Tips for Header Settings

There is a very troublesome function in Word, but we have to master it - header.
The company made a brochure and added a logo to the header to enhance the company's image, but I didn't know where to start. Add a header, but there is always an annoying horizontal line in the header, which cannot be deleted no matter how you delete it, etc...
If you are troubled by any of the above problems, it proves that you have not mastered it. The correct way to set up a header. So today, the editor has summarized some of the most common techniques for setting headers for everyone. I hope it will be helpful to you.
Clear the horizontal lines in the header
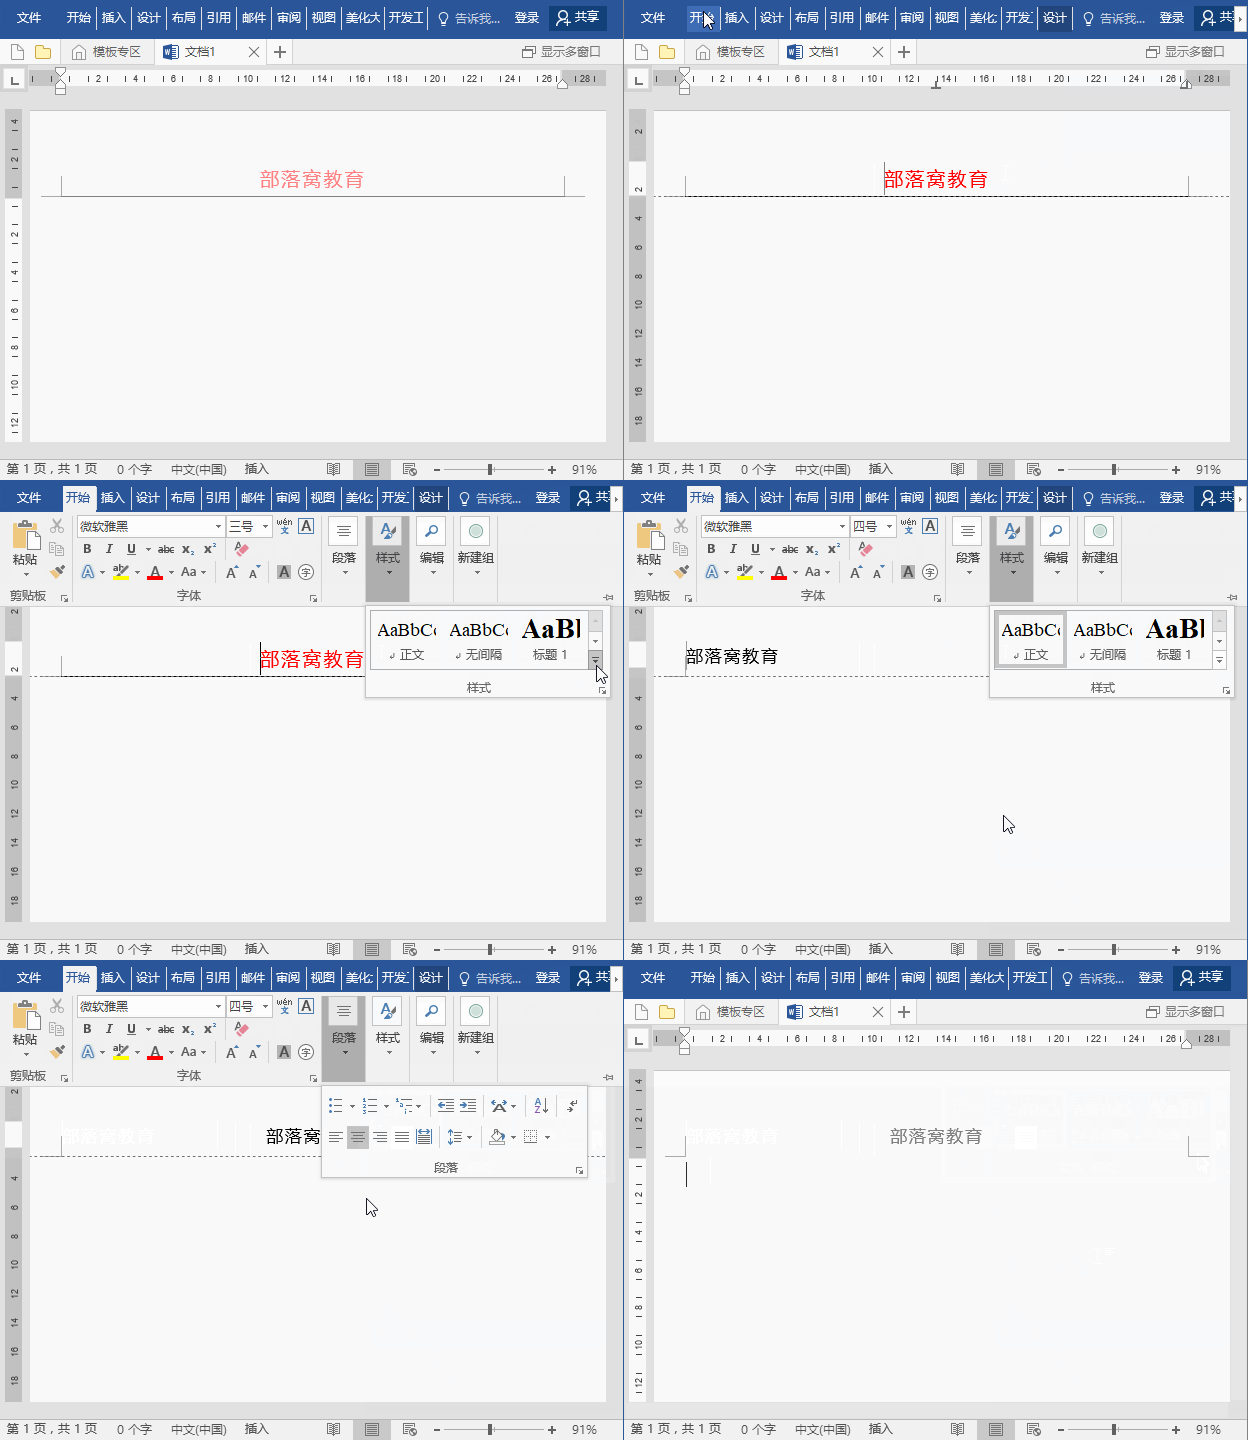
In Word, double-click the header to enter the header and footer mode . At this time, we usually see a horizontal line in the header. However, sometimes, this horizontal line may not be needed. What should I do? It's easy, just delete it.
Double-click the header to enter the header editing state. Click the drop-down button on the right side of [Start]-[Style], and select [Clear Format] from the pop-up drop-down option to easily do it.
Add LOGO in the header
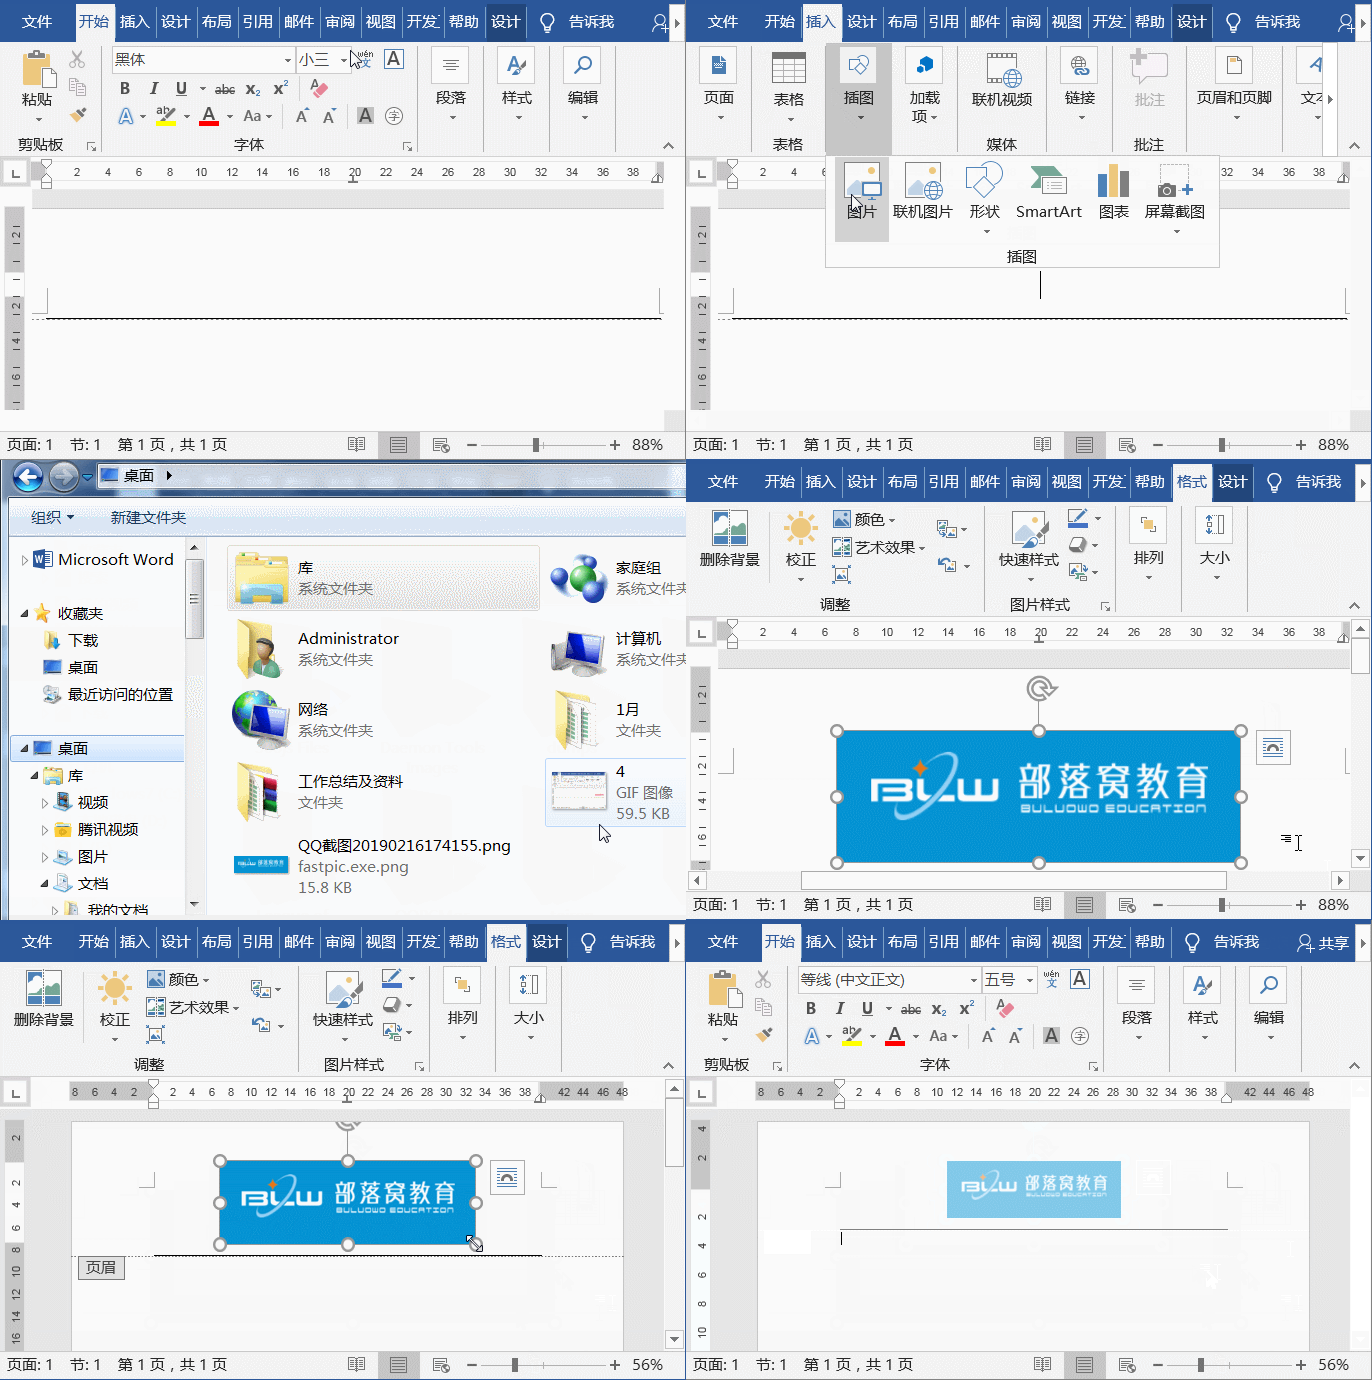
Normally, not only You can only add text and page numbers, but you can also add any pictures, shapes and other elements. Therefore, we often see company LOGO images in the header or footer of many documents.
Double-click the header and footer to enter the header and footer editing state, click the "Picture" button in the [Header and Footer Tools]-[Design]-[Insert] group, and open the "Insert" Select the desired picture in the "Picture" dialog box and click the "Insert" button to add it.
Set double lines and colors for the header
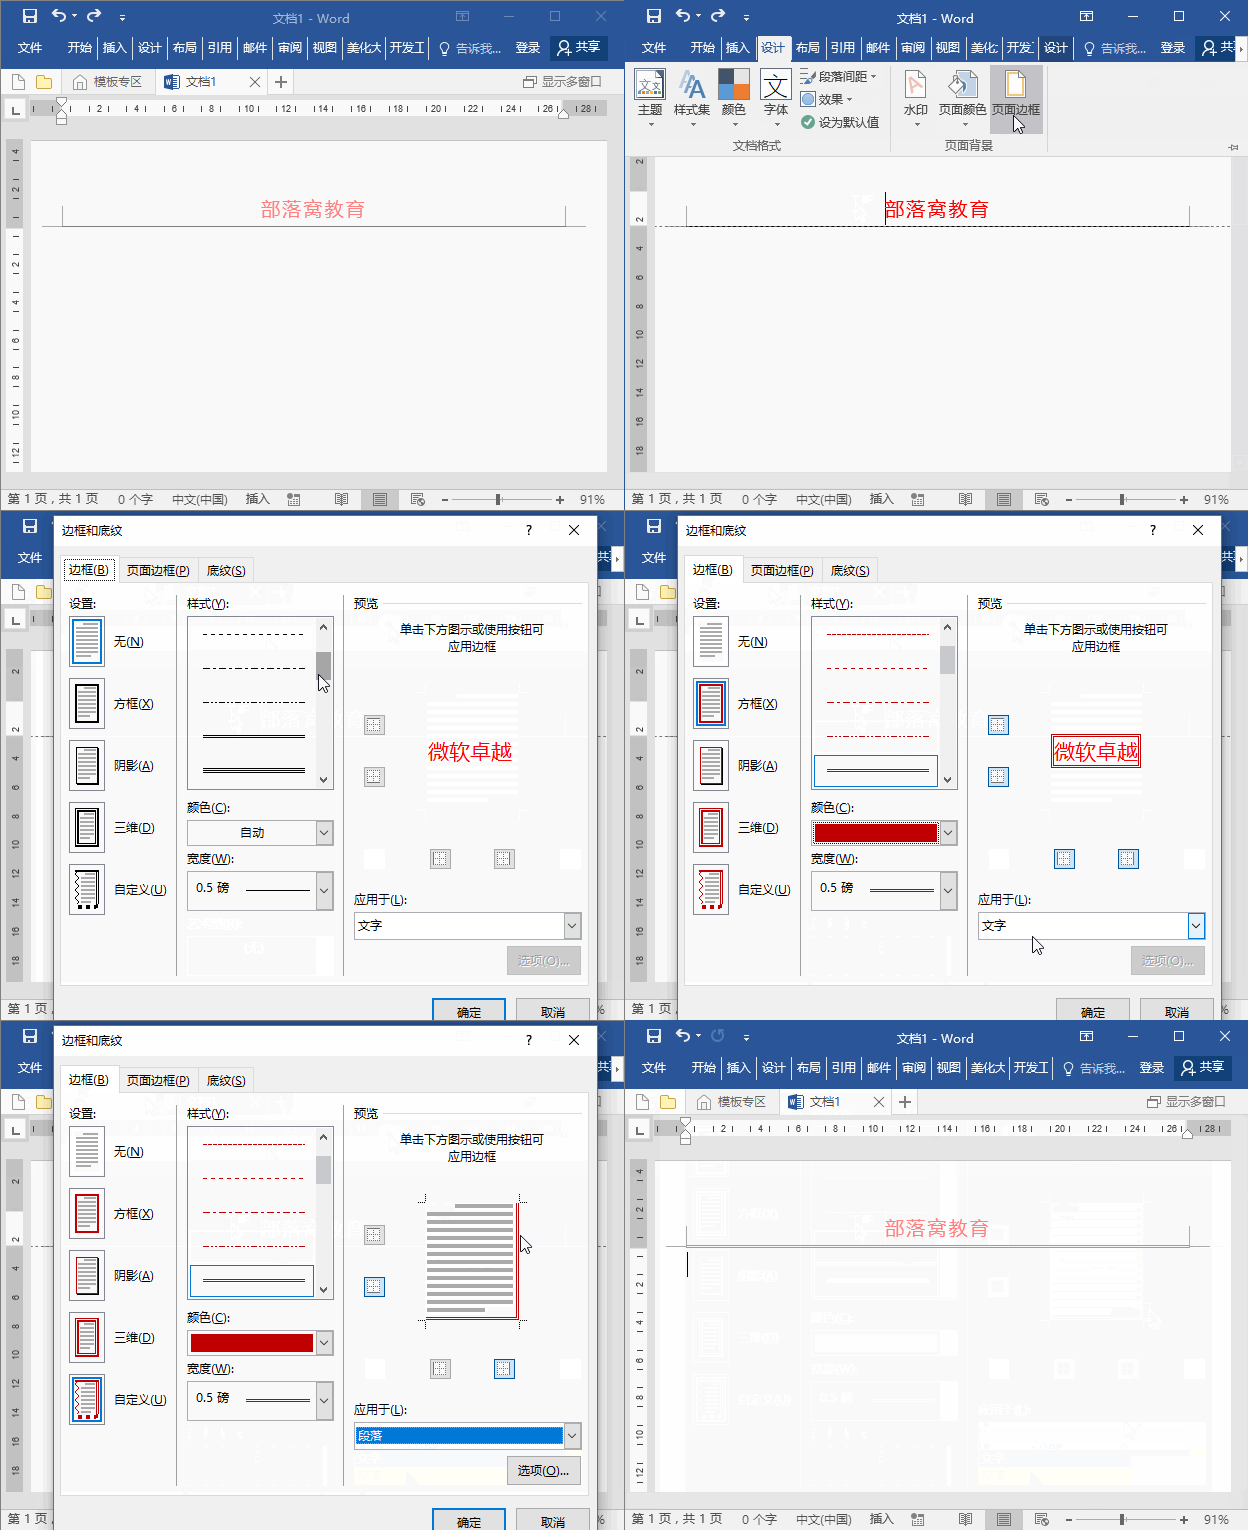
Double-click the header to enter header editing state. Click [Design]-[Page Background]-[Page Border]. Open the "Borders and Shading" dialog box, select the "Border" tab, select "Double Line" in the "Style" drop-down list, and set the color of the horizontal line in the "Color" list, which should be applied to the selected "Paragraph". And remove the "top, left, right" lines in the "Preview" column. Then click the "OK" button, and the single horizontal line under the header will become a double horizontal line!
Shorten the horizontal line in the header
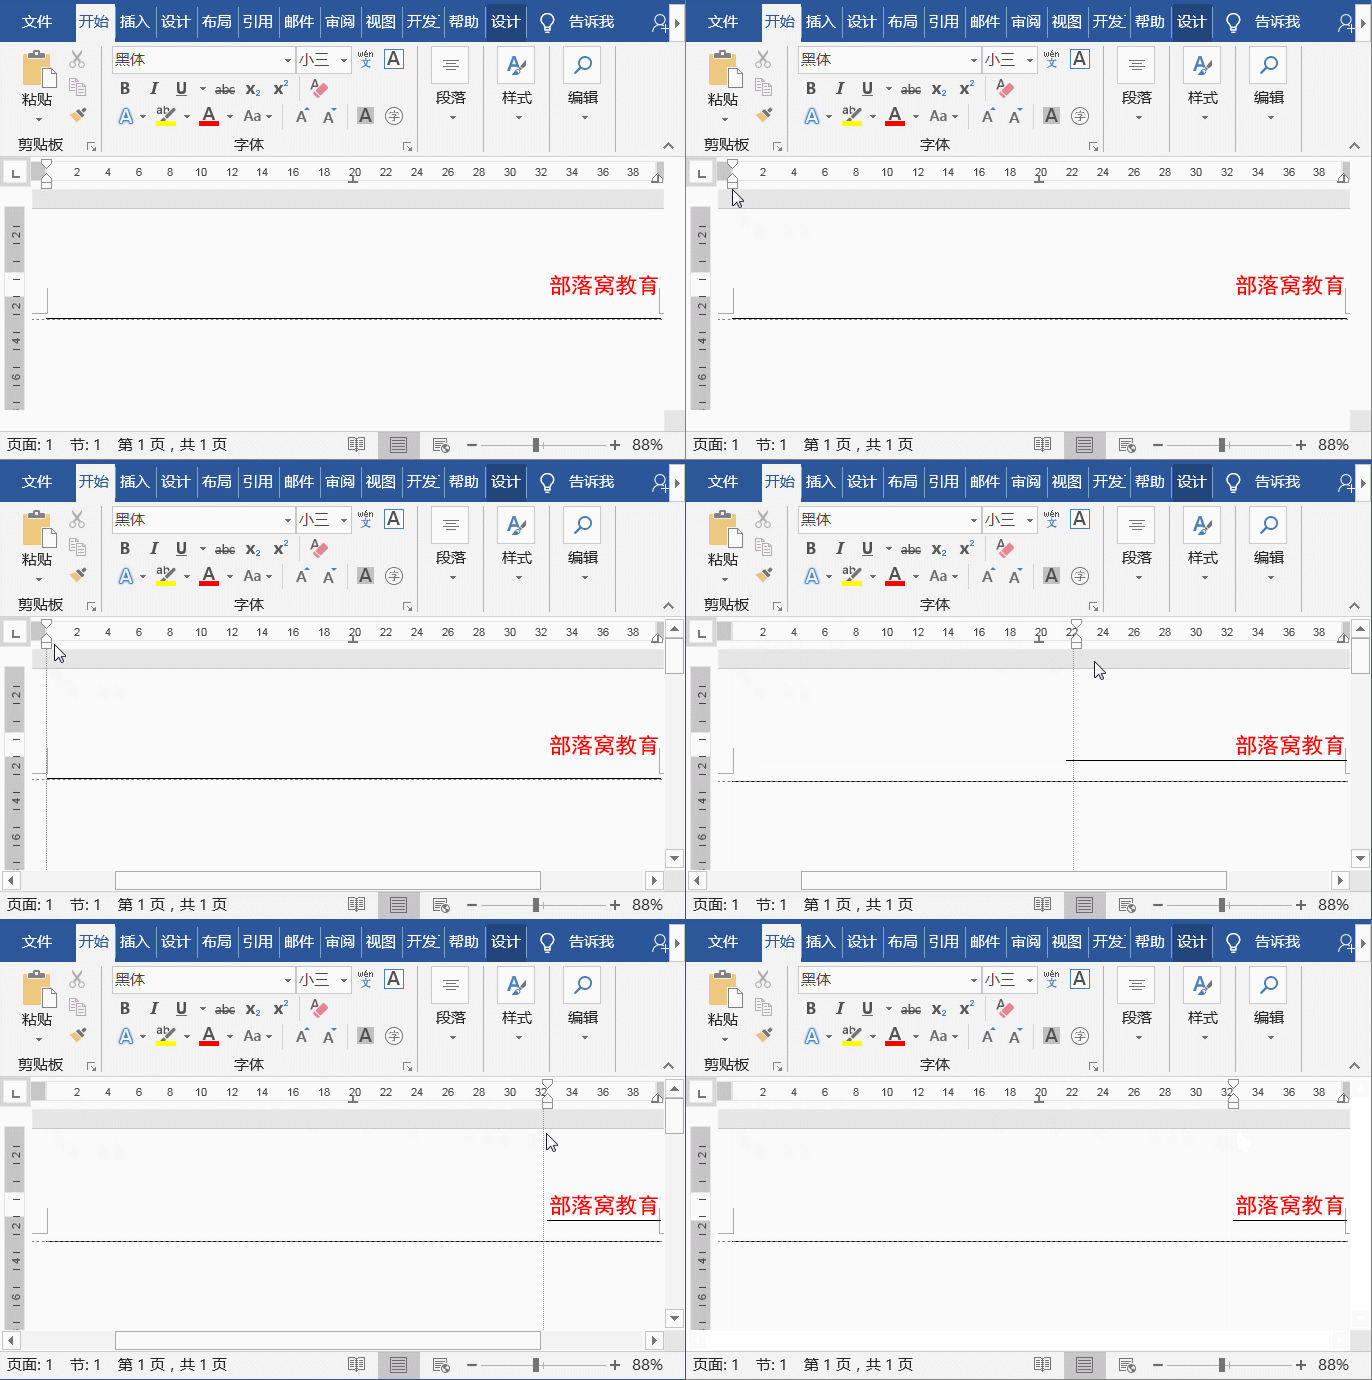
If you want the horizontal line in the header to be the same as The company name is of the same length, and we can adjust the length of this horizontal line.
Double-click the header to enter the header and footer editing state, click [View]-[Display] group, check the "Ruler" checkbox, and hold down the left mouse button on the left and right indent rulers. Drag it to the right to shorten the horizontal line.
Set the distance between the header and the page boundary
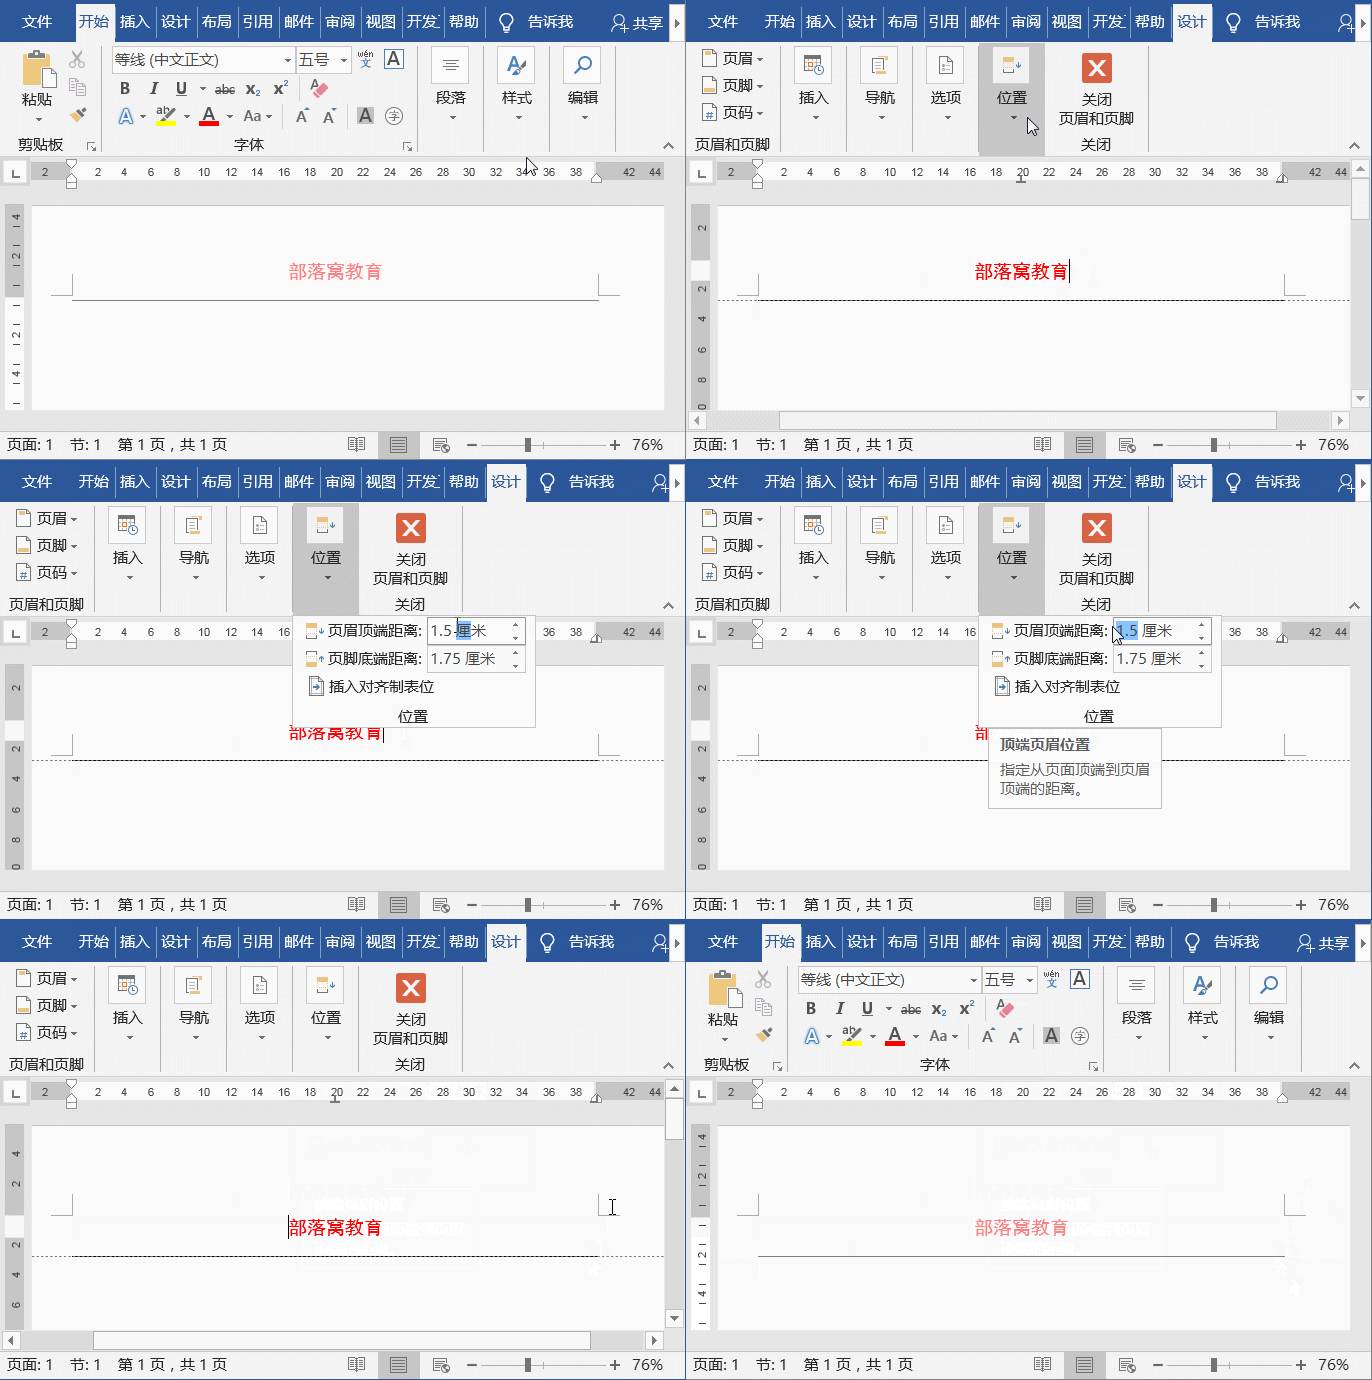
After inserting the header in the document, if If you feel that the default header height is inappropriate (Word's default header value is "1.5 cm"), you can adjust it.
Double-click to enter the header and footer editing state, and set the "Header Top Distance" and "Footer Bottom Distance" in the [Header and Footer Tools]-[Design]-[Position] group. At this time, you will find that the date and horizontal line in the header have moved down, and the distance from the top of the header has changed.
Recommended tutorial: "Word Tutorial"
The above is the detailed content of Practical Word Tips Sharing: Several Common Tips for Header Settings. For more information, please follow other related articles on the PHP Chinese website!

Hot AI Tools

Undress AI Tool
Undress images for free

Undresser.AI Undress
AI-powered app for creating realistic nude photos

AI Clothes Remover
Online AI tool for removing clothes from photos.

Clothoff.io
AI clothes remover

Video Face Swap
Swap faces in any video effortlessly with our completely free AI face swap tool!

Hot Article

Hot Tools

Notepad++7.3.1
Easy-to-use and free code editor

SublimeText3 Chinese version
Chinese version, very easy to use

Zend Studio 13.0.1
Powerful PHP integrated development environment

Dreamweaver CS6
Visual web development tools

SublimeText3 Mac version
God-level code editing software (SublimeText3)
 Detailed explanation of how to display the ruler in Word and how to operate the ruler!
Mar 20, 2024 am 10:46 AM
When we use Word, in order to edit the content more beautifully, we often use rulers. You should know that the rulers in Word include horizontal rulers and vertical rulers, which are used to display and adjust the document's page margins, paragraph indents, tabs, etc. So, how do you display the ruler in Word? Next, I will teach you how to set the ruler display. Students in need should quickly collect it! The steps are as follows: 1. First, we need to bring up the word ruler. The default word document does not display the word ruler. We only need to click the [View] button in word. 2. Then, we find the option of [Ruler] and check it. In this way, we can adjust the word ruler! Yes or no
 How to add handwritten signature to word document
Mar 20, 2024 pm 08:56 PM
Word documents are widely used due to their powerful functions. Not only can various formats be inserted into Word, such as pictures and tables, etc., but now for the integrity and authenticity of the files, many files require a manual signature at the end of the document. It sounds like this How to solve complex problems? Today I will teach you how to add a handwritten signature to a word document. Use a scanner, camera or mobile phone to scan or photograph the handwritten signature, and then use PS or other image editing software to perform necessary cropping on the image. 2. Select "Insert - Picture - From File" in the Word document where you want to insert the handwritten signature, and select the cropped handwritten signature. 3. Double-click the handwritten signature picture (or right-click the picture and select "Set Picture Format"), and the "Set Picture Format" pops up.
 How to draw a table in Word
Mar 19, 2024 pm 11:50 PM
Word is a very powerful office software. Compared with WPS, Word has more advantages in detail processing. Especially when the document description is too complex, it is generally more worry-free to use Word. Therefore, when you enter the society, you must learn some tips on using word. Some time ago, my cousin asked me a question like this. I often see other people drawing tables when using Word, and I feel very high-level. I laughed at that time. It seemed like high-level content, but actually it only took 3 steps to operate. Do you know how to draw a table in Word? 1. Open word, select the place where you want to insert the table, and find the "Insert" option in the upper menu bar. 2. Click the "Table" option, and densely packed small cubes will appear.
 Where is the shading setting in word?
Mar 20, 2024 am 08:16 AM
We often use word for office work, but do you know where the shading settings are in word? Today I will share with you the specific operation steps. Come and take a look, friends! 1. First, open the word document, select a paragraph of text paragraph information that needs to be added with shading, then click the [Start] button on the toolbar, find the paragraph area, and click the drop-down button on the right (as shown in the red circle in the figure below) ). 2. After clicking the drop-down box button, in the pop-up menu options, click the [Border and Shading] option (as shown in the red circle in the figure below). 3. In the pop-up [Border and Shading] dialog box, click the [Shading] option (as shown in the red circle in the figure below). 4. In the filled column, select a color
 How to underline in Word
Mar 20, 2024 pm 03:16 PM
As a very commonly used word processing software, Word is used in our life, study and work all the time. Of course, if you want to make good use of Word to edit text, you must lay a good foundation. So today I will take you to learn how to underline in Word. You can do it together with the editor. It is very simple. 1. First, we open the file we need to edit. Here we take the following figure as an example. 2. Use the mouse to select the text we need to edit. In the pop-up tab, we select the [U] icon. The operation is as shown in the figure: 3. Let’s take a look at the effect: 4. In fact, we can use a more convenient and faster The method is to use the key combination [ctrl] + [U] on the keyboard to add and follow your text.
 What should I do if the word interface becomes smaller?
Mar 20, 2024 pm 09:30 PM
When we use computers to edit word documents, we often don't know where we touched, and the interface suddenly becomes very small. Sometimes the text in the word document cannot be seen clearly. Some people may panic when encountering such a problem, thinking that the computer is malfunctioning. In fact, it is just because you have encountered a certain setting and adjusted the display. So, if you accidentally change the size of the interface display, how should you restore and adjust it? What should I do if the word interface becomes smaller? Below, we will share several ways to solve it. I hope you can easily deal with it when you encounter such a problem. First, we create and open a Word document and perform simple editing operations to show the steps. In the picture below
 How to insert automatic numbering or serial numbers into Word tables
Mar 20, 2024 am 09:30 AM
When we make tables, the first thing we think of is to use Excel software to make tables. But did you know that Word software is actually very convenient to make tables. Sometimes when we make tables in Word software, we need to enter serial numbers or numbers. , if you enter them one by one manually, it will be very troublesome. In fact, there is an operation in the word software that can automatically insert numbers or serial numbers. So let’s learn with the editor how to insert automatic numbering or serial numbers into Word tables. . 1. First create a Word document and insert a table. 2. Select the column or cell where you want to insert automatic serial numbers or numbers. 3. Click "Start" - "Number". 4. Select one of the style numbers. 5.
 How to switch tables horizontally and vertically in word
Mar 20, 2024 am 09:31 AM
Word software is indispensable to us and needs to be used frequently. I have learned how to edit tables using Word software before. However, if I accidentally edit the table in the horizontal and vertical directions, and I don’t want to waste time re-creating it, is it possible to change the horizontal and vertical directions of the table? Woolen cloth? The answer is of course yes. Next, the editor will introduce to you in detail how to swap tables horizontally and vertically in Word. Let us learn together. First, we need to swap the rows and columns of the Word table below. To do this, we need to first select the table entirely, then right-click and select the copy function. Step 2: After selecting copy, we minimize word, then open an Excel table, right-click, select paste, and paste it into Exc


