How to blur part of an image in PowerPoint application
When giving a presentation using the best PowerPoint app ever, adding images relevant to your presentation makes it easier for your audience to understand the topic and content, not just the text or paragraphs. Sometimes there is something very sensitive in the image that is not considered safe to show to viewers.
Therefore, it is standard practice to blur specific parts of an image. However, blurring a part of an image in PowerPoint application is not easily done by any straightforward method. In this article, we have shown a simple method through which you can blur any specific part of an image in PowerPoint application using a few steps given below.
How to blur part of an image in the PowerPoint application
Blur the entire image
Step 1: You need to open the PowerPoint application first. To do this, press the Windows key on your keyboard and type powerpoint.
Step 2: Then, click on the PowerPoint application from the results as shown in the screenshot below.

Step 3: Now you can click on Blank Presentation or open any saved file from your computer.

Step 4: If you selected a blank presentation, draft your slides by adding images.
Step 5: Now, if you want to blur the entire image using PowerPoint application, then first select the image that you want to blur.
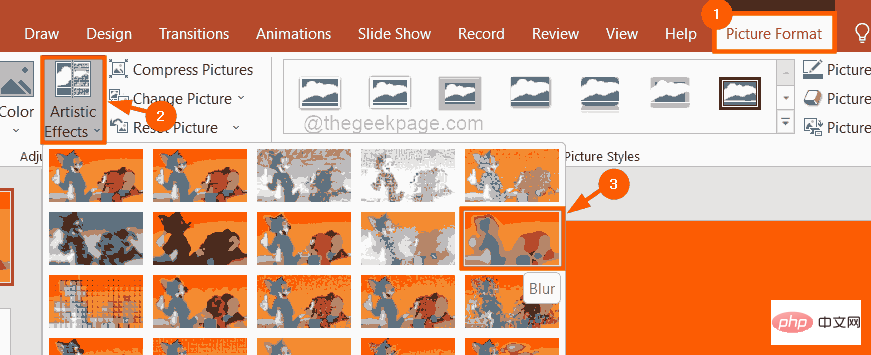
Step 6: Then go to the "Picture Format" tab on the top bar and click on the "Artistic Effects" drop-down option once.
Step 7: Select one of the various types of blur options in the drop-down menu as shown below.
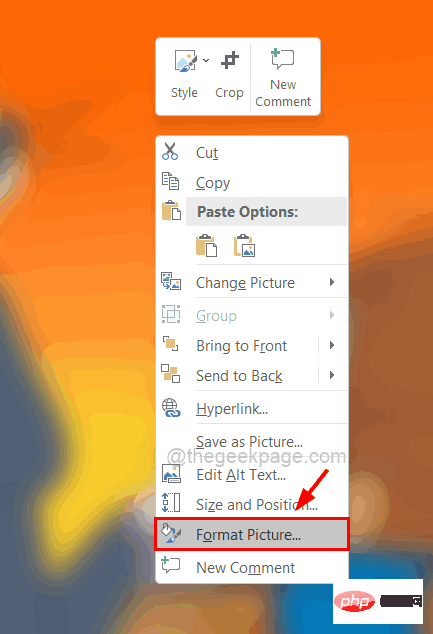
Step 8: Right-click your blurred image again and select the "Format Picture" option from the context menu.
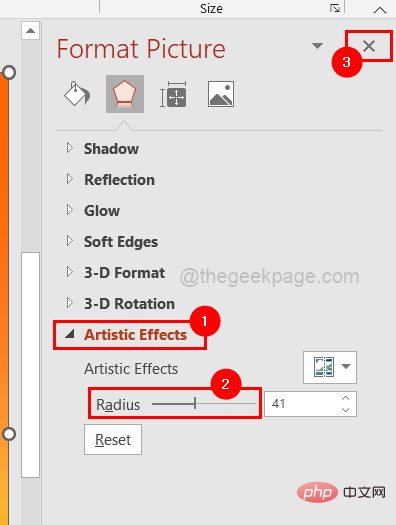
Step 9: Under Format Picture on the right, click Artistic Picture once and change Radius Move the slider to the right to further blur the image.
Step 10: Once completed, turn off the “Format Image” option on the right as shown below.
Blur part of the image
Step 1: After selecting the image, press the CTRL C keyCopyThe image to be blurred.
Step 2: Then, just press the CTRL V key to paste it to the image you want to blur middle.
Step 3: Now you will have two images, one on top of the other.
Step 4: Compress the file by clicking on its edges, dragging the file inward and placing it over the part of the image you want to blur, as shown below.

Step 5: Now to blur the dragged image, select the top image (the pasted image) and click on Click on Artistic Effects and select the Blur option from the drop-down menu to blur it as shown below.
Step 6: Once finished,right-click on the  small blurred image and select "Format
Step 7: Next, click on
Artistic Effect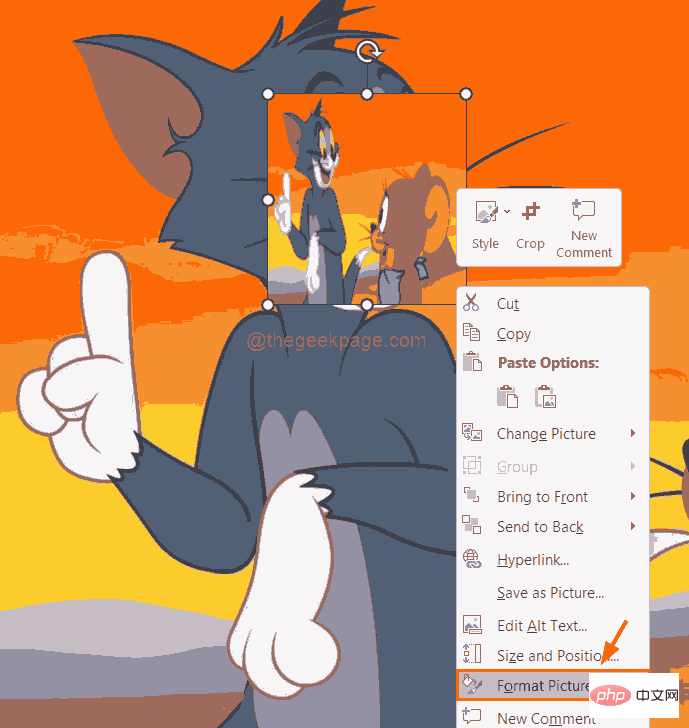 and slide the radius option to
and turn it off Format picture part, as shown below.
Step 8: Now you can see that part of the image has been blurred.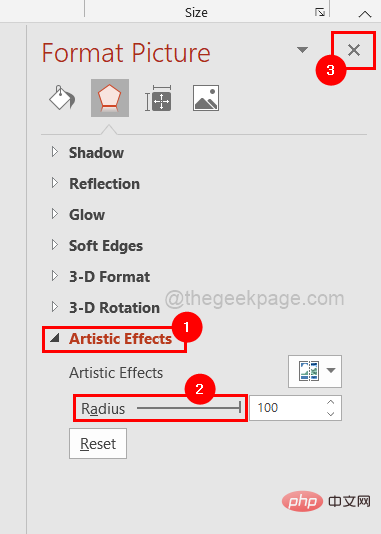
The above is the detailed content of How to blur part of an image in PowerPoint application. For more information, please follow other related articles on the PHP Chinese website!

Hot AI Tools

Undresser.AI Undress
AI-powered app for creating realistic nude photos

AI Clothes Remover
Online AI tool for removing clothes from photos.

Undress AI Tool
Undress images for free

Clothoff.io
AI clothes remover

AI Hentai Generator
Generate AI Hentai for free.

Hot Article

Hot Tools

Notepad++7.3.1
Easy-to-use and free code editor

SublimeText3 Chinese version
Chinese version, very easy to use

Zend Studio 13.0.1
Powerful PHP integrated development environment

Dreamweaver CS6
Visual web development tools

SublimeText3 Mac version
God-level code editing software (SublimeText3)

Hot Topics
 1379
1379
 52
52
 How to blur an image in PowerPoint
Apr 14, 2023 pm 12:13 PM
How to Blur Part of an Image in PowerPoint There is no official tool that allows you to blur part of an image in a PowerPoint presentation. Instead, you do this using a combination of shapes and other features. To blur part of an image in PowerPoint: Open your PowerPoint presentation. Press Insert > Shape and choose a suitable shape to cover your image. Draw the image onto the slide and position it over the area of the image you want to blur. If you want to design a custom shape
 How to highlight text in PowerPoint
Apr 19, 2023 pm 12:04 PM
How to Highlight Text in PowerPoint 2019 or 365 If you are using PowerPoint 2019 or have a Microsoft 365 subscription, highlighting text is quick and easy. There are two main ways to highlight text in PowerPoint. How to Highlight Selected Text in PowerPoint The first way is to select the text you want to highlight before applying the effect. To highlight selected text in PowerPoint: Click and drag the text you want to highlight. In the Home tab, click the down arrow next to the Text Highlight Color tool. Click on the highlight color of your choice
 How to Create a Macro in Powerpoint Step by Step
May 13, 2023 pm 02:13 PM
A macro is simply a set of instructions written by the user and saved under the macro name. When a macro name is called in a presentation, it automatically executes the set of instructions defined under the macro name. Macros are embedded into PowerPoint presentations when needed. Macro code can be written in PowerPoint using VBA. It helps us create our own designs and reuse them. Macros can also be created in other Microsoft Office applications. Let’s see how to create a simple macro in PowerPoint. Steps involved in macro creation are Step 1. Open PowerPoint. Type PowerPoint in the search space in the lower left corner. You can open Po with just one click
 How to blur part of an image in PowerPoint application
Apr 14, 2023 pm 07:19 PM
When giving a presentation using the best PowerPoint app ever, adding images relevant to your presentation makes it easier for your audience to understand the topic and content, not just the text or paragraphs. Sometimes there is something very sensitive in the image that is not considered safe to show to viewers. Therefore, it is standard practice to blur specific parts of an image. However, blurring a part of an image in PowerPoint application is not easily done by any direct method. In this post, we have shown a simple method by which you can blur any specific part of an image in PowerPoint application using a few steps given below. How to blur images in PowerPoint application
 What are the main functions of powerpoint
Sep 14, 2022 pm 03:54 PM
The main function of powerpoint is to create presentations; users can also make presentations on a projector or computer, or print out presentations. PPT is suitable for work reports, corporate publicity, product promotions, wedding celebrations, project bidding, management consulting, Education and training and other fields, and has functions such as photo album production, document merging, application masterboard, picture movement, animation control, etc.
 How to insert an image into a shape in PowerPoint
Apr 17, 2023 pm 02:28 PM
How to Insert an Image into a Shape in PowerPoint Inserting an image into a shape is useful for creating visual elements that stand out in your presentation. It could be an arrow, a heart, or a cross, but each of these shapes provides a purpose or emotion that can help your image pack a punch. If you're not sure how to insert an image into a shape in PowerPoint, follow these steps: Open your PowerPoint presentation. Click the Insert tab in the ribbon. Click the shape. Select the desired shape and draw it on the slide. Next, select the shape you drew and select the Format Shape tab on the ribbon bar. Click the shape fill. Fill dropdown menu from shape
 What is included in the fill effect option for setting the slide background in powerpoint
Jul 27, 2021 pm 02:04 PM
The fill effect options for setting the slide background in PowerPoint include gradients, textures, patterns and pictures. The method to set the slide background is to select "Format Background" or click the "Design" tab to set the background.
 What kind of software is PowerPoint?
Dec 10, 2020 pm 03:23 PM
PowerPoint is a "presentation" software. PowerPoint refers to Microsoft's presentation software. Users can present on a projector or computer, or they can print out the presentation and make it into film for application in a wider range of fields.


